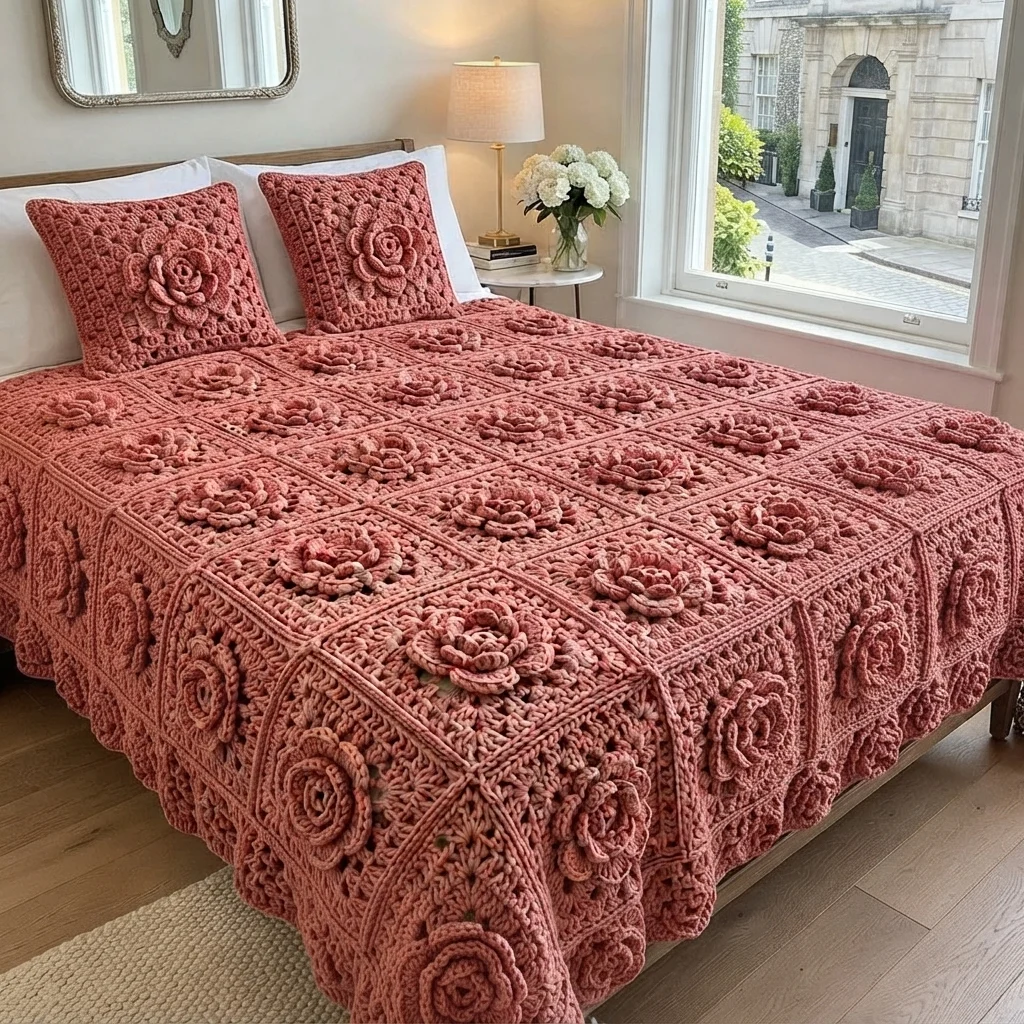
Dusty Rose 3D Flower Crochet Bedspread Pattern
Beginner Friendly
Perfect for those just starting their crochet journey, with clear instructions and simple techniques
Single-Day Project
A satisfying project you can complete in a single afternoon or evening.
Handmade Gift
A beautiful keepsake — free forever. Read online or print at home.
About This Dusty Rose 3D Flower Crochet Bedspread Pattern
This 3D rose crochet bedspread pattern turns dusty rose yarn into a field of raised flowers framed by textured square motifs. Each square is crocheted separately, then joined into a soft, dimensional cover with coordinating pillow panels and a scalloped edge.
The layered roses and textured backgrounds make this an advanced project that takes patience to assemble. Plan on about 80 to 120 hours for a large bedspread, depending on your bed size and pace. Measure the mattress and decide how much overhang you want before making the full set of squares; a blocked sample will give you the most reliable sizing.
Materials
- Worsted-weight cotton or cotton blend in dusty rose Approximately 3,000-4,000 g for a large bedspread and matching pillows
- 5 mm crochet hook For the square backgrounds
- 4 mm crochet hook For the raised roses, joining, and border
- Yarn needle For sewing flower layers, joining squares, and weaving in ends
- Locking stitch markers To mark square corners and panel layout
- Blocking mats and rustproof pins To shape the squares consistently
- Scissors and tape measure For finishing and made-to-measure planning
- Optional pillow inserts Measure these before making the matching covers
Abbreviations
chchainsl stslip stitchscsingle crochethdchalf double crochetdcdouble crochettrtreble crochetskskipspspacereprepeatst(s)stitch(es)RSright sideWSwrong sideTextured granny square
- With the 5 mm hook, make a magic ring. Ch 3; this counts as the first dc.
- Round 1: Work 2 dc into the ring, ch 2, *3 dc into the ring, ch 2.* Rep from * twice more. Join with a sl st to the top of the beginning ch 3. (4 groups of 3 dc; 4 corner spaces)
- Round 2: Sl st across to the first corner ch-2 space. Ch 3, work 2 dc in the same corner space, ch 1, *(3 dc, ch 2, 3 dc) in the next corner space, ch 1.* Rep from * twice more. Join with a sl st to the top of the beginning ch 3. (8 groups of 3 dc; 4 corner spaces)
- Round 3: Sl st across to the first corner space. Ch 3, 2 dc in the same corner space, ch 1, 3 dc in the next ch-1 space, ch 1, *(3 dc, ch 2, 3 dc) in the next corner space, ch 1, 3 dc in the next ch-1 space, ch 1.* Rep from * twice more. Join. (12 groups of 3 dc; 4 corner spaces)
- Round 4: Sl st to the first corner space. Ch 3, 2 dc in the same space, ch 1, 3 dc in each side space to the next corner, ch 1, *(3 dc, ch 2, 3 dc) in the corner space, ch 1, 3 dc in each side space to the next corner, ch 1.* Rep from * twice more. Join. (16 groups of 3 dc; 4 corner spaces)
- Round 5: Repeat Round 4, working one additional 3-dc group along each side between the corner spaces. (20 groups of 3 dc; 4 corner spaces)
- For a larger square, repeat Round 4, adding one 3-dc group to each side on every round. Fasten off and weave in the ends.
- For subtle surface texture, join yarn with a sl st around the post of a side dc group, ch 1, and work 1 sc around each group post along the sides. Keep the corners clear and the tension relaxed. This optional detail gives the square a raised frame without making it curl.
Layered rose center
- With the 4 mm hook, ch 31. Row 1: Starting in the second ch from the hook, work 1 sc in each ch. (30 sts)
- Row 2: Ch 1, turn. *Sl st in the first st, (hdc, 2 dc, hdc) in the next st, sl st in the next st.* Rep from * across. Fasten off, leaving a long sewing tail. This creates a row of small curved petals.
- For the second petal strip, ch 41. Row 1: Starting in the second ch from the hook, work 1 sc in each ch. (40 sts)
- Row 2: Ch 1, turn. *Sl st in the first st, (hdc, 2 dc, 2 tr, 2 dc, hdc) in the next st, sl st in the next st.* Rep from * across. Fasten off, leaving a long sewing tail.
- For the outer petal strip, ch 51. Row 1: Starting in the second ch from the hook, work 1 sc in each ch. (50 sts)
- Row 2: Ch 1, turn. *Sl st in the first st, (hdc, 2 dc, 3 tr, 2 dc, hdc) in the next st, sl st in the next st.* Rep from * across. Fasten off with a long sewing tail.
- Roll the smallest strip into a tight center, keeping the petal edges facing outward. Sew through the base every few turns so the roll holds its shape.
- Wrap the medium strip around the center, slightly overlapping the first layer. Sew through the base, not through the visible petal tips.
- Wrap the largest strip around the flower, shaping the petals into an open rose. Secure the base firmly and arrange the petals so they do not lie flat.
- Pin the rose to the center of the granny square and sew through the flower base and square at several points. Do not pull the stitches so tightly that the square puckers.
Square assembly and bedspread layout
- Block all squares to the same finished measurements before attaching the roses. Let them dry fully so the square corners and side lengths stay even.
- Measure the mattress and add the desired drop at the sides and foot. Divide each measurement by the blocked square width to estimate the number of squares needed in each direction.
- Arrange the squares in a grid with the roses centered and facing the same way. Lay out the full bedspread before joining so any size adjustments can be made with an extra border round.
- Place two squares with RS together. Using the 4 mm hook, join with sl st through the inner loops of both squares along one edge. Keep the seam even and flexible.
- Join the squares into horizontal strips first, then join the strips together. Match the corner spaces at every intersection and secure the joins without pulling the fabric tight.
- For a flatter seam, sew the squares together with a yarn needle and mattress stitch, taking one loop from each edge in turn. Use this method if the sl st join feels too bulky.
- Weave in all joining tails on the WS before adding the outside border. Check the bedspread against the bed to confirm the overhang and placement.
Matching pillow covers
- Measure the pillow insert. Make a front panel from one or more granny squares, adding rounds if needed until the blocked panel is slightly smaller than the insert for a snug fit.
- For the back, crochet two dusty rose rectangles in dc rows. Make each the pillow width; make one panel about half the pillow height and the other about two-thirds of the height for an envelope overlap.
- Work 3 rows of sc along the overlap edge of each back panel. On the longer flap, make buttonholes in the final row by chaining 1 and skipping 1 stitch at evenly spaced points.
- Make and sew a smaller layered rose to the front panel, following the rose instructions above. Secure the base at several points so the flower does not loosen with use.
- With WS together, overlap the back panels and sc around the outside, placing 3 sc in each corner. Insert the pillow form, mark the button positions through the buttonholes, and sew on buttons securely.
Scalloped bedspread border
- With the 4 mm hook, join yarn at a corner of the bedspread. Work one round of sc evenly around the edge, placing 3 sc in each corner. Along panel edges, distribute the stitches evenly so the border lies flat.
- Join with a sl st to the first sc. Round 2: Ch 1, sc in each stitch around, placing 3 sc in the center stitch of each corner group. Join and fasten off.
- Join yarn at a corner. *Sk 2 sts, work 5 dc in the next st, sk 2 sts, sl st in the next st.* Rep from * around the edge. Adjust the skipped stitches near corners so the scallops remain evenly spaced.
- At each corner, work one scallop centered over the corner stitch. If the corner pulls, add a ch 1 before the scallop; if it flares, skip one additional stitch on either side.
- Fasten off and weave in the ends. Lay the bedspread flat and gently block the scallops into an even curve.
Finishing
Weave in every remaining end and inspect the flower bases and joining seams. Check that each rose is firmly attached without puckering its square. Wash and dry the bedspread according to the yarn label, supporting the raised flowers while the fabric is wet. Lay it flat to dry, then arrange the pillows to match the square layout.
Tips for success
- Use the same hook and tension for every background square; small differences become noticeable when the grid is joined.
- Block the squares before sewing on the roses so you can keep the background flat and accurately measure the finished size.
- Roll the petal strips gradually and sew the base as you go; this keeps the rose center from springing open.
- Pin the roses in place before sewing, then check that each flower sits at the same height and angle.
- Make a care sample with one square and rose. Wash it as you plan to wash the bedspread to check that the flower keeps its shape.
Common mistakes to avoid
- Squares that do not match: the background rounds were worked at different tension. Block each square to the same measurement before assembly.
- A rose that looks flat: the strips were rolled too tightly or the petals were sewn down. Keep the petal edges loose and sew through the base only.
- A puckered square under the flower: the rose was attached with overly tight stitches. Remove a few stitches and resew with a little ease in the yarn.
- Uneven seams: corners were not aligned during joining. Pin the corners and side centers together before working the join.
- A wavy border: too many stitches were placed along the panel edges. Undo the first border round and redistribute the sc evenly, adding increases only at corners.
Ways to customize this pattern
- Use ivory or cream for the roses and keep dusty rose for the squares to make the flowers stand out.
- Make smaller roses for a more delicate bedspread, or use only the medium and large petal strips for fuller blooms.
- Add a small leaf pair in sage green under selected roses for a garden-inspired variation.
- Replace the scalloped border with a simple round of picots or a wide textured border made from additional granny-square rounds.
- Make a matching cushion, runner, or lap blanket using the same rose squares in a smaller arrangement.
Frequently asked questions
The number depends on your blocked square size and the amount of overhang you want. Measure the bed, divide the planned width and length by the finished square measurement, and make a few extra squares to allow for layout adjustments.
The raised flowers add texture and may feel bumpy beneath a light sheet. For a smoother sleeping surface, place the bedspread over a top sheet or make the roses smaller and sew them down more securely.
Yes. Use a contrasting shade for the flower strips, or use several colors for separate petal layers. Keep the square background consistent so the bedspread still reads as one coordinated design.
Follow the yarn care label and test one square first. Support the fabric while wet, avoid twisting the raised flowers, and dry the bedspread flat so the squares and petals keep their shape.
The finished Dusty Rose 3D Flower Crochet Bedspread Pattern

