Dusty Rose Bloom Lace Table Runner
Beginner Friendly
Perfect for those just starting their crochet journey, with clear instructions and simple techniques
Single-Day Project
A satisfying project you can complete in a single afternoon or evening.
Handmade Gift
A beautiful keepsake — free forever. Read online or print at home.
About This Dusty Rose Bloom Lace Table Runner
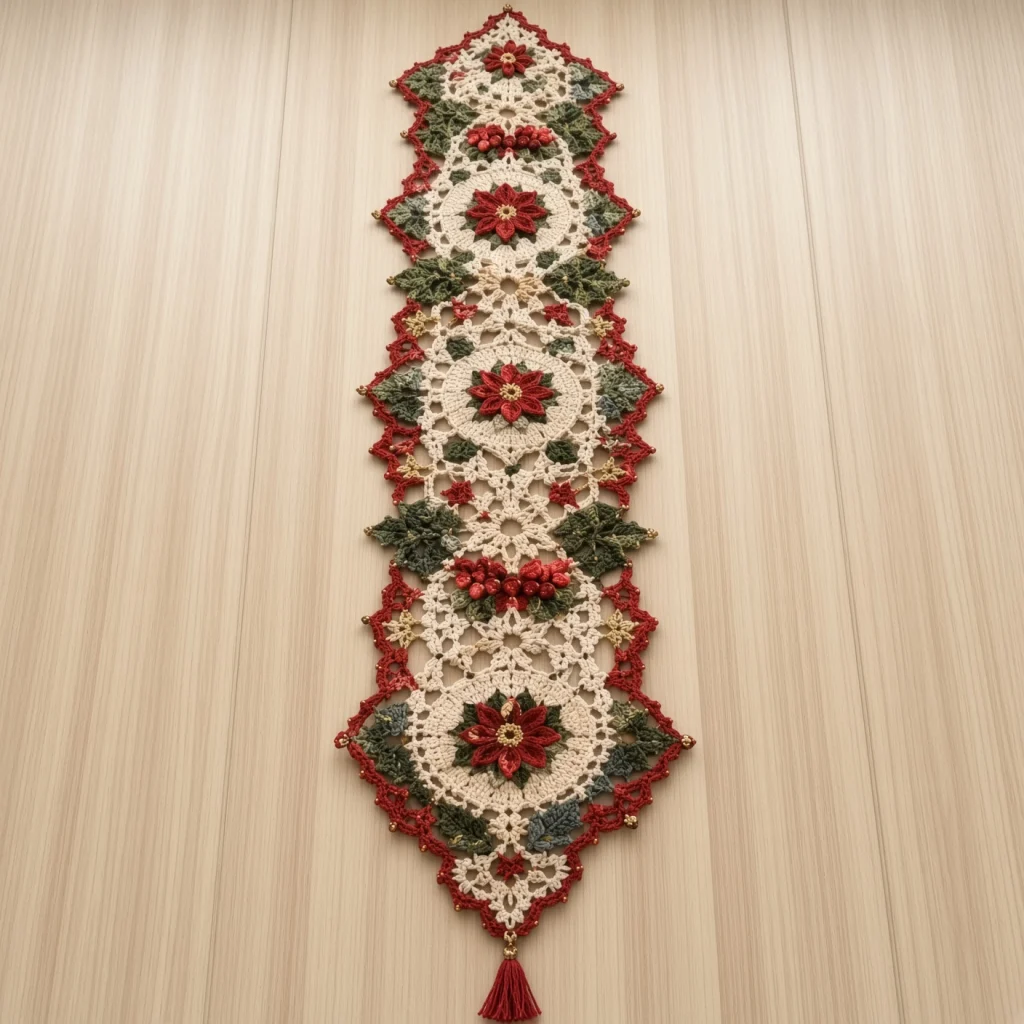
This crochet floral table runner pattern builds three cream lace squares into a column, tops each one with a two-tone rosette bloom in dusty rose and blush, and finishes the whole perimeter with soft pink points carrying an ivory pearl at every tip. The lace itself is deliberately quiet — a solid disc at the center of each square opening out into six rounds of 3-dc groups — because all the color and dimension sit on top of it. Nothing in the base fabric competes with the flowers.
The appliqués are where the hours go. Each bloom is two stacked layers of eight petals, the smaller blush layer sitting inside the larger dusty rose one and offset so both colors show. The leaves are worked around a foundation chain with smooth tapered edges, in two different greens so the foliage reads as depth rather than a flat band. The buds are small stuffed spheres, seven to a cluster, and tiny champagne star flowers tucked at the side points catch the light the way the pearls do.
Set aside 25 to 32 hours. The three lace squares take about four hours each, the appliqués together take eight to ten, and assembly and the beaded border account for the rest. This is an advanced project because of the number of separate pieces and because the appliqué placement has to be judged by eye against the lace beneath it. The stitches themselves are all ordinary; patience is the hard part. The palette is soft enough to leave out year round rather than packing away with seasonal decorations.
Materials
- Size 3 crochet cotton in cream approx. 500 m (about 170 g) — lace motifs and end points
- Size 3 crochet cotton in dusty rose approx. 160 m (about 55 g) — lower petals, border, tassel
- Size 3 crochet cotton in blush pink approx. 70 m — upper petals and buds
- Size 3 crochet cotton in sage green approx. 80 m — leaves
- Size 3 crochet cotton in soft grey-green approx. 80 m — leaves
- Champagne metallic crochet thread approx. 40 m — star flowers and bloom centers
- Ivory pearl beads, 4 mm about 70; hole must take size 3 cotton
- 2.5 mm crochet hook US B-1/C-2
- 1.75 mm hook for the champagne star flowers
- Beading needle or dental floss threader for pre-stringing beads
- Tapestry needle blunt tip
- Rustproof pins 40+
- Blocking mats or a towel-covered board at least 90 x 30 cm
- Spray starch optional but recommended for the points
- Small sharp scissors and a measuring tape
Abbreviations
begbeginningchchaindcdouble crochethdchalf double crochetMRmagic ringreprepeatrnd(s)round(s)RSright sidescsingle crochetsc2togsingle crochet 2 stitches togetherskskipsl stslip stitchsp(s)space(s)st(s)stitch(es)Gauge and sizing
- Gauge: Rnds 1-5 of the lace motif (the solid center disc) measure 8 cm across, blocked.
- One finished lace motif measures 16 cm square, blocked.
- Each end point adds about 11 cm of length.
- Finished runner: approximately 73 cm long by 21 cm wide, measured to the outer edge of the beaded points, plus an 11 cm tassel.
- All instructions use US crochet terminology.
- To lengthen, add motifs in multiples of one — each adds 16 cm. You will also need one more bloom, four more leaves, two more star flowers and one more bud cluster per motif added.
Lace motif (make 3)
- Rnd 1: With cream, MR, ch 3 (counts as dc here and throughout), 15 dc in ring, pull ring closed, sl st to top of beg ch-3. (16 dc)
- Rnd 2: Ch 3, dc in same st, 2 dc in each dc around, sl st to top of beg ch-3. (32 dc)
- Rnd 3: Ch 3, dc in same st, dc in next dc, *2 dc in next dc, dc in next dc; rep from * around, sl st to top of beg ch-3. (48 dc)
- Rnd 4: Ch 3, dc in next dc, 2 dc in next dc, *dc in next 2 dc, 2 dc in next dc; rep from * around, sl st to top of beg ch-3. (64 dc)
- Rnd 5: Ch 3, dc in next 2 dc, 2 dc in next dc, *dc in next 3 dc, 2 dc in next dc; rep from * around, sl st to top of beg ch-3. (80 dc) The disc should measure about 8 cm across.
- Rnd 6: Ch 4 (counts as dc + ch 1), sk next dc, *dc in next dc, ch 1, sk next dc; rep from * around, sl st to 3rd ch of beg ch-4. (40 dc, 40 ch-1 sps)
- Rnd 7 (squaring round): Sl st into first ch-1 sp, ch 3, (2 dc, ch 3, 3 dc) in same sp — first corner made. *[Ch 2, sk next ch-1 sp, 3 dc in next ch-1 sp] 4 times, ch 2, sk next ch-1 sp, (3 dc, ch 3, 3 dc) in next ch-1 sp; rep from * twice more, [ch 2, sk next ch-1 sp, 3 dc in next ch-1 sp] 4 times, ch 2, sk next ch-1 sp, sl st to top of beg ch-3. (72 dc, 20 ch-2 sps, 4 corner ch-3 sps; 4 groups of 3 dc and 5 ch-2 sps per side)
- Rnd 8: Sl st in next 2 dc and into corner ch-3 sp, ch 3, (2 dc, ch 3, 3 dc) in same corner sp, *[ch 2, 3 dc in next ch-2 sp] 5 times, ch 2, (3 dc, ch 3, 3 dc) in next corner sp; rep from * twice more, [ch 2, 3 dc in next ch-2 sp] 5 times, ch 2, sl st to top of beg ch-3. (84 dc, 24 ch-2 sps; 5 groups and 6 ch-2 sps per side)
- Rnd 9: Work as Rnd 8, but rep the bracketed section 6 times on each side. (96 dc, 28 ch-2 sps; 6 groups and 7 ch-2 sps per side)
- Rnd 10: Work as Rnd 8, but rep the bracketed section 7 times on each side. (108 dc, 32 ch-2 sps; 7 groups and 8 ch-2 sps per side)
- Rnd 11: Work as Rnd 8, but rep the bracketed section 8 times on each side. (120 dc, 36 ch-2 sps; 8 groups and 9 ch-2 sps per side)
- Rnd 12: Work as Rnd 8, but rep the bracketed section 9 times on each side. (132 dc, 40 ch-2 sps; 9 groups and 10 ch-2 sps per side)
- Rnd 13 (edge round): Sl st in next 2 dc and into corner ch-3 sp, ch 1, (2 sc, ch 2, 2 sc) in same corner sp, *[3 sc in next ch-2 sp, sc in each of the next 3 dc] 9 times, 3 sc in next ch-2 sp, (2 sc, ch 2, 2 sc) in corner sp; rep from * around, sl st to first sc. (244 sc total; 61 sc per side counted from corner sp to corner sp, 4 corner ch-2 sps)
- Fasten off and weave in ends. The motif should measure 16 cm square once blocked. Make 3 identical motifs.
Joining the motifs
- Block all three motifs to exactly 16 cm square before joining. Uneven motifs cannot be corrected later without the runner bowing.
- Lay two motifs side by side with one full edge of each touching, RS up. The edges you are joining each have 61 sc between corner ch-2 spaces.
- With cream and a tapestry needle, whip stitch through the back loops only, working 1 stitch into each pair of corresponding sc across all 61 stitches, and catching both corner ch-2 spaces at each end.
- Keep the seam at the same tension as the lace. A tight seam pulls the two motifs into a shallow V and the runner will not lie flat.
- Join the third motif to the free edge of the second in the same way. You now have a column of three motifs measuring about 48 cm long by 16 cm wide.
- Secure both seam ends with two small backstitches on the wrong side and weave in.
End points (make 2)
- Row 1 (RS): With cream, join with a sl st to the corner ch-2 sp at the left end of the free short edge of the top motif. Ch 3, dc in the first sc, *ch 2, sk next 2 sc, dc in next sc; rep from * across the 61 sc. Turn. (21 dc, 20 ch-2 sps)
- Row 2: Sl st in first ch-2 sp, sl st in next dc, ch 3, *ch 2, dc in next dc; rep from * across, leaving the final ch-2 sp and final dc unworked. Turn. (19 dc, 18 ch-2 sps)
- Row 3: Rep Row 2. (17 dc, 16 ch-2 sps)
- Row 4: Rep Row 2. (15 dc, 14 ch-2 sps)
- Row 5: Rep Row 2. (13 dc, 12 ch-2 sps)
- Row 6: Rep Row 2. (11 dc, 10 ch-2 sps)
- Row 7: Rep Row 2. (9 dc, 8 ch-2 sps)
- Row 8: Rep Row 2. (7 dc, 6 ch-2 sps)
- Row 9: Rep Row 2. (5 dc, 4 ch-2 sps)
- Row 10: Rep Row 2. (3 dc, 2 ch-2 sps)
- Row 11 (tip): Sl st in first ch-2 sp, sl st in next dc (the center dc), ch 1, sc in same dc, ch 6, sl st in the same dc to form a tip loop. Fasten off.
- Work a second end point onto the free short edge of the bottom motif in exactly the same way. The lower tip loop will carry the tassel.
Rosette bloom (make 3)
- Lower layer, Rnd 1: With dusty rose, MR, ch 1, 8 sc in ring, pull closed, sl st to first sc. (8 sc)
- Lower layer, Rnd 2: *Ch 12, sc in 2nd ch from hook, sc in next ch, hdc in next 2 ch, dc in next 4 ch, hdc in next 2 ch, sc in last ch, sl st in next sc of Rnd 1; rep from * 7 more times. Sl st to the base of the first petal. (8 petals of 11 sts) Fasten off, leaving a 40 cm tail.
- Upper layer, Rnd 1: With blush pink, MR, ch 1, 8 sc in ring, pull closed, sl st to first sc. (8 sc)
- Upper layer, Rnd 2: *Ch 9, sc in 2nd ch from hook, sc in next ch, hdc in next 2 ch, dc in next 2 ch, hdc in next ch, sc in last ch, sl st in next sc of Rnd 1; rep from * 7 more times. Sl st to the base of the first petal. (8 petals of 8 sts) Fasten off, leaving a 30 cm tail.
- Stack the blush layer on the dusty rose layer, rotating it so its petals sit in the gaps between the lower petals. Sew the two centers together with a few stitches through the middle only — the petals stay free.
- Center: with the champagne metallic thread, work 5 dc together in the center hole to form a small bobble, or sew 7 pearl beads in a tight cluster.
- Make 3 complete blooms. Each should measure about 7 cm across.
Leaves (make 12: 6 sage, 6 grey-green)
- Ch 13.
- Rnd 1: Sc in 2nd ch from hook, sc in next ch, hdc in next 2 ch, dc in next 4 ch, hdc in next 2 ch, sc in next ch (11 sts along the first side); (sc, ch 2, sc) in the last ch — leaf tip made. Working along the opposite side of the foundation ch: sc in next ch, hdc in next 2 ch, dc in next 4 ch, hdc in next 2 ch, sc in next 2 ch (11 sts along the second side); ch 2, sl st to first sc — leaf base made. (24 sts, plus a ch-2 point at each end)
- Fasten off, leaving a 30 cm tail for sewing. The leaf should measure about 4.5 cm long.
- Make 6 in sage and 6 in soft grey-green. The two greens are what give the foliage depth, so keep them clearly different in value, not just in hue.
Bud clusters (make 2)
- Bud, Rnd 1: With blush pink, MR, ch 1, 6 sc in ring, pull closed. Do not join; work in a continuous spiral, marking the first st of each rnd. (6 sc)
- Bud, Rnd 2: 2 sc in each sc around. (12 sc)
- Bud, Rnd 3: Sc in each sc around. (12 sc)
- Bud, Rnd 4: Sc in each sc around. (12 sc)
- Bud, Rnd 5: Stuff firmly with a small scrap of the same blush cotton, then [sc2tog] 6 times. (6 sc)
- Fasten off, leaving a 20 cm tail. Thread the tail through the front loops of the remaining 6 sc and pull tight to close. The bud should measure about 1.2 cm.
- Make 14 buds in total — 7 for each of the 2 clusters.
- To assemble a cluster, lay 7 buds in a rough triangle (3 across the back, 3 in the middle, 1 in front) and stitch them to one another through their sides with a doubled length of blush, working on a flat surface so the cluster sits low rather than balling up.
Star flowers (make 6)
- Rnd 1: With champagne metallic thread and the 1.75 mm hook, MR, ch 1, 6 sc in ring, pull closed, sl st to first sc. (6 sc)
- Rnd 2: *Ch 4, sl st in 2nd ch from hook, sc in next ch, sl st in next ch, sl st in next sc of Rnd 1; rep from * 5 more times. (6 points)
- Fasten off, leaving a 20 cm tail. Sew a single pearl bead at the center. The flower should measure about 2 cm across.
- Make 6.
Beaded border
- Rnd 1 (cream): Join cream with a sl st at any point on the outer edge. Ch 1, then sc around the entire perimeter of the assembled runner: 1 sc in each sc along the free side edges of the three motifs, 2 sc into the end of each row along the slanted edges of both end points, and 3 sc into each tip loop. Sl st to first sc. Your total should be a multiple of 8 — aim for about 456 sc, adjusting by adding or skipping 1-2 sc beside a motif seam where it will not show.
- Pre-string 60 pearl beads onto the dusty rose cotton before continuing. Slide them well down the yarn and out of the way.
- Rnd 2 (dusty rose, beaded points): Join dusty rose with a sl st in any sc. *Sk next 3 sc, work 3 dc in next sc, slide a bead up close to the hook, ch 3, sl st in 3rd ch from hook trapping the bead in the picot, 3 dc in the same sc, sk next 3 sc, sc in next sc; rep from * around, sl st to the first dc. (57 beaded points, based on 456 sc in Rnd 1)
- Fasten off and weave the tail into the back of a point, not into the cream lace where a pink tail would show through.
Tassel
- Cut a piece of stiff card 11 cm deep. Wrap dusty rose cotton around it 40 times.
- Thread a 30 cm length of dusty rose under all the strands at the top of the card, pull tight, and knot twice. Leave both ends long — these will attach the tassel.
- Cut the strands along the bottom edge of the card and remove.
- Wrap a fresh 40 cm length around the whole bundle 12 times, 1.5 cm down from the tied top, to form the neck. Thread the wrapping end onto a needle and pass it up through the neck wrap and out at the top to hide it.
- Trim the skirt level. The finished tassel should measure about 11 cm.
- Thread the two long ties from step 2 through the tip loop at the lower end point, knot securely on the wrong side, and weave the ends into the tassel head.
Assembly
- Block the joined lace column and both end points before any appliqué goes on. Pin the runner square, let it dry completely, and only then start sewing.
- Lay everything out dry before stitching anything down: 3 blooms, 12 leaves, 2 bud clusters, 6 star flowers. Step back and look at the balance before you commit.
- Blooms: center one over the solid disc of each motif. Sew through the center of the flower only, with 8 small stitches radiating out under the dusty rose petals. Leave every petal tip free so the flower lifts off the fabric.
- Leaves: place 4 leaves at each of the 2 motif seams — two to the left of center, two to the right — alternating sage and grey-green so no two of the same green touch. Place the remaining 4 leaves in pairs, one pair on the top motif above its bloom and one pair on the bottom motif below its bloom. Sew each leaf along its center chain only, leaving the outer edges free.
- Bud clusters: sew one cluster over the center of each motif seam, sitting on top of the leaf bases so it hides the join between them. Stitch through the underside of the outer buds into the lace.
- Star flowers: sew 2 to each motif, one at the left side edge and one at the right, level with the bloom center. Attach through the center of each star only.
- Attach the tassel to the lower tip loop last, after the runner has had its final blocking.
- Weave all appliqué tails into the backs of the appliqués themselves. Cream lace is open enough that a pink or green tail run through it will be visible from the front.
Finishing
Give the runner a final light block once everything is sewn on. Mist with water rather than soaking, which keeps the beads and the metallic thread out of trouble and stops the appliqués and the lace relaxing at different rates. Pin the four outer corners first, then the long edges, then work along the beaded border pinning each point outward so the zigzag edge sits crisp and even.
Do not pin the bloom petals or the leaf tips flat. Press them gently with your fingertips so they settle, then leave them alone — the lift in those pieces is the whole reason they are worked separately. If the petals splay too much, a light mist of spray starch on the flower alone, applied before you pin the runner, will hold them in a tidier cup.
Let it dry fully, at least twelve hours, before unpinning and attaching the tassel. Store the runner rolled around a cardboard tube rather than folded, since a fold crease across a beaded point is very difficult to block out later. Hand wash only, in cool water, and re-block flat while damp.
Tips for Success
- Count the four corner ch-3 spaces at the end of every squaring round from Rnd 7 onward. If a corner gets absorbed into a side, the motif turns into a lopsided pentagon and it will not show until three rounds later.
- String all 70 beads before starting the border, and count them as you go. Beads slide along the working yarn and it is easy to lose track; if you run short at point 50 of 57, there is no graceful fix.
- Make all three blooms before sewing any of them. Working them back to back keeps your petal tension consistent, and three flowers made on three different evenings rarely match.
- Use the two greens deliberately. Alternate them at every seam so the eye reads foliage rather than a green stripe, and keep all the sage leaves pointing the same direction.
- Keep the motif seams loose enough to have the same give as the lace. Test by holding the joined column up by one end — if it hangs straight, the seams are right; if it kinks at a seam, undo it and redo it looser.
Common Mistakes to Avoid
- Working Rnd 7 into every ch-1 space instead of skipping alternate ones. The round will have 80 stitch groups instead of 40 and the motif will ruffle instead of squaring. Count the ch-2 spaces on one side — you need exactly 5 between corners before moving to Rnd 8.
- Sewing the bloom down around its full outline. That flattens it into a pink patch. Only the very center is attached; if you can lift a petal tip with a fingernail, you have done it right.
- Trapping the bead in the wrong chain. The bead has to be slid up before you start the ch 3, so that it sits at the base of the picot. If it ends up loose on the chain, it will spin and hang off the edge instead of sitting at the tip.
- Stuffing the buds with polyfill. White fiberfill reads as a pale patch through size 3 cotton and flattens the blush color. Use a scrap of the same blush cotton instead.
- Blocking after the appliqués go on but not before. Sewing onto unblocked lace means the fabric shifts under the flowers, and once the pieces are stitched down you cannot pull the motif square again.
Ways to Customize This Pattern
- Swap the dusty rose and blush for dusty blue and pale grey, keeping the sage foliage and pearls, for a cooler coastal palette that suits a painted table.
- Make a matching pair of coasters: work the lace motif through Rnd 8 only, add the sc edge round, and top each with one upper-layer bloom and two leaves.
- Work the whole piece tonal — cream lace, ecru blooms, stone-grey leaves, ivory pearls — so the texture does all the work and the runner reads as neutral in any room.
- Skip the end points and the tassel and work the beaded border straight around the three-motif rectangle for a runner that suits a square or round table better.
- Add a fourth and fifth motif for a 105 cm runner, and increase to 5 blooms, 20 leaves, 4 bud clusters and 10 star flowers. Restring another 25 beads for the longer border.
Frequently asked questions
Cupping at the squaring round means the transition from the solid disc to the lace is too tight. Check that Rnd 6 has exactly 40 dc and 40 ch-1 spaces — if it has fewer, the disc will not have enough stitches to open out. If the count is right, your ch-2 spaces are being worked too tightly; go up half a hook size for Rnds 7 through 12, then return to 2.5 mm for the sc edge round.
Yes, with a 4 mm hook. Each motif grows to roughly 26 cm and the finished runner to about 115 cm, which suits a long dining table. You will need roughly three times the yardage, and you should use 6 mm beads rather than 4 mm so they stay in proportion to the heavier picots.
The slip stitch that closes the picot is what locks the bead in place, so it has to be worked into the 3rd chain from the hook with the bead already sitting below all three chains. If a bead still shifts, add one extra chain before the bead and work the closing slip stitch into the 4th chain instead — the slightly longer picot grips it more firmly.
Eight is the minimum for the design to read — four at each seam. The extra four at the top and bottom motifs balance the composition against the end points, and without them the two ends of the runner look bare compared with the middle. If you are short on green, drop the grey-green leaves at the ends rather than the sage ones, since the sage carries more of the visual weight against cream.
Glass pearls are fine in cool hand washing. Avoid plastic pearls with a painted or plated coating, which can dull after a few washes and will not recover. Never machine wash — the agitation flexes the picots against the beads and eventually the cotton wears through at those points.
The finished Dusty Rose Bloom Lace Table Runner

