Dusty Rose Floral Lattice Crochet Panel
Advanced
For experienced crocheters who enjoy complex shaping, fine detail, and ambitious construction
Weekend Project
A satisfying weekend make — start Friday, finish Sunday, enjoy forever.
Handmade Gift
A beautiful keepsake — free forever. Read online or print at home.
About This Dusty Rose Floral Lattice Crochet Panel
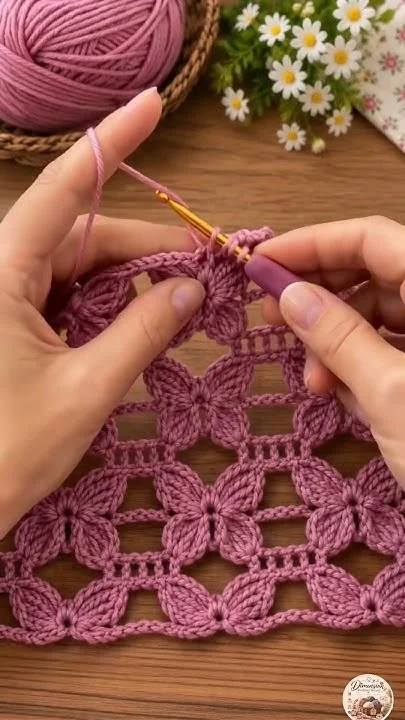
This floral lattice crochet pattern creates a dusty-rose lace panel with raised four-petal flowers and open, ladder-like spaces between them. Inspired by the flat floral fabric in the reference, it uses separately shaped petals, small stitched centers, and square mesh frames to build a repeating arrangement.
The finished rectangle works as a small table runner, a decorative mat, or a panel for a larger textile project. Allow approximately 18–24 hours for the twelve flowers, their frames, assembly, and finishing, plus drying time. This advanced project suits crocheters comfortable with tall stitches, working around foundation chains, precise sewing, and blocking lace to measurements.
Materials
- Smooth DK cotton yarn in dusty rose Approximately 250 g / 600 m, including swatching allowance; estimated quantity
- Crochet hook 3.5 mm, or size needed for the blocked motif gauge
- Tapestry needle For petal assembly, matching seams, and woven center details
- Locking stitch markers At least eight; use contrasting colors for petal bases and tips
- Blocking mats, rustproof pins, and measuring tape Enough space for a 29 × 38 cm rectangle
- Scissors For trimming secured ends
Abbreviations
chchainscsingle crochethdchalf double crochetdcdouble crochettrtreble crochetsl stslip stitchMRmagic ringBLOback loop onlyRSright sideGauge, Layout, and Counting
- Use US crochet terminology. All work uses dusty-rose yarn. Starting chains and joining slip stitches do not count as stitches unless a chain space is explicitly included in the count.
- Preliminary fabric gauge: approximately 20 sc and 24 rows = 10 × 10 cm. This is a starting guide; the completed blocked motif is the controlling gauge.
- Completed motif gauge: one flower with its two frame rounds = 9 × 9 cm after wet blocking. Aim for approximately 19 relaxed foundation chains per 10 cm as an additional check.
- Make twelve motifs. Each contains one eight-stitch center, four separate petals, and a two-round square frame. Arrange them in three columns and four rows.
- The joined panel measures approximately 27 × 36 cm before edging. Two edging rounds add approximately 1 cm at each outer edge, producing a finished size near 29 × 38 cm.
- Frame and border counts include each individual chain as one perimeter position. A ch-7 space therefore contributes seven positions. Mark all four frame corners.
Flower Centers — Make 12
- Round 1: Work 8 sc in MR. Close the ring firmly and sl st to the first sc. Fasten off, leaving a 20 cm tail. Count: 8 sc.
- Divide the center into four consecutive pairs of stitches: stitches 1–2, 3–4, 5–6, and 7–8. Each pair will support one petal base.
Shaped Petals — Make 48
- Foundation: Leave a 25 cm starting tail and ch 13. Work the first side into the back bumps of the foundation chain. Twelve chains will be worked; the chain nearest the hook is skipped.
- Round 1, first side: Sc in the second ch from the hook, hdc in the next ch, dc in each of the next 2 ch, tr in each of the next 4 ch, dc in each of the next 2 ch, hdc in the next ch, sc in the last ch. Count: 12 stitches.
- Round 1, base turn: Ch 1 and rotate to work along the unused loops on the opposite side of the foundation. Mark this ch-1 space as the petal base.
- Round 1, second side: Starting in the same foundation chain that holds the last sc, work sc, hdc, 2 dc, 4 tr, 2 dc, hdc, sc across the twelve foundation chains, placing one stitch in each chain. Ch 1 and sl st to the first sc. Mark this final ch-1 space as the petal tip. Count for the complete round: 24 stitches and two ch-1 spaces, or 26 perimeter positions.
- Round 2: Ch 1. Sc BLO in each of the next 12 stitches, sc into the base ch-1 space, sc BLO in each of the next 12 stitches, and sc into the tip ch-1 space. Sl st to the first sc. Count: 26 sc. Transfer the base and tip markers into the sc worked in their respective spaces.
- Fasten off, leaving a 15 cm tail. Keep the petal flat, with its foundation ridge centered. The tall middle stitches create the broad middle; the shorter stitches taper both ends.
Assemble the Four-Petal Flowers
- Place one center RS up. Arrange four petals around it, with their marked bases pointing inward and their marked tips pointing toward the four corners of an imaginary square. Keep every petal RS up.
- Use each petal’s starting tail to sew its marked base sc and the immediately adjacent sc on either side to its assigned two-stitch center segment. Spread the three petal stitches evenly across those two center stitches. Secure with a second pass through the same attachment area.
- Repeat for all four petals. Keep the attachments close together so the center appears compact, while the broad sections of the petals remain separate. Do not sew neighboring petal edges together.
- Use the center tail to make four short radial surface stitches, one from the ring opening toward each petal base. Catch the underlying fabric rather than spanning an open gap. These stitches cover the base joins and emphasize the four-part flower center.
- Secure and weave in the center and base tails on the back. Retain the four tip markers. Repeat for all twelve flowers.
Square Lattice Frames — Work Around Each Flower
- Preparation: Place a flower RS up with its petals pointing northwest, northeast, southeast, and southwest. Join yarn with a sl st in the marked tip sc of the northwest petal. This joining slip stitch does not count.
- Round 1: Ch 1 and sc in that same tip sc. Ch 17, sc in the marked tip sc of the northeast petal; ch 17, sc in the southeast tip; ch 17, sc in the southwest tip; ch 17 and sl st to the first sc. Count: 4 corner sc and four ch-17 spaces, or 72 perimeter positions. Check that no chain is twisted.
- Round 2: Ch 1. Starting in the first corner sc, repeat the following four times: sc in the corner sc, ch 7, skip the first 7 chains of the next ch-17 space, dc in each of its next 3 chains, ch 7, skip its last 7 chains. After the fourth repeat, sl st to the first sc. Count: 4 corner sc, 12 dc, and eight ch-7 spaces, or 72 perimeter positions.
- Mark the four corner sc. Fasten off and weave in the frame tails without shortening the chain spaces. Each finished side runs from one corner sc through 7 chains, 3 dc, and 7 chains to the next corner sc.
- Wet-block each complete motif to a 9 × 9 cm square. Pin the corner sc first, then support the frame chains along straight sides. Let the petals settle into the diagonals without stretching their centers into holes. Allow to dry fully.
Join the Twelve Motifs
- Arrange the dry motifs RS up in three columns and four rows. Rotate motifs as needed so their petals and frame corners align. Label rows 1–4 from top to bottom and columns 1–3 from left to right.
- Join neighboring motifs with a flat sewn seam. Thread a manageable length of matching yarn and alternate small stitches through corresponding edge loops, keeping both motifs RS up. Catch the outward-facing loop of each chain and the outward-facing top loop of each dc; catch both loops at corner sc for strength.
- For each side seam, match 19 positions: the starting corner sc, 7 individual chains, 3 dc, 7 individual chains, and the ending corner sc. Pair each position with its equivalent on the neighboring motif. These are sewn pairs, not new crochet stitches.
- Join columns 1 and 2, then columns 2 and 3, within each row. This makes eight vertical side seams in total. Keep the paired chains side by side rather than pulling one edge over the other.
- Join row 1 to row 2, row 2 to row 3, and row 3 to row 4 across all three columns. This makes nine horizontal side seams. At each four-motif intersection, pass through the four corner sc once to secure the junction without building a knot on the surface.
- At each junction on the outside perimeter, the two sewn corner sc form one boundary point. Mark these points before edging. Lay the panel flat and loosen any seam that draws its neighboring squares inward.
Continuous Outer Border
- Round 1: With RS facing, join yarn in the upper-left outer corner sc. Ch 1 and work 3 sc in that corner. Work one sc in every ordinary perimeter position, placing stitches in individual chains rather than around chain spaces. At each joined boundary point, work one sc through the paired corner sc together. Work 3 sc in each of the other three outer corners, then sl st to the first sc.
- Round 1 count check: Each short edge has 53 positions between its outer corners: 3 × 17 frame positions plus 2 joined boundary points. Each long edge has 71 positions: 4 × 17 frame positions plus 3 joined boundary points. Total: 2 × 53 + 2 × 71 + 12 corner stitches = 260 sc. Mark the middle sc of each three-stitch corner group.
- Round 2: Ch 1. Sc in each stitch around, working 3 sc in each marked corner stitch. Sl st to the first sc. Count: 268 sc. Transfer corner markers to the middle stitch of each new corner group.
- Fasten off and make an invisible finish with the tapestry needle. Weave in the end on the back through several border stitches, reverse direction, and trim.
Finishing
Check each petal base, tip attachment, and four-motif intersection before the final wash. Secure any loose sewing ends through solid stitches on the back. The flower centers should sit flat, with the narrow petal tips meeting the lattice corners cleanly.
Soak the panel according to the yarn label, press out excess water in a towel, and pin it to approximately 29 × 38 cm. Square the outer corners and straighten the ladder sections without pulling the petals tight. Let the panel dry completely before unpinning. Store it flat or loosely rolled to preserve the open mesh.
Tips for Success
- Keep the four middle treble stitches at a consistent height on every petal. Uneven tall stitches make one side of a flower look heavier.
- Move the base and tip markers immediately after the petal edging round. Both ends taper, so identifying them later is easy to get wrong.
- Count the three central dc on every frame side before fastening off. They should sit between two equal ch-7 spaces.
- Block all twelve motifs to the same measurement before sewing. Equal squares make the seventeen seams easier to align.
- Leave the sewing yarn relaxed enough that each paired frame edge retains its full length when laid flat.
Common Mistakes to Avoid
- Missing a stitch on the second side of a petal: work into all twelve foundation chains, including both end chains. Round 1 must contain 24 stitches plus two chain spaces.
- Attaching a petal by its tip: the marked base is the turn made after the first twelve stitches. Correct the attachment before adding the frame.
- Working the frame dc around the whole chain space: place each dc into its specified individual chain so the ladder stays centered.
- Counting joined outside corners twice: each sewn pair at a boundary junction receives one border sc through both corner stitches. Counting them separately changes the border total.
- Forcing a small motif to reach 9 cm with aggressive blocking: change hook size and remake the sample if reaching the target distorts the petals or tightens the frame.
Ways to Customize This Pattern
- Make a longer runner with three columns and six rows, using eighteen flowers and seventy-two petals. At the same gauge, it finishes approximately 29 × 56 cm with this border.
- Use a deeper plum for the centers while keeping the petals and frames dusty rose. Change color between separate components; no stitch counts change.
- Work the frames in warm cream to make each rose flower more distinct. Use the frame color for the seams and outer border.
- Use mercerized cotton for a sharper lattice or matte cotton for a softer appearance. Swatch a complete motif because the finished dimensions may change.
Frequently asked questions
Separate petals allow a defined foundation ridge, tapered ends, and a raised outline around each lobe. Sewing their bases to the small center also lets you adjust their diagonal placement before adding the square frame.
No. Their tips anchor the corners, but their broad middle sections should lie comfortably inside the frame. If the frame pulls the flower tight or the petals buckle badly at the target gauge, adjust the hook size and remake the complete sample.
Count 53 positions between the outer corners on each short edge and 71 on each long edge. Treat each sewn corner pair along an edge as one position. Adding three stitches at each outer corner gives 260 sc for the first border round.
Yes. Repeat the square motifs to suit the opening, then sew the completed border to a fabric support or curtain band. Measure a blocked sample first, and support the upper edge continuously so the cotton does not hang from individual flower tips.
The finished Dusty Rose Floral Lattice Crochet Panel

