Dusty Rose Lattice Crochet Curtain Pattern
Advanced
For experienced crocheters who enjoy complex shaping, fine detail, and ambitious construction
Single-Day Project
A satisfying project you can complete in a single afternoon or evening.
Handmade Gift
A beautiful keepsake — free forever. Read online or print at home.
About This Dusty Rose Lattice Crochet Curtain Pattern
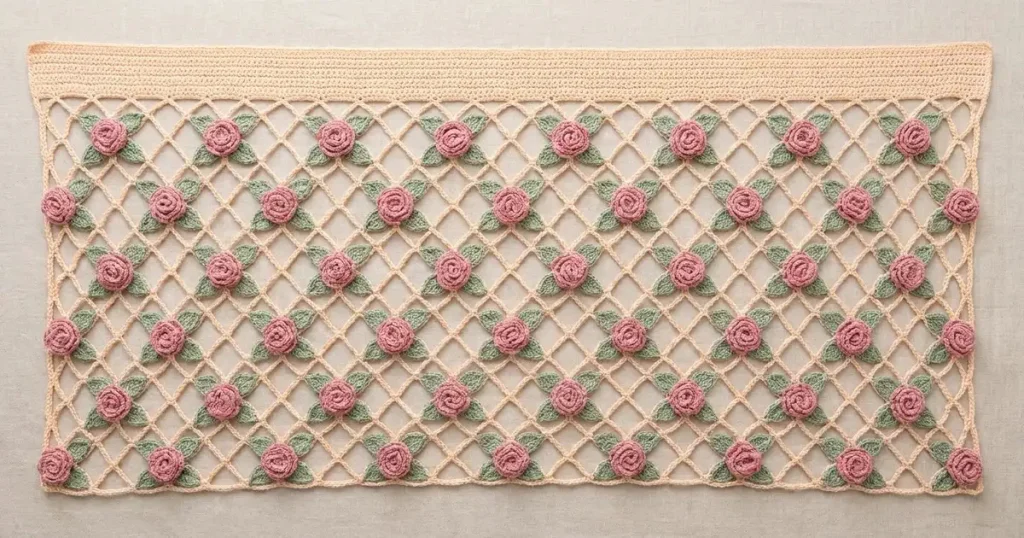
This rose lattice crochet curtain pattern pairs an open cream diamond mesh with raised dusty pink roses and pointed sage leaves. Inspired by the photographed rectangular floral panel, it has a substantial solid top band, slim edges, and six staggered rows of flowers. The finished piece works as a decorative window valance or a wall panel.
Allow about 35–45 hours for the mesh, 51 rolled roses, and 204 individually shaped leaves. This advanced project suits crocheters who enjoy precise lace blocking, repeated small motifs, and careful hand assembly. The open background is worked flat, while every flower and leaf is made separately and sewn in place.
Materials
- Sport-weight cotton, approximately 160 m per 50 g Cream: 200 g; dusty pink: 100 g; sage green: 150 g. These are planning allowances, including swatching.
- Crochet hook 3.0 mm, or size needed for gauge
- Tapestry needle and scissors For motif assembly and securing ends
- Locking stitch markers At least 16, for lattice repeats and flower placement
- Blocking mat, rustproof pins, and measuring tape A blocking area at least 100 × 50 cm
- Curtain clips Approximately 17 clips, spaced about 6 cm apart across the top band
Abbreviations
chchainscsingle crochethdchalf double crochetdcdouble crochetsl stslip stitchst(s)stitch(es)RSright sideGauge, Dimensions, and Construction
- Solid-band gauge after washing and blocking: 20 sc and 24 rows = 10 × 10 cm. A 193-stitch band should measure approximately 96 cm wide.
- Lattice gauge under gentle blocking tension: four complete ch-5 spaces across a full-space row = 12 cm; eight mesh rows = approximately 13.6 cm high. Count horizontal spaces between their anchor stitches.
- For a lattice swatch, ch 50. Follow Mesh Row 1 below with eight repeats instead of 32, then work Mesh Rows 2–8 using seven full middle spaces wherever the full pattern uses 31. Block to approximately 24 cm wide × 13.6 cm high.
- The panel has 14 solid rows, approximately 5.8 cm high, followed by 24 mesh rows, approximately 40.8 cm high. Edging brings the finished height to roughly 47 cm.
- Make one panel, 51 roses, and 204 leaves. Target blocked rose diameter: 3–3.5 cm. Target leaf length: approximately 3 cm. Adjust motif hook size separately if necessary.
- Turning ch-1 does not count as a stitch. Mesh edge chains and edge dc are structural parts of the lattice and are counted as described in each row. Turn after every panel row.
Cream Top Band
- Row 1: With cream, ch 194. Sc in the second ch from the hook and in every remaining ch. Turn. (193 sc)
- Rows 2–14: Ch 1, sc in every st. Turn. (193 sc in each row; 14 rows total)
- Keep the yarn attached. The mesh is worked directly from the last band row, downward toward the bottom of the curtain.
Diamond Lattice Panel
- Mesh Row 1: Ch 1, sc in the first st; repeat the following 32 times: ch 5, skip 5 sts, sc in the next st. Turn. (33 sc anchors and 32 ch-5 spaces; all 193 band stitches accounted for)
- Mesh Row 2 — offset row: Ch 3, sc in the first ch-5 space; repeat the following 31 times: ch 5, sc in the next ch-5 space. Ch 2, dc in the final sc at the far edge. Turn. (32 sc, 31 full ch-5 spaces, and two partial edge spaces)
- Mesh Row 3 — full-space row: Ch 1, sc in the top of the edge dc; repeat the following 31 times: ch 5, sc in the next full ch-5 space. Ch 5, sc in the top of the starting ch-3 at the far edge. Turn. Do not work into either partial edge space. (33 sc and 32 ch-5 spaces)
- Mesh Rows 4–23: Repeat Mesh Rows 2 and 3 ten times. Each even-numbered row has 31 full spaces and two partial edges; each odd-numbered row has 32 full spaces.
- Mesh Row 24: Repeat Mesh Row 2 once. (32 sc, 31 full ch-5 spaces, and two partial edge spaces) Fasten off.
- Check the panel before edging: there must be 24 mesh rows below the 14-row band. Mark every fourth mesh row to help keep the blocking grid even.
Cream Perimeter Edging
- With RS facing, join cream at the upper-left corner. Ch 1 and work 193 sc across the unused foundation-chain loops along the top. Ch 1 to turn the corner. The corner chains are additional to the side counts.
- Work 14 sc down the band edge, one in each row end. Continue down the mesh edge with 2 sc around each of its 24 row-end segments. Ch 1 at the lower corner. (62 sc along this side)
- Across the bottom, work 2 sc into the first partial edge space, then repeat the following 31 times: sc in the next anchor sc, 5 sc in the next full ch-5 space. Sc in the final anchor sc, then 2 sc into the last partial edge space. Ch 1 at the corner. (191 sc)
- Work 2 sc around each of the 24 mesh row-end segments, then 14 sc along the band edge. Ch 1 at the upper corner; sl st to the first edging sc. Fasten off. (62 sc along this side; 508 sc and four corner ch-1 spaces around the perimeter)
- Wash and pin the undecorated panel to approximately 96 × 47 cm. Keep the top and bottom parallel and distribute the diamond openings evenly. Let it dry completely before placing motifs.
Dusty Pink Rolled Roses — Make 51
- Row 1: With dusty pink, leave a 15 cm starting tail and ch 26. Sc in the second ch from the hook and in each remaining ch. Turn. (25 sc)
- Row 2: Ch 1; repeat the following six times: skip the next st, work 5 dc in the next st, skip the next st, sl st in the next st. Sc in the final st. (Six 5-dc petals, six sl sts, and one final sc; 25 foundation stitches consumed)
- Fasten off with a 45 cm sewing tail. With the petal side facing outward, roll the first petal tightly into a center. Wrap the remaining five petals around it, keeping the straight foundation edge level underneath.
- Thread the long tail through the foundation edge of every layer. Take several crossing stitches through the base, avoiding the petal tips. Flatten the base slightly so the rose sits securely on the mesh.
- Secure the starting tail inside the base. Keep the long tail for attaching the rose. Make all 51 roses with the same rolling direction for a consistent spiral appearance.
Pointed Sage Leaves — Make 204
- Round 1, first side: With sage, leave a 25 cm starting tail and ch 8. Sc in the second ch from the hook, hdc in the next ch, dc in each of the next 3 ch, hdc in the next ch, and 3 sc in the final ch. (9 sts so far)
- Round 1, second side: Rotate to work into the unused loops on the opposite side of the foundation chain. Hdc in the next ch, dc in each of the next 3 ch, hdc in the next ch, sc in the final ch. Sl st to the first sc. (15 sts around the leaf; joining sl st excluded)
- Round 2: Ch 1, sl st in each of the first 7 sts. In the next st, which is the middle sc of the three-stitch tip, work sl st, ch 2, sl st. Sl st in each of the remaining 7 sts; join to the first sl st. (16 sl sts and one ch-2 point)
- Fasten off with a 25 cm tail. With this tail, make three small running stitches along the foundation-chain center line, from tip toward base. Draw up only enough to form a shallow central crease, then secure without puckering.
- Retain both tails for sewing. Block each leaf flat with its tip slightly extended. Group four leaves with each rose.
Staggered Floral Placement and Joining
- Lay the blocked panel RS up, with the band at the top. All measurements below start at the upper-left corner of the mesh, immediately below the solid band. The mesh is approximately 96 cm wide × 40.8 cm high.
- Mark six horizontal flower lines at 3.4, 10.2, 17.0, 23.8, 30.6, and 37.4 cm below the band. These divide the mesh into six evenly spaced floral bands.
- On flower lines 1, 3, and 5, place eight rose centers at 6, 18, 30, 42, 54, 66, 78, and 90 cm from the left mesh edge. (24 roses)
- On flower lines 2, 4, and 6, place nine rose centers at 1.8, 12, 24, 36, 48, 60, 72, 84, and 94.2 cm from the left mesh edge. The two outer roses sit close to the side borders. (27 roses; 51 total)
- These coordinates are placement guides. Move a center by up to 1.5 cm to meet the nearest sturdy lattice junction, keeping the staggered arrangement and approximately even spacing.
- At each center, arrange four leaves diagonally, with their bases overlapping beneath the rose. Point them upper-left, upper-right, lower-left, and lower-right. At the side edges, rotate the outer leaves inward so they remain within the panel.
- Using sage tails, sew each leaf base to a mesh junction, then tack the outer third of the leaf to an adjacent chain strand. Pass the needle through the yarn strands rather than around an entire open diamond. Leave the pointed tip free.
- Set the rose over the four leaf bases. With its pink tail, sew its base to at least three nearby cream strands or anchor stitches, catching the leaf bases beneath it. Keep the petals free and avoid drawing the mesh inward.
Finishing
Check the back of every flower for loose loops and secure each sewing tail through several stitches before trimming. Lift the panel gently to check that the roses stay upright and the leaves remain spread. If a flower tips forward, add another small attachment stitch across its base.
Give the assembled panel a gentle final wash if needed, supporting its full weight when wet. Lay it flat to dry and shape the roses with your fingers. Attach curtain clips only through the solid top band, spacing approximately 17 clips evenly across its width. The finished panel should hang with an open lattice and softly raised flowers.
Tips for Success
- Place a marker after every eighth space on full-space mesh rows. Four groups of eight make a quick width check.
- Roll and measure one rose before making the remaining 50. Consistent petal tension matters more than rolling each center tightly.
- Attach the center flowers first, then work outward. This helps distribute any small differences in blocked mesh spacing.
- Slide a contrasting cloth beneath the cream lattice while sewing. It makes individual strands easier to see and reduces accidental stitches through open spaces.
- Support the whole panel on a table during assembly so the weight of completed flowers does not stretch unfinished areas.
Common Mistakes to Avoid
- Working into partial edge spaces on full-space rows adds unwanted loops. Work only the 31 full middle spaces, then finish in the top of the starting ch-3.
- Using only 31 repeats in Mesh Row 1 narrows the panel. That row requires 32 repeats after the first sc, consuming all 193 band stitches.
- Pulling rose attachment stitches tight gathers the diamonds. Loosen the sewing stitches and spread the load across three or more strands.
- Rolling petals at different heights creates a cone-shaped flower. Keep all foundation edges level and stitch through every layer of the base.
- Hanging the curtain while damp stretches the mesh. Dry it flat before clipping it to the window hardware.
Ways to Customize This Pattern
- Use two close shades of dusty pink, alternating them between flower lines while keeping the cream background and sage foliage.
- Make a narrower panel with 24 mesh spaces: ch 146 for a 145-sc band, use 24 repeats in Mesh Row 1, and use 23 full middle spaces on subsequent rows. At gauge, the band is approximately 72 cm wide; recalculate edging and floral placement for the new width.
- For a less densely decorated panel, attach roses only on flower lines 1, 3, and 5. This uses 24 roses and 96 leaves.
- Use the panel flat as a decorative table overlay. Keep hot dishes and objects with narrow feet away from the raised flowers and open mesh.
Frequently asked questions
No. The photographed appearance is represented by a flat solid band. This pattern uses curtain clips through that band; folding it into a pocket would shorten the finished panel and change its proportions.
The offset creates the diamond arrangement. Full-space rows contain 32 complete loops, while alternating rows contain 31 complete loops plus a partial space at each edge. The partial spaces keep the sides approximately straight.
Block the plain panel first. Attaching flowers before establishing the lattice dimensions can trap uneven openings and make the finished rectangle difficult to square.
Follow the cotton yarn’s care label, use a gentle hand wash, and support the panel when lifting it from water. Press it in a towel without twisting, then dry flat with the leaves spread and the rose petals shaped by hand.
The finished Dusty Rose Lattice Crochet Curtain Pattern

