Earth Tone Color Block Crochet Blanket Pattern
Beginner Friendly
Perfect for those just starting their crochet journey, with clear instructions and simple techniques
Single-Day Project
A satisfying project you can complete in a single afternoon or evening.
Handmade Gift
A beautiful keepsake — free forever. Read online or print at home.
About This Earth Tone Color Block Crochet Blanket Pattern
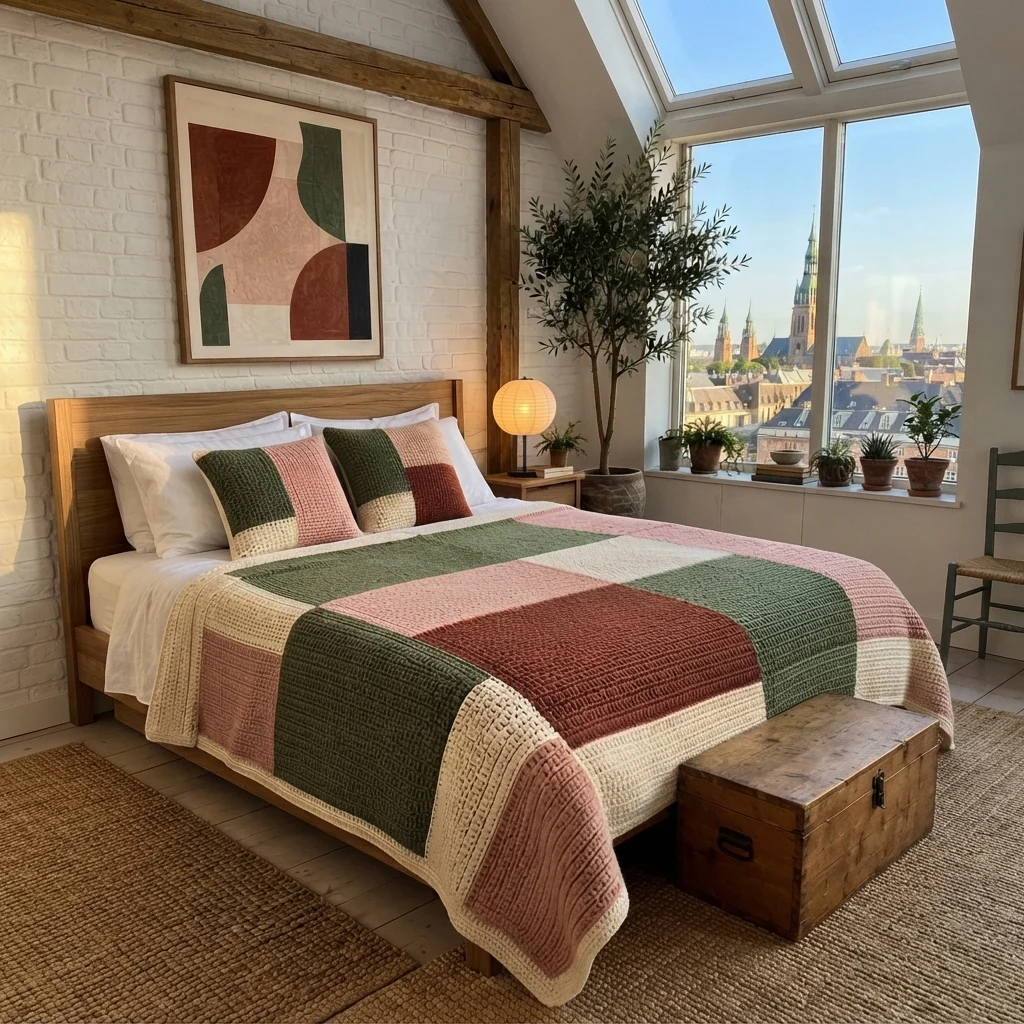
This color block crochet blanket pattern builds a calm, modern throw from large rectangles in olive green, dusty pink, rust and cream. Each block is a simple slab of single crochet, and the olive and rust blocks are worked in the back loop only, so they have fine horizontal ridges that catch the light next to the smoother pink and cream blocks.
It is an advanced project because of its size and the precision it asks for. You will make 15 rectangles that must all come out the same size, join them with flat seams so the grid lines up, and then work 13 border rounds of more than 700 stitches each. Plan on 35 to 45 hours in total, about an hour per block, plus joining and the border.
It suits crocheters who like long, steady projects and want a graphic blanket that looks like a patchwork of paint swatches. The finished throw is about 150 x 175 cm, and it is easy to resize by adding or removing a column or a row of blocks.
Materials
- Chunky cotton-blend yarn, olive green (O) about 400 g, estimated
- Chunky cotton-blend yarn, dusty pink (P) about 400 g, estimated
- Chunky cotton-blend yarn, rust (R) about 300 g, estimated
- Chunky cotton-blend yarn, cream (C) about 800 g, estimated, blocks and border
- Crochet hook 6.0 mm
- Yarn needle
- Stitch markers one every 10 rows of the border, and for joining
- Flat surface and pins for blocking and layout
Abbreviations
chchainscsingle crochetsl stslip stitchst(s)stitch(es)BLOback loop onlyRSright sideFOfasten offOolive green yarnPdusty pink yarnRrust yarnCcream yarn( )xrepeat the stitches in brackets the number of times givenRidged Block (make 7: 4 olive, 3 rust)
- Foundation: with O or R, ch 53. Sc in the 2nd ch from the hook and in each ch across (52).
- Rows 2-40: ch 1 and turn at the end of every row (the ch 1 does not count as a stitch), then sc in the back loop only of each st across (52). You now have 40 rows of 52 stitches.
- FO leaving a 20 cm tail and weave in the ends.
- Check your block: it should measure about 43 x 31 cm, and the ridges should run across the width of the block.
Plain Block (make 8: 4 pink, 4 cream)
- Foundation: with P or C, ch 53. Sc in the 2nd ch from the hook and in each ch across (52).
- Rows 2-40: ch 1 and turn at the end of every row (the ch 1 does not count as a stitch), then sc in both loops of each st across (52). You now have 40 rows of 52 stitches.
- FO leaving a 20 cm tail and weave in the ends.
- Check your block: it should measure about 43 x 31 cm, the same as the ridged block.
- Block all 15 rectangles flat with a damp cloth and pin each one to the same size, 43 x 31 cm. Let them dry fully before joining.
Blanket Layout
- Lay out 3 blocks across and 5 blocks down (15 blocks in all), with the 52-stitch edges running across the width. Read the layout from the head of the bed to the foot, and from left to right.
- Row 1: olive, cream, pink
- Row 2: pink, rust, olive
- Row 3: cream, olive, rust
- Row 4: rust, pink, cream
- Row 5: olive, cream, pink
- Check the layout: no two blocks of the same color touch along a side, there are 4 olive, 4 pink, 4 cream and 3 rust blocks, and every ridged block has its ridges running in the same direction.
Joining
- Join the blocks into 5 rows of 3. Place two neighboring blocks side by side, right sides up, and sew them together with mattress stitch along the 40 row ends, one bar to one bar. Use a strand of the lighter block’s color.
- Each row of 3 blocks is now 156 stitches wide and 40 rows tall.
- Join the 5 rows to each other in the same way, with mattress stitch along the 156-stitch edges, one stitch to one stitch. Match the vertical seams so they run in straight lines from the head to the foot.
- Work the seams from the head down so any small differences collect at the foot, where they are easiest to hide.
- Weave in all ends along the back.
- Check the joined body: it should be 156 stitches wide and 200 rows tall, about 130 x 154 cm.
Cream Border
- Round 1: with the RS facing you and the head of the blanket at the top, join C in the top right corner stitch. Ch 1, work 3 sc in the corner st, then sc in each of the next 154 sts across the top. Work 3 sc in the next corner st.
- Work 198 sc evenly down the left side, one in each row end between the corners. Work 3 sc in the bottom left corner st, 154 sc along the foot, 3 sc in the bottom right corner st and 198 sc up the right side. Join with a sl st to the first sc (716).
- Rounds 2-13: ch 1, sc in each st around, working 3 sc in the middle st of each corner group. Join with a sl st at the end of each round. Work the even rounds (2, 4, 6, 8, 10, 12) in the back loop only for a ridged look, and the odd rounds (3, 5, 7, 9, 11, 13) in both loops.
- Each round adds 8 stitches: round 2 has 724, round 3 has 732, round 7 has 764, round 10 has 788 and round 13 has 812.
- FO after round 13 and weave in the end.
- Check your border: it should be about 10 cm wide, and the corners should lie flat without cupping or ruffling.
Finishing
Weave in all ends along the back, following the stitches for at least 8 cm. Block the whole blanket by laying it flat on towels, pinning the corners and the edges of the border to about 150 x 175 cm, and misting it with water. Let it dry fully before moving it. This evens out the ridged and plain blocks and flattens the seams.
Drape the blanket over the foot of the bed with a row of blocks hanging down and the cream border showing along the sides, and it will look like the photo.
Tips for Success
- Count your stitches at the end of every tenth row of every block. There should always be 52, or the seams will not line up.
- Make the blocks in batches of five, one color at a time, so your tension stays the same within each color.
- Block every block to exactly the same size before you join. Small differences become wavy seams across a blanket this big.
- Place the finished blocks on the floor and check the layout from a few steps back before you sew anything.
- Place a stitch marker in the first corner of every border round so you never lose your corners.
Common Mistakes to Avoid
- Working the ridged blocks tighter than the plain ones leaves them shorter. Measure both types and change the hook size for the ridged ones if needed.
- Counting the turning chain as a stitch makes a block 53 or 51 stitches wide. The ch 1 never counts.
- Joining the blocks with a tight seam puckers the fabric. Keep the mattress stitches loose and let the seam stretch with the blocks.
- Turning one block a quarter turn puts the ridges the wrong way. Check every block before you sew.
- Working a different number of stitches in the corners makes the border ripple. Use exactly 3 sc in each corner stitch on every round.
Ways to Customize This Pattern
- Swap the palette for navy, mustard, sage and oatmeal, or for gray, blush and cream, and keep the same layout.
- Make a baby blanket with 2 blocks across and 3 down (6 blocks), about 85 x 95 cm before the border, with 6 border rounds.
- Make a larger blanket by adding a fourth column of blocks (adds about 43 cm) and a sixth row (adds about 31 cm). Recalculate the border from the new stitch and row counts.
- Make matching pillow covers by joining 2 x 2 smaller blocks of 24 stitches and 24 rows in the same colors, sewing the panel to a plain back with a button closure.
- Work all the blocks in plain sc, or all in back loop only, for a more uniform look.
Frequently asked questions
The amounts above are estimates of about 85 g of yarn per block and about 400 g of cream for the border. Weigh your test blocks, multiply by the number of blocks in each color, and add about 10 percent for the joining and the border.
Add or remove whole blocks. A column adds 52 stitches and about 43 cm to the width, and a row adds 40 rows and about 31 cm to the length. For the border, recalculate round 1 as twice the stitches across the top plus twice the rows down the side, minus 4, plus 12 for the corners.
Yes. A worsted yarn with a 5 mm hook gives a lighter blanket, but the blocks will come out smaller, so chain more stitches and work more rows. Swatch first and divide the width and height you want by your gauge.
With a washable cotton blend, wash it on a gentle cycle in cool water, press out the water without wringing, and lay it flat to dry. Hanging a wet blanket this heavy stretches it out of shape, and dark colors like rust and olive can bleed, so wash it with a color catcher the first time.
The finished Earth Tone Color Block Crochet Blanket Pattern

