Elegant White Floral Granny Square Crochet Bedspread Pattern
Beginner Friendly
Perfect for those just starting their crochet journey, with clear instructions and simple techniques
Single-Day Project
A satisfying project you can complete in a single afternoon or evening.
Handmade Gift
A beautiful keepsake — free forever. Read online or print at home.
About This Elegant White Floral Granny Square Crochet Bedspread Pattern
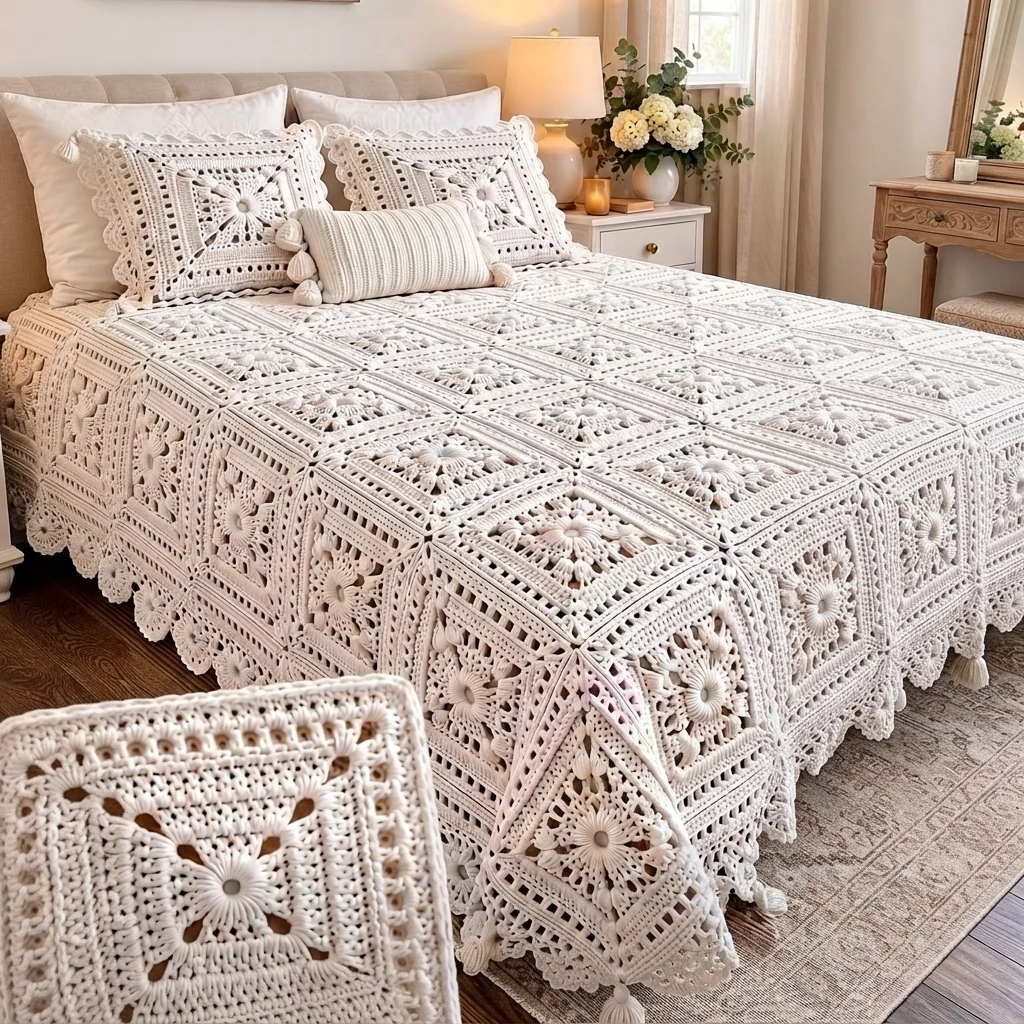
This white floral crochet bedspread pattern creates an elegant, textured bed covering using individually crocheted granny squares with raised daisy centers. Each square features dimensional petals, delicate openwork corners, and a structured lace border. The finished bedspread has the romantic, handcrafted appearance of vintage crochet bedding, with beautiful floral details that stand out against the crisp white cotton.
This advanced project is designed for experienced crocheters who enjoy intricate stitch combinations, dimensional flowers, precise square construction, and decorative joining techniques. The bedspread is assembled from repeating floral motifs, with an additional scalloped edging and optional matching pillow covers. A full-size bedspread typically takes 65-90 hours, depending on your speed, yarn choice, and finished dimensions. Although the individual motifs are manageable, achieving consistent tension and a smooth, professional finish requires patience and careful blocking.
The design uses a single soft-white color to emphasize the raised flowers and lace texture. Unlike a traditional amigurumi toy, this photographed project is a flat, joined-motif bedspread, so it uses dimensional crochet flowers rather than stuffed body parts. The pattern includes separately constructed flower centers, petals, square foundations, joining rounds, and finishing borders to reproduce the layered floral appearance.
Materials
- DK-weight cotton yarn in soft white Approximately 5,500-7,000 meters for the bedspread; buy extra for swatching and matching pillows
- 3.5 mm crochet hook Or size needed to achieve the finished motif measurement
- 3.0 mm crochet hook Optional for firmer flower centers
- Tapestry needle For joining details and weaving in ends
- Sharp scissors For trimming yarn
- Locking stitch markers At least 12 for marking corners and joining points
- Measuring tape For checking motif dimensions
- Blocking mats and rustproof pins For shaping each lace square
- Spray bottle or steamer For gentle blocking
- White cotton pillow inserts Optional, two 45 × 45 cm inserts
- White cotton backing fabric Optional, for lined pillow covers
Abbreviations
MRMagic ringchChainsl stSlip stitchscSingle crochethdcHalf double crochetdcDouble crochettrTreble crochetincTwo sc in the same stitchdecSingle crochet two stitches togetherstStitchstsStitchesspSpacerepRepeatRSRight sideWSWrong sideFOFasten offpuffYarn over, insert hook, pull up a loop three times in the same stitch, yarn over and pull through all seven loops, ch 1 to securepicotCh 3, sl st into the first chainRaised Daisy Flower Center
- Round 1: With white yarn, make a MR. Work 6 sc into the ring. Pull tight and join with a sl st to the first sc. (6 sc)
- Round 2: Ch 1, inc in each stitch around. Join with a sl st. (12 sc)
- Round 3: Ch 1, (1 sc, inc) rep 6 times. Join with a sl st. (18 sc)
- Round 4: Ch 1, (2 sc, inc) rep 6 times. Join with a sl st. (24 sc)
- Round 5: Ch 1, (3 sc, inc) rep 6 times. Join with a sl st. (30 sc)
- Round 6: Ch 1, (4 sc, inc) rep 6 times. Join with a sl st. (36 sc)
- Round 7: Working into the front loops only, (sl st into next stitch, ch 5, skip 2 sts) rep 12 times. Join to the first sl st. (12 ch-5 petal loops)
- Round 8: Into each ch-5 loop work (1 sc, 1 hdc, 3 dc, 1 hdc, 1 sc). Rep around. Join and FO. (12 raised petals, 84 worked stitches)
- Leave the unused back loops from Round 6 accessible. These will be used to attach the flower to the square foundation.
Floral Square Foundation
- Round 1: Make a MR. Ch 3 (counts as first dc), work 11 dc into the ring. Join to the top of beginning ch 3. (12 dc)
- Round 2: Ch 3 (counts as first dc), work 1 dc into the same stitch, then 2 dc into each remaining stitch. Join. (24 dc)
- Round 3: Ch 3 (counts as first dc), work 1 dc in the same stitch, 1 dc in next stitch; (2 dc in next stitch, 1 dc in next stitch) rep 11 times. Join. (36 dc)
- Round 4: Ch 1, 1 sc in each of the next 3 stitches, ch 5, skip 3 stitches; rep the sequence 6 times around. Join. (18 sc and 6 ch-5 spaces)
- Round 5: Sl st to the first ch-5 space. Ch 3 (counts as dc), work 5 dc into the same space, ch 2; work (6 dc, ch 2) into each remaining ch-5 space. Join. (36 dc and 6 ch-2 spaces)
- Round 6: Ch 1, 1 sc into each dc and 3 sc into each ch-2 space around. Join. (54 sc)
- Round 7: Ch 1, 1 sc into each of the next 6 stitches, ch 5, skip 3 stitches; rep 6 times around. Join. (36 sc and 6 ch-5 spaces)
- Round 8: Sl st to the first ch-5 space. Ch 3 (counts as dc), 7 dc into the same space, ch 2; (8 dc, ch 2) into each remaining ch-5 space. Join. (48 dc and 6 ch-2 spaces)
- Round 9: Ch 1, work 1 sc into every dc and 2 sc into every ch-2 space. Join. (60 sc)
- FO, leaving a short tail to weave in. This circular foundation will sit beneath the dimensional flower and inside the square frame.
Square Lace Frame
- Round 1: Join yarn to any stitch of Round 9 of the foundation. Ch 3 (counts as first dc), dc in each of the next 14 stitches, (2 dc, ch 2, 2 dc) in the next stitch for the corner. Repeat the sequence of 15 dc followed by a corner group three more times, working the fourth corner into the last stitch of the round. Join. (76 dc and 4 ch-2 corners)
- Round 2: Sl st into the next corner space. Ch 3 (counts as first dc), (1 dc, ch 2, 2 dc) in the same corner space. Work 1 dc in each of the 19 stitches along the next side; in the next corner work (2 dc, ch 2, 2 dc). Repeat for all four sides. Join. (92 dc and 4 corner spaces)
- Round 3: Sl st into a corner space. Ch 3 (counts as dc), (1 dc, ch 2, 2 dc) into the same space. Work (ch 1, skip 1 dc, dc in next dc) 11 times, then ch 1, skip the last dc before the next corner. Work the corner group. Repeat around. Join. (48 dc including corner groups, 48 ch-1 spaces, and 4 ch-2 corners)
- Round 4: Sl st into a corner space. Work (2 dc, ch 2, 2 dc) in the corner. Across the side, work 1 dc into each dc and 1 dc into each ch-1 space. Repeat around. Join. (108 dc and 4 ch-2 corners)
- Round 5: Work (2 dc, ch 2, 2 dc) in each corner, with 1 dc in every stitch along each side. Join. (124 dc and 4 ch-2 corners)
- Round 6: Work (2 dc, ch 2, 2 dc) in each corner. Along each side, work (dc in next stitch, ch 1, skip next stitch) across the 31 side stitches, ending with dc in the final stitch before the corner. Repeat on all sides. Join. (80 dc, 60 ch-1 spaces, and 4 ch-2 corners)
- Round 7: Work (2 dc, ch 2, 2 dc) into each corner, 1 dc into each dc and each ch-1 space along every side. Join. (140 dc and 4 ch-2 corners)
- Round 8: Work (2 dc, ch 2, 2 dc) into each corner, then 1 dc into each stitch along the sides. Join. (156 dc and 4 ch-2 corners)
- Round 9: Ch 1, work 1 sc into each dc and 3 sc into each ch-2 corner space. Join and FO. (168 sc)
- Block the frame to an even square, keeping the four corners at right angles.
Attaching the Raised Flower
- Step 1: Position the completed daisy flower in the center of the square foundation, with the petals facing upward.
- Step 2: Thread a tapestry needle with matching white yarn. Working from the WS, stitch through the foundation and the unused back loops of the flower’s Round 6.
- Step 3: Attach the flower evenly at 12 points around the circle, placing one securing stitch approximately every three back loops.
- Step 4: Check that the petals spread outward naturally and do not fold underneath the flower.
- Step 5: Add a small circular line of surface embroidery around the center using white yarn to create a raised, textured daisy heart.
- Step 6: Secure all ends on the WS without pulling the center into a dome.
Decorative Petal Embroidery
- Step 1: Cut a 40 cm length of white cotton yarn and thread it through a tapestry needle.
- Step 2: Bring the needle from the WS to the RS at the base of one flower petal.
- Step 3: Work a short straight stitch along the center of the petal, approximately 1 cm long.
- Step 4: Return the needle to the WS and secure without tightening the petal.
- Step 5: Repeat on all 12 petals to emphasize the raised daisy shape.
- Step 6: Weave the yarn ends beneath the flower center to keep the back of the square neat.
Making the Bedspread Squares
- Step 1: Make one complete sample square and block it to approximately 25 × 25 cm.
- Step 2: For the suggested bedspread layout, make 72 identical floral squares arranged in 8 columns and 9 rows.
- Step 3: Keep the same yarn, hook, and tension for every square to avoid uneven joining seams.
- Step 4: After every 8 completed squares, measure them together to confirm that the finished dimensions remain consistent.
- Step 5: Arrange the squares on a flat surface with all flowers facing the same direction.
- Step 6: Pin the squares into their final layout before joining. The 8-by-9 arrangement measures approximately 200 × 225 cm before the outer edging, assuming 25 cm blocked squares and negligible joining width.
Joining the Floral Squares
- Step 1: Place two squares WS together with their edges aligned.
- Step 2: Insert the hook through the corresponding outer loops of the corner stitches on both squares.
- Step 3: Join white yarn with a sl st.
- Step 4: Work 1 sc through the corresponding stitches of both squares across the entire edge, including the final corner stitch. Each Round 9 edge has 42 stitches when the three corner stitches are divided consistently between neighboring sides.
- Step 5: FO and weave in the end. Open the squares flat so the joining ridge sits neatly on the RS.
- Step 6: Join the squares into nine horizontal rows of eight motifs each.
- Step 7: Join the completed rows together using the same sc seam technique, aligning the flower centers and square corners.
- Step 8: At each four-square intersection, secure the meeting point with a few discreet stitches to prevent an open gap.
Outer Lace Border
- Round 1: With RS facing, join white yarn at any outer corner. Ch 1, work 1 sc into each available edge stitch around the entire bedspread, placing 3 sc into each of the four outer corners. At motif seams, adjust the spacing by one stitch if needed to keep the edge flat. Join with a sl st.
- Round 2: Ch 3 (counts as dc), work 1 dc into each sc around, placing 3 dc into the center stitch of each corner group. Join.
- Round 3: Ch 1, sc in the first stitch, (ch 3, skip 2 stitches, sc in next stitch) rep around. At corners, add a ch-5 loop if needed to prevent pulling. Join.
- Round 4: Sl st into the first ch-3 space. Work (3 dc, ch 2, 3 dc) into each ch-3 space around. At ch-5 corners, work (4 dc, ch 3, 4 dc). Join.
- Round 5: Ch 1, work 1 sc in every dc and 3 sc into each ch-2 space. At each corner ch-3 space, work 5 sc. Join.
- Round 6: Ch 1, sc in the first stitch, (skip 2 stitches, 5 dc in next stitch, skip 2 stitches, sc in next stitch) rep around to create scallops. Adjust the final repeat near corners rather than forcing an extra shell into a short gap. Join and FO.
- Lightly steam or wet-block the border, shaping the scallops into even curves without flattening the raised flowers.
Matching Floral Pillow Covers
- Step 1: Make four additional floral squares for each pillow cover, using the same center, frame, and raised petal instructions as the bedspread.
- Step 2: Join the four squares into a 2 × 2 panel using the same sc joining method. With 25 cm squares, the panel will measure approximately 50 × 50 cm before final shaping.
- Step 3: Block the panel to an even square. For a 45 × 45 cm insert, use a larger insert for a plump finish or adjust your square gauge to make a smaller cover.
- Step 4: Cut two pieces of white cotton backing fabric to match the blocked panel, allowing seam allowances.
- Step 5: Create an envelope-style backing with overlapping fabric edges, then sew it to the crocheted panel with RS facing inward.
- Step 6: Turn the cover right side out and insert the pillow.
- Step 7: Optionally crochet a narrow sc edging around the pillow opening for a coordinated finish.
Finishing
Once every floral square has been joined, lay the bedspread on a clean, flat surface and inspect the seams. Check that the flowers are centered, the square corners align, and the joining ridges remain consistent throughout the blanket. Weave in every loose end securely on the wrong side, especially around the raised flower centers and the outer lace border.
Wash the finished bedspread gently according to the yarn label, then block it to its intended dimensions. Pin the corners and scalloped edging into shape, but avoid stretching the floral centers. Allow the entire piece to dry completely before placing it on the bed. The finished design should drape softly over the mattress while retaining its dimensional daisies and crisp lace framework.
Tips for Success
- Block every motif to the same size: A difference of even 5 mm between squares can create noticeable ripples when joining 72 motifs.
- Keep the raised petals loose: Use relaxed tension when forming the ch-5 loops so the daisy petals remain rounded instead of curling inward.
- Use consistent cotton yarn: Choose yarn from the same dye lot whenever possible. Even white yarn can vary slightly between batches.
- Secure the flower centers carefully: Attach the centers at evenly spaced points rather than sewing continuously around the petals, which can flatten their texture.
- Check the border after each round: Lay the bedspread flat and adjust corner spacing immediately if the edging begins to ruffle or pull inward.
Common Mistakes to Avoid
- Uneven square dimensions: Joining unblocked motifs can cause puckering. Measure and block all squares before assembly.
- Flattened daisy petals: Pulling embroidery or attachment stitches too tightly removes the dimensional effect. Secure the flowers gently and leave the petals free.
- Misaligned joining seams: Skipping a stitch while joining creates crooked rows. Use markers at the corners and count corresponding edge stitches.
- Overly tight lace borders: A tight border makes the bedspread curl. Use a slightly larger hook for the final edging if necessary.
- Incorrect yarn estimates: Large floral motifs consume more yarn than flat granny squares. Weigh your completed sample and calculate the total yarn requirement before buying the full quantity.
Ways to Customize This Pattern
- Ivory vintage version: Replace pure white with warm ivory cotton to create a softer, antique-inspired bedspread.
- Two-tone floral centers: Crochet the small center circles in pale beige or champagne while keeping the petals and lace frames white.
- Smaller throw blanket: Make a 5 × 6 arrangement of floral squares for a decorative sofa throw measuring approximately 125 × 150 cm before edging.
- Extra-wide bedspread: Add one or two columns of squares for a wider mattress or a more dramatic overhang.
- Decorative tassel border: Add small handmade white cotton tassels at the four outer corners instead of leaving the scalloped edge completely plain.
Frequently asked questions
The suggested layout uses 72 squares arranged in 8 columns and 9 rows. With each blocked square measuring approximately 25 × 25 cm, the assembled center measures around 200 × 225 cm before adding the lace edging. Adjust the number of squares according to your mattress size and desired overhang.
Yes, but cotton is recommended because it gives the lace borders clearer stitch definition and helps the raised daisies maintain their shape. Acrylic creates a lighter, softer blanket but may require more careful blocking and can behave differently after washing.
Avoid pressing the petals directly with an iron. When blocking, shape the surrounding square while leaving the flower center slightly elevated. Use gentle steam around the petals rather than applying pressure directly to them.
Absolutely. The pillow covers are optional and use the same floral motif as the bedspread. You can complete the bedspread alone or make the pillows later using leftover yarn.
Curling usually indicates tight tension, insufficient corner spacing, or an uneven stitch distribution. Check the stitch counts in each frame round, make sure the corner chain spaces are not too tight, and block the motif before joining. If curling persists, try a slightly larger hook for the square frame.
Use a gentle wash cycle with mild detergent if the yarn label permits machine washing. For delicate raised flowers, hand washing is safer. Support the wet fabric when lifting it, reshape the lace edges, and dry flat whenever possible. Avoid chlorine bleach unless specifically approved for your yarn.
The finished Elegant White Floral Granny Square Crochet Bedspread Pattern

