Ember the Lantern Pumpkin Amigurumi Pattern
Beginner Friendly
Perfect for those just starting their crochet journey, with clear instructions and simple techniques
Single-Day Project
A satisfying project you can complete in a single afternoon or evening.
Handmade Gift
A beautiful keepsake — free forever. Read online or print at home.
About This Ember the Lantern Pumpkin Amigurumi Pattern
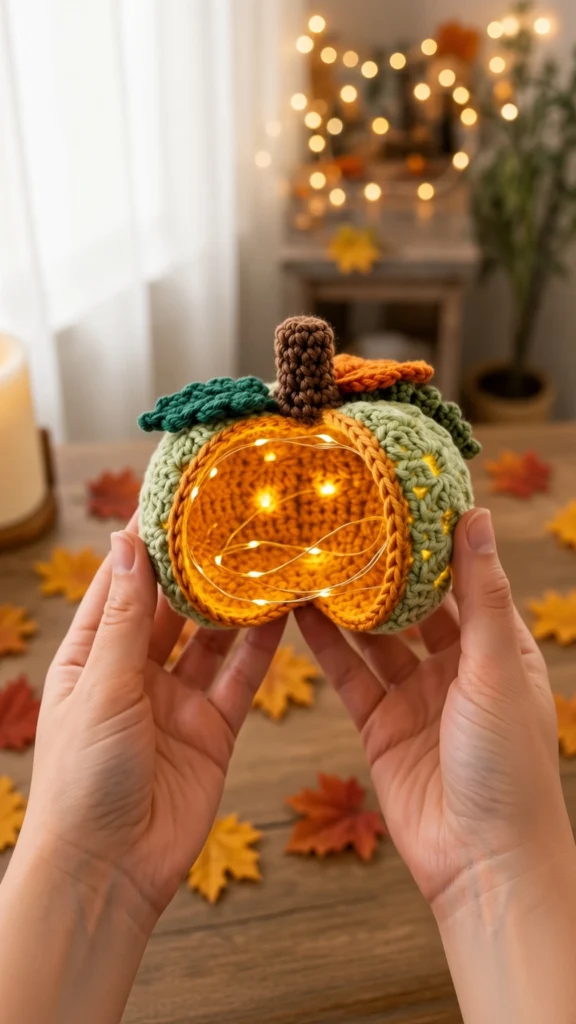
This lighted pumpkin amigurumi pattern makes Ember, a hollow sage green lantern with a glowing pumpkin orange window worked directly into the shell using tapestry crochet. There is no appliqué and no cutting: the window is a colour block shaped over ten rounds, then outlined with a rust surface crochet chain so it reads as a carved opening. Eyelet rounds above and below the window let pinpoints of light escape through the green, which is what gives the finished piece that scattered candlelit look rather than one flat glow.
The shell is never stuffed. A rolled clear mylar cylinder sits inside and holds the round shape, a warm white LED string coils inside that, and a separate base disc joins on with a slip stitch seam that unzips when the batteries need changing. Four surface slip stitch ribs pull the sides into soft pumpkin lobes, a ridged back loop only stem plugs the top, and four leaves plus two tight curly vines finish the crown.
Expect six to eight hours across a couple of evenings. It suits confident intermediate makers who are ready for their first real tapestry crochet colour block and their first surface crochet, and it is a good pattern to learn on because the window is a single contiguous shape rather than a fiddly multi-colour chart. If you have made spheres before, the only genuinely new skills are carrying a second colour and reading a stitch count that includes chain spaces.
Materials
- Worsted weight (4) cotton or cotton blend in sage green approx. 55 g / 100 yds
- Same yarn in pumpkin orange approx. 20 g / 38 yds
- Same yarn in rust / burnt orange approx. 12 g / 22 yds, for the window rim and one vine
- Same yarn in chestnut brown approx. 8 g / 15 yds, for the stem
- Same yarn in deep teal approx. 8 g / 15 yds, for two leaves
- 4.0 mm crochet hook or whatever gives you a firm, gap free fabric
- 20 LED warm white battery fairy light string on copper wire CR2032 powered, with spare batteries
- Clear 6 mil mylar craft plastic sheet at least 34 x 10 cm
- Clear tape for the mylar cylinder seam
- Polyester fiberfill a small handful, stem only
- Yarn needle, stitch marker, scissors, measuring tape
Abbreviations
MRmagic ringchchainscsingle crochethdchalf double crochetdcdouble crochetsl stslip stitchinc2 sc in the same stitchdecinvisible decrease over 2 stitchesBLOback loop onlyskskipst(s)stitch(es)spspacerndroundFOfasten off[ ]repeat the instructions in brackets( )stitch count at the end of the roundGauge and Sizing
- 20 sc x 22 rnds = 10 cm (4 in) in single crochet worked in continuous rounds, firmly.
- Gauge is not critical to the pattern maths, but a loose fabric lets individual LEDs read as hot spots instead of a soft overall glow. If you can see daylight between your stitches, go down a hook size.
- At this gauge the finished pumpkin is about 11.5 cm (4.5 in) wide and about 15 cm (6 in) tall including the stem.
- All rounds are worked in a continuous spiral with a marker in the first stitch. Do not join or turn unless told to.
- Place the marker at what will be the centre back. Every window round is counted from that marker, which is what keeps the oval centred on the front.
Pumpkin Shell
- Worked top down in sage green, starting at the crown.
- Rnd 1: 6 sc in MR (6)
- Rnd 2: inc in each st around (12)
- Rnd 3: [sc 1, inc] x6 (18)
- Rnd 4: [sc 2, inc] x6 (24)
- Rnd 5: [sc 3, inc] x6 (30)
- Rnd 6: [sc 4, inc] x6 (36)
- Rnd 7: [sc 5, inc] x6 (42)
- Rnd 8: [sc 6, inc] x6 (48)
- Rnd 9: [sc 7, inc] x6 (54)
- Rnd 10: [sc 8, inc] x6 (60)
- Rnd 11: [sc 9, inc] x6 (66)
- Rnd 12: [sc 10, inc] x6 (72)
- Rnd 13 (eyelet round): [sc 3, ch 1, sk 1 st] x18 (72)
- Rnd 14: sc in each st and in each ch-1 sp around (72)
- Join pumpkin orange now. From Rnd 15 to Rnd 24 you carry the unused colour loosely along the inside of the round and work over it. Change colour on the final yarn over of the stitch before each switch.
- Rnd 15: sc 31 sage, sc 10 pumpkin, sc 31 sage (72)
- Rnd 16: sc 28 sage, sc 16 pumpkin, sc 28 sage (72)
- Rnd 17: sc 26 sage, sc 20 pumpkin, sc 26 sage (72)
- Rnd 18: sc 25 sage, sc 22 pumpkin, sc 25 sage (72)
- Rnd 19: sc 24 sage, sc 24 pumpkin, sc 24 sage (72)
- Rnd 20 (side eyelets): in sage, sc 4, [ch 1, sk 1 st, sc 4] x4 (24 positions); sc 24 pumpkin; in sage, sc 4, [ch 1, sk 1 st, sc 4] x4 (24 positions) (72)
- Rnd 21: sc in each st and in each ch-1 sp around, keeping to 24 sage, 24 pumpkin, 24 sage (72)
- Rnd 22: sc 25 sage, sc 22 pumpkin, sc 25 sage (72)
- Rnd 23: sc 27 sage, sc 18 pumpkin, sc 27 sage (72)
- Rnd 24: sc 30 sage, sc 12 pumpkin, sc 30 sage (72)
- Cut the pumpkin orange, leaving a 10 cm tail to weave in on the inside. The window is now complete.
- Rnd 25 (eyelet round): in sage, [sc 3, ch 1, sk 1 st] x18 (72)
- Rnd 26: sc in each st and in each ch-1 sp around (72)
- Rnd 27: [sc 10, dec] x6 (66)
- Rnd 28: [sc 9, dec] x6 (60)
- Rnd 29: [sc 8, dec] x6 (54)
- Rnd 30: [sc 7, dec] x6 (48)
- Rnd 31: [sc 6, dec] x6 (42)
- Rnd 32: [sc 5, dec] x6 (36)
- Sl st in the next st and FO. Weave in the end on the inside. Leave the shell open at 36 sts. Do not stuff it.
Base Disc
- Worked in sage green.
- Rnd 1: 6 sc in MR (6)
- Rnd 2: inc in each st around (12)
- Rnd 3: [sc 1, inc] x6 (18)
- Rnd 4: [sc 2, inc] x6 (24)
- Rnd 5: [sc 3, inc] x6 (30)
- Rnd 6: [sc 4, inc] x6 (36)
- Rnd 7: sc in BLO in each st around (36). This raises a small lip that makes the join seam sit flat.
- Sl st in the next st and FO, leaving a 70 cm tail for joining later.
Stem
- Worked in chestnut brown. The BLO rounds give the ridged bark texture.
- Rnd 1: 6 sc in MR (6)
- Rnd 2: [sc 1, inc] x3 (9)
- Rnd 3: sc in BLO in each st around (9)
- Rnd 4: [sc 2, inc] x3 (12)
- Rnd 5: sc in BLO in each st around (12)
- Rnd 6: sc in BLO in each st around (12)
- Rnd 7: sc in BLO in each st around (12)
- Rnd 8: [sc 3, inc] x3 (15)
- Rnd 9: sc in BLO in each st around (15)
- Rnd 10: sc in BLO in each st around (15)
- Stuff firmly, keeping the cylinder straight rather than barrel shaped. FO leaving a 50 cm tail for sewing.
Leaves (make 4)
- Make 2 in deep teal, 1 in sage green, 1 in pumpkin orange. Each leaf is worked as one round around both sides of a foundation chain.
- Ch 13.
- Rnd 1, first side, working into the back bumps of the chain: sc in 2nd ch from hook, sc 1, hdc 2, dc 2, ch 3 and sl st into the same ch as the last dc (picot lobe), dc 2, hdc 2, sc 1 (11 sts worked into 11 chains).
- Work 3 sc into the last ch to turn the tip.
- Second side, working into the free loops along the opposite edge of the same chain: sc 1, hdc 2, dc 2, ch 3 and sl st into the same ch as the last dc (picot lobe), dc 2, hdc 2, sc 2 (11 sts).
- Sl st into the first sc to join (25 sts plus 2 picots).
- FO leaving a 30 cm tail. Do not block the leaves flat; a slight cup is what makes them sit against the curve of the shell.
Curly Vines (make 2)
- Make 1 in sage green and 1 in rust.
- Ch 21.
- Row 1: 3 sc in the 2nd ch from hook, then 3 sc in each remaining ch across (60 sc).
- FO leaving a 25 cm tail. The strip will spiral on its own as you release it. Do not press or block it or the coil relaxes.
Window Rim (Surface Crochet)
- Work this before the liner and lights go in, while you can still reach inside the shell.
- Hold the rust yarn on the inside of the shell. Insert the hook from the front, one stitch outside the colour boundary at the bottom centre of the window, and pull up a loop.
- Work surface slip stitches all the way around the oval boundary, one slip stitch per stitch along the horizontal edges and roughly one per round up the curved sides, always keeping the line one stitch out into the sage.
- Keep the tension even and slightly loose. Surface slip stitch tightens as it goes and a tight rim will cup the window inward.
- Sl st into the first surface slip stitch to close the ring, cut the yarn, and pull the tail through to the inside. Knot the two rust tails together and weave them in against a sage stitch, not against the window.
Lobe Ribs (Surface Slip Stitch)
- Find the six increase columns running down from the crown. Two of them cross the window; skip those and work the remaining four, two on each side of the window across the back.
- Starting at the top of each column, work a line of surface slip stitches in sage green down to the bottom edge of the shell.
- Space them at roughly 3 slip stitches for every 4 rounds so the line pulls the fabric in a little as it travels. This is what forms the soft lobes.
- FO each rib at the bottom edge and pull the tail to the inside. Do not knot the ribs to each other.
- Set the shell on a table and check the lobes look even. If one rib is tighter than the others, unpick it and redo it rather than trying to stretch it out later.
Liner and Lights
- Cut a rectangle of clear 6 mil mylar 34 cm long x 10 cm tall.
- Roll it into a cylinder with a 2 cm overlap and tape the seam on the outside, top and bottom, so nothing snags the yarn. The finished cylinder is about 10 cm across.
- Compress the cylinder gently and feed it into the shell through the open base. Let it spring open inside, then push it up until the top edge sits just under the crown decreases.
- Coil the fairy light string loosely inside the cylinder, working from the top down. Press three or four LEDs against the inside of the mylar directly behind the window panel, and spread the rest so they sit behind the eyelet rounds.
- Switch the lights on and look at the pumpkin from the front before you go any further. Move individual LEDs until the window glows evenly and no single bulb reads as a bright dot.
- Rest the battery pack flat inside the shell at the very bottom, switch facing the open base so you can reach it.
Finishing
Line up the base disc against the open edge of the shell, wrong sides together, and match 36 stitches to 36 stitches. Ease rather than stretch; the disc is very slightly larger than the opening and that extra fabric wants to be spread out, not bunched in one place. Using the 70 cm tail and a hook, join the two edges with slip stitches worked through both loops of both pieces all the way around. Do not weave the last end in. Knot it loosely and tuck it inside, because when the batteries die you can pull that end and the whole slip stitch seam unzips in a few seconds, then you slip stitch it closed again.
Sew the stem to the centre of the crown with the 50 cm brown tail, stitching through the base round of the stem and into the top rounds of the shell, working right round twice so it will not lean. Arrange the four leaves around the stem base with the two teal ones at the back and sides, the sage one tucked between them, and the pumpkin orange one angled forward over the window. Sew each leaf down through its centre spine only, leaving the picot lobes free so they lift off the surface. Finally, hold each vine by one end, wrap it once around the base of the stem, and tack it in place with three or four stitches. Push the coils around with your fingers until they sit at different heights, then weave the last ends into the crown.
Tips for Success
- Keep the marker in the first stitch of every round from Rnd 1 onward. The window counts are all measured from that marker, and if it drifts by two or three stitches the oval ends up sitting off to one side of the front.
- Change colour on the final yarn over of the stitch before the switch, not on the stitch itself. Doing it a stitch late is the most common reason a tapestry crochet edge looks ragged.
- Carry the unused colour loosely enough that the fabric lies flat when you tug it sideways. Carried strands do show faintly when the lights are on, which reads as texture, but tight strands pull the oval into a rectangle.
- Do all the surface crochet before the liner goes in. Once the mylar is inside you cannot get a hook behind the fabric to pull loops through.
- Test fit the mylar cylinder in the shell before you tape it. It should hold the walls out without straining them; if the eyelet rounds start gaping, cut 2 cm off the length and re roll.
Common Mistakes to Avoid
- Stuffing the shell. Fiberfill blocks the light completely and the eyelets go dark. Only the stem is stuffed; the shell stays hollow and the mylar does the shaping.
- Forgetting that a ch-1 counts as a stitch on the round after an eyelet round. If Rnd 14, 21, 25 or 26 comes out short, you skipped the chain spaces. Work one sc into each chain space as well as each stitch and the count returns to 72.
- Pulling the lobe ribs too tight. Over gathered ribs distort the whole silhouette and can crack the mylar liner. If a rib puckers the fabric into hard folds rather than gentle curves, unpick and rework it with more slip stitches per round.
- Rimming the window right on the colour boundary. Work the surface slip stitches one full stitch out into the sage, otherwise the rust line disappears into the orange and the carved edge is lost.
- Weaving in the base seam end. Weave it in and you have permanently sealed the battery pack inside. Knot it and tuck it, nothing more.
Ways to Customize This Pattern
- Add a jack o lantern face. Before you rim the window, embroider triangular eyes and a grin onto the orange panel in black yarn using split stitch. The light glows around the embroidery rather than through it, which gives a proper silhouette.
- Work the ivory colourway. Substitute cream for the sage and keep the orange window; pale yarn transmits far more light, so the whole shell glows rather than just the eyelets. Drop to a 10 LED string so it does not overpower.
- Make a small one. Stop increasing at Rnd 10 (60 sts), shorten every window round by 6 pumpkin stitches and 3 sage stitches each side, work only one eyelet round above and below, and decrease from 60 down to 30. Use a 26 cm mylar strip.
- Skip the window entirely. Work the shell in one colour and add eyelet rounds at Rnds 13, 17, 21 and 25 for an all over dotted glow, then keep all six lobe ribs instead of four.
- Turn it into a pincushion. Leave out the lights and liner, stuff the shell firmly, run a long doubled thread from the crown through to the centre of the base and back three times to cinch deep lobes, and sew a felt circle over the base.
Frequently asked questions
No. Cotton yarn and mylar are both flammable and the shell is a sealed cavity with no ventilation. If you want the flicker of a candle, use a battery powered flameless LED tea light instead. It sits neatly on the base disc, though you can skip the mylar liner in that case and stuff the crown lightly with a little fiberfill to hold the dome up.
Slightly, yes. Behind the window you will see faint horizontal shadows where the sage yarn is carried across. That is normal for tapestry crochet and most people read it as texture rather than a flaw. If you want a completely clean window, use two separate balls of sage green, one on each side of the oval, and let the pumpkin orange travel between them instead. You will have more ends to weave in but no carried strands crossing the lit panel.
Find the knotted sage tail tucked just inside the base seam, pull it, and the slip stitch join unzips the whole way round in a few seconds. Lift the base disc off, swap the CR2032, and slip stitch the seam closed again with the same length of yarn. This is the reason the base is joined with slip stitches instead of whipstitched, so do not be tempted to sew it down more securely.
If it is off by one or two stitches, leave it and shift the surface crochet rim slightly to compensate; nobody will notice once the leaves and vines are on. If it is off by more than about four stitches, the marker drifted and the only real fix is to rip back to Rnd 14. Before you restart, run a length of contrast thread up the centre back as a permanent guideline and count each window round against it.
Yes, and it will glow a little more warmly because acrylic is slightly more translucent. The trade off is structure: acrylic is softer and the shell will slump more between the ribs, so make the mylar cylinder about 2 cm larger in circumference than specified so it presses out against the walls more firmly.
The finished Ember the Lantern Pumpkin Amigurumi Pattern

