Embroidered Fern Leaf Square Bedspread Crochet Pattern
Beginner Friendly
Perfect for those just starting their crochet journey, with clear instructions and simple techniques
Single-Day Project
A satisfying project you can complete in a single afternoon or evening.
Handmade Gift
A beautiful keepsake — free forever. Read online or print at home.
About This Embroidered Fern Leaf Square Bedspread Crochet Pattern
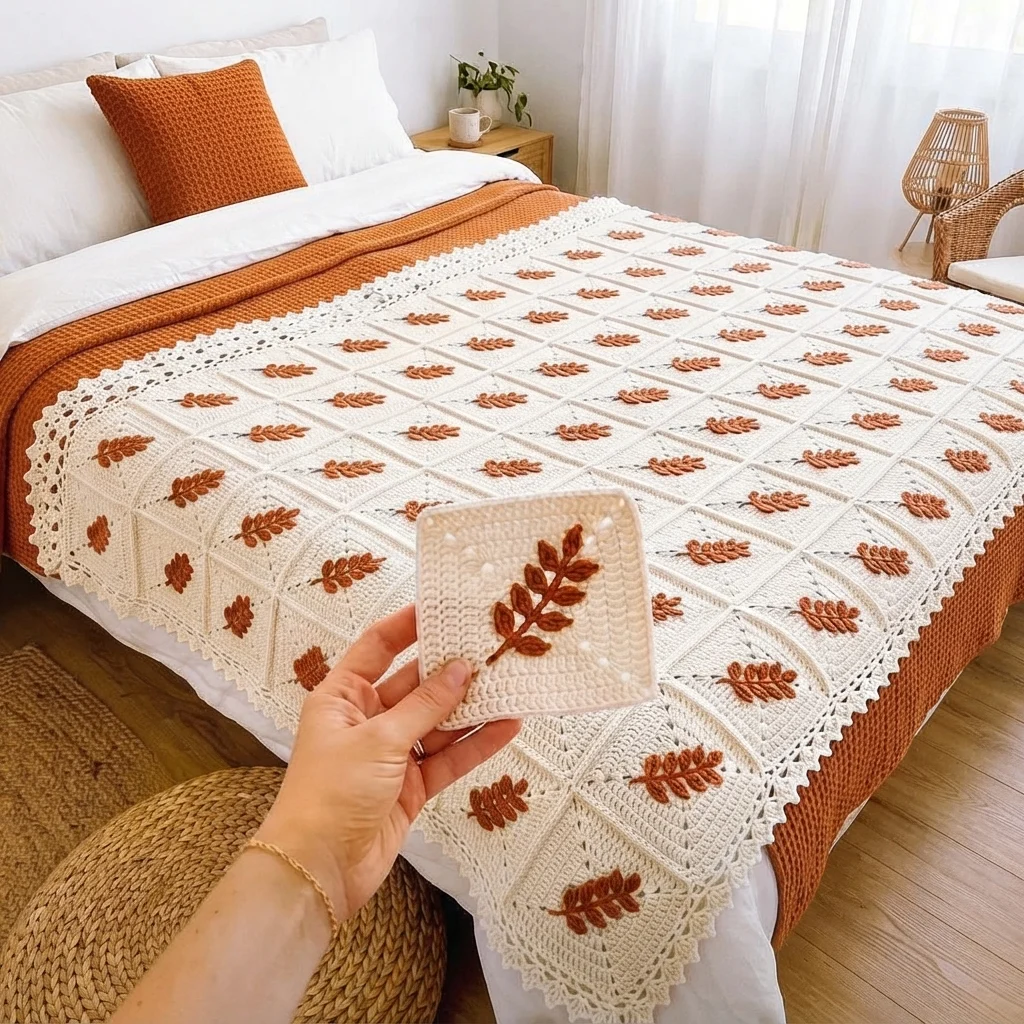
This crochet fern leaf bedspread pattern joins a large grid of solid cream granny squares, each carrying a surface-embroidered fern branch in rust terracotta worked directly onto the finished square, into a full coverlet finished with a lacy, picot-dotted border and a solid rust accent band along two sides. Unlike an appliquéd or colorwork leaf, every fern branch is added after the square is complete, using surface slip stitch embroidery that sits raised slightly above the fabric.
What makes this design distinctive is the embroidery technique itself: rather than crocheting the leaf shape directly into the square’s stitch pattern, each fern branch is surface-slip-stitched on afterward in a continuous line, a central stem with alternating angled leaflets branching off to each side, so it reads as a hand-drawn botanical sketch rather than a blocky colorwork motif. Repeating that same embroidered branch with total consistency across a very large number of squares, each one centered and angled identically, is what makes this such a demanding project despite the square’s otherwise simple base construction. Expect to spend 42-50 hours total for the full bedspread.
This is an advanced pattern, best suited to someone comfortable with surface slip stitch embroidery on crochet fabric and confident repeating that embroidery identically across a very large number of squares, rather than someone wanting a colorwork or appliqué-based leaf motif.
Materials
- Worsted weight cotton yarn, cream ~900g, squares and lace border
- Worsted weight yarn, rust terracotta ~350g, fern embroidery and accent band
- Crochet hook 4.5 mm (US 7)
- Tapestry/yarn needle
- Steam iron and pressing cloth, or a large blocking mat and pins
- Sharp scissors
Abbreviations
chchainsl stslip stitchscsingle crochethdchalf double crochetdcdouble crochetpicotch 3, sl st in first ch of the 3ch-spchain spacest(s)stitch(es)reprepeatFOfasten offCream Base Square (make approximately 195 for a full/queen bedspread)
- With cream, ch 4, sl st in first ch to form a ring. Round 1: ch 3 (counts as first dc), 2 dc in ring, ch 2, *3 dc in ring, ch 2; rep from * 2 more times (4 corner groups total). Sl st to join.
- Round 2: sl st into next ch-2 corner sp, ch 3, (2 dc, ch 2, 3 dc) in same sp, *ch 1, (3 dc, ch 2, 3 dc) in next corner sp; rep from * around. Sl st to join.
- Round 3: repeat Round 2’s structure, adding 1 more ch-1 space between corner groups on each side to widen the square to its final size.
- Round 4 (solid filler round): work a round of sc into every st and ch-sp around the whole square, filling in the open granny texture to create a more solid surface for the embroidery to sit on cleanly.
- Sl st to join, FO leaving a short tail. Repeat for approximately 195 squares total.
Surface Embroidered Fern Branch (worked on every square, in rust terracotta)
- Thread rust terracotta yarn onto a tapestry needle, or work directly with a crochet hook using surface slip stitch.
- Central stem: insert the hook or needle from the back of the square near one corner, and work a line of sl st (or backstitch, if using a needle) diagonally across the square toward the opposite corner, to form the fern’s main stem.
- Leaflets: working outward from the stem at regular intervals, add 5-7 pairs of small angled leaflets on alternating sides of the stem, each leaflet worked as a short line of sl st or backstitch angling away from the stem and tapering to a point, mimicking a real fern frond.
- Keep leaflet size graduated, slightly larger near the base of the stem and tapering smaller toward the tip, for a realistic branch shape.
- Secure the working yarn on the back of the square and weave in the end. Repeat this embroidery identically on every square, keeping stem angle and leaflet count consistent across the whole batch.
Join-As-You-Go Assembly
- Arrange squares into your planned grid (for example, 13 columns x 15 rows for a queen-size coverlet, adjusting to your own mattress measurements), checking that fern branch angles alternate or align consistently in a pleasing way across the grid.
- Join squares edge to edge using a simple whipstitch or crochet join through their outer sc round, working row by row until the entire grid is assembled.
Lace and Accent Border
- With cream, join at any corner of the assembled bedspread. Round 1: sc evenly around the entire perimeter, working 3 sc at each of the 4 corners to keep them flat.
- Round 2 (picot dot round): *sc in next 2 sts, picot; rep from * evenly around all 4 sides, scattering small picot dots along the edge as shown in the photo.
- Round 3 (lace trim): *ch 3, skip 1 st, sl st in next st; rep from * evenly around for an airy open lace edge.
- Round 4, with rust terracotta (accent band, worked along 2 opposite sides only): work 4-5 rows of solid dc along the head and foot edges of the bedspread, matching the solid rust band shown draped at the top of the bed in the photo.
- FO and weave in all ends.
Finishing
Weave in every square’s starting and ending tail individually across the entire bedspread, since a project this size accumulates a very large number of loose ends, and double-check that every embroidered fern’s back-side tails are secured and trimmed. Steam-block the finished bedspread flat, pinning the lace border open evenly and taking care not to press directly on the embroidered fern branches, which should stay slightly raised rather than flattening into the fabric.
Tips for Success
- Work the solid filler round (Round 4) on every square identically, since this is what gives the embroidery a clean, consistent surface to sit on.
- Mark the center point of each square lightly before embroidering, so the fern stem lands in the same position on every single square.
- Keep leaflet count and spacing identical across all squares; even small variations become very visible once dozens of squares sit side by side.
- Work embroidery at a consistent tension, not too tight, so the fern sits slightly raised above the square’s surface rather than pulling the fabric in.
- Consider embroidering all squares before joining any of them, so you can compare several side by side and catch inconsistencies early.
Common Mistakes to Avoid
- Skipping the solid filler round leaves the open granny texture underneath, making embroidery uneven and harder to control. Fix: always work Round 4 as a solid sc round before embroidering.
- Varying the fern stem’s angle or starting point between squares breaks the pattern’s visual consistency. Fix: mark a consistent starting and ending point on every square before stitching.
- Pulling embroidery stitches too tight distorts the square’s shape and flattens the leaf’s dimension. Fix: keep embroidery tension relaxed, similar to the surrounding crochet fabric.
- Joining squares before checking that all fern branches are embroidered consistently makes correcting a mistake much harder. Fix: embroider and review all squares first, then join them.
- Pressing an iron directly onto the embroidered ferns during blocking flattens their raised texture. Fix: steam from a slight distance, avoiding direct contact with the embroidered areas.
Ways to Customize This Pattern
- Reduce the grid size for a throw blanket instead of a full bedspread.
- Swap the rust terracotta for a different accent color, such as forest green or navy, for a different seasonal look.
- Alternate the fern’s diagonal direction square to square for a more dynamic, varied grid pattern.
- Skip the solid accent band at the head and foot for an all-lace border throughout.
- Add a matching set of pillow shams using the same embroidered square technique.
Frequently asked questions
Either technique works. Surface slip stitch with a crochet hook creates a slightly more raised, chain-like line, while needle backstitch with a tapestry needle gives a flatter, more embroidered look. Choose whichever feels more comfortable and keep it consistent across all squares.
Fold each finished square in half diagonally before embroidering to find the center line, and use that fold as your guide for the stem’s starting and ending points on every square.
It’s much harder to keep consistent tension and placement once squares are joined into a large, heavy piece. Embroidering each square individually while it’s still a separate, manageable piece is strongly recommended.
This usually means the embroidery was worked too tightly, pulling flush with the fabric instead of sitting slightly proud of it. Work with a bit more slack in each stitch, and avoid pressing an iron directly onto the embroidered areas when blocking.
The finished Embroidered Fern Leaf Square Bedspread Crochet Pattern

