Emerald and Ivory Oval Lace Wall Hanging Crochet Pattern
Advanced
For experienced crocheters who enjoy complex shaping, fine detail, and ambitious construction
Single-Day Project
A satisfying project you can complete in a single afternoon or evening.
Handmade Gift
A beautiful keepsake — free forever. Read online or print at home.
About This Emerald and Ivory Oval Lace Wall Hanging Crochet Pattern
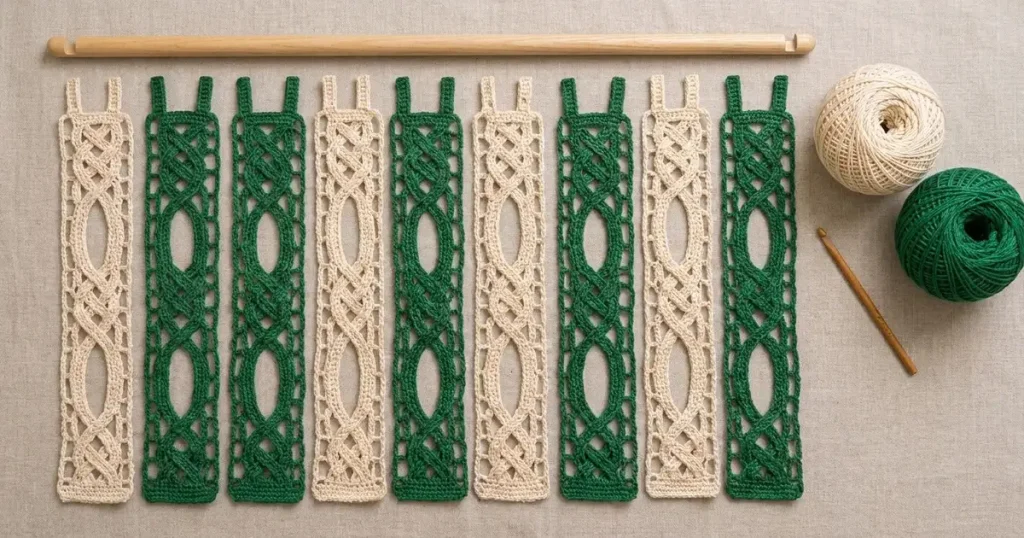
This lace wall hanging crochet pattern combines narrow emerald and ivory panels with elongated oval openings and interwoven diagonal cords. Nine separate strips hang from paired tabs, echoing the airy arrangement in the reference photograph.
The construction rewards careful finishing: you will crochet open frames, shape eighteen oval motifs, weave lattice cords, and sew each junction securely. Allow approximately 24–32 hours for the complete set. This advanced project suits crocheters who enjoy precise blocking, small-scale assembly, and decorative lace with a clean geometric outline.
Materials
- Smooth fine / sport cotton Approximately 600 m emerald and 480 m ivory; use the same yarn range for both colors
- Crochet hook 2.5 mm, or size needed for blocked gauge
- Wooden dowel Approximately 65 cm long and 12 mm in diameter
- Tapestry needle and scissors For joining motifs and hiding tails inside the rails
- Blocking board, rustproof pins, and ruler A board at least 35 cm long is useful
- Removable stitch markers Mark attachment rows on each frame
- Wall brackets suitable for your wall Support the dowel at both ends
Abbreviations
chchainscsingle crochet, US terminologysl stslip stitchinc2 single crochet in one stitchst / stsstitch / stitchesRSright sideGauge, Layout, and Counting
- Blocked single crochet gauge: 26 sts and 32 rows = 10 × 10 cm. Make a swatch at least 30 sts wide and 36 rows tall, wet-block it, and measure the central area.
- Blocked chain gauge for the lattice cords: approximately 30 chain links = 10 cm. Slip stitching can shorten a cord; check the finished cord length separately.
- Each frame has 13 stitch positions across and 96 rows, giving approximately 5 × 30 cm. Open rows contain 4 sc and a ch-9 space. Turning chains never count as stitches.
- Number frame rows upward from the bottom. The face chosen for assembly becomes the RS. When viewed from the RS, the two stitches at each edge form the left and right rails.
- Make four ivory panels and five emerald panels. Arrange them from left to right: ivory, emerald, emerald, ivory, emerald, ivory, emerald, ivory, emerald. Work each panel and all its components in one color.
Open Panel Frames — Make Nine
- Foundation: ch 14 loosely.
- Row 1: Sc in second ch from hook and each remaining ch. Turn. (13 sc)
- Row 2: Ch 1, sc in each st. Turn. (13 sc)
- Row 3: Ch 1, sc in each st. Turn. (13 sc)
- Row 4: Ch 1, sc in first 2 sts, ch 9, skip 9 sts, sc in last 2 sts. Turn. (4 sc and one ch-9 space; 13 positions)
- Rows 5–93: Ch 1, sc in first 2 sc, ch 9, skip the entire ch-9 space, sc in last 2 sc. Turn after every row. (4 sc and one ch-9 space per row; 89 rows)
- Row 94: Ch 1, sc in first 2 sc, work 9 sc around the ch-9 space, sc in last 2 sc. Turn. (13 sc)
- Row 95: Ch 1, sc in each st. Turn. (13 sc)
- Row 96: Ch 1, sc in each st. Fasten off. (13 sc)
- Block each frame to 5 × 30 cm. Pin both rails straight and distribute the horizontal chain bridges evenly. These bridges form a fine supporting mesh behind the applied motifs.
Elongated Oval Motifs — Make Eighteen
- Make two in the matching color for every panel. Ch 18. Work around both sides of this foundation chain.
- Round 1: Sc in second ch from hook and next 15 ch, 3 sc in last ch. Rotate the chain; working into its unused underside loops, sc in next 15 ch, then 2 sc in the same foundation chain that holds the first sc. Join with sl st to first sc. (36 sc: 16 + 3 + 15 + 2)
- Round 2: Ch 1, inc in first st, sc in next 15 sts, inc in each of next 3 sts, sc in next 15 sts, inc in each of last 2 sts. Join with sl st to first sc. (42 sc)
- Round 3: Ch 1, sc in each of the 42 sts. Join with sl st to first sc. Fasten off, leaving a 70 cm sewing tail. (42 sc)
- Wet-block each motif into a narrow oval approximately 7.5 cm long and 2.3 cm wide. Keep the center slit open with pins; do not stretch it into a solid leaf.
Place and Secure the Ovals
- Lay one blocked frame RS upward. Pin the first oval vertically on its centerline, with its lower tip level with Row 17 and upper tip level with Row 41.
- Pin the second oval with its lower tip at Row 57 and upper tip at Row 81. Both ovals sit in front of the horizontal chain bridges.
- At each tip, sew through the oval edge and the midpoint of the corresponding chain bridge three times. Keep the stitches small and avoid pulling the bridge sideways.
- Secure each long side to the bridges at four levels: Rows 22, 27, 32, and 37 for the lower oval; Rows 62, 67, 72, and 77 for the upper oval. At each level, attach both sides independently with two small stitches.
- Pass the sewing yarn along the underside of the oval between attachment points. Do not carry yarn across the visible opening. Weave in the remaining tail.
Woven Lattice Cords — Make Eighteen per Panel
- For each cord, leave a 20 cm starting tail and ch 22 loosely.
- Row 1: Sl st in second ch from hook and each remaining ch. Fasten off with a 20 cm tail. (21 sl sts)
- Block each cord to approximately 7 cm long. Make 18 cords per panel: six for each of three lattice zones. Total for nine panels: 162 cords.
- For a cord that will not reach 7 cm without hard stretching, remake it with additional foundation chains. Every added chain adds one slip stitch; this length adjustment does not change any frame or motif count.
Weave and Attach the Three Lattice Zones
- Keep the panel pinned to its finished dimensions. Attach cords to the inner edge of each two-stitch rail. All listed row numbers refer to the frame.
- Lower zone, first diagonal family: place three cords from left Row 3 to right Row 13, left Row 5 to right Row 15, and left Row 7 to right Row 17. Sew both ends securely.
- Lower zone, opposing family: place cords from right Row 3 to left Row 13, right Row 5 to left Row 15, and right Row 7 to left Row 17. As each cord crosses the first family, alternate over and under. Reverse the starting over-under order for the next cord.
- Middle zone: repeat the same six-cord arrangement with these three paired levels: 41 to 53, 43 to 55, and 45 to 57. Work one family from left to right and the opposing family from right to left.
- Upper zone: repeat with paired levels 81 to 90, 83 to 92, and 85 to 94. Again work three cords in each direction, alternating their woven crossings.
- Ease any slight excess cord length into shallow curves near the rails. Keep the center crossings flat. Do not stretch the frame inward to fit a short cord.
- With matching yarn, tack every cord crossing using one small stitch through the underside of both cords. Tack each cord to a supporting chain bridge halfway between its crossings and its rail attachments wherever those layers meet naturally.
- At Rows 17, 41, 57, and 81, tack the nearest lattice cord to the adjacent oval tip. This connects the decorative sections without closing the oval openings.
Paired Hanging Tabs — Make Two per Panel
- With RS facing and the top edge upward, join matching yarn to the first stitch of Row 96.
- Tab Row 1: Ch 1, sc in that st and the next st. Turn. (2 sc)
- Tab Rows 2–22: Ch 1, sc in both sts. Turn after each row. (2 sc per row; 21 rows)
- Fasten off with a 30 cm tail. Fold the tab toward the back and sew its two final stitches to the backs of the same two top-edge stitches where the tab began. Keep the loop untwisted.
- Make the second tab identically over stitches 12 and 13 of Row 96. Each tab is approximately 6.9 cm long before folding and adds approximately 3.4 cm to the panel height.
- Check both loops on the actual dowel before securing the sewing tails. The specified loops accommodate a 12 mm dowel with room to slide.
Finishing
Weave all tails through the backs of the rails, cords, or oval edges. Soak the completed panels according to the yarn label, press out water in a towel, and pin each frame to 5 × 30 cm. Straighten the rails first, then open the oval centers and settle the woven crossings. Let everything dry completely before removing the pins.
Slide both tabs of each panel onto the dowel in the stated color order. Leave approximately 1.5 cm between neighboring panels: nine 5 cm panels plus eight gaps give a display about 57 cm wide. Center the arrangement on the 65 cm dowel and support the dowel at both ends. Smooth the panels by hand so their lower edges hang at the same level.
Tips for Success
- Mark Rows 17, 41, 57, and 81 before adding motifs. These four landmarks keep the oval tips aligned across all nine panels.
- Work slip stitches loosely enough that the lattice cords remain flexible. A tight cord can pull an otherwise correctly sized frame into an hourglass.
- Photograph the first completed lattice zone before repeating it. Use that image to maintain the same over-under sequence on the remaining panels.
- Block emerald and ivory pieces separately for the first wash, especially if the green cotton releases dye.
- Keep sewing stitches behind the raised motif edges so the visible oval outlines stay smooth.
Common Mistakes to Avoid
- Working into the chain bridges on open rows fills the frame. Rows 5–93 skip the whole space and create a fresh ch-9 bridge.
- Missing the shared starting chain on an oval changes its count. Round 1 must finish with 2 sc in the chain that already holds its first sc, giving 36 stitches.
- Sewing an oval flat across its center closes the opening. Attach only its outer edges and tips, keeping travel yarn hidden beneath the motif.
- Pulling all cord tails tight narrows the rails. Pin the frame to its full width while sewing, and secure the tails without tension.
- Attaching the tabs at different depths makes the panel lean. Sew both tab ends directly behind their own starting stitches.
Ways to Customize This Pattern
- Make three panels for a narrow wall space, keeping the same 1.5 cm gaps and allowing extra dowel length at both ends.
- Use ivory throughout for a softer arrangement that emphasizes the oval openings and woven texture.
- Swap emerald for deep teal or forest green while keeping all components within each panel the same color.
- For a larger hanging, use thicker cotton and a matching hook. Swatch first, then scale the dowel and all blocking measurements by the ratio of your gauge to the stated gauge.
Frequently asked questions
They stabilize the narrow rails and give the applied ovals secure attachment points. This original interpretation uses a supporting mesh beneath the more prominent oval and woven details.
The stated layout uses nine independent strips with visible gaps. Joining their sides would remove those gaps and change the width and drape. For this version, connect the panels only through their shared dowel.
Check for 36 stitches after Round 1 and 42 after Rounds 2 and 3. If the counts are correct, wet-block it with the two rounded ends aligned and the center slit pinned open before sewing.
Slide the panels off the dowel and hand-wash according to the cotton label. Support the wet lace, press it in a towel, and reblock each strip to its original measurements. Rehang only when fully dry.
The finished Emerald and Ivory Oval Lace Wall Hanging Crochet Pattern

