Emerald Celtic Knot Crochet Bedspread Pattern
Beginner Friendly
Perfect for those just starting their crochet journey, with clear instructions and simple techniques
Single-Day Project
A satisfying project you can complete in a single afternoon or evening.
Handmade Gift
A beautiful keepsake — free forever. Read online or print at home.
About This Emerald Celtic Knot Crochet Bedspread Pattern
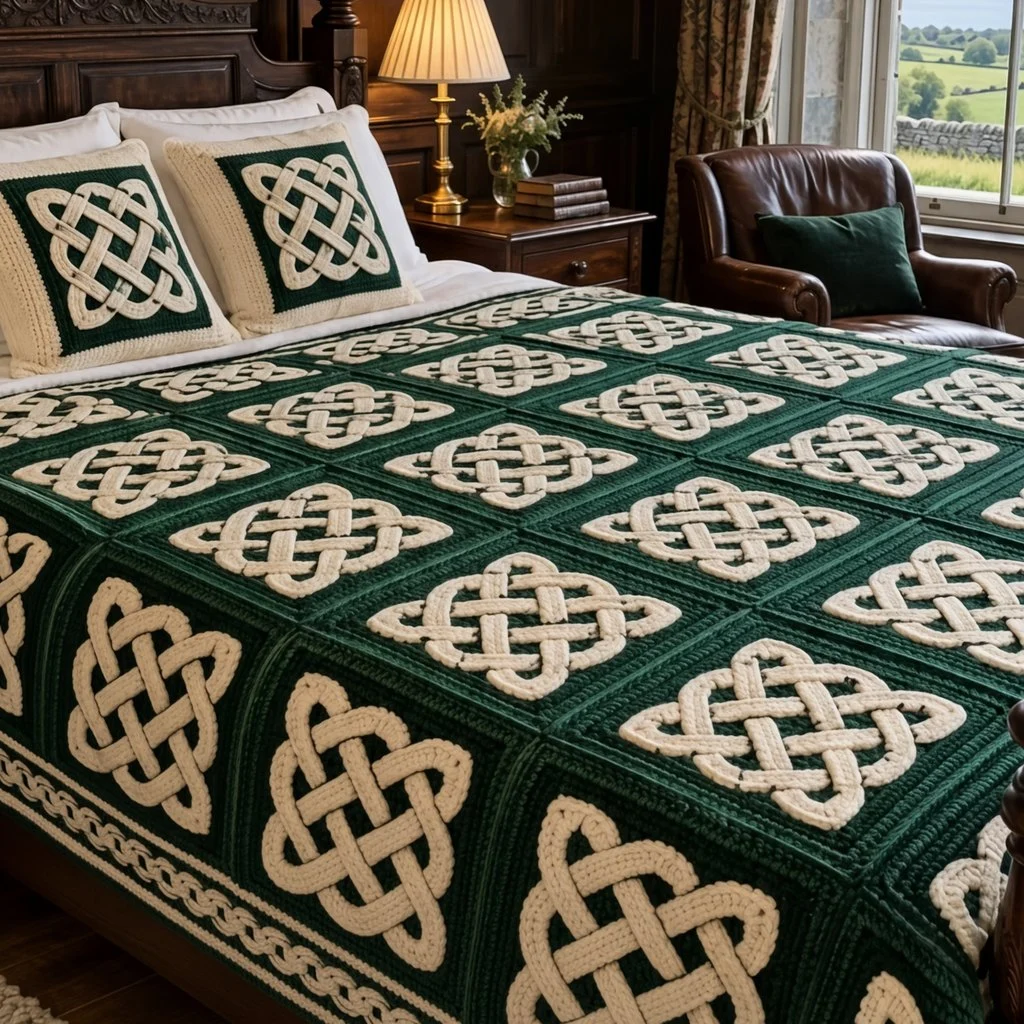
This Celtic knot crochet blanket pattern places a raised cream knot on every deep green square. Each knot is made from two crocheted cords, woven over and under each other the way the lines of a carved Celtic knot pass through one another. Because the cords sit on top of the fabric rather than being worked into it, the knots have real depth. They cast small shadows at every crossing, which is what makes them read so clearly from across a room.
The construction has three stages. First you work a solid green square with a raised post-stitch frame. Next you make two cream tube cords, join each into a loop, and weave them together on top of the square following a simple paper template. Then you sew the cords down. The 63 finished squares are joined flat, and the bedspread is finished with a cream cable border that echoes the woven knots. Two pillow covers use the same square, framed in cream.
This is a slow, rewarding project of about 120 to 140 hours, and most of that time goes into making and sewing the cords. It suits a crocheter who is comfortable with post stitches and cables and patient with finishing work. Because each square is completed separately, you can see the bedspread grow one knot at a time.
Materials
- Worsted weight (#4) yarn, color A, forest green about 4,000 m / 4,375 yd (roughly 23 skeins of 100 g / 180 m)
- Worsted weight (#4) yarn, color B, cream about 3,400 m / 3,720 yd (roughly 19 skeins of 100 g / 180 m)
- 5 mm (H-8) crochet hook for squares, border and pillow panels
- 4.5 mm (7) crochet hook for the knot cords
- 2 pillow inserts 35 x 35 cm (14 x 14 in)
- Tapestry needle and a sharp sewing needle
- Cream sewing thread or split ply of color B for sewing the cords down
- Paper, a ruler and a pencil for the knot template
- Pins and stitch markers
- Blocking mats and a spray bottle
Abbreviations
A / Bcolor A (green) / color B (cream)MRmagic ringchchainsl stslip stitchscsingle crochetsc2togsingle crochet 2 stitches togetherdcdouble crochetfpdcfront post double crochetbpdcback post double crochetfptrfront post treble crochetcross 4skip next 2 sts, fptr around each of next 2 sts, then working in front of the sts just made, fptr around each of the 2 skipped stsBLOback loop onlyrev screverse single crochet (crab stitch)skskipspspacest(s)stitch(es)Green Square (make 63)
- Rnd 1: With A and the 5 mm hook, make a MR. Ch 3 (counts as dc), 2 dc in ring, ch 2, *3 dc in ring, ch 2* 3 times. Sl st to top of ch-3. (12 dc: 3 per side)
- Rnd 2: Sl st in next 2 dc and into ch-2 sp. Ch 3 (counts as dc), (dc, ch 2, 2 dc) in same sp. *Dc in each dc across, (2 dc, ch 2, 2 dc) in next corner sp* 3 times. Dc in each dc across, sl st to top of ch-3. (7 dc per side)
- Rnds 3-9: Sl st in next dc and into corner ch-2 sp, then work as Rnd 2. Each round adds 4 sts per side. (35 dc per side at the end of Rnd 9)
- Rnd 10 (raised frame): Sl st in next dc and into corner ch-2 sp. Ch 3 (counts as dc), (dc, ch 2, 2 dc) in same sp. *Fpdc around each st across, (2 dc, ch 2, 2 dc) in next corner sp* 3 times. Fpdc around each st across, sl st to top of ch-3. (39 sts per side)
- Rnd 11: Sl st in next dc and into corner ch-2 sp. Ch 1, (sc, ch 2, sc) in same sp. Sc in each st across, with (sc, ch 2, sc) in each corner sp. Sl st to first sc. (41 sc per side) Fasten off and weave in ends.
- Block to 25 cm (10 in) square and let dry fully before adding the knot. Sewing onto a flat, blocked square keeps the knot from distorting later.
Knot Cords (make 2 per square)
- With B and the 4.5 mm hook, make a MR and work 5 sc in ring. Do not join. Place a marker in the last st.
- Work sc in each st around in a continuous spiral, moving the marker up each round. (5 sc per round)
- Continue until the cord measures 55 cm (21.5 in), about 88 rounds. Do not stretch the cord while you measure it.
- Fasten off, leaving a 25 cm tail. Shape the cord into a loop and sew its two ends together with the tail, keeping the seam flat and round. Leave the remaining tail for sewing down.
- Make a second identical cord loop. One loop becomes the rounded square of the knot and the other the rounded diamond.
Knot Template and Weaving
- On paper, draw a 25 cm square and mark its center. Centered on that point and parallel to the edges, draw a 14 cm square with corners rounded to a 2 cm radius. This is the square loop.
- Draw the same rounded square again, rotated 45 degrees, so its points face the middle of each side. This is the diamond loop. The two shapes cross each other at 8 points.
- Number the 8 crossings around the knot. At odd-numbered crossings, the square loop goes over the diamond loop. At even-numbered crossings, it goes under. Mark O and U on the template.
- Lay the template under the blocked square, or pin it on top as a guide. Lay the square loop on the green fabric, with its sewn join tucked where it will sit under a crossing, and pin it every 3 cm.
- Weave the diamond loop through the square loop, following the O and U marks. Hide its join under a crossing too. Pin it in place, then check every crossing once more: going around either loop, it must alternate over, under, over, under.
Sewing the Knot Down
- Thread a sharp needle with cream thread or split ply of B. Starting near a crossing, whipstitch along one side edge of a cord, catching the cord and the top layer of green stitches.
- Sew both edges of each cord, with stitches about 1 cm apart, pulling just firmly enough to hold the cord down without flattening it.
- At each crossing, sew the lower cord right up to the edge of the upper cord, then pass to the other side underneath. Never sew the upper cord through the lower one, or the crossing loses its depth.
- Tack each crossing with one small stitch from underneath, so the top cord cannot shift sideways. Remove the pins and weave the tails in under the cords.
Joining the Squares
- Lay out the squares 7 across and 9 down, all with the knots turned the same way.
- Hold two neighboring squares with right sides together. With A, join yarn in both corner ch-2 sps. Sl st through the BLO of both layers in each of the 41 sc, then sl st in the next pair of corner sps. (43 sl sts per edge)
- Without fastening off, continue onto the next pair in the same line. Join all 6 lengthwise seams (9 squares each), then all 8 widthwise seams (7 squares each).
- Keep the slip stitches relaxed and check every few squares that the seams lie flat. The raised frames from Round 10 will then sit side by side and form a neat double ridge between the knots.
Cable Border
- Rnd 1: With the right side facing, join A in any blanket corner ch-2 sp. Ch 3 (counts as dc), (dc, ch 2, 2 dc) in same sp. Dc in each sc along each square edge, plus 1 dc in each square corner sp on either side of every seam. Work (2 dc, ch 2, 2 dc) in each blanket corner, then sl st to top of ch-3. (303 sts on each short side and 389 on each long side, counted between blanket corner sps)
- Rnd 2: Sl st in next dc and into corner ch-2 sp, then work as Rnd 1, with dc in each st along the sides. (307 sts on short sides, 393 on long sides) Fasten off A.
- Rnd 3: Join B in any corner ch-2 sp. Ch 1, then work (sc, ch 2, sc) in each corner sp and sc in each st along the sides. As you go, work 3 sc2tog evenly spaced along each short side, and 2 sc in the middle st of each long side. Sl st to first sc. (306 sts on short sides, 396 on long sides)
- Rnd 4: Sl st into corner ch-2 sp. Ch 3 (counts as dc), (dc, ch 2, 2 dc) in same sp. *Bpdc around next st, then [fpdc around each of next 4 sts, bpdc around next st] across the side (61 times on short sides, 79 times on long sides), then (2 dc, ch 2, 2 dc) in corner sp* around. Sl st to top of ch-3.
- Rnd 5 (first cross): Sl st in next dc and into corner ch-2 sp. Ch 3, (dc, ch 2, 2 dc) in same sp. *Bpdc around each st up to the first group of 4 fpdc, then [cross 4, bpdc around next bpdc] across all groups on the side. Bpdc around each remaining st up to the corner, then (2 dc, ch 2, 2 dc) in corner sp* around. Sl st to top of ch-3.
- Rnd 6: Work as Rnd 5, but work fpdc around each of the 4 cable sts instead of crossing them. Work bpdc around all background sts, including the new corner dc from the previous round.
- Rnd 7 (second cross): Work as Rnd 5. Crossing every other round makes the cables twist into a chain-like braid around the bedspread. Fasten off and rejoin B if you prefer to start the next round at a fresh corner.
- Rnd 8: Sl st in next dc and into corner ch-2 sp. Ch 1, (sc, ch 2, sc) in same sp. Sc in each st around, with (sc, ch 2, sc) in each corner sp. Sl st to first sc.
- Rnd 9: Ch 1, rev sc in each st around, sl st to first st. Fasten off and weave in ends.
Pillow Front (make 2)
- Rnds 1-11: Work as the Green Square and block it. Fasten off A.
- Rnd 12: Join B in any corner ch-2 sp. Ch 3 (counts as dc), (dc, ch 2, 2 dc) in same sp. Dc in each st across, with (2 dc, ch 2, 2 dc) in each corner sp. Sl st to top of ch-3. (45 sts per side)
- Rnd 13: Sl st in next dc and into corner sp. Ch 3, (dc, ch 2, 2 dc) in same sp. Fpdc around each st across, with (2 dc, ch 2, 2 dc) in each corner sp. Sl st to top of ch-3. (49 sts per side)
- Rnd 14: Sl st in next dc and into corner sp. Work as Rnd 12. (53 sts per side) Fasten off.
- Make two cords, weave them, and sew the knot onto the green center, exactly as for a bedspread square.
Pillow Back (make 2)
- Rnd 1: With B, make a MR. Ch 3 (counts as dc), 2 dc in ring, ch 2, *3 dc in ring, ch 2* 3 times. Sl st to top of ch-3. (3 dc per side)
- Rnds 2-13: Work as Green Square Rnds 2-9, continuing until you have 13 rounds in total. (51 dc per side)
- Rnd 14: Sl st in next dc and into corner ch-2 sp. Ch 1, (sc, ch 2, sc) in same sp. Sc in each st across, with (sc, ch 2, sc) in each corner sp. Sl st to first sc. (53 sc per side, matching the front) Fasten off.
Pillow Assembly (make 2)
- Hold one front and one back with wrong sides together and the stitches matched.
- With B, join yarn through both corner sps. Ch 1, then sc through both layers in each st along three sides, with (sc, ch 2, sc) in each corner.
- Push the 35 cm insert in through the open side. The cover is slightly smaller than the insert, so it stays full and the knot sits flat.
- Sc the fourth side closed, sl st to the first sc, and fasten off. Hide the tail inside the cover.
Finishing
When the border is complete, lay the bedspread flat and check each knot. If a crossing has shifted, add a tacking stitch from the back. Mist the green areas lightly and smooth the squares into straight rows, but do not press or steam the cords, because flattening them takes away the raised look.
Wash the bedspread gently on a cool cycle inside a large laundry bag, or by hand, and dry it flat. Sewn-on cords can catch on other items in a busy machine. Wash a scrap of green and cream together before you start, to make sure the green does not bleed into the cream.
Tips for Success
- Make all the cords for several squares in a batch. A 5-stitch spiral is easy to work while watching something, and steady tension gives the cords a matching thickness.
- Spiral tubes twist slightly as they grow. Before you pin a cord down, turn it so the line of your round markers faces the fabric, which keeps all the knots looking the same.
- Weave and pin the whole knot before sewing a single stitch. It is easy to fix an over-under mistake with pins and very tedious once it is sewn.
- Sew with thread or one split ply of yarn rather than full worsted yarn. Thinner thread sinks between the stitches and stays invisible.
- Keep your template on hand and lay it over finished squares now and then, so the knots stay the same size and centered across the whole bedspread.
Common Mistakes to Avoid
- Two overs or two unders in a row: the knot will look wrong even if you cannot immediately see why. Trace each loop with a finger before sewing and make sure it strictly alternates.
- Sewing through both cords at a crossing: this flattens the crossing and makes the knot look printed rather than woven. Always pass underneath at crossings.
- Puckered squares: the cords were sewn down with tight stitches. Use light, even tension, and keep each square flat on a table while you sew.
- A cable border that cups: the post stitches are too tight. Go up to a 5.5 mm hook for Rounds 4-7 if the border pulls in.
- Cords of different lengths: the knot will lean to one side. Measure every cord against the first one before joining its ends.
Ways to Customize This Pattern
- Swap the colors for navy and gold, burgundy and cream, or charcoal and silver grey to suit a different bedroom.
- Use a knitted or crocheted I-cord instead of the spiral tube. It is lighter and quicker to make, though slightly less raised.
- Make a throw of 4 x 5 squares, about 110 x 135 cm with the border, as a smaller project with the same look.
- Replace the cable border with three green dc rounds and a cream rev sc edge if you want a quicker finish.
- Alternate knotted squares with plain green squares in a checkerboard. This halves the cord work while keeping the Celtic feel.
Frequently asked questions
Worked-in colorwork lies flat and cannot pass one strand over another. Separate cords can be woven over and under at every crossing, which is what gives a Celtic knot its depth and is what you see in the finished bedspread.
About 1 hour 50 minutes: roughly 40 minutes for the green square, 45 minutes for the two cords, and 25 minutes to weave and sew the knot. You will speed up noticeably after the first ten squares.
Not with this design. The rounded square and diamond are two closed loops linked together, so they have to be two separate cords. If you want a single-cord knot, you would need a different interlace drawn on your template.
About 5 x 8 squares (40 in total), which is roughly 145 x 220 cm with the cable border. Plan on about 2,500 m of green and 2,200 m of cream, then recalculate the border Rnd 3 adjustments so each side is a multiple of 5 plus 1.
The finished Emerald Celtic Knot Crochet Bedspread Pattern

