Advanced
For experienced crocheters who enjoy complex shaping, fine detail, and ambitious construction
Single-Day Project
A satisfying project you can complete in a single afternoon or evening.
Handmade Gift
A beautiful keepsake — free forever. Read online or print at home.
About This Emerald Fan Lace Crochet Pattern
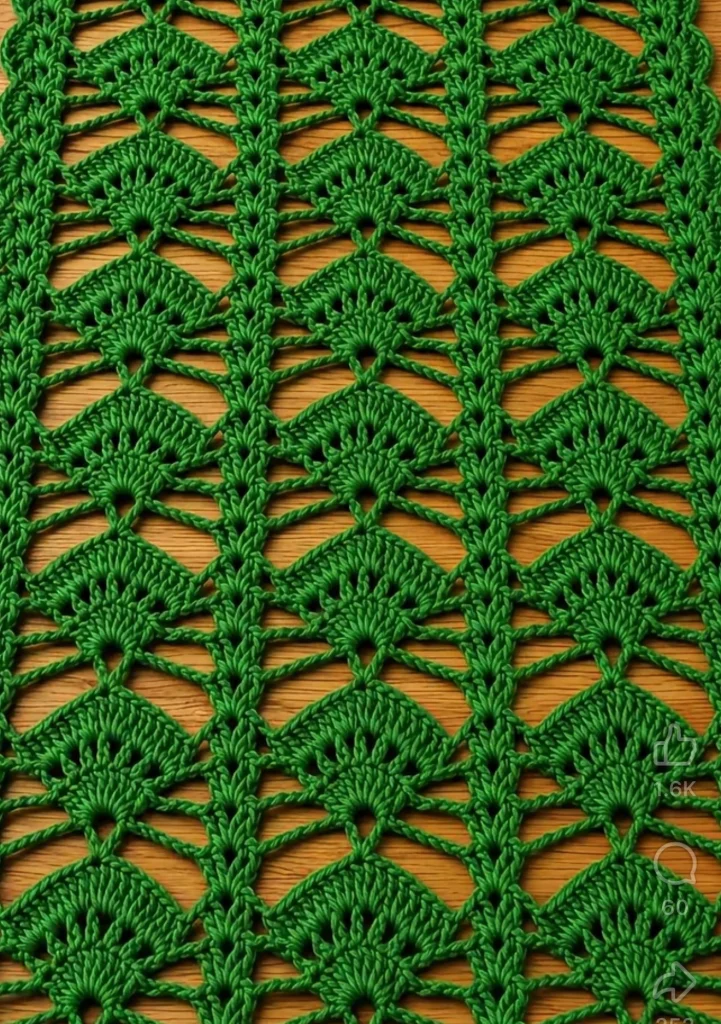
This Emerald fan lace crochet pattern pairs broad, open fans with narrow shell columns in a single shade of rich green. The photographed fabric has a lovely balance of dense stitches and long, open bridges. This reconstruction follows that arrangement with three fan columns and seven stacked tiers, keeping the piece flat and unadorned.
Allow approximately 10–14 hours, plus drying time after blocking. This advanced project suits crocheters who enjoy tracking several types of chain spaces, locating exact central stitches, and shaping lace through changes in stitch density. Unlike a stuffed figure, this piece needs no filling, facial details, or separate attachments. Its detail comes entirely from the layered fans and continuous shell columns.
Materials
- Rich green mercerized cotton, sport weight Approximately 150 g / 375 m; choose one solid shade throughout
- 3.0 mm crochet hook Adjust if necessary to achieve the blocked repeat measurements
- Removable stitch markers Seven helpful: four for shell spaces and three for fan centers
- Tapestry needle For securing yarn ends within the dense shell columns
- Small scissors For trimming secured ends
- Blocking board, rustproof pins, and measuring tape For opening the fans without stretching the bridges excessively
Abbreviations
chchaindcdouble crochet, using US terminologyststitchstsstitchesspspaceSshell: work 2 dc, ch 2, 2 dc into the indicated space or foundation chainVseed stitch: work dc, ch 3, dc into the indicated stitch or foundation chainGauge, Size, and Construction
- Use US crochet terminology. Work back and forth, turning after every completed row. All stitches are worked through both top loops unless a chain space is specified.
- The panel contains three fan columns separated and bordered by four continuous shell columns. It is made as one flat piece, with no added edging or attached decorations.
- After gentle blocking, aim for approximately 10 cm between the centers of neighboring shell columns and 7.5 cm in height over one complete four-row lace repeat. Measure away from the foundation and final edge.
- The full panel should measure approximately 34 cm wide and 54 cm long. These measurements are estimates because cotton, hook size, and blocking tension affect open lace noticeably.
- For a useful swatch, follow the full-width instructions through Row 9, then wet-block. Adjust the hook before making the complete panel if the fan shape or measurements differ substantially.
- At the beginning of every row after Row 1, make the starting shell as follows: ch 3, dc into the first shell ch-2 sp, ch 2, then 2 dc into that same sp. The starting ch 3 counts as one dc, so this shell contains four dc.
- After the starting shell, do not work into the remaining dc of the previous shell. Travel to the next specified anchor using the instructed bridge chains. Every later S goes into the next shell ch-2 sp.
- Each row contains four shells. Counts below include the starting ch 3 as one dc but list structural chain spaces separately. Unworked bridge chains and unused stitches are intentionally left open.
Foundation — Row 1
- Row 1: Ch 40. Into the fourth ch from the hook, work dc, ch 2, 2 dc; the three skipped chains count as the first dc of the first shell. Then repeat the following sequence three times: ch 5, skip five foundation chains, work V into the next foundation chain; ch 5, skip five foundation chains, work S into the next foundation chain. The last S uses the final foundation chain. Turn. Count: 22 dc, four shell ch-2 spaces, three seed ch-3 spaces, and six ch-5 bridges.
First Fan Tier — Rows 2–4
- Row 2 — Fan Row A: Make the starting shell. Repeat three times: ch 5, work 9 dc into the next seed ch-3 sp, ch 5, work S into the next shell ch-2 sp. Skip the old seed dc and all old bridge chains. Turn. Count: 43 dc, four shell ch-2 spaces, and six ch-5 bridges.
- Row 3 — Fan Row B: Make the starting shell. Repeat three times: ch 4, dc into the first dc of the next nine-dc fan; then repeat “ch 1, dc into the next dc” eight times; ch 4, work S into the next shell ch-2 sp. Each fan now has nine dc separated by eight ch-1 spaces. Turn. Count: 43 dc, 24 fan ch-1 spaces, four shell ch-2 spaces, and six ch-4 bridges.
- Row 4 — Fan Row C: Make the starting shell. Repeat three times: ch 3, work one dc into each of the next fan’s nine dc and one dc into each of its eight intervening ch-1 spaces, in their natural order; ch 3, work S into the next shell ch-2 sp. Each fan has 17 consecutive dc. Mark the ninth dc of each fan as you work. Turn. Count: 67 dc, four shell ch-2 spaces, and six ch-3 bridges.
Fan-to-Fan Joining Row — Row 5
- Row 5 — Seed Row D: Make the starting shell. Repeat three times: ch 5, skip the first eight dc of the next fan, work V into its marked ninth dc, skip the remaining eight fan dc; ch 5, work S into the next shell ch-2 sp. Do not work into the previous row’s bridge chains. Remove the fan-center markers after using them. Turn. Count: 22 dc, four shell ch-2 spaces, three seed ch-3 spaces, and six ch-5 bridges.
Remaining Fan Tiers — Rows 6–28
- Row 6: Repeat Fan Row A from Row 2, placing each nine-dc fan in a seed ch-3 sp. Turn. Count: 43 dc, four shell ch-2 spaces, six ch-5 bridges.
- Row 7: Repeat Fan Row B from Row 3. Turn. Count: 43 dc, 24 fan ch-1 spaces, four shell ch-2 spaces, six ch-4 bridges.
- Row 8: Repeat Fan Row C from Row 4, marking the ninth dc of each 17-dc fan. Turn. Count: 67 dc, four shell ch-2 spaces, six ch-3 bridges.
- Row 9: Repeat Seed Row D from Row 5. Turn. Count: 22 dc, four shell ch-2 spaces, three seed ch-3 spaces, six ch-5 bridges.
- Row 10: Repeat Fan Row A. Turn. Count: 43 dc, four shell ch-2 spaces, six ch-5 bridges.
- Row 11: Repeat Fan Row B. Turn. Count: 43 dc, 24 fan ch-1 spaces, four shell ch-2 spaces, six ch-4 bridges.
- Row 12: Repeat Fan Row C, marking the ninth dc of each fan. Turn. Count: 67 dc, four shell ch-2 spaces, six ch-3 bridges.
- Row 13: Repeat Seed Row D. Turn. Count: 22 dc, four shell ch-2 spaces, three seed ch-3 spaces, six ch-5 bridges.
- Row 14: Repeat Fan Row A. Turn. Count: 43 dc, four shell ch-2 spaces, six ch-5 bridges.
- Row 15: Repeat Fan Row B. Turn. Count: 43 dc, 24 fan ch-1 spaces, four shell ch-2 spaces, six ch-4 bridges.
- Row 16: Repeat Fan Row C, marking the ninth dc of each fan. Turn. Count: 67 dc, four shell ch-2 spaces, six ch-3 bridges.
- Row 17: Repeat Seed Row D. Turn. Count: 22 dc, four shell ch-2 spaces, three seed ch-3 spaces, six ch-5 bridges.
- Row 18: Repeat Fan Row A. Turn. Count: 43 dc, four shell ch-2 spaces, six ch-5 bridges.
- Row 19: Repeat Fan Row B. Turn. Count: 43 dc, 24 fan ch-1 spaces, four shell ch-2 spaces, six ch-4 bridges.
- Row 20: Repeat Fan Row C, marking the ninth dc of each fan. Turn. Count: 67 dc, four shell ch-2 spaces, six ch-3 bridges.
- Row 21: Repeat Seed Row D. Turn. Count: 22 dc, four shell ch-2 spaces, three seed ch-3 spaces, six ch-5 bridges.
- Row 22: Repeat Fan Row A. Turn. Count: 43 dc, four shell ch-2 spaces, six ch-5 bridges.
- Row 23: Repeat Fan Row B. Turn. Count: 43 dc, 24 fan ch-1 spaces, four shell ch-2 spaces, six ch-4 bridges.
- Row 24: Repeat Fan Row C, marking the ninth dc of each fan. Turn. Count: 67 dc, four shell ch-2 spaces, six ch-3 bridges.
- Row 25: Repeat Seed Row D. Turn. Count: 22 dc, four shell ch-2 spaces, three seed ch-3 spaces, six ch-5 bridges.
- Row 26: Repeat Fan Row A. Turn. Count: 43 dc, four shell ch-2 spaces, six ch-5 bridges.
- Row 27: Repeat Fan Row B. Turn. Count: 43 dc, 24 fan ch-1 spaces, four shell ch-2 spaces, six ch-4 bridges.
- Row 28: Repeat Fan Row C. Count: 67 dc, four shell ch-2 spaces, six ch-3 bridges. Do not work another seed row. Fasten off, leaving a 15 cm tail. Remove all markers.
Finishing
Check that every fan has nine spokes on its open row and 17 stitches along its dense upper arc. The four shell columns should remain continuous from the foundation to the final row. No sewing or separate assembly is required.
Weave the ends through the dense shell stitches, changing direction once so they stay secure without tightening the lace. Soak the panel according to the yarn label, then press out water in a towel without twisting. Lay it flat and arrange the shell columns in straight, parallel lines. Pin the fan arcs gently, keeping corresponding tiers at the same height.
Let the panel dry completely before removing the pins. Aim for softly rounded fans and relaxed bridge chains rather than a rigid rectangle. The open side edges and shaped upper edge are part of the design; do not fill them with extra stitches.
Tips for Success
- Count each fan separately before moving to the next shell: nine dc on Fan Row A, nine separated dc on Fan Row B, and 17 dc on Fan Row C.
- Mark the ninth dc while making each dense fan arc. Finding that center afterward is harder once the fabric folds or curls.
- Keep bridge chains relaxed but consistent. They shorten from five to four to three chains as the fan widens, then return to five chains on the seed row.
- Support the panel on a table during the later tiers. Letting its weight hang from the hook can lengthen the chains unevenly.
- Block by the shell columns first and the fan tips second. Straight columns give you a reliable reference for opening every fan evenly.
Common Mistakes to Avoid
- Working a shell into a bridge instead of its ch-2 space shifts the vertical column. Undo that section and return the shell to the marked ch-2 space.
- Adding a ch 1 after the ninth spoke on Fan Row B creates an extra space. There are only eight internal ch-1 spaces; the next chains belong to the ch-4 bridge.
- Working two dc into every ch-1 space on Fan Row C makes the fan too full. Work one dc into each of the nine dc and one into each of the eight spaces, giving 17 total.
- Placing the seed off-center makes the next tier lean. Count eight fan stitches, place V in the ninth, and leave eight stitches unworked on the other side.
- Pulling the panel to a fixed measurement despite resistant stitches can distort the cotton. If gentle blocking will not open the fans, adjust the hook and remake the swatch instead.
Ways to Customize This Pattern
- Make a narrower two-fan panel by starting with ch 28 and working two fan repeats per row. Keep three shell columns. The seed rows have 16 dc, Fan Rows A and B have 30 dc, and Fan Row C has 46 dc.
- Make a wider four-fan panel by starting with ch 52 and working four fan repeats per row. Keep five shell columns. The seed rows have 28 dc, Fan Rows A and B have 56 dc, and Fan Row C has 88 dc.
- Adjust the length by adding or removing complete four-row units. Always finish after Fan Row C so the last tier has its full upper arc.
- For a finer version of the same green lace, use finer mercerized cotton and a matching smaller hook. Keep all stitch counts unchanged and determine the new size from a blocked swatch.
Frequently asked questions
The reference photo shows a single openwork fabric panel. Its fans, shell columns, and long chain bridges are the design, so the instructions preserve that structure without adding stuffing or separate features.
The fans deliberately expand and then return to small seed stitches. The standard panel moves through 43 dc, 43 dc, 67 dc, and 22 dc. The four shell columns remain constant while the central fan sections change.
No. Bridge chains connect the shells and fans but are not worked into. Work only into the specified shell spaces, seed spaces, fan stitches, or internal fan ch-1 spaces. Leave all previous bridges free.
Use 12 foundation chains per fan column, plus four extra chains. For example, three columns use 40 chains and four columns use 52. Work one more shell column than fan columns, and repeat the fan sequence once per column.
This is an original reconstruction from the visible fabric, not a verified source chart. It follows the green color, stacked fan arrangement, open bridges, and narrow shell columns. Make and block the swatch to check the precise appearance before committing to the full panel.
The finished Emerald Fan Lace Crochet Pattern

