Emerald Velvet Granny Square Bedspread and Cushions Crochet Pattern
Beginner Friendly
Perfect for those just starting their crochet journey, with clear instructions and simple techniques
Single-Day Project
A satisfying project you can complete in a single afternoon or evening.
Handmade Gift
A beautiful keepsake — free forever. Read online or print at home.
About This Emerald Velvet Granny Square Bedspread and Cushions Crochet Pattern
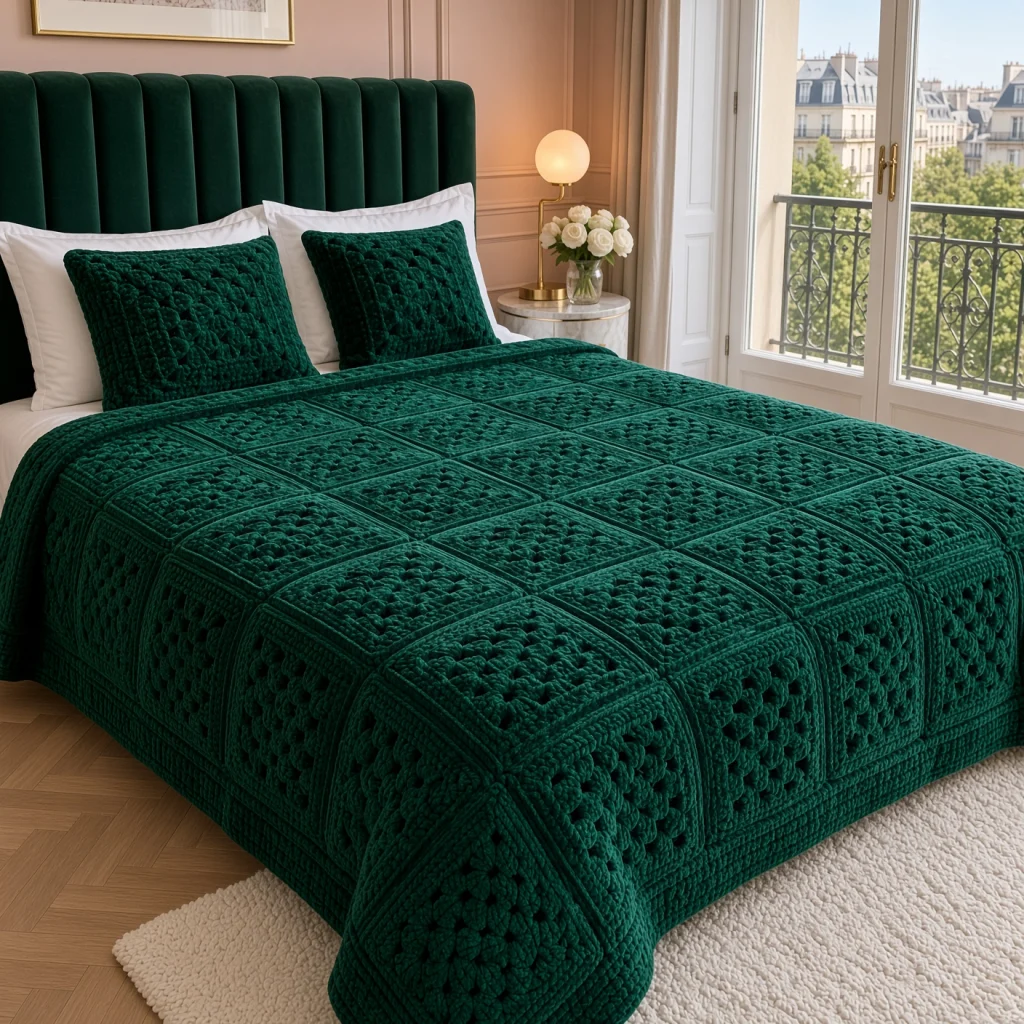
This velvet granny square bedspread is made in a single deep emerald, so its beauty comes from the plush yarn and the shadows of the stitches. Each square has a flower of eight fanned petals at its center, a ring of granny clusters, a band of shells and a solid frame. The squares are joined with raised seams that catch the light like piping, and two square cushions finish the set.
Velvet yarn makes every stitch look soft and rounded, which turns a classic granny square into something that feels luxurious. Because it’s worked in one color, there are very few ends, and the pattern stays calm and elegant even across a full bed. The ridged seams give the bedspread structure and show off the grid of squares.
The bedspread takes about 70 to 85 hours. Bulky velvet works up quickly, so each square takes around 40 minutes. It suits a crocheter who knows granny squares and is ready to handle velvet yarn, which looks wonderful but needs a gentle touch.
Materials
- Bulky velvet or chenille yarn, emerald green about 3,500 m (30 skeins of 100 g / 120 m)
- 6 mm crochet hook
- Locking stitch markers about 10, for marking corners
- Tapestry needle with a large eye, and scissors
- Two 40 cm square cushion forms
Abbreviations
MRmagic ringchchainscsingle crochethdchalf double crochetdcdouble crochetsl stslip stitchrev screverse single crochet (crab stitch), worked left to rightskskipspspacest(s)stitch(es)rndroundreprepeatRS / WSright side / wrong sideFan Flower Center (Rnds 1-3)
- Rnd 1: MR, ch 3 (counts as dc here and throughout), 15 dc in ring, join with sl st to top of ch 3. Pull the ring tight. (16 sts)
- Rnd 2 (petals): ch 3, 4 dc in same st, ch 1, sk next st, *5 dc in next st, ch 1, sk next st; rep from * 6 more times, join to top of ch 3. (8 fans of 5 dc, 8 ch-1 sps)
- Rnd 3: sl st in next 4 dc and in next ch-1 sp, ch 3, (2 dc, ch 2, 3 dc) in same sp, ch 1, 3 dc in next ch-1 sp, ch 1, *(3 dc, ch 2, 3 dc) in next ch-1 sp, ch 1, 3 dc in next ch-1 sp, ch 1; rep from * 2 more times, join. (3 groups of 3 dc per side, 36 dc, 4 corner ch-2 sps)
Granny and Shell Rounds (Rnds 4-5)
- Rnd 4: sl st in next 2 dc and in corner sp, ch 3, (2 dc, ch 2, 3 dc) in same sp, ch 1, *3 dc in each ch-1 sp to next corner with ch 1 between groups, (3 dc, ch 2, 3 dc) in corner sp, ch 1; rep from * 2 more times, 3 dc in each remaining ch-1 sp with ch 1 between groups, join. (4 groups per side, 48 dc, 3 ch-1 sps per side)
- Rnd 5: sl st in next 2 dc and in corner sp, ch 3, (2 dc, ch 2, 3 dc) in same sp, *sc in next ch-1 sp, 5 dc in next ch-1 sp, sc in next ch-1 sp, (3 dc, ch 2, 3 dc) in next corner sp; rep from * 2 more times, sc in next ch-1 sp, 5 dc in next ch-1 sp, sc in next ch-1 sp, join. (13 sts per side: a shell in the middle of each side, 52 sts)
Solid Frame (Rnds 6-8)
- Rnd 6: sl st in next 2 dc and in corner sp, ch 3, (dc, ch 2, 2 dc) in same sp, *dc in each st to next corner, (2 dc, ch 2, 2 dc) in corner sp; rep from * 2 more times, dc in each remaining st, join. (17 dc per side, 68 dc)
- Rnd 7: sl st in next dc and in corner sp, ch 3, (dc, ch 2, 2 dc) in same sp, *dc in each st to next corner, (2 dc, ch 2, 2 dc) in corner sp; rep from * 2 more times, dc in each remaining st, join. (21 dc per side, 84 dc)
- Rnd 8: sl st in next dc and in corner sp, ch 1, (sc, ch 2, sc) in same sp, *sc in each st to next corner, (sc, ch 2, sc) in corner sp; rep from * 2 more times, sc in each remaining st, join. Fasten off. (23 sc per side, 92 sc)
- The square measures about 25 cm. Make 90.
Joining the Squares
- Lay out 90 squares, 9 across and 10 long.
- Join method: hold two squares WS together with the edges matched. Sl st through both loops of both squares in each matching st, starting and ending in the corner ch-2 sps. (25 sl st per side, including both corners) This leaves a raised ridge on the RS.
- Join the squares into rows of 9, then join the rows along their long edges, crossing over the ridges at the corners.
- Where four corners meet, work through all four corner sps so no gap is left.
- The joined bedspread measures about 225 x 250 cm.
Border
- Rnd 1: RS facing, join in a corner sp. Work 3 sc in each bedspread corner sp, sc in each st along the edge of every square, and 1 sc in each point where two squares meet. Join. (239 sc along each long side, 215 along each short side and 12 at the corners: 920 sts)
- Rnd 2: ch 2 (does not count as a st), hdc in each st around, working 3 hdc in the center st of each corner. Join. (928 sts)
- Rnds 3-4: rep Rnd 2, adding 8 sts each rnd. (Rnd 3: 936 sts, Rnd 4: 944 sts)
- Rnd 5: ch 1, rev sc in each st around. Join and fasten off. (944 sts)
Large Cushion Squares (make 4)
- Work Rnds 1-7 of the square. (21 dc per side, 84 dc)
- Rnds 8-12: rep Rnd 7, adding 4 sts per side each rnd. (Rnd 8: 25 per side, Rnd 9: 29, Rnd 10: 33, Rnd 11: 37, Rnd 12: 41 per side, 164 dc)
- Rnd 13: work as Rnd 8 of the square. Fasten off. (43 sc per side, 172 sc)
- Each large square measures about 38 cm. Make 2 fronts and 2 backs.
Cushion Assembly
- Hold a front and a back WS together, with the front facing you and the corners matched.
- Rnd 1: join in a corner sp through both layers. Working through both layers, 3 sc in each corner sp and sc in each st along the sides. Insert the cushion form before closing the last side. Join. (184 sts: 46 per side including corners)
- Rnd 2: ch 1, rev sc in each st around. Join and fasten off. (184 sts)
- Rep with the second cushion.
Finishing
Weave in all ends on the WS, going back and forth through the stitches in at least two directions. Velvet yarn is slippery and ends can work their way out if they are only woven in one direction.
Lay the bedspread flat and steam it lightly, holding the iron well above the fabric. Never press velvet, because it flattens the pile permanently. Smooth the squares and straighten the ridged seams with your hands while the yarn is warm, then let it cool before moving it.
Tips for Success
- Use a stitch marker in each corner sp of every rnd. Velvet’s thick pile can hide the corners, especially in the dc rounds.
- Keep your tension relaxed and even. Velvet doesn’t stretch, so tight stitches make the square stiff and hard to work into.
- Count the stitches after every rnd rather than ripping back. Velvet can shed or “worm” (loops pulling out of the core) when unraveled several times.
- Buy all the yarn from one dye lot. In a single-color bedspread, even a small color difference shows clearly.
- Join squares in good light. Dark velvet hides stitches, and it’s easy to miss a st when working the joins.
Common Mistakes to Avoid
- Fans that ruffle in Rnd 2. Five dc in one st is a lot for a thin ring. If the fans buckle, work Rnd 1 a little looser so there is more room for them.
- Corners in the wrong spaces in Rnd 3. Corners go in every second ch-1 sp. Mark them before you start the round.
- A crooked shell in Rnd 5. The shell must land in the middle ch-1 sp of each side. If it’s off center, Rnd 4 has the wrong number of groups on that side.
- Joins on the wrong side. Holding the squares RS together hides the ridges. Always hold them WS together so the ridge shows on the front.
- Pressing with an iron. It crushes the velvet pile and leaves shiny marks. Steam from above only.
Ways to Customize This Pattern
- Choose another jewel tone: sapphire blue, ruby red or deep plum all look stunning in velvet.
- Change the size: each square adds 25 cm. A throw of 5 by 6 squares is about 133 x 158 cm with the border.
- Work the flower center (Rnds 1-2) in a lighter shade of green for a subtle two-tone square.
- Make a matching table runner of 2 by 6 squares with the same border.
- Use a smooth cotton yarn instead of velvet for a lighter, washable summer version.
Frequently asked questions
It takes a little getting used to. The pile hides the stitches, so it’s harder to see where to insert the hook, and it doesn’t like being unraveled. Relaxed tension, good light and stitch markers make it much easier.
Yes, on Rnd 8, but the seams will lie flat instead of forming raised ridges. For the look in the photo, finish all the squares first and join them WS together.
Expect around 3 kg in bulky velvet. Velvet is heavier than it looks, so the bedspread drapes nicely and stays in place on the bed.
Wash it on a gentle cold cycle inside a large laundry bag, or by hand, and dry it flat. Never tumble dry velvet yarn, because heat and friction make it shed and lose its pile.
The finished Emerald Velvet Granny Square Bedspread and Cushions Crochet Pattern

