Evergreen Vine Crochet Leaf Table Runner Pattern
Beginner Friendly
Perfect for those just starting their crochet journey, with clear instructions and simple techniques
Single-Day Project
A satisfying project you can complete in a single afternoon or evening.
Handmade Gift
A beautiful keepsake — free forever. Read online or print at home.
About This Evergreen Vine Crochet Leaf Table Runner Pattern
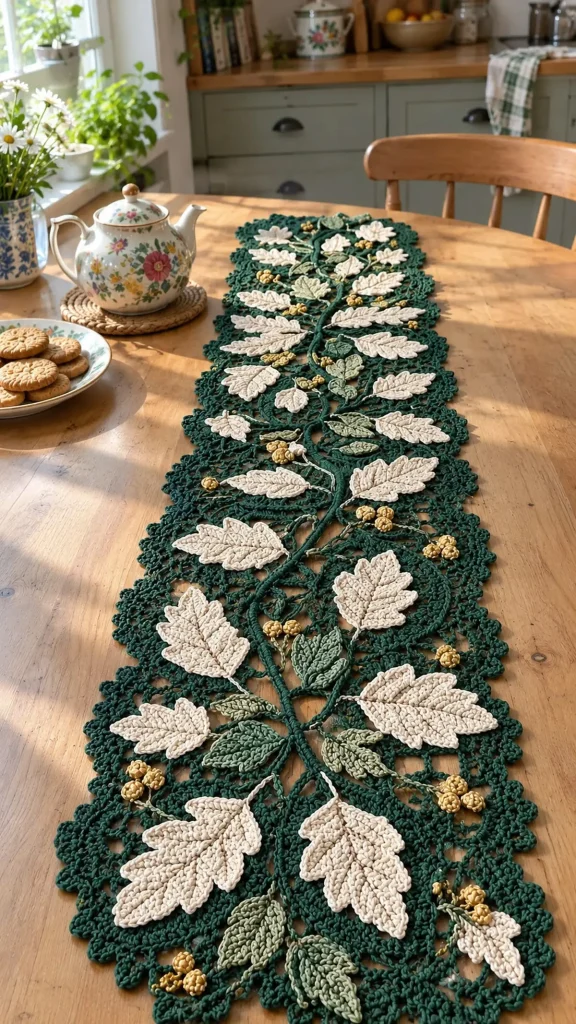
This crochet leaf table runner pattern brings the look of Irish crochet lace to an everyday kitchen table. Cream oak leaves, smaller sage leaves and clusters of gold berries climb a twisting green vine over a forest green picot mesh. The leaves are made separately, with raised serrated edges and a stitched center vein. Because of that, they sit on top of the lace instead of blending into it, which gives the runner its layered, almost carved look.
This is an advanced project built from many parts. You make a picot mesh panel with a three-round scalloped border, a padded-cord vine with branches and curling tendrils, three kinds of leaves, and 36 tiny stuffed berries. Expect around 30 to 40 hours in total. Most of those hours go into small, portable pieces, so you can make leaves and berries a few at a time between longer sessions on the mesh.
Choose this pattern if you are comfortable with treble crochet, working into both sides of a foundation chain, and sewing motifs down neatly. It suits you best if you enjoy arranging a piece as much as stitching it. The finished runner measures about 42 x 105 cm, fits most rectangular tables for four to six, and holds up well to regular use in cotton.
Materials
- Worsted weight cotton yarn, forest green about 600 m (mesh, border, vine, branches, tendrils)
- Worsted weight cotton yarn, cream about 280 m (oak leaves)
- Worsted weight cotton yarn, sage green about 110 m (sage leaves, stems, veins)
- Worsted weight cotton yarn, mustard gold about 60 m (berries, plus scraps for stuffing)
- 4.0 mm crochet hook mesh, border, vine and tendrils
- 3.5 mm crochet hook leaves and berries, for firmer motifs
- Stitch markers at least 6
- Tapestry needle blunt tip, large eye
- Rust-proof pins and blocking mats enough to pin a 42 x 105 cm piece
- Spray bottle and scissors
Abbreviations
chchainsl stslip stitchscsingle crochethdchalf double crochetdcdouble crochettrtreble crochetrev screverse single crochet (crab stitch), worked left to rightinc2 sc in the same stitchdecsc2tog, single crochet 2 togetherMRmagic ringBLOback loop onlypicotch 3, sl st in 3rd ch from hookPLpicot loop: ch 2, picot, ch 2st(s) / spstitch(es) / spacerep / rndrepeat / roundPicot Mesh Panel (forest green)
- With forest green and the 4.0 mm hook, ch 66 loosely.
- Row 1: Sc in 6th ch from hook, *ch 5, skip 3 ch, sc in next ch; rep from * across. Turn. (16 loops)
- Row 2: Ch 5 (counts as first loop), sc in first ch-5 sp, [PL, sc in next ch-5 sp] 15 times, working the last sc into the loop formed by the skipped chains at the start of Row 1. Turn. (16 loops)
- Row 3: Ch 5 (counts as first loop), sc in first loop, [PL, sc in next loop] 15 times, working the last sc into the turning ch-5 loop of the previous row. Turn. (16 loops)
- Rows 4–55: Rep Row 3. (16 loops in every row.) Do not fasten off.
- Check your size. The panel should measure about 36 x 99 cm, and 4 loops by 5 rows is roughly a 9 cm square. To change the length, add or remove rows in pairs so the total stays odd; the border counts below depend on an odd row count.
Scalloped Border (forest green)
- Rnd 1: Ch 1 and rotate to work down the long edge. *3 sc in corner; work 165 sc along the long edge (3 sc into each of the 55 row ends); 3 sc in corner; work 63 sc across the short edge (4 sc into each of the first 15 loops, 3 sc into the 16th loop). Rep from * once more, working the second short edge into the spaces along the foundation chain. Sl st to first sc. (468 sts) Place a marker in the center st of each 3-sc corner group.
- Rnd 2: Sl st in next st (the marked corner center). Ch 3 (counts as dc), 8 dc in same st (corner shell made).
*[Skip 2 sts, sc in next st, skip 2 sts, 7 dc in next st] 27 times; skip 2 sts, sc in next st, skip 2 sts, 9 dc in next st (corner).
[Skip 2 sts, sc in next st, skip 2 sts, 7 dc in next st] 10 times; skip 2 sts, sc in next st, skip 2 sts, 9 dc in next st (corner).
Rep from * once more, but on the final repeat do not work the last corner shell; sl st to top of beginning ch-3 instead. (4 corner shells, 74 side shells, 78 sc) - Rnd 3: Ch 1. Work the edging using these two groups:
Corner: sc in next 4 dc, (sc, picot, sc) in next dc, sc in next 4 dc, sl st in next sc.
Side scallop: sc in next 3 dc, (sc, picot, sc) in next dc, sc in next 3 dc, sl st in next sc.
Starting in the same st as the join, work Corner. Then work 27 Side scallops, Corner, 10 Side scallops, Corner, 27 Side scallops, Corner, 10 Side scallops. Sl st to first sc to join. - Fasten off and weave in all ends on the wrong side.
Vine and Branches (forest green)
- Main vine: Cut a 250 cm strand of forest green and fold it in half; this is your padding cord. With the 4.0 mm hook, ch 201.
- Row 1: Hold the padding cord along the top of the chain. Sc in 2nd ch from hook and in each ch across, enclosing the cord with every stitch. (200 sc)
- Row 2: Do not turn. Ch 1, rev sc in each st back to the beginning. (200 rev sc) This row gives the vine its twisted, rope-like ridge.
- Fasten off with a 40 cm tail for sewing. Leave the cord ends hanging for now. Pull the cord gently to ease the vine into soft S-curves.
- Branches (make 8): Use a 40 cm padding cord folded in half. Ch 26. Work Row 1 (25 sc over the cord) and Row 2 (25 rev sc) as for the main vine. Fasten off with a 25 cm tail.
Curling Tendrils (make 6, forest green)
- With the 4.0 mm hook, ch 16.
- Row 1: 2 sc in 2nd ch from hook and in each ch across. (30 sc) The strip will twist into a curl on its own.
- Fasten off with a 25 cm tail. Coil each tendril into a loose flat spiral and pin it; you will sew it down in this shape during assembly.
Large Oak Leaves (make 10, cream)
- With cream and the 3.5 mm hook, ch 17.
- Rnd 1: Sc in 2nd ch from hook, hdc in next ch, dc in next 3 ch, tr in next 6 ch, dc in next 3 ch, hdc in next ch, 5 sc in last ch. Now work along the opposite side of the foundation chain: hdc in next ch, dc in next 3 ch, tr in next 6 ch, dc in next 3 ch, hdc in next ch, sc in the same ch as the first sc. Sl st to first sc. (35 sts)
- Rnd 2: Ch 1. Work the edge in four parts:
Tip: (sc, picot, sc) in first st.
First side: sc in next st, [sc in next st, (hdc, dc, picot, dc, hdc) in next st, sl st in next st] 4 times, sc in next st.
Base: sc in next 2 sts, 3 sc in next st, sc in next 2 sts.
Second side: sc in next st, [sl st in next st, (hdc, dc, picot, dc, hdc) in next st, sc in next st] 4 times, sc in next st.
Finish with sc in last st and sl st to first sc. (62 sts, plus 9 picots) - Fasten off, leaving a 40 cm tail for sewing.
- Stem: Join sage at the center of the base. Ch 9, then sl st in 2nd ch from hook and in each ch back (8 sl st). Sl st to base and fasten off.
- Vein: With sage, work surface sl st up the center of the leaf, along the foundation chain line, from base to tip. Then add 4 straight-stitch side veins on each side, angled up toward the lobes.
Small Oak Leaves (make 12, cream)
- With cream and the 3.5 mm hook, ch 11.
- Rnd 1: Sc in 2nd ch from hook, hdc in next ch, dc in next 2 ch, tr in next 3 ch, dc in next ch, hdc in next ch, 5 sc in last ch. Now work along the opposite side of the foundation chain: hdc in next ch, dc in next ch, tr in next 3 ch, dc in next 2 ch, hdc in next ch, sc in the same ch as the first sc. Sl st to first sc. (23 sts)
- Rnd 2: Ch 1. Work the edge in four parts:
Tip: (sc, picot, sc) in first st.
First side: sc in next st, [sc in next st, (hdc, dc, picot, dc, hdc) in next st, sl st in next st] 2 times, sc in next st.
Base: sc in next 2 sts, 3 sc in next st, sc in next 2 sts.
Second side: sc in next st, [sl st in next st, (hdc, dc, picot, dc, hdc) in next st, sc in next st] 2 times, sc in next st.
Finish with sc in last st and sl st to first sc. (38 sts, plus 5 picots) - Fasten off, leaving a 30 cm tail.
- Stem and vein: Join sage at the base, ch 6, then sl st in 2nd ch from hook and in each ch back (5 sl st). Sl st to base. Work a surface sl st center vein with 2 straight-stitch side veins on each side.
Ribbed Sage Leaves (make 10, sage)
- With sage and the 3.5 mm hook, ch 12.
- Row 1: Sc in 2nd ch from hook and in next 9 ch (10 sc). 3 sc in last ch. Working along the opposite side of the chain, sc in next 9 ch. Turn. (22 sts)
- Row 2: Ch 1. Working in BLO: sc in next 10 sts, 3 sc in next st (center st of the tip), sc in next 8 sts; leave the remaining 3 sts unworked. Turn. (21 sts)
- Row 3: Ch 1. Working in BLO: sc in next 9 sts, 3 sc in next st, sc in next 8 sts; leave 3 sts unworked. Turn. (20 sts)
- Row 4: Ch 1. Working in BLO: sc in next 9 sts, 3 sc in next st, sc in next 7 sts; leave 3 sts unworked. Turn. (19 sts)
- Row 5: Ch 1. Working in BLO: sc in next 8 sts, 3 sc in next st, sc in next 7 sts; leave 3 sts unworked. (18 sts)
- Stem: Do not fasten off. Ch 7, sl st in 2nd ch from hook and in next 5 ch, then sl st into the leaf base. Fasten off, leaving a 25 cm tail. The BLO rows form the raised ribs, so no embroidered vein is needed.
Gold Berries (make 36) and Cluster Stems (make 12)
- Berries are worked in continuous rounds with mustard gold and the 3.5 mm hook.
- Rnd 1: 6 sc in MR. (6)
- Rnd 2: [Sc in next st, inc] 3 times. (9)
- Rnd 3: Sc in each st around. (9)
- Stuff firmly with scraps of mustard gold yarn. Yarn is better than fiberfill here, because white fiberfill shows through the stitches.
- Rnd 4: [Sc in next st, dec] 3 times. (6) Fasten off. Weave the tail through the front loops of the last 6 sts and pull closed. Keep the tail for sewing.
- Cluster stems: With sage, ch 10, then sl st in 2nd ch from hook and in each ch across (9 sl st). Fasten off with a 20 cm tail. Sew 3 berries in a tight triangle at one end of each stem to make 12 clusters.
Finishing
Block the mesh first. Wet the runner, press out the water in a towel, and pin it flat to about 42 x 105 cm. Pin out every picot on the border scallops and let it dry completely. Block all the leaves at the same time, pinning each picot point so the serrated edges stay sharp.
Lay the dry runner right side up on a large table and arrange everything before sewing anything. Run the main vine down the center in gentle S-curves, stopping about 5 cm inside the border at each end. Tuck the 8 branches under the vine at roughly 12 cm intervals, alternating sides and angling them toward the edges. Place the 6 tendril spirals in the open curves of the vine.
Next, place the leaves. Put the large cream leaves along the vine in alternating pairs, with the largest ones toward the two ends as in the photo, and let each overlap the vine or a branch by about 1 cm. Fill the gaps with the small cream leaves, then tuck the sage leaves partly beneath the cream ones near the vine so they read as a second layer. Scatter the 12 berry clusters in the remaining open spaces. Take a photo of the layout before you pick up a needle.
Sew from the center outward so the mesh does not creep. Whip stitch the vine and branches through their back loops only, catching the mesh beneath. Attach each leaf with small stitches around its outer edge and base, tacking every picot so it cannot snag. Stitch the berry clusters down through their stems and the base of each berry. Weave all ends in on the back, then give the runner a light steam from the wrong side to settle the stitches.
Tips for Success
- Use the 3.5 mm hook for all leaves and berries even though the mesh uses 4.0 mm. The tighter fabric keeps the lobes crisp and stops stuffing from showing through the berries.
- Count your loops at the end of every mesh row. It is much easier to fix a missed loop in the next row than to discover a narrowing edge 30 rows later.
- Put a stitch marker in each corner center on Border Rnd 1 and move it up on each round. The shell counts only work if each corner shell lands exactly on that stitch.
- Make the berries in a batch of 12 at a time and stuff them all to the same firmness. Uneven berries are the first thing the eye notices in a cluster.
- Sew the motifs on a flat table, never on your lap. Picking the runner up while sewing stretches the mesh and leaves puckers around each leaf.
Common Mistakes to Avoid
- Skipping the turning loop at the end of a mesh row. The ch-5 at the start of each row counts as a loop, so your last sc of the next row must go into it. If you skip it, the panel loses a loop per row and narrows quickly.
- Working both loops on the sage leaves. Without BLO the ribs disappear and the leaf turns out flat and plain. If your ribs look faint, check that you are working only the back loop, and that you really are leaving 3 stitches unworked at the end of each row.
- Making the tr section of the oak leaves too loose, so the leaf cups or ruffles. Go down a hook size, or change the 6 tr to 2 dc, 2 tr, 2 dc for a flatter leaf.
- Pulling sewing stitches tight. A tight stitch gathers the mesh under the motif and the runner no longer lies flat. Each stitch should just hold the leaf edge in place, with no dimple in the mesh beneath.
- Changing the mesh size without redoing the border math. Keep the row count odd, and only use loop counts of 13, 16, 19 or 22 across. Otherwise the scallops will not meet evenly at the corners.
Ways to Customize This Pattern
- Autumn version: work the mesh in cream and the leaves in rust, caramel and mustard, with brown berries, for a warm harvest table.
- Centerpiece size: work 25 mesh rows instead of 55. Each long edge then takes 75 sc in Rnd 1 and 12 side scallops in Rnd 2, and you need about half the motifs.
- Wider runner: ch 78 for 19 loops across. Each short edge then takes 75 sc (4 sc in each of 18 loops, 3 in the last) and 12 side scallops.
- Winter holiday version: keep the green mesh, swap the gold berries for red, and replace some of the cream oak leaves with sage leaves for a holly look.
- Tone-on-tone lace: make every piece in one color, such as all ecru. The texture then does all the work, and the piece suits a formal dining table.
Frequently asked questions
Yes. The vine, leaves, tendrils and berries can all be stitched onto a plain linen or cotton runner about 40 x 105 cm. You skip the mesh and border, which cuts the project time by roughly a third. Use matching sewing thread, and back the fabric with a lightweight interfacing so it does not pucker.
You can, but cotton is the better choice for a table piece. It blocks crisply, keeps the picot points sharp, and handles hot teapots and regular washing. Acrylic leaves tend to curl at the lobes and will not hold a blocked shape as well.
Hand wash in cool water with mild soap, and press the water out in a towel instead of wringing. Then lay the runner flat and re-pin the border scallops and leaf points while it dries. Avoid the dryer, which can shrink the cotton mesh unevenly around the sewn motifs.
No. The counts give a full, balanced look close to the photo, but the layout is freeform. If your runner feels crowded, leave out a few small cream leaves. If there are bare patches of mesh, add another berry cluster or a sage leaf. Lay everything out before sewing and adjust by eye.
The finished Evergreen Vine Crochet Leaf Table Runner Pattern

