Fall Leaves Crochet Table Runner
Beginner Friendly
Perfect for those just starting their crochet journey, with clear instructions and simple techniques
Single-Day Project
A satisfying project you can complete in a single afternoon or evening.
Handmade Gift
A beautiful keepsake — free forever. Read online or print at home.
About This Fall Leaves Crochet Table Runner
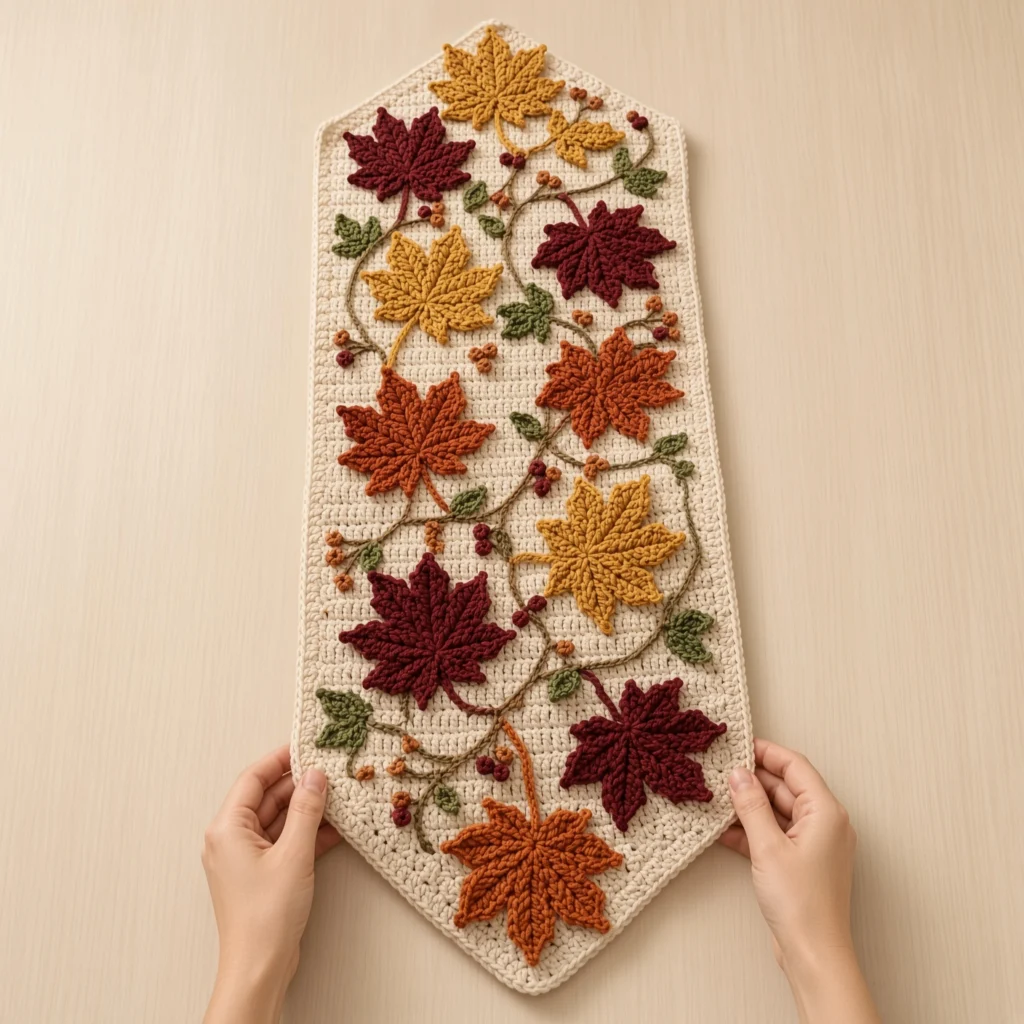
This fall leaves crochet table runner pattern works in three layers, and each one is a different technique. Underneath is a solid cream single crochet base with a sharp point at both ends, shaped by increasing and then decreasing one stitch at each edge. On top of that sit ten seven lobed maple leaves in burgundy, mustard gold and two shades of orange. Threading between them are vines worked as surface chains directly onto the finished base, with small green leaves and clusters of tiny bobble berries scattered along their length.
The surface vines are what make this design worth doing properly. They are not sewn on cord, they are slip stitched into the fabric itself with a hook, which means they sit flush with the base and curve wherever you want them to. You draw the whole vine layout freehand with pins first, then follow it. That single detail is the difference between a runner that looks like leaves stuck onto a rectangle and one that looks like a branch fell across the table.
The base is slow but simple, about 150 rows of single crochet, and it is the kind of thing you can work through several evenings without thinking. Everything else is small and quick. Budget 14 to 18 hours total. This suits someone comfortable with edge shaping and willing to do a careful layout, and it needs patience more than technical difficulty. If you have never worked surface crochet, practise on a swatch first, because unpicking a wandering vine from the finished base is unpleasant.
Materials
- Worsted weight cotton, cream 350 g — base and border
- Worsted weight cotton, deep burgundy 50 g — 4 maple leaves and some berries
- Worsted weight cotton, mustard gold 40 g — 3 maple leaves
- Worsted weight cotton, rust 30 g — 2 maple leaves and some berries
- Worsted weight cotton, burnt orange 30 g — 1 maple leaf and some berries
- Worsted weight cotton, sage green 25 g — small vine leaves
- Worsted weight cotton, olive green 25 g — small vine leaves and some vines
- Worsted weight cotton, taupe 25 g — main surface vines
- 4.0 mm crochet hook base, border, leaves
- 3.5 mm crochet hook surface vines and veins
- Tapestry needle blunt tip
- Rustproof pins at least 30, for plotting the vine lines
- Stitch markers at least 4
- Blocking mat you need the full 92 cm length
- Spray starch optional
Abbreviations
MRmagic ringchchainsl stslip stitchscsingle crochethdchalf double crochetdcdouble crochetincincrease (2 sc in the same stitch)sc2togsingle crochet 2 stitches togetherBLOback loops onlysurface sl stslip stitch worked through the finished fabric with the yarn held behindst(s)stitch(es)rndroundRSright sidereprepeatFOfasten offGauge and Motif Count
- Gauge: 15 sc and 17 rows measure 10 x 10 cm in plain single crochet with the 4.0 mm hook.
- The base is 51 stitches at its widest, which gives a panel about 34 cm across before the border.
- Make 10 large maple leaves: 4 deep burgundy, 3 mustard gold, 2 rust, 1 burnt orange.
- Make 12 small vine leaves: 7 sage green, 5 olive green.
- Make 24 bobble berries: 9 rust, 8 deep burgundy, 7 burnt orange.
- Work roughly 4 main vine lines and 6 short offshoots in surface crochet, in taupe and olive green.
Runner Base
- With cream and the 4.0 mm hook, ch 4.
- Row 1: sc in 2nd ch from hook and in each ch across. (3 sts) Turn.
- Row 2: ch 1, inc in first st, sc in next st, inc in last st. (5 sts) Turn.
- Row 3: ch 1, inc in first st, sc in each st to the last st, inc in last st. (7 sts) Turn.
- Rows 4 to 25: rep Row 3. Each row gains 2 sts, one at each edge. (9, 11, 13, 15, 17, 19, 21, 23, 25, 27, 29, 31, 33, 35, 37, 39, 41, 43, 45, 47, 49, 51 sts)
- Rows 26 to 125: ch 1, sc in each st across. (51 sts on every row) Turn. This is the straight body, 100 rows deep, roughly 59 cm.
- Measure at Row 50. The piece should be about 33 cm from the first point to that row, and 34 cm wide. If it is running wider, drop to a 3.75 mm hook and restart, because a base that is 4 cm too wide will not take the leaf layout as written.
- Row 126: ch 1, sc2tog, sc in each st to the last 2 sts, sc2tog. (49 sts) Turn.
- Rows 127 to 149: rep Row 126. Each row loses 2 sts, one at each edge. (47, 45, 43, 41, 39, 37, 35, 33, 31, 29, 27, 25, 23, 21, 19, 17, 15, 13, 11, 9, 7, 5, 3 sts)
- Do not FO after Row 149. The border begins straight from the 3 stitches at the second point.
- Count the stitches at the end of every increase and decrease row. In plain single crochet an accidental extra stitch at an edge is almost invisible until the two points come out at different angles.
Border
- Rnd 1: ch 1, 3 sc in the center st of the 3 remaining sts to turn the second point, then sc evenly down the first long edge working 1 sc into the end of each row, 3 sc in the center st at the first point, and 1 sc into the end of each row back up the second long edge. Sl st to the first sc.
- At each of the four shoulder corners, where the increase or decrease shaping meets the straight body, work 2 sc into that single row end so the border does not pull the corner in.
- Rnd 2: ch 1, sc in each st around, placing 3 sc in the center st at each of the two points. Sl st to the first sc.
- Rnd 3: ch 1, sc in each st around, placing 3 sc in the center st at each of the two points. Sl st to the first sc.
- Rnd 4 (finishing ridge): sl st in BLO in each st around. FO and weave in the end. This last round gives the raised rolled edge that frames the whole runner.
- Lay the runner flat before you go further. The border should lie perfectly flat with no ripple and no cupping. Ripple means too many stitches along the long edges; cupping means too few. Fix it now, because you cannot rework a border once the appliqué is attached.
Large Maple Leaf (make 10)
- Stem: with the 4.0 mm hook, ch 9. All seven spokes are worked from the last chain, which becomes the leaf base.
- Spoke 1 (short): ch 7, then working back along that chain: sl st in 2nd ch from hook, sc in next 2 ch, hdc in next 2 ch, dc in last ch. (6 sts) Sl st into the leaf base.
- Spoke 2 (medium): ch 9, then working back: sl st in 2nd ch from hook, sc in next 2 ch, hdc in next 2 ch, dc in next 3 ch. (8 sts) Sl st into the leaf base.
- Spoke 3 (long): ch 11, then working back: sl st in 2nd ch from hook, sc in next 3 ch, hdc in next 3 ch, dc in next 3 ch. (10 sts) Sl st into the leaf base.
- Spoke 4 (longest, center): ch 13, then working back: sl st in 2nd ch from hook, sc in next 4 ch, hdc in next 4 ch, dc in next 3 ch. (12 sts) Sl st into the leaf base.
- Spoke 5 (long): work exactly as Spoke 3. (10 sts) Sl st into the leaf base.
- Spoke 6 (medium): work exactly as Spoke 2. (8 sts) Sl st into the leaf base.
- Spoke 7 (short): work exactly as Spoke 1. (6 sts) Sl st into the leaf base. You now have seven spokes fanning from one point in the order short, medium, long, longest, long, medium, short, 60 stitches in total.
- Rnd 2 (outline): ch 1. Working around the outside of the whole leaf, beginning up the free chain loops of Spoke 7: sc in the free loop of each ch to the tip, (sc, ch 2, sc) in the tip loop, then sc in each st back down the worked side to the base, then sc2tog over the last st of that spoke and the first st of the next. Rep this sequence for all seven spokes, then sc down both sides of the stem and sl st to the first sc. Work evenly and do not chase a stitch total; what must be exact is 7 ch-2 picot tips and 6 sc2tog valleys.
- FO, leaving a 30 cm tail.
- Veins: with the 3.5 mm hook and a 45 cm length of the same color, work a line of surface slip stitches from the leaf base up the center of the longest spoke, then up the center of each long and each medium spoke. Five veins per leaf. Fasten the ends on the back and trim.
- Repeat 10 times: 4 deep burgundy, 3 mustard gold, 2 rust, 1 burnt orange.
Small Vine Leaf (make 12)
- Rnd 1: with sage or olive green and the 4.0 mm hook, ch 7. Sl st in 2nd ch from hook, sc in next ch, hdc in next 2 ch, sc in next ch, (sc, ch 2, sc) in the last ch. Working along the opposite side of the same chain: sc in next ch, hdc in next 2 ch, sc in next ch, sl st in the last ch. (13 sts plus the ch-2 tip)
- Rnd 2 (stem): ch 4, sl st in 2nd ch from hook and in each ch back to the leaf base, sl st into the base st. FO, leaving a 20 cm tail.
- Center vein: with the 3.5 mm hook and a 20 cm length of the same green, work a single line of surface slip stitches from the base to the tip. This is one vein only; anything more on a leaf this small looks cluttered.
- Repeat 12 times: 7 sage green, 5 olive green.
Bobble Berry (make 24)
- Rnd 1: with rust, deep burgundy or burnt orange, 6 sc in MR. (6 sts)
- Rnd 2: sc in each st around. (6 sts)
- FO leaving a 20 cm tail. Push the starting yarn end down inside the berry to fill it, then thread the tail through the front loops of all 6 sts and pull tight to close.
- Each finished berry is about 1 cm across. Do not add fiberfill; the yarn end alone gives exactly the right amount of firmness, and stuffing makes them sit up like beads instead of resting against the base.
- Repeat 24 times: 9 rust, 8 deep burgundy, 7 burnt orange.
Surface Chain Vines
- Block the base runner flat and dry before starting. Surface crochet on an unblocked base will distort as soon as the fabric relaxes.
- Lay all ten maple leaves loosely on the base in the arrangement you want, but do not sew them. Use pins to mark where each leaf sits, then lift the leaves off. Now pin out your vine lines in the empty space: 4 long curving lines wandering roughly down the length, plus 6 short offshoots branching from them. The vines should pass under where the leaves will sit and reappear on the other side.
- With taupe and the 3.5 mm hook, hold the yarn behind the base. Insert the hook front to back at the start of a vine line, draw up a loop, then insert the hook one stitch further along the pinned line, draw up a loop and pull it through the loop on your hook. That is one surface slip stitch.
- Continue along the pinned line, moving one stitch or one row at a time depending on the direction of the curve. To turn a corner smoothly, work into the diagonal rather than making a right angle.
- Work the 4 main vines in taupe and the 6 offshoots in olive green. Keep the tension loose. A tight surface chain puckers the base into a visible pull line that no blocking will remove.
- FO at the end of each vine by drawing the yarn through to the back and knotting it against the fabric. Weave in the ends on the back.
- Remove the pins and check the base still lies flat. Fix any puckering now by unpicking that section and reworking it looser.
Finishing
Block every maple and every small green leaf before assembly. Pin each maple with all seven lobes pulled fully open and the picot tips stretched to a point, and pin the small leaves symmetrically. Spray with water or spray starch and let them dry completely. Chained spokes curl toward the back if they are left unblocked, and once a leaf is sewn into place you cannot pin it open on its own.
Put the maple leaves back exactly where your pins marked them, so each one covers a section of vine and appears to be growing from it. Angle them in different directions rather than lining them all up, and check the color spread from a few steps back. The four burgundies are the heaviest color and will pull the eye if they end up clustered at one end. Photograph the layout before you thread a needle.
Sew each maple down through the stem and the base of three spokes only, using its own long tail and small whip stitches through the back loops into the base fabric. Leave every lobe tip completely free so it lifts off the surface, which is what gives the runner its depth. Attach the small green leaves next, each one tacked at the stem and near the tip so it sits against a vine rather than floating. Sew the berries last, in clusters of two and three along the vines, anchoring each with three or four stitches around the closed base so they cannot roll.
Weave in all remaining ends on the back and check for any lobe or leaf caught by a single stitch. Give the finished runner one last light steam under a cloth, then leave it flat overnight under a weight so the appliqué areas sit level with the base. If it will live on a polished table, a few small circles of non slip tape on the back under the heaviest leaves will stop it sliding.
Tips for Success
- Make all ten maple leaves before you start the base. They are the interesting part, and doing them first means the 150 row base becomes the thing standing between you and a finished runner rather than a chore you face after the fun is over.
- Count the spokes on every maple before starting Round 2. There must be seven, and the longest must be dead center with three on each side. A leaf with the long spoke off center is unusable and you will only notice once the outline is done.
- Practise surface crochet on a spare swatch of the same cream cotton before you touch the runner. Ten minutes of practice will save you from a puckered vine line across a base that took eight hours to make.
- Use a contrasting scrap of yarn instead of pins to plot the vine lines if you have a lot of curves. Lay it on the base, shift it until the shape is right, then tack it down and follow it with the hook.
- Keep the cream base clean while you work. It is a large pale surface and it will pick up everything. Store it in a bag between sessions and wash your hands before handling it.
Common Mistakes to Avoid
- Working the surface vines too tight. This is the single most common failure on this design. Each surface slip stitch should be loose enough that the base fabric underneath stays completely relaxed. If you see a ridge or a pull line, the vine is too tight and has to come out.
- Sewing the maple leaves down before the vines are in. The hook needs to get behind the base fabric, and a leaf on top blocks it. The vine then has to stop and restart at every leaf, which is immediately visible.
- Missing the sc2tog in the leaf valleys. There must be exactly six, one between each pair of spokes. Without them the notches between lobes flare open and the leaf reads as a seven pointed star instead of a maple.
- Losing stitches at the base edges. In plain single crochet it is easy to skip the last stitch of a row, and over 100 body rows that turns a straight edge into a taper. Count 51 at the end of every fifth row.
- Stuffing the berries with fiberfill. They are only 1 cm across and fiberfill makes them hard and round so they stand up off the surface and catch on things. The yarn end tucked inside is all they need.
Ways to Customize This Pattern
- Make a matching set of placemats. Work the same base 51 stitches wide but only 40 body rows, with both points, and add one maple leaf, two green leaves, one short vine and three berries to each. Four of them plus the runner makes a full table.
- Change the base to a color and the leaves to neutrals. A deep walnut or charcoal base with cream, oatmeal and pale gold leaves reverses the whole mood and looks striking under white plates.
- Skip the points for a straight rectangle. Start with a foundation chain of 51, work 150 rows straight and border as written. Faster, and it suits a modern square table better.
- Turn the palette to spring. Three greens for the maples, cream and blush for the small leaves, and pale blue berries, over the same cream base with the same vines.
- Add a hanging sleeve to use it as a wall piece. Crochet a strip 8 sc wide and 30 cm long, fold it and sew it across the back near one point, then run a dowel through it.
Frequently asked questions
You can, and it is a reasonable substitute if surface crochet is not something you want to learn on a piece this size. Make chain cords in taupe, slip stitch back along each one for stability, then sew them down with tiny stitches every 2 cm. The difference is that a sewn cord sits on top of the fabric and casts a small shadow, while a surface chain sits flush and looks like it was knitted in. Both look good; they just look different.
Almost always a miscount in the shaping rows. The first point increases across 24 rows from 3 stitches to 51, and the second decreases across 24 rows from 51 back to 3. If one of them took 22 or 26 rows, or if a row gained or lost only one stitch instead of two, the angle changes. Lay the runner flat, fold it in half lengthwise, and compare the points. If they are close, blocking will disguise it; if one is visibly steeper, the shaping rows need reworking.
350 g is a safe estimate for the base plus a four round border at the stated gauge, and most people finish with a little left. If you are working looser than gauge, or if you decide to add body rows for a longer runner, buy an extra 50 g ball, and buy it at the same time so the dye lot matches. A base that changes shade halfway is the one mistake on this pattern you cannot fix at all.
Keep them loose. The runner is essentially flat and the only depth in the design comes from those lifted lobe tips and the small green leaves standing slightly proud of the base. Sew every point down and the whole thing flattens into what looks like colorwork rather than appliqué. The only exception is if the runner will get heavy daily use, in which case tack the outermost lobe of each maple with one stitch so it cannot catch on a plate.
Hand wash in cool water with a mild detergent. The base itself is solid fabric and sturdy, but the appliqué leaves are attached with sewn stitches and the surface vines can be pulled if the piece is agitated. Squeeze the water out without wringing, lay it flat on a towel, reshape the points and lobes, and dry flat. Do not hang it wet, because the weight of the wet base will stretch the pointed ends out of shape.
The finished Fall Leaves Crochet Table Runner

