Fall Maple Leaf Accents Crochet Pattern
Beginner Friendly
Perfect for those just starting their crochet journey, with clear instructions and simple techniques
Single-Day Project
A satisfying project you can complete in a single afternoon or evening.
Handmade Gift
A beautiful keepsake — free forever. Read online or print at home.
About This Fall Maple Leaf Accents Crochet Pattern
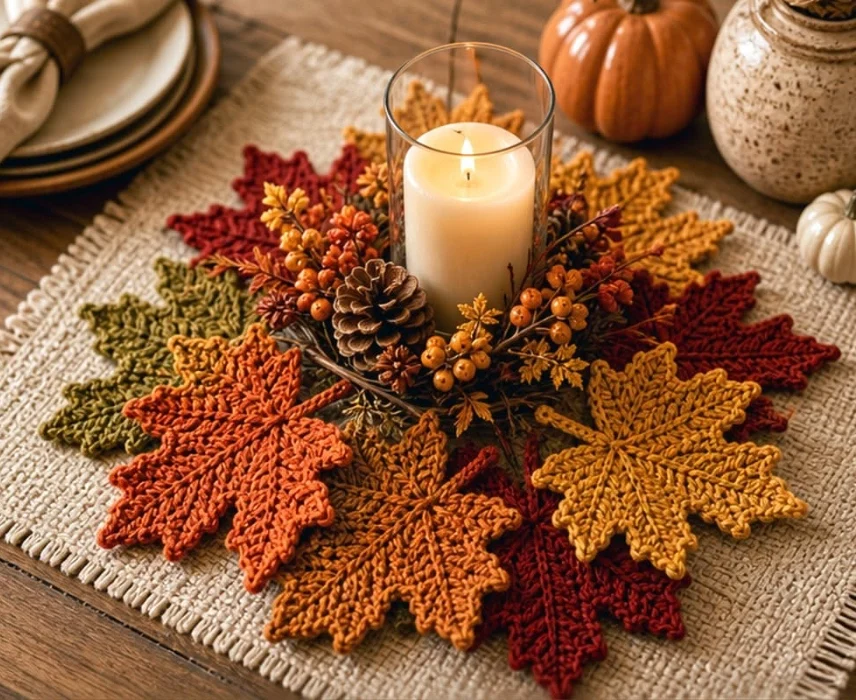
This crochet maple leaf pattern makes individual leaf motifs, each about 15 cm across, in a mix of rust, gold, deep red, and olive. They’re versatile by design: cluster 6-8 of them around a candle for a centerpiece ring, or scatter single leaves on plates and napkins as place-setting accents. Each leaf takes shape through a small increase-based center round followed by five separately shaped lobes, so it holds a real, pointed maple silhouette rather than a rounded generic leaf.
What makes this design distinctive is how much mileage you get from one small motif. The same leaf pattern works equally well as a stand-alone napkin topper, a scattered table accent, or grouped densely into a ring around a candle and pinecones for a full centerpiece. Expect to spend 45-60 minutes per leaf once you’re comfortable with the lobe shaping, so a set of 8 runs roughly 6-9 hours total.
This is an advanced pattern, best suited to someone comfortable shaping individual lobes with graduated stitch heights and managing multiple color repeats, rather than someone crocheting their first leaf motif.
Materials
- Worsted weight yarn, rust ~15g per leaf
- Worsted weight yarn, gold ~15g per leaf
- Worsted weight yarn, deep red ~15g per leaf
- Worsted weight yarn, olive ~15g per leaf
- Crochet hook 3.5 mm
- Tapestry/yarn needle
- Sharp scissors
- Natural jute mat for centerpiece styling
- Candle and small autumn accents optional, for centerpiece styling
Abbreviations
MRmagic ringscsingle crochetincincrease (2 sc in next st)decdecrease (invisible)hdchalf double crochetdcdouble crochettrtreble crochetsl stslip stitchchchainBLOback loop onlyFLOfront loop onlyst(s)stitch(es)Maple Leaf Motif (make multiple: mix of rust, gold, deep red, and olive)
- Round 1: 5 sc in MR, then inc around. (10 sts)
- Round 2: (sc, inc) around. (15 sts)
- Round 3: sc around even. (15 sts)
- Round 4: (sc, inc) around, working in a modified repeat to widen the base for lobe shaping. (approx. 20 sts)
- Round 5: (sc, inc, sc) around to finish shaping the base disc before starting the lobes. (approx. 24 sts)
Shaping the Five Lobes
- Round 1: sc around the base disc, then sc, dec to begin narrowing into the first lobe base. (6 sts across this lobe)
- Round 2: (sc, inc) x2 across the lobe to widen it into its main body. (2 sts net change per repeat)
- Round 3: sc around even across the lobe. (unchanged st count)
- Round 4: (sc, inc) x2 to build the lobe’s broadest point. (6-8 sts)
- Round 4 repeat: sc around 8 sts for the lobe’s tip taper.
- Round 6: sc around 8 sts, then continue with sc around 9 sts on the next repeat to shape the point at the very tip of the lobe.
- Round 10: sc around 8 sts to close the lobe smoothly, then fasten off that lobe and rejoin at the base to begin the next of the five lobes, repeating the shaping above for all 5.
Finishing
Once all 5 lobes are shaped and fastened off, weave in every yarn end securely at the base disc where the lobes meet, since this is the point that takes the most handling. Lightly steam each leaf and pin the lobes flat and spread evenly apart while damp, then let dry completely. For a centerpiece ring, arrange 6-8 finished leaves in a circle around a candle on a jute mat, tucking in pinecones or berry sprigs between leaves as shown. For place settings, position a single leaf on top of a folded napkin or plate.
Tips for Success
- Keep tension consistent across all 5 lobes on one leaf; even small tension shifts between lobes are noticeable once the leaf is finished and flat.
- Block every leaf before styling it into a centerpiece or on a plate; unblocked lobes curl at the tips and won’t lie flat against a table setting.
- Mix your 4 colors across leaves in a set rather than making them all one color, so a grouped candle ring or scattered accents look intentional rather than repetitive.
- Weave in ends at the base disc extra securely; this point holds all 5 lobes and gets the most stress when leaves are handled or moved between settings.
- Make a couple of extra leaves beyond what you think you need; having spares makes arranging a centerpiece ring or place settings much easier to balance by eye.
Common Mistakes to Avoid
- Rushing through the lobe shaping without counting stitches at each stage leads to uneven, lopsided lobes. Fix: check your stitch count after every round before moving to the next.
- Skipping blocking before using leaves as plate or napkin accents leaves them curling instead of lying flat. Fix: steam-block every leaf and let it dry fully before styling.
- Making an entire set in only one color loses the layered look shown in the photo. Fix: distribute all 4 colors across your leaves as you make them.
- Leaving loose ends at the base disc unwoven risks the lobes coming apart with handling. Fix: weave in securely and double back through a few stitches for extra hold.
- Cramming too many leaves tightly around a candle leaves no room for pinecones or berries. Fix: leave small gaps between leaves when arranging a centerpiece ring.
Ways to Customize This Pattern
- Make a larger batch and join leaves edge to edge for a matching table runner using this same leaf motif.
- Add a short crocheted stem to the base of each leaf for a more finished look, especially for standalone napkin toppers.
- Swap the fall palette for greens and yellows for a spring or summer version of the same leaf.
- Scale down the starting rounds slightly for a smaller leaf suited to place cards or gift tags.
- Stiffen finished leaves lightly with fabric stiffener for a crisper, more structured centerpiece ring.
Frequently asked questions
The photo shows roughly 6-8 leaves arranged around a candle with added pinecones and berries filling the gaps. Adjust the count based on your candle’s size and how full you want the ring to look.
Yes. String or sew several leaves along a length of twine or ribbon at even intervals to make a simple garland using the same individual leaf motif.
A stem is optional and mainly decorative. The leaf holds its shape and displays well without one, but a short crocheted stem can add a nice finishing detail, especially when leaves are used individually on a plate.
This usually comes down to yarn weight and hook size. Using a lighter yarn or smaller hook than specified will shrink the leaf; switching to a bulkier yarn or larger hook will size it up.
The finished Fall Maple Leaf Accents Crochet Pattern

