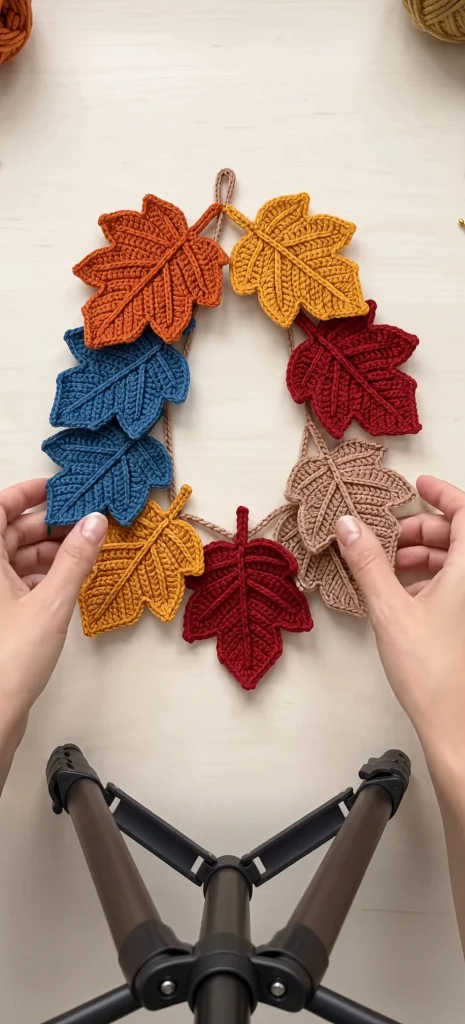
Falling Leaves Crochet Garland in Nine Colours
Beginner Friendly
Perfect for those just starting their crochet journey, with clear instructions and simple techniques
Single-Day Project
A satisfying project you can complete in a single afternoon or evening.
Handmade Gift
A beautiful keepsake — free forever. Read online or print at home.
About This Falling Leaves Crochet Garland in Nine Colours
This crochet leaf garland pattern is nine separate leaves strung along a single slim cord: five broad five-lobed maples, two narrower three-lobed maples and two oak leaves with rounded lobes, in rust, gold, teal blue, deep red and taupe. Every leaf is worked flat in rows from the stem end outward, one lobe at a time, then outlined in a single round that pulls the separate lobes into one shape and gives the edge its definition.
The veins are what lift this above a row of leaf shapes. Each leaf gets a central spine and four to six branching veins worked in surface slip stitch over the finished fabric, in the same colour as the leaf, so they read as texture rather than as contrast lines. It takes about eight minutes per leaf and it is the difference between something that looks like a leaf and something that looks like a leaf shape.
Expect 8 to 11 hours, which makes this the quickest advanced project in the autumn set and a good one for using up single balls. No leaf needs more than 25 g. The five colours are scattered deliberately rather than repeated in sequence, with the two teal leaves paired together on one side to stop the palette reading as a rainbow. Worsted cotton at a firm gauge keeps the lobe points sharp. Written in US terms throughout.
Materials
- Worsted / Aran cotton in rust approx. 25 g
- Worsted / Aran cotton in golden yellow approx. 45 g, two leaves
- Worsted / Aran cotton in teal blue approx. 45 g, two leaves
- Worsted / Aran cotton in deep red approx. 45 g, two leaves
- Worsted / Aran cotton in taupe approx. 25 g plus 30 g for the cord
- 3.5 mm crochet hook one size down from the ball band, for crisp lobe points
- Tapestry needle blunt, large eye
- Stitch markers at least 5, one per lobe in progress
- Rust-proof pins and blocking mats around 60 pins, every lobe tip needs one
- Spray bottle and a steam iron with a pressing cloth
- Tape measure and sharp scissors
Abbreviations
chchainscsingle crochethdchalf double crochetdcdouble crochetsl stslip stitchsc2togsingle crochet 2 stitches togethersc3togsingle crochet 3 stitches togetherdc2togdouble crochet 2 stitches togethersurface sl stslip stitch worked over the surface of finished fabricst / stsstitch / stitchesreprepeatRSright sideFOfasten offGauge and Working Notes
- Gauge: a finished large maple leaf measures about 14 cm across and 15 cm from stem tip to top lobe. A small maple is about 11 cm and an oak leaf about 13 cm long.
- Every leaf starts at the stem end and grows outward. The base fan is worked in the round, the lobes in rows, and the outline in the round again.
- Turning chains count as a stitch throughout: ch 3 counts as a dc. The ch 1 at the start of an sc row does not count as a stitch.
- Work the surface veins after the outline round and before blocking. The outline sets the shape the veins have to follow.
- Keep every surface sl st loose and even. A tight vein gathers the fabric behind it and the leaf will not block flat, which is by far the most common problem with this design.
- Leave a 25 cm tail on every leaf. You will use it to attach the leaf to the cord, so one tail does both jobs.
- Make and block all nine leaves before touching the cord. The spacing is judged with the leaves in front of you.
Large Maple Leaf (make 5)
- Base: ch 4 and sl st into the first ch to form a ring.
- Round 1: ch 3 (counts as first dc), 14 dc into the ring, sl st into the top of the ch-3 (15 dc).
- Round 2: ch 1, sc in the same st as the join, ch 5, skip the next 2 dc, *sc in the next dc, ch 5, skip the next 2 dc*; rep from * 3 more times, sl st into the first sc (5 ch-5 loops, using all 15 dc). FO.
- Lobe Row 1: join yarn in the next ch-5 loop, ch 3 (counts as first dc), 6 dc into the same loop, turn (7 dc).
- Lobe Row 2: ch 3, dc in the first st, dc in the next 5 sts, 2 dc in the last st, turn (9 dc).
- Lobe Row 3: ch 3, dc in the next 7 sts, dc in the last st, turn (9 dc).
- Lobe Row 4: ch 3, dc2tog over the next 2 sts, dc in the next 3 sts, dc2tog over the next 2 sts, dc in the last st, turn (7 dc).
- Lobe Row 5: ch 1, sc in the first st, sc2tog, sc in the next st, sc2tog, sc in the last st, turn (5 sc).
- Lobe Row 6: ch 1, sc2tog, sc in the next st, sc2tog, turn (3 sc).
- Lobe Row 7: ch 1, sc3tog (1 st), then ch 3 and sl st into the 3rd ch from hook for the tip picot. FO.
- Repeat Rows 1 to 7 in each of the remaining 4 ch-5 loops, for 5 lobes in total. Make the two lowest lobes shorter by omitting Row 3, which is what gives a maple leaf its narrower lower pair.
- Outline round: join in the gap between the two lowest lobes. Ch 11, sl st into the 2nd ch from hook and into each remaining ch (10 sl sts for the stem), then 1 sc into the base gap. On each lobe work 2 sc into the row-end of each dc row and 1 sc into the row-end of each sc row going up the side, 3 sc into the tip picot, then the same coming down (24 sc on a full lobe, 20 on a shortened one), with 1 sc into each of the 4 valleys between lobes. Sl st into the first sc (113 sc plus the stem). FO.
- Make 5: one rust, one gold, one teal, one deep red, one taupe.
Small Maple Leaf (make 2)
- Base: ch 4 and sl st into the first ch to form a ring.
- Round 1: ch 3 (counts as first dc), 8 dc into the ring, sl st into the top of the ch-3 (9 dc).
- Round 2: ch 1, sc in the same st as the join, ch 5, skip the next 2 dc, *sc in the next dc, ch 5, skip the next 2 dc*; rep from * once more, sl st into the first sc (3 ch-5 loops, using all 9 dc). FO.
- Lobe Row 1: join yarn in a ch-5 loop, ch 3, 6 dc into the same loop, turn (7 dc).
- Lobe Row 2: ch 3, dc in the next 5 sts, dc in the last st, turn (7 dc).
- Lobe Row 3: ch 3, dc2tog over the next 2 sts, dc in the next st, dc2tog over the next 2 sts, dc in the last st, turn (5 dc).
- Lobe Row 4: ch 1, sc in the first st, sc3tog, sc in the last st, turn (3 sc).
- Lobe Row 5: ch 1, sc3tog (1 st), then ch 3 and sl st into the 3rd ch from hook. FO.
- Repeat Rows 1 to 5 in the remaining 2 loops, for 3 lobes.
- Outline round: join in the base gap, ch 9, sl st into the 2nd ch from hook and each remaining ch (8 sl sts for the stem), 1 sc into the base gap. On each lobe work 2 sc into each of the 3 dc row-ends and 1 sc into each of the 2 sc row-ends going up (8 sc), 3 sc into the tip picot, then 8 sc down the other side (19 sc per lobe), with 1 sc into each of the 2 valleys. Sl st into the first sc (60 sc plus the stem). FO.
- Make 2: one gold and one deep red.
Oak Leaf (make 2)
- With teal or taupe, ch 25.
- Row 1: sc in the 2nd ch from hook and in each ch across, turn (24 sc). This row is the central axis of the leaf and the stem grows from one end of it.
- Row 2 (first side lobes): ch 1, sc in the next 3 sts, *ch 5, sc in the 2nd ch from hook, hdc in the next ch, dc in the next 2 ch, sl st into the same st of Row 1, sc in the next 3 sts*; rep from * 4 more times, sc in the last st, turn (5 rounded lobes along one side).
- Row 3 (second side lobes): turn the work so the underside of the foundation chain is facing you. Join in the first ch and rep Row 2 exactly, so the leaf has 5 matching lobes on the second side.
- Tip: at the far end of the axis, work (ch 6, sc in the 2nd ch from hook, hdc in the next ch, dc in the next 3 ch, sl st into the end st of the axis) to make the single pointed end lobe.
- Outline round: join at the stem end, ch 11, sl st into the 2nd ch from hook and each remaining ch (10 sl sts for the stem), then sc evenly all the way around the outline, working 2 sc into the tip of each rounded lobe and sc2tog in each valley between lobes. Sl st to join (approximately 96 sc). FO.
- The exact outline count varies with how tightly you worked the lobes. What matters is that the edge lies flat: if it ruffles, you have too many sc, and if it cups, too few.
- Make 2: one teal and one taupe. Oak leaves are the odd ones out in the garland on purpose, since a string of nine identical maples reads as repetitive.
Surface Veins (all nine leaves)
- Work with the same colour as the leaf, holding the yarn behind the fabric. Insert the hook from the front, pull a loop through, and work surface sl sts across the face of the leaf, one into each row or round you cross.
- Spine: start at the point where the stem joins the leaf and work a line of surface sl sts straight up the centre to the tip of the top lobe. On a large maple this is about 14 sl sts.
- Branch veins on a large maple: from a point one third of the way up the spine, work a line out to the tip of each of the two lower lobes. From a point two thirds up, work a line out to the tip of each of the two side lobes. Four branches in total, about 8 sl sts each.
- Branch veins on a small maple: two branches, one to each side lobe tip, about 6 sl sts each.
- Branch veins on an oak leaf: work a short branch from the spine out toward each rounded lobe, 10 branches of 3 or 4 sl sts. Keep these very short, since long oak veins make the leaf look striped.
- Curve every branch slightly upward as it travels outward rather than running it dead straight. Straight veins read as drawn on.
- FO each vein at the outer end and weave the tail into the outline round on the back.
Cord and Hanging Loop
- With taupe, ch 300 (about 120 cm).
- Return pass: sl st into the back bump of the 2nd ch from hook and into the back bump of each remaining ch (299 sl sts).
- Work into the back bump, not the top loops, and keep the slip stitches loose. This is the only thing that keeps the cord flat instead of corkscrewing, and it cannot be fixed afterwards.
- FO leaving 20 cm tails at both ends.
- Hanging loop: if you want to hang the garland as a loop rather than a straight swag, fold the cord in half to find the centre, then make a 10 cm loop there by working 25 sl sts back along the cord to form a doubled section, and stitch it closed with the tapestry needle.
- For a straight mantel garland, skip the loop and finish each end with a simple knotted loop of 20 chains instead.
Assembly
- Block all nine leaves before attaching anything. Damp each one, pin every lobe tip out to a sharp point, and let them dry completely. Unblocked leaves have rounded tips and the difference is immediately visible on a garland.
- Lay the cord out at its final length and arrange the leaves along it before sewing. Work with the garland hung or laid out exactly as it will live, since a loop and a straight swag need different spacing.
- Space the leaves roughly 12 cm apart, measuring from stem to stem, which fills about 108 cm of a 120 cm cord and leaves the ends clear.
- Alternate which side of the cord each leaf sits on, and alternate the angle so no two leaves hang at the same tilt. Leaves all facing the same way look like a chart.
- Colour order matters more than spacing. Keep the two teal leaves adjacent and put the taupe ones at opposite ends, so the palette reads as a scatter rather than as a sequence.
- Attach each leaf by stitching the crocheted stem to the cord with four or five stitches along its length, not by the leaf body. The stem is what lets the leaf swing and settle naturally.
- Check the balance by holding the garland up before the last two leaves go on. It is much easier to adjust the spacing of the final two than to unpick the middle.
Finishing
Weave in every end along the outline round on the back of a leaf, following the line of the stitches for at least 3 cm and splitting the yarn once along the way. Do not weave tails along the cord, where a doubled strand shows as a visible thickening on something this slim. There are around 40 ends on this garland once you count the veins, so do them leaf by leaf rather than saving them up.
Hang the finished garland and look at it from a few metres away before deciding it is done. Two things usually need adjusting at this point: a leaf that hangs face inward and needs its stem stitch loosened so it can rotate, and a gap that reads as too wide because the leaf beside it is smaller than its neighbours. Both take two minutes now and are annoying to fix once it is on the wall.
If a leaf loses its shape after handling, steam it from 15 cm away with the iron never touching the work, and pinch the lobe tips back to points while the cotton is warm. Store the garland loosely coiled in a box rather than folded, since a fold line across a leaf sets into cotton and takes a full re-block to remove.
Tips for Success
- Work all five large maples before starting the small ones. Lobe tension settles after the first two leaves, and a garland where leaf one and leaf nine differ noticeably in size looks like an accident rather than a design.
- Omit Row 3 on the two lowest lobes of every maple, as written. It is a single row but it is what makes the silhouette read as maple rather than as a five-pointed star.
- Keep the surface veins looser than feels right. A vein that puckers the leaf is the most common fault in this design and there is no fixing it short of pulling the vein out and redoing it.
- Pin every lobe tip when blocking, all of them, on all nine leaves. That is around 45 pins. The sharp tip is the entire character of the leaf and it will not form on its own.
- Decide the colour order with all nine leaves laid out on the floor before you thread anything. It is the one design decision in this project that cannot be judged a leaf at a time.
Common Mistakes to Avoid
- Rounded lobe tips. The last three rows of each lobe do all the shaping, and working sc3tog as three separate sc rounds the point off. If your tips are blunt, that is where to look.
- Puckered leaves from tight veins. Surface slip stitch worked at normal crochet tension will always gather the fabric behind it. Work every vein noticeably loose and check the leaf lies flat after each one.
- A cord that corkscrews. Almost always slip stitches worked into the top loops instead of the back bump, or worked too tight. Undo the return pass and redo it rather than trying to steam it straight.
- Leaves attached through the body instead of the stem. Stitched through the fabric, a leaf sits rigid against the cord and the garland looks flat. Sew the stem only, and let the leaf hang.
- Even spacing with every leaf at the same angle. A garland is a scatter, not a rule. Alternate the side and the tilt of every leaf along the cord.
- Skipping the block. Nine unblocked leaves look like nine soft blobs, and no amount of good crochet in the lobes will show through until they are pinned and dried.
Ways to Customize This Pattern
- Change the length by whole leaves. Each one occupies about 12 cm of cord, so six leaves suit a 90 cm mantel and thirteen will span a 170 cm doorway.
- Work it in a single colour for a more formal piece. All nine leaves in cream with cream veins turns the same garland into something that works year round on a bookshelf.
- Turn individual leaves into coasters by working a second plain leaf without veins, holding the two together and joining them with a round of sc.
- Add small stuffed acorns between the leaves, worked as 6 sc in a magic ring increased to 12, with a brown textured cap worked in back loop only.
- Use single leaves as gift tags, bookmarks or napkin rings, adding a longer 20 chain stem and a small loop at the end.
- Make it a window garland by hanging it vertically, with the largest leaf at the bottom and the two small maples at the top, which suits a narrow window better than a horizontal swag.
Frequently asked questions
You can, and the garland still works, but the leaves become leaf shapes rather than leaves. The veins take about eight minutes each and roughly seventy minutes across all nine, which is the best-value hour in the whole project. If you want to cut something, cut the two oak leaves instead and make seven maples.
Usually the outline round rather than the leaf itself. Too many sc around the edge makes it ruffle, too few makes it cup, and both are visible on a flat leaf. The other cause is tight veins gathering the centre. Test by pinning the leaf flat while damp: if it lies flat under pins and curls again when dry, the veins are the problem. If it will not even pin flat, the outline is.
Divide the length you want to cover by the number of leaves plus one. For nine leaves on a 120 cm mantel that gives 12 cm between stems with a clear stretch at each end. Always leave at least 6 cm of bare cord at both ends, because a leaf right at the end has nowhere to hang and looks cramped against whatever the cord is tied to.
Wool works well and blocks beautifully, so it is a good substitute if you want a softer look. Acrylic is the problem: it has no memory for wet blocking, so the lobe tips stay rounded no matter how long you pin them, and steaming it flat enough to compensate risks killing the fibre. On a design where the whole appeal is sharp points, that matters.
Coil it loosely in a box with the leaves lying flat rather than folding it or hanging it on a hook for eleven months. Cotton takes a crease along a fold and it sets in over time, so a folded leaf will need a full re-block next autumn. Tissue paper between the layers helps if you are stacking it with other pieces.
The finished Falling Leaves Crochet Garland in Nine Colours

