Advanced
For experienced crocheters who enjoy complex shaping, fine detail, and ambitious construction
Weekend Project
A satisfying weekend make — start Friday, finish Sunday, enjoy forever.
Handmade Gift
A beautiful keepsake — free forever. Read online or print at home.
About This Fern & Cream Shell Stitch Bedspread
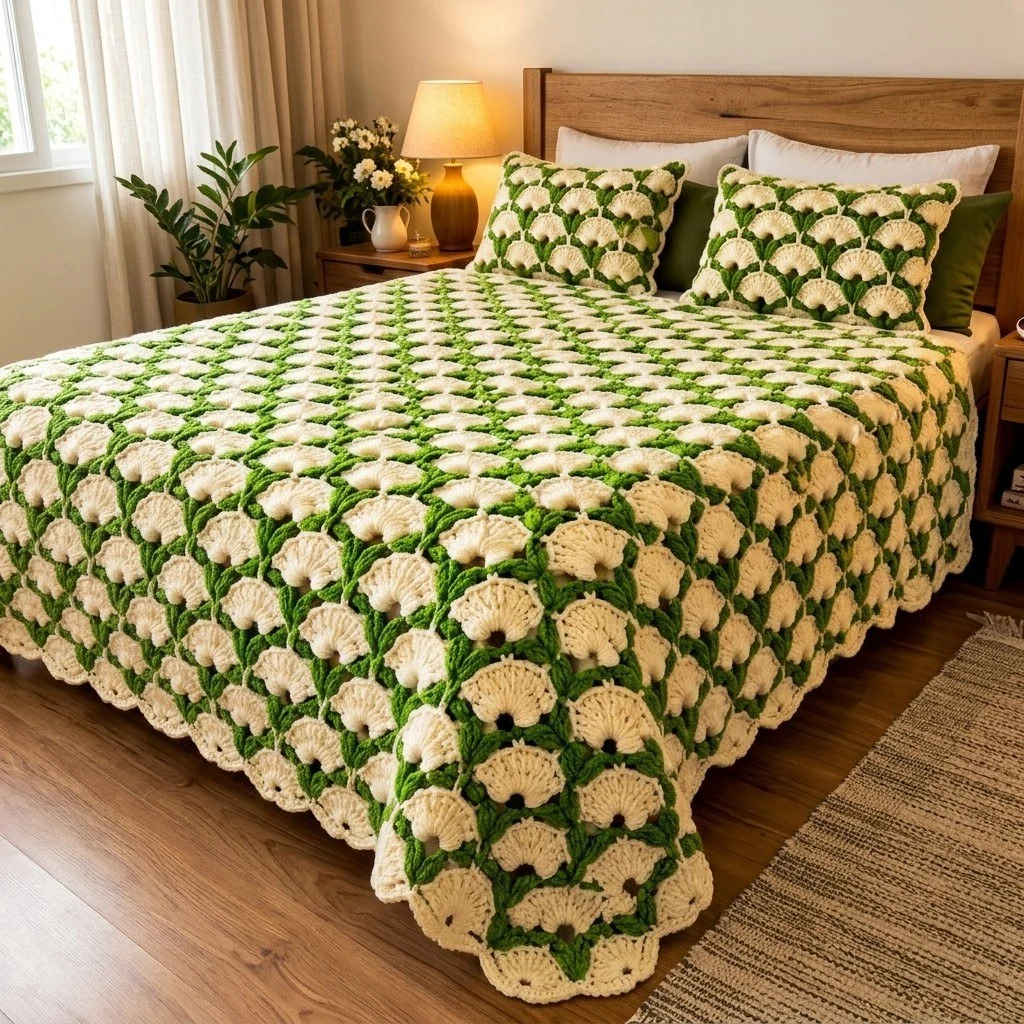
This shell stitch bedspread crochet pattern builds a full double-bed cover out of two alternating rows: a fern green row of chain arcs, and a cream row of seven-double-crochet fans worked into those arcs. Because every cream row is anchored in the centre of the fans below it, the fans sit half-offset from row to row, like overlapping scales, and the green arcs peek out between them as small pointed leaves. That offset is the whole trick of the design — it is what makes the fabric look like a vintage heirloom coverlet instead of a flat row of shells.
It is an advanced pattern for a few honest reasons. The two colours alternate every single row, so you are joining and fastening off constantly. The fans change anchor point on a four-row repeat, so you have to read your fabric rather than count blindly. The side edges carry half-fans on every other row, which looks wrong until the border pulls it all straight. And it is big: 206 foundation chains, 118 rows, and a three-round scalloped border worked over more than a thousand stitches. None of it is difficult on its own, but it asks for attention and stamina.
Plan on 45 to 60 hours for the bedspread and roughly 6 hours for each pillow cover, spread over several weeks. It suits a confident crocheter who already works comfortably with shells and chain spaces and wants one large, long project to live with. Worked in aran-weight cotton on a 5 mm hook, the finished bedspread measures about 180 x 215 cm — enough to cover a standard double mattress with a drop on three sides — and the matching covers fit 45 cm pillow forms.
Materials
- Aran / worsted weight cotton or cotton-acrylic blend in cream approx. 2900 g (≈5600 m) total for the bedspread and both pillow covers
- Aran / worsted weight cotton or cotton-acrylic blend in fern green approx. 950 g (≈1850 m) total
- 5 mm crochet hook or the size that gives you gauge
- Tapestry needle large eye, blunt tip, for the many ends
- Stitch markers at least 6, for marking fan centres and row edges
- Two pillow forms, 45 x 45 cm for the matching covers
- Tape measure and sharp scissors
- Rust-proof blocking pins and a large flat surface bed or clean floor with towels
Abbreviations
chchainsl stslip stitchscsingle crochethdchalf double crochetdcdouble crochetst(s)stitch(es)skskipspspacereprepeatRSright sideWSwrong sidefan7 dc worked into one ch-5 archalf fan4 dc worked into an edge ch-3 sppicotch 3, sl st in 3rd ch from hookGauge and Sizing
- Gauge, after blocking, with a 5 mm hook: one fan repeat (7 dc + 1 sc) measures 5 cm wide, and one four-row pattern repeat measures 7 cm tall. Put another way, 2 fan repeats and 8 rows = 10 cm wide x 14 cm tall.
- Swatch first: ch 26 (that is 6 x 4 + 2) and work Rows 1-6 of the bedspread. Measure across the fans, not including the edge half-fans. Four fans should measure 20 cm.
- If your swatch is too wide, go down to a 4.5 mm hook. If it is too narrow, go up to a 5.5 mm hook. Do not try to correct gauge by changing the stitch counts — the arcs will distort.
- The bedspread as written uses 34 fans across and 118 rows, finishing at about 170 x 206 cm before the border and about 180 x 215 cm after it.
- To resize: foundation chain = (6 x number of fans) + 2. Each fan adds 5 cm of width. Each four-row repeat adds 7 cm of length. For a single bed, 28 fans (ch 170) and 118 rows gives roughly 150 x 215 cm.
How the Stitch Pattern Works
- Every green row creates chain arcs. Every cream row fills those arcs with fans. The colours alternate on every single row, so each row is joined at the start and fastened off at the end, leaving a tail of about 12 cm.
- Work with the RS facing on every row if you prefer absolutely even fans: fasten off at the end of each row, then rejoin at the beginning of the next row on the same side. This is slower but gives the cleanest scale effect and is what the photographed piece uses.
- A faster alternative is to turn at the end of each row and carry the unused colour loosely up the side edge, catching the float in the first stitch of every second row. The border will cover the floats.
- Rows 1 and 2 set the fabric up. Rows 3, 4, 5 and 6 are the repeat. Row 6 ends in exactly the same configuration as Row 2, so you simply return to Row 3 each time.
- Rows 4 produce 33 full fans plus a half fan at each edge; Rows 2 and 6 produce 34 full fans. The edge alternating between full and half fans is correct and intentional — it is what gives the soft scallop down the sides.
Bedspread: Foundation and Set-Up Rows
- With fern green, ch 206. (That is 6 x 34 + 2. Count twice; it is a long chain and a miscount here costs hours.)
- Row 1 (green, RS): sc in 2nd ch from hook, *ch 5, sk 5 ch, sc in next ch; rep from * across. You have 34 ch-5 arcs and 35 sc. Fasten off green.
- Row 2 (cream, RS): join cream with a sl st in the first sc of Row 1, ch 1, sc in same sc, *7 dc in next ch-5 arc, sc in next sc; rep from * across. You have 34 fans and 35 sc, 273 sts in total. Fasten off cream.
- Place a marker in the centre (4th) dc of each fan before you fasten off. These markers are your anchor points for Row 3.
Bedspread: The Four-Row Shell Repeat
- Row 3 (green): join green in the first sc of the previous row, ch 1, sc in same sc, ch 3, sk 3 dc, sc in centre dc of first fan, *ch 5, sk 3 dc, sk next sc, sk 3 dc, sc in centre dc of next fan; rep from * across to the last fan, ch 3, sk 3 dc, sc in last sc. You have 1 ch-3 sp, 33 ch-5 arcs, 1 ch-3 sp and 36 sc. Fasten off green.
- Row 4 (cream): join cream in the first sc, ch 1, sc in same sc, 4 dc in ch-3 sp, sc in next sc, *7 dc in next ch-5 arc, sc in next sc; rep from * 32 more times, 4 dc in last ch-3 sp, sc in last sc. You have 1 half fan, 33 full fans, 1 half fan and 36 sc, 275 sts in total. Fasten off cream.
- Mark the centre (4th) dc of each of the 33 full fans. Do not mark the half fans.
- Row 5 (green): join green in the first sc, ch 1, sc in same sc, ch 5, sk 4 dc, sk next sc, sk 3 dc, sc in centre dc of first full fan, *ch 5, sk 3 dc, sk next sc, sk 3 dc, sc in centre dc of next full fan; rep from * 31 more times, ch 5, sk 3 dc, sk next sc, sk 4 dc, sc in last sc. You have 34 ch-5 arcs and 35 sc. Fasten off green.
- Row 6 (cream): join cream in the first sc, ch 1, sc in same sc, *7 dc in next ch-5 arc, sc in next sc; rep from * across. You have 34 fans and 35 sc, 273 sts. Fasten off cream. Mark the centre dc of each fan.
- Row 6 leaves the fabric in exactly the same state as Row 2, so Rows 3-6 are the full repeat from here on.
Bedspread: Working to Full Length
- Repeat Rows 3-6 a total of 29 times. Counting Rows 1 and 2, that gives 118 rows worked.
- The last row worked is a Row 6, so the top edge finishes with 34 full fans — the same as the foundation end. Do not stop on a Row 4; the two short edges will not match.
- Check width every 20 rows by laying the piece flat and measuring across the middle. It should stay at about 170 cm. If it is creeping narrower, you are probably pulling the ch-5 arcs tight; loosen them or move up half a hook size for the arcs only.
- Measure length against your bed as you go. Finished length before the border should be about 206 cm. Add or remove whole four-row repeats, always finishing on a Row 6.
- Weave in the row-end tails in batches of twenty or so as you work. Leaving 236 tails for the end is miserable.
Bedspread: Scalloped Border
- Round 1 (green): join green in any corner, ch 1, 3 sc in the corner. Along each short edge (top and foundation edge) work 276 sc, working 1 sc in each st along the top edge and roughly 8 sc for every 6 foundation chains along the lower edge, adding or skipping a few sc evenly to land exactly on 276.
- Continue Round 1 along each long edge with 240 sc, which is 2 sc into each row end (236) plus 4 extra sc spaced evenly along the edge. Work 3 sc in each remaining corner. Join with a sl st to the first sc. Total: 1044 sc. Fasten off green.
- Round 2 (cream): join cream in the centre sc of any corner, ch 3, 6 dc in the same st (corner shell), *sk corner sc, then along the edge work: sk 2 sc, 5 dc in next sc, sk 2 sc, sc in next sc; rep the edge sequence to the last corner group (46 shells per short edge, 40 shells per long edge), sk corner sc, 7 dc in centre corner sc; rep from * around. Join with a sl st to the top of the ch-3. You have 176 shells in total. If the count runs out by one stitch at a corner, skip one more or one fewer sc there — it will not show. Fasten off cream.
- Round 3 (green): join green in any sc between two shells, ch 1, sc in same st, *sc in next 2 dc, (sc, picot, sc) in centre dc of shell, sc in next 2 dc, sc in next sc; rep from * around, working the corner shells as: sc in next 3 dc, (sc, picot, sc) in centre dc, sc in next 3 dc. Join with a sl st and fasten off.
- Weave in all border ends on the wrong side, following the line of the stitches rather than cutting across them, so the edge stays flexible.
Pillow Cover Front (make 2)
- With fern green, ch 56 (6 x 9 + 2).
- Row 1 (green): sc in 2nd ch from hook, *ch 5, sk 5 ch, sc in next ch; rep from * across. You have 9 ch-5 arcs and 10 sc. Fasten off.
- Row 2 (cream): join cream in first sc, ch 1, sc in same sc, *7 dc in next arc, sc in next sc; rep from * across. 9 fans, 10 sc, 73 sts. Fasten off.
- Row 3 (green): ch 1, sc in first sc, ch 3, sk 3 dc, sc in centre dc of first fan, *ch 5, sk 7 sts, sc in centre dc of next fan; rep from * across, ch 3, sk 3 dc, sc in last sc. 1 ch-3 sp, 8 ch-5 arcs, 1 ch-3 sp, 11 sc. Fasten off.
- Row 4 (cream): ch 1, sc in first sc, 4 dc in ch-3 sp, sc in next sc, *7 dc in next arc, sc in next sc; rep from * 7 more times, 4 dc in last ch-3 sp, sc in last sc. 2 half fans, 8 full fans, 11 sc. Fasten off.
- Row 5 (green): ch 1, sc in first sc, ch 5, sk 8 sts, sc in centre dc of first full fan, *ch 5, sk 7 sts, sc in centre dc of next full fan; rep from * 6 more times, ch 5, sk 8 sts, sc in last sc. 9 ch-5 arcs, 10 sc. Fasten off.
- Row 6 (cream): as Row 2. 9 fans, 10 sc. Fasten off.
- Repeat Rows 3-6 a total of 6 times, ending on a Row 6. Counting Rows 1 and 2 you have 26 rows and a panel of about 45 x 45 cm. Make a second identical front panel for the other pillow.
Pillow Cover Back Panels (make 4)
- With cream, ch 64.
- Row 1: hdc in 3rd ch from hook and in each ch across. 62 hdc plus the turning ch counts as the 63rd st. Turn.
- Rows 2-30: ch 2, hdc in each st across. 63 hdc. Turn. Hdc gauge should be 14 sts and 10 rows to 10 cm, giving a panel of about 45 x 30 cm.
- At the end of Row 30 do not fasten off. Edging row (green): ch 1, sc in each st across one long edge, 63 sc. Fasten off. This firmed green edge becomes the visible overlap inside the envelope opening.
- Make 4 panels in total — two for each pillow cover.
Pillow Cover Assembly and Edging
- Lay one front panel wrong side up. Place the two back panels on top of it, right sides up, green edged sides facing the centre, overlapping by about 15 cm so that together they cover the full 45 cm square. Pin generously around all four sides.
- Round 1 (green): working through all layers, join green in any corner, ch 1, 3 sc in the corner. Along each edge that runs across the fans (top and bottom) work 72 sc; along each side edge work 54 sc, which is 2 sc per row end plus 2 extra spaced evenly. Work 3 sc in each corner. Join with a sl st. Total: 264 sc. Fasten off green.
- Round 2 (cream): join cream in the centre sc of any corner, ch 3, 6 dc in same st, *sk corner sc, then: sk 2 sc, 5 dc in next sc, sk 2 sc, sc in next sc; rep to the next corner group (12 shells on each top and bottom edge, 9 shells on each side edge), sk corner sc, 7 dc in centre corner sc; rep from * around. Join and fasten off. You have 46 shells.
- Round 3 (green): as Round 3 of the bedspread border — sc in next 2 dc, (sc, picot, sc) in centre dc, sc in next 2 dc, sc in next sc, around, using 3 dc either side of the picot on the corner shells. Join and fasten off.
- Insert the 45 cm pillow form through the overlapped back opening. Repeat for the second cover.
Finishing
Weave in every remaining end before you block. On a piece this size, ends that are only half-secured will work loose the first time the bedspread is shaken out. Run each tail along the back of a row of fans for about 5 cm, then double back on itself for 2 cm, and trim close.
Block the bedspread flat. Lay it right side up on a bed covered with dry towels, pat it out to 180 x 215 cm, and pin the picots of the border so each scallop is a distinct point. Spray it evenly with cool water until the fabric is damp all the way through but not soaked, then leave it for 24 to 48 hours with a fan running in the room. Cotton takes a long time to dry at this weight. Blocking is what turns the slightly cupped, lumpy shell fabric into the flat, even scale pattern you are after, so do not skip it.
Block the pillow covers the same way before inserting the forms, pinning them to a true 45 cm square. Once everything is dry, lay the bedspread on the bed with the foundation edge at the foot, and set the pillow covers at the head. Wash it on a cool gentle cycle in a large machine, and dry it flat rather than hanging it — the weight of wet cotton will stretch the fans out of shape on a line.
Tips for Success
- Buy all your cream yarn at once and from the same dye lot. Cream shows lot differences more than any other shade, and a seam of slightly different white across the middle of a bedspread cannot be hidden.
- Mark the centre dc of every fan the moment you finish a cream row. The whole pattern depends on hitting that stitch, and finding it on a 273-stitch row after the fact is slow work.
- Work in a repeat-sized session: one full Rows 3-6 block at a sitting. Stopping mid-row on a two-colour pattern is how people lose their place.
- Support the weight of the finished part on a table or across your lap, not hanging from the hook. The drag of several kilos of cotton tightens your arcs without you noticing and narrows the piece.
- Keep a tally sheet with 29 boxes for the four-row repeats and tick one off each time. Row counters on a project this long get knocked and reset.
Common Mistakes to Avoid
- Anchoring Row 5 in the sc between fans instead of the fan centre. This cancels the offset and your fans end up stacked in straight columns. Pull the row back and re-check that each sc lands in the 4th dc of a full fan.
- Forgetting the ch-3 spaces at each end of Row 3. Without them there is nowhere for the edge half fans of Row 4 to go, and the piece loses about 4 cm of width per repeat. Count 36 sc at the end of every Row 3.
- Working a full 7-dc fan into the edge ch-3 spaces on Row 4. The edge will flare and ruffle. The edge spaces take 4 dc only.
- Pulling the ch-5 arcs tight so the fans cup forward. The arcs should sit slightly loose and relaxed across the fan below. If your fabric is bowl-shaped rather than flat, loosen the chains before blaming blocking.
- Stopping on a Row 4. The top edge will have half fans and the bottom edge full fans, and the border will not land on the same stitch counts. Always finish the body on a Row 6.
Ways to Customize This Pattern
- Work the whole bedspread in a single colour. The fans still read clearly through texture alone, and you skip all the joining — a good way to turn this into a more restful long project.
- Reverse the colour placement: fern green fans over cream arcs gives a much deeper, leafier fabric with the pale colour used as the outline.
- Shrink it to a sofa throw with 24 fans across (ch 146) and 17 four-row repeats, finishing at about 120 x 125 cm. The same border rounds apply with 196 sc on each short edge and 156 sc on each long edge.
- Make a 6-fan table runner (ch 38) in the same two colours, 40 rows long, with just Rounds 1 and 2 of the border for a lighter edge.
- Line the bedspread with a cotton sheet, slip stitched to the wrong side just inside the border round, if you want a cover that sits flat and does not catch on bed frames.
Frequently asked questions
Because they are supposed to. Rows 2 and 6 finish with a full 7-dc fan at the edge, while Row 4 finishes with a 4-dc half fan, so the sides alternate between a bulge and a dip every other row. Round 1 of the border, worked at 240 sc down each long edge, evens that out, and blocking sets it straight. Only worry if the waviness is more than about 1.5 cm deep, which means your arcs are too loose.
Not necessarily. Fastening off and rejoining with the right side facing every row gives the cleanest fans, which is why it is written that way, but you can turn at the end of each row and carry the resting colour loosely up the side edge instead, catching the float in the first stitch of every second row. You will have two slightly different row textures and a stripe of floats down each side, both of which disappear under the border.
Expect roughly 2900 g of cream and 950 g of green for the bedspread plus both pillow covers, with shell stitch eating more yarn than most people estimate. Acrylic works and makes the finished piece lighter and faster to dry, but it will not block as crisply — the picot scallops stay softer. A cotton-acrylic blend is the best compromise for something this large, since pure cotton at this size is heavy enough to stretch under its own weight.
Yes. Length is controlled entirely by how many times you repeat Rows 3-6, and each repeat adds about 7 cm. For a longer drop at the foot of the bed, work 32 or 33 repeats instead of 29 and finish on a Row 6. The only change to the border is the long-edge count: work 2 sc per row end, then add a few extra sc evenly so each long edge lands on a multiple of 6.
Almost always the hook size. Shell fabric needs a hook a touch larger than the yarn band suggests so the seven double crochets can spread inside the arc. If you are at 5 mm and the fans still look crowded, move to 5.5 mm and re-swatch — one fan repeat should measure a full 5 cm after blocking. The second cause is working the dc too tightly into the chain arc rather than around it; always insert the hook under the whole chain, never into a single chain stitch.
The finished Fern & Cream Shell Stitch Bedspread

