Advanced
For experienced crocheters who enjoy complex shaping, fine detail, and ambitious construction
Single-Day Project
A satisfying project you can complete in a single afternoon or evening.
Handmade Gift
A beautiful keepsake — free forever. Read online or print at home.
About This Fern Lace Crochet Curtain Pattern
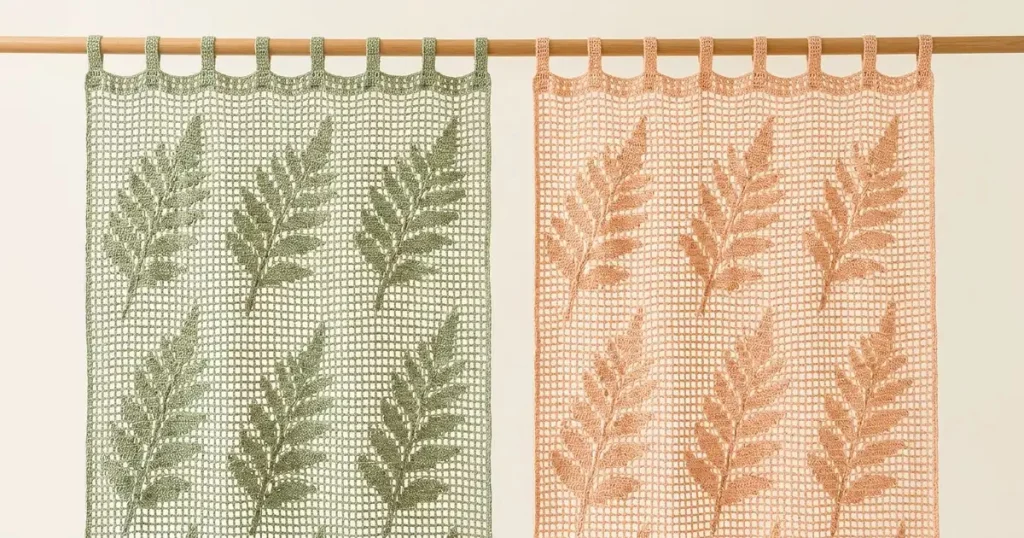
This fern crochet curtain pattern pairs a fine square mesh with raised botanical motifs and eight folded hanging tabs. The reference shows matching panels in muted sage green and soft peach, with tall fern fronds arranged in two rows. This original interpretation keeps that light, open appearance and builds the ferns as separately crocheted leaves attached around embroidered stems.
Allow approximately 35–50 hours for each panel. This advanced project suits crocheters who enjoy fine cotton work, precise blocking, and detailed appliqué placement. Instructions make one panel; repeat in the second color for the pair shown. The finished mesh remains transparent, while closely secured leaves give each fern its textured silhouette.
Materials
- Fingering cotton, approximately 250 m per 50 g Allow 450–550 g in muted sage for one panel; the same amount in soft peach for a second panel. This is an untested allowance.
- Crochet hook 2.5 mm, or size needed for blocked mesh gauge
- Tapestry needle and fine sewing needle For stems, leaf veins, and secure attachment
- Matching cotton sewing thread For discreet leaf-edge stitches
- Locking stitch markers, rustproof pins, blocking mats, and tape measure For counting and full-size layout
- Smooth curtain rod Approximately 18–22 mm diameter; rod and brackets must support the finished curtain
Abbreviations
chchainsl stslip stitchscsingle crochethdchalf double crochetdcdouble crochettrtreble crochetststitchRSright sideGauge, Dimensions, and Construction
- Use US crochet terminology throughout. Work the curtain flat in turned rows. All fern components use the same color as their panel; no stuffing, eyes, or contrasting details are needed.
- Blocked mesh gauge: 8 square cells and 8 rows measure 10 × 10 cm. Each cell consists of ch 2 between neighboring dc posts. A horizontal repeat spans 3 foundation stitches.
- Swatch foundation: ch 40. Row 1: dc in eighth ch from hook, then repeat (ch 2, skip 2 ch, dc in next ch) 10 times. The initial skipped chains represent the first dc and first ch-2 space. Result: 12 cells and 13 dc posts.
- Swatch Rows 2–12: ch 5, turn; skip the first ch-2 space, dc in next dc; repeat (ch 2, dc in next dc) 11 times, placing the final dc in the third chain of the previous turning chain. Each row has 12 cells and 13 dc posts. Wash, block, and measure the central 8 cells and 8 rows.
- The panel has 48 cells across and 72 mesh rows: approximately 60 × 90 cm before edging. Edging adds approximately 1 cm overall in each direction. Folded tabs add approximately 4 cm above the top edge, giving an overall hanging size near 61 × 95 cm.
- Tab gauge: approximately 24 sc and 24 rows per 10 cm. Leaves are shaped with graduated stitch heights around both sides of a foundation chain. Their exact width depends on your tension; block the largest leaves to approximately 5–6 cm long.
Square Mesh Panel — Make One per Color
- Foundation: ch 148 loosely. Use a larger hook for this chain if necessary.
- Row 1: dc in eighth ch from hook; repeat (ch 2, skip 2 ch, dc in next ch) 46 times. Including the initial turning chain, there are 49 dc posts and 48 ch-2 cells. The final dc uses the final foundation chain.
- Row 2: ch 5, turn; dc in the next dc, skipping the intervening ch-2 space; repeat (ch 2, dc in next dc) 47 times. Work the final dc into the third chain of the previous turning chain. Count 49 dc posts, including the turning chain, and 48 cells.
- Rows 3–72: repeat Row 2. Every row has 48 cells and 49 dc posts. Mark every twelfth row to simplify the later fern layout.
- Fasten off. Wash according to the yarn label and pin the mesh to 60 × 90 cm, keeping columns vertical and rows level. Let dry completely.
Panel Edging
- With RS facing, join yarn at the upper-right corner. Work across the top: sc in the first dc, then repeat (2 sc in the next ch-2 space, sc in the next dc) 48 times. This gives 145 sc across the top, including both corner stitches.
- Ch 2 for the corner. Work 3 sc around each of the 72 row-end posts down the first side: 216 sc. Do not add another stitch into either corner dc.
- Ch 2. Across the foundation edge, sc into the base of the first dc post; repeat (2 sc around the foundation span beneath the next cell, sc into the base of the next dc post) 48 times: 145 sc.
- Ch 2. Work 3 sc around each of the 72 row-end posts up the remaining side: 216 sc. Ch 2 and sl st to the first sc. Total: 722 sc and four ch-2 corner spaces. Fasten off.
- Reblock lightly. The edging should lie flat without contracting the mesh. Mark the top-edge sc from 1 to 145, counting from left to right with RS facing.
Folded Rod Tabs — Make Eight
- Make each tab separately in the panel color. Foundation: ch 6.
- Row 1: sc in second ch from hook and each remaining ch: 5 sc.
- Rows 2–20: ch 1, turn, sc in all 5 stitches: 5 sc per row. The turning chain never counts as a stitch. Fasten off with a 35 cm sewing tail.
- Block each strip to approximately 2.1 × 8.3 cm. Fold it across its length so its foundation and final row meet, creating a loop approximately 4 cm high.
- Place tab ends behind top-edge stitches 1–5, 21–25, 41–45, 61–65, 81–85, 101–105, 121–125, and 141–145. Sew both short ends securely to those five stitches, then reinforce the join with a second pass through the top mesh posts below the edging. Keep the opening clear for the rod.
Small Fern Leaflets — Make 24 per Panel
- Each fern uses four small leaflets. Leave a 15 cm starting tail and ch 10.
- Round 1, first side: working into the back bumps, sc in second ch from hook, hdc in next ch, dc in each of next 5 ch, hdc in next ch, sc in last ch: 9 stitches.
- Ch 1 and rotate to work along the unused loops on the opposite side of the foundation. Sc in the first foundation chain, hdc in next, dc in each of next 5, hdc in next, sc in last: 9 stitches on this side.
- Ch 1; sl st to the first sc. Total: 18 stitches and two ch-1 end spaces. Fasten off with a 20 cm tail. The joining sl st does not count as a stitch. Pin into a narrow oval with gently pointed ends.
Medium Fern Leaflets — Make 30 per Panel
- Each fern uses four medium side leaflets and one medium terminal leaflet. Leave a 15 cm starting tail and ch 12.
- Round 1, first side: sc in second ch from hook, hdc in next ch, dc in each of next 2 ch, tr in each of next 3 ch, dc in each of next 2 ch, hdc in next ch, sc in last ch: 11 stitches.
- Ch 1 and rotate. Along the opposite side of the same foundation, work sc, hdc, 2 dc in separate chains, 3 tr in separate chains, 2 dc in separate chains, hdc, sc: 11 stitches.
- Ch 1; sl st to first sc. Total: 22 stitches and two ch-1 end spaces. Fasten off with a 25 cm tail and block into a narrow leaf shape.
Large Fern Leaflets — Make 24 per Panel
- Each fern uses four large leaflets. Leave a 15 cm starting tail and ch 14.
- Round 1, first side: sc in second ch from hook, hdc in next ch, dc in each of next 2 ch, tr in each of next 5 ch, dc in each of next 2 ch, hdc in next ch, sc in last ch: 13 stitches.
- Ch 1 and rotate. Along the opposite side, work sc, hdc, 2 dc in separate chains, 5 tr in separate chains, 2 dc in separate chains, hdc, sc: 13 stitches.
- Ch 1; sl st to first sc. Total: 26 stitches and two ch-1 end spaces. Fasten off with a 30 cm tail. Block each leaf to approximately 5–6 cm long, without stretching the foundation chain into a curve.
Fern Layout and Embroidered Stems — Make Six
- Lay the blocked panel RS up. Number mesh columns 1–48 from left to right and mesh rows 1–72 from the foundation upward. All placement measurements refer to the mesh, excluding edging.
- Place three lower fern bases at the lower-left corners of cells in columns 5, 21, and 37 on Row 4. Place three upper bases at the corresponding positions on Row 39. These positions are approximately 5, 25, and 45 cm from the left mesh edge, at heights of 3.75 and 47.5 cm.
- For each fern, mark a gently curving stem from its base through points 1 cm right and 8 cm up, then 3 cm right and 16 cm up, ending 5 cm right and 24 cm up. Measure these offsets from that fern’s base. Use removable thread markers rather than drawing on the cotton.
- Embroider a continuous chain-stitch stem along this curve using the panel yarn. Make links approximately 4–5 mm long. Anchor every link around a nearby mesh post or chain strand; where the curve crosses an open cell, use a slightly longer link and secure it to the next strand. Keep the mesh flat throughout.
- Measure upward along the stem and mark six paired leaflet attachment levels at approximately 4, 7, 10, 13, 16, and 19 cm. These are placement marks, not crochet rounds.
Fern Assembly and Leaf Veins
- For each fern, arrange leaflet pairs from bottom to top in this order: medium, large, large, medium, small, small. Add one medium terminal leaflet at the stem tip. Each fern uses 13 leaves; all six together use 78 leaves.
- Set one leaf on each side of every marked level. Point each outer tip upward at approximately 45 degrees to the local stem direction. Offset the right leaflet about 5 mm above its partner for a natural fern outline. Overlap only the inner 3–5 mm of each leaflet with the stem.
- Position the terminal leaflet along the final direction of the stem, with its inner end at approximately the 22 cm point and its outer tip extending beyond the stem. Keep every completed fern within an envelope approximately 15 cm wide and 28–30 cm tall.
- Use each leaf’s yarn tail to sew its inner end around the embroidered stem and a mesh junction. Continue with small stitches down the central foundation chain, securing the leaf to the underlying mesh wherever they cross. This forms the central vein and supports the leaf across the open ground.
- With matching sewing thread, tack each outer tip and two points on each long edge to nearby mesh strands. Take stitches around strands without splitting them. Keep the leaf flat and the mesh squares open. Secure all tails through dense leaf stitches on the reverse.
Finishing
Check the curtain from both sides before trimming any remaining tails. Reinforce loose stem ends and tab seams, then weave tails through several dense stitches, reverse direction, and trim. Remove every placement marker. Give the assembled panel a gentle final wash if needed and dry it flat to its blocked measurements, shaping the leaves with your fingers.
Slide the dry tabs onto the rod and distribute them evenly. Let the curtain hang for a day before judging the final length, since cotton can settle under its own weight. For a pair, make the second panel in soft peach using the same gauge and placement chart. The fern silhouettes should feel related while the separate leaves retain a little natural variation.
Tips for Success
- Place markers every eight mesh cells. Each marked group measures approximately 10 cm after blocking and makes missed cells easier to find.
- Block all leaflets by size before arranging them. Consistent large leaves keep the middle of each fern full without crowding neighboring motifs.
- Pin all six complete fern arrangements before sewing any leaves. Check that upper and lower motifs have similar spacing and clear mesh around their tips.
- Support the full panel on a table while attaching leaves. Letting it hang from your lap can stretch the mesh beneath your stitches.
- Dry the curtain flat after washing to protect its length and the folded tab seams.
Common Mistakes to Avoid
- Losing the final mesh cell: work the last dc into the third chain of the previous turning chain and confirm 48 cells before continuing.
- Adding stitches at the leaflet ends: the turning ch-1 spaces provide the end allowance. Do not add extra stitches into the end chains.
- Pulling the stem embroidery tight: ease each link until the underlying mesh retains its blocked shape, then secure the next link.
- Attaching leaves only at their bases: unsupported leaves twist when the curtain hangs. Secure their central veins, tips, and edge points as instructed.
- Making unequal tabs: block all eight strips to the same length before folding, then align their attachment seams with the top edging.
Ways to Customize This Pattern
- Make both panels in sage for a quiet botanical window, or both in peach for the warmer version shown in the reference.
- Use a slightly darker shade of the panel color for the embroidered stems and central leaf veins to give the fronds more definition.
- For a wider panel, add 16 cells per extra fern column: add 48 foundation chains and 48 top-edge sc per added column. Place the added fern bases 20 cm apart at the stated gauge, and distribute additional tabs no more than about 9 cm apart.
- For a shorter curtain, work 48 mesh rows for a 60 cm mesh height and use only one row of three ferns, keeping their bases at Row 4. Each side edging then uses 144 sc rather than 216.
Frequently asked questions
In this original interpretation, the mesh is crocheted first and the leaves are made separately. Embroidered stems and closely secured leaf veins connect the pieces, creating the raised botanical texture visible in the reference.
At the stated gauge, each 8.3 cm strip forms a loop suited to an approximately 18–22 mm rod, allowing some room for the seam. Test one finished tab on your rod before making the remaining seven. For a thicker rod, add an even number of rows and expect the overall curtain height to increase by half the added strip length.
Block each leaf flat, sew along its central foundation chain, and add the specified discreet edge and tip tacks. If a tip still lifts after hanging, attach it to the nearest mesh junction without pulling that junction out of position.
The square mesh is open and the fern motifs cover only part of the fabric. This panel softens a window and adds decoration; use a separate blind or lining when you need privacy.
The finished Fern Lace Crochet Curtain Pattern

