Filet Crochet Rose Bedspread Pattern
Beginner Friendly
Perfect for those just starting their crochet journey, with clear instructions and simple techniques
Single-Day Project
A satisfying project you can complete in a single afternoon or evening.
Handmade Gift
A beautiful keepsake — free forever. Read online or print at home.
About This Filet Crochet Rose Bedspread Pattern
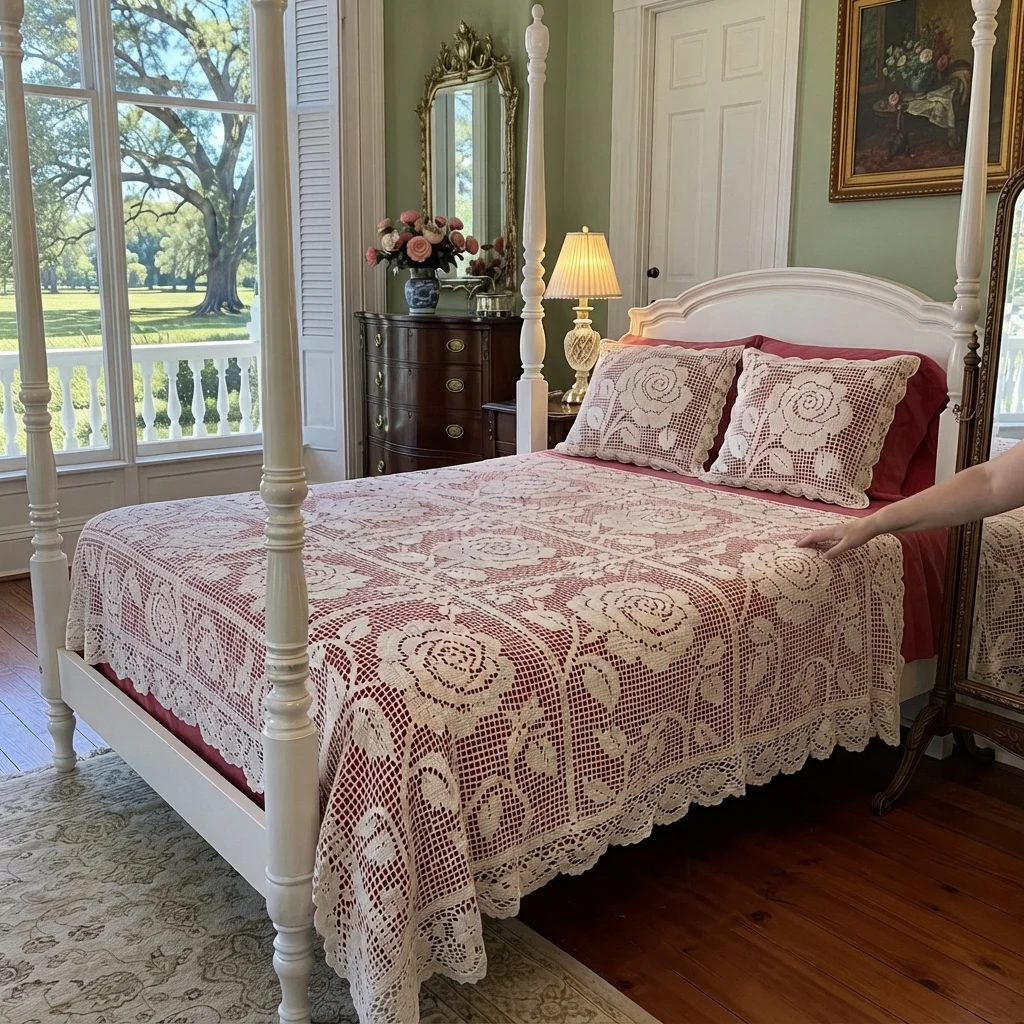
This filet crochet rose bedspread pattern builds a classic heirloom cover from 30 square blocks, each with a solid cream rose on an open mesh background. The blocks are framed by solid lines of single crochet, so when they are joined the bedspread reads as a grid of roses, and a scalloped shell edge finishes the sides and foot like the bedspread in the photo.
It is an advanced project because of the chart work and the volume. Each block is 25 rows of 25 filet tiles, with 76 stitches in every row, and you need 30 identical blocks, then joining and a shell edge. Each block takes about two and a half hours, so plan on 80 to 100 hours in total. Filet is easy to do once you can read the chart, but it is unforgiving if a row is miscounted.
It suits crocheters who are comfortable with double crochet and chart reading and want a traditional, airy bedspread. The finished cover is about 150 x 178 cm. Lay it over a colored sheet or bed skirt, as in the photo, and the mesh shows the color through the spaces.
Materials
- Worsted cotton yarn, cream about 2.6 kg, estimated
- Crochet hook 4.0 mm
- Yarn needle
- Stitch markers to mark the corners
- Flat surface and pins for blocking and layout
Abbreviations
chchainscsingle crochetdcdouble crochetsl stslip stitchspspacest(s)stitch(es). Each chain in a ch-2 space counts as one stitch.Sspace tile (open mesh)Bblock tile (solid)RSright sideFOfasten off( )xrepeat the stitches in brackets the number of times givenHow Filet Tiles Work
- Every row has 76 stitches: 1 edge stitch plus 25 tiles of 3 stitches each. Turn at the end of every row.
- Edge stitch: ch 3 at the start of every row after row 1. It counts as the first dc.
- Space tile (S): ch 2, skip 2 sts, dc in the next st. Over a space in the row below, skip the ch-2 space and dc in the next dc.
- Block tile (B): dc in each of the next 3 sts. Over a space in the row below, work 2 dc in the ch-2 space and 1 dc in the next dc.
- Every tile ends in a dc, so the tiles line up from row to row.
- The chart is symmetrical from left to right, so it reads the same from either end. You can work every row in the order written, whether it is a right-side or a wrong-side row.
Rose Block Chart (25 rows of 25 tiles)
- Foundation: ch 78. For row 1, the first 3 chains from the hook count as the first dc. Then work each tile along the chain: for a block, dc in each of the next 3 chains. For a space, skip 2 chains and dc in the next chain.
- Every row below is written as runs of tiles from one edge to the other and adds up to 25 tiles. Ch 3 and turn at the end of each row.
- Row 1: S25
- Row 2: S25
- Row 3: S9 B7 S9
- Row 4: S7 B11 S7
- Row 5: S6 B3 S2 B3 S2 B3 S6
- Row 6: S5 B2 S4 B3 S4 B2 S5
- Row 7: S5 B2 S5 B1 S5 B2 S5
- Row 8: S4 B2 S4 B5 S4 B2 S4
- Row 9: S4 B2 S3 B7 S3 B2 S4
- Row 10: S4 B2 S2 B9 S2 B2 S4
- Row 11: S4 B2 S3 B7 S3 B2 S4
- Row 12: S4 B2 S4 B5 S4 B2 S4
- Row 13: S5 B2 S5 B1 S5 B2 S5
- Row 14: S5 B2 S4 B3 S4 B2 S5
- Row 15: S6 B3 S2 B3 S2 B3 S6
- Row 16: S7 B11 S7
- Row 17: S9 B7 S9
- Row 18: S12 B1 S12
- Row 19: S5 B2 S5 B1 S5 B2 S5
- Row 20: S5 B4 S3 B1 S3 B4 S5
- Row 21: S7 B4 S1 B1 S1 B4 S7
- Row 22: S9 B7 S9
- Rows 23-25: S12 B1 S12. Do not FO after row 25.
- Check your block: every row must have 76 stitches. Rows 3 to 17 form the rose, with the widest point on row 10, and rows 18 to 25 form the stem with one pair of leaves on rows 19 to 22.
Block Border
- Round 1: with the RS facing you, you are at the top left corner. Ch 1 and work 3 sc in the corner stitch. Work 74 sc evenly down the left side, with 3 sc in each of the first 24 row ends and 2 sc in the last. Work 3 sc in the bottom left corner.
- Work 74 sc evenly along the foundation edge, 3 sc in the bottom right corner, 74 sc up the right side in the same way, and 3 sc in the top right corner. Work 1 sc in each dc and each chain across the top (74 sc). Join with a sl st to the first sc (308).
- Round 2: ch 1, sc in each st around, working 3 sc in the middle st of each 3-sc corner group. Join with a sl st, FO and weave in the ends (316).
- Each side now has 76 stitches between the corner groups. Count them before you move on.
- Block each block flat with a damp cloth and pin it to the same size as your test block. Let it dry fully.
Bedspread Layout
- Lay out 5 blocks across and 6 blocks down (30 blocks in all), with the stems pointing down toward the foot of the bed.
- Check from a few steps back that the roses line up in straight rows and columns before you start joining.
Joining
- Join the blocks into 6 rows of 5. Hold two blocks with wrong sides together and sc through both loops of both, matching the stitches one for one along each side, from the middle stitch of one corner group to the middle stitch of the next (78 stitches). The solid seam will look like a cream frame between the roses.
- Join the 6 rows to each other in the same way, matching the corners so the seams make a clean cross.
- Work the horizontal seams last so the vertical and horizontal seams meet flat at each corner.
- Weave in all ends.
Shell Edging
- Round 1: join yarn in any outer corner. Ch 1 and sc evenly around the bedspread, working 3 sc in each corner and one sc in each stitch and seam. Join with a sl st.
- Round 2: ch 1, sc in the same st, (skip 3 sts, 5 dc in the next st, skip 3 sts, sc in the next st) around, working 5 dc in each corner stitch. Adjust by skipping 2 or 4 stitches in a few places so the shells lie flat. Join with a sl st to the first sc.
- Round 3: sl st across the first 2 dc of the first shell, ch 1, (sc in the middle dc of the shell, ch 3, sl st in the 3rd ch from the hook, ch 1, sc in the sc between the shells) around. Join with a sl st, FO and weave in the end.
Finishing
Block the finished bedspread by laying it flat on towels, pinning the corners and the shells to the size you want, and misting it with water. Let it dry fully before moving it. Blocking opens the mesh and shows the roses clearly, and it sets the shells so they lie flat.
Drape the bedspread over a colored sheet or bed skirt with the shell edge hanging over the foot and sides, and it will look like the photo. Fold back the top edge under the pillows.
Tips for Success
- Make one test block before you commit to all 30, and write down your hook size and measurements.
- Count the stitches at the end of every row. Every row must have 76, and it is much easier to fix a mistake straight away.
- Tick off each chart row as you finish it, and keep a ruler under the row you are working so you can see the whole chart.
- Use a smooth cotton, since it shows the mesh crisply and washes well.
- Block every block before joining. Filet curls at the edges, and unblocked blocks will not join flat.
Common Mistakes to Avoid
- Working a block over a space with 3 dc into the ch-2 space instead of 2 dc plus 1 dc in the dc shifts the count. Follow the tile rules every time.
- Skipping a stitch in a space tile makes a row 75 or 77 stitches wide. Count after each row.
- Forgetting the edge stitch makes the first tile too wide. Always start with ch 3.
- Working different counts in the border makes the blocks unequal. Use 74 sc between the corner groups on round 1 and 76 on round 2.
- Joining with a tight seam makes ridges across the roses. Use a loose stitch and match the seam tension to the blocks.
Ways to Customize This Pattern
- Work the roses in ecru, soft pink or pale gold for a different cast, and keep the mesh in the same color.
- Make a baby blanket with 3 blocks across and 3 down (9 blocks), about 85 x 85 cm before the edging.
- Make matching pillow covers by joining 2 blocks side by side and sewing the panel to a plain back with a button closure.
- Leave the stems out of the chart by replacing rows 18 to 25 with spaces and shortening the block to 17 rows, for a smaller rose.
- Work the border rounds in a contrasting color, such as burgundy, for a stronger frame around each rose.
Frequently asked questions
The amount above is an estimate of about 2.6 kg, based on roughly 75 g per block plus the edging. Yarn use depends on your tension, so weigh your test block, multiply by 30, and add about 10 percent.
Yes. Cotton thread or fingering weight with a smaller hook gives a finer, lacier bedspread, but the tiles will be smaller, so you will need more blocks to reach the same size. Swatch first and divide the size you want by your block size.
No. The photo shows a spiral rose with curling leaves, which needs a much larger chart. This pattern uses a symmetrical concentric rose on a 25 x 25 chart that is easier to count, and you can swap in your own rose chart using the same tile rules.
With a washable cotton, wash it on a gentle cycle in cool water, press out the water without wringing, and lay it flat to dry. Hanging a wet bedspread this large stretches the mesh out of shape.
The finished Filet Crochet Rose Bedspread Pattern

