Filet Lace Daisy Vine Table Runner Crochet Pattern
Beginner Friendly
Perfect for those just starting their crochet journey, with clear instructions and simple techniques
Single-Day Project
A satisfying project you can complete in a single afternoon or evening.
Handmade Gift
A beautiful keepsake — free forever. Read online or print at home.
About This Filet Lace Daisy Vine Table Runner Crochet Pattern
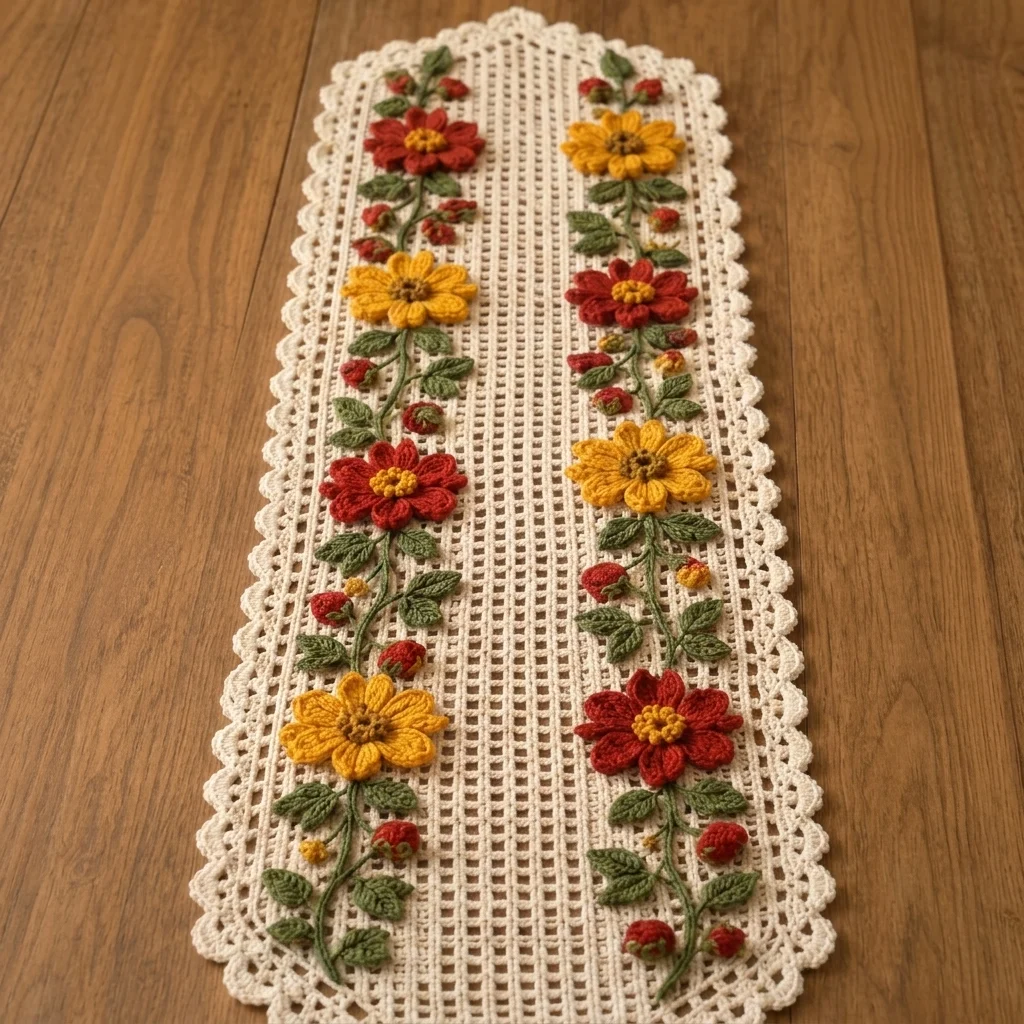
This crochet daisy table runner pattern combines an open filet mesh base with two full vines of 3D layered daisies, leaves, and berry clusters worked separately and stitched on. The oval shape and scalloped lace edge give it a vintage, heirloom look, while the raised flowers add texture and color against the plain cream background.
What makes this design distinctive is the layering: the filet mesh base is worked flat first in a single color, then each daisy is crocheted as its own small piece with two rounds of petals in contrasting shades, a contrast-color center, and its own leaves and berries, all appliqued on afterward. That separation between structural base and decorative layer is what lets the flowers sit slightly raised off the mesh instead of flattening into it. Expect to spend 16-20 hours total between the base, ten daisies, and all the leaf and berry pieces.
This is an advanced pattern, best suited to someone comfortable with filet crochet charts and multi-piece applique work, rather than someone who wants a single, straightforward project.
Materials
- DK weight cotton yarn, cream ~200g, base and edging
- DK weight yarn, rust red ~40g, daisy outer petals
- DK weight yarn, mustard gold ~40g, daisy outer petals
- DK weight yarn, mustard gold ~15g, daisy centers
- DK weight yarn, olive green ~50g, stems and leaves
- DK weight yarn, brick red ~10g, berries
- Crochet hook 3.5 mm (US E/4)
- Tapestry/yarn needle
- Fabric stiffener spray or diluted white glue optional, for the base
- Steam iron and pressing cloth, or blocking mat and pins
- Sharp scissors
- Straight pins for positioning flowers before sewing
Abbreviations
chchainsl stslip stitchscsingle crochethdchalf double crochetdcdouble crochettrtreble/triple crochetMRmagic ringch-spchain spacest(s)stitch(es)reprepeatFOfasten offFilet Mesh Base
- With cream, ch 46. Row 1: dc in 6th ch from hook, *ch 1, skip 1 ch, dc in next ch; rep from * across. 21 mesh squares.
- Row 2: ch 4 (counts as dc + ch-1), turn, dc in next dc, *ch 1, dc in next dc; rep from * across, ending dc in top of turning ch. 21 squares maintained.
- Rep Row 2 until the piece measures approximately 78 cm long, keeping the 21-square width consistent throughout.
- FO after the final row, leaving a long tail for the edging join.
Oval Shaping and Edging
- With cream, join at one short end of the mesh panel. Round 1: sc evenly around the entire panel, working extra sc sts around each short end curve to shape it into a rounded oval end rather than a flat rectangle corner.
- Round 2: ch 1, sc in each st around, continuing to add 2-3 extra sc at each curved end to keep the oval shape flat.
- Round 3 (scallop round): *sk 2 sts, 5 dc in next st, sk 2 sts, sl st in next st; rep from * evenly around the entire oval, adjusting the st count between scallops slightly at the curved ends so the scallops stay even in size.
- Join with sl st to first st of the round and FO. Weave in all ends along the edge.
Daisy Motif (make 10: 5 rust red, 5 mustard gold)
- With mustard gold, 8 sc in MR, do not join, work in a continuous spiral.
- Round 1: sl st into MR ring, then FO mustard gold and set aside as the center.
- With outer petal color, join in any st of the center ring. Round 2 (inner petals): *ch 2, dc 3 in next st, ch 2, sl st in same st; rep from * around all 8 sts. 8 petals.
- Round 3 (outer petals): working behind Round 2 petals, join outer petal color in a base st between two Round 2 petals, *ch 3, dc 4 in next base st, ch 3, sl st in same st; rep from * around. 8 larger petals layered behind the first set.
- FO leaving a short tail. Fold each petal layer slightly forward so the two rounds separate visually into inner and outer petals.
Leaves (make approximately 30, in sets of 3)
- With olive green, ch 8. Starting in 2nd ch from hook: sl st in next ch, sc in next 2 ch, hdc in next 2 ch, dc in next 2 ch, 3 dc in last ch.
- Continue back down the other side of the chain: dc in next 2 ch, hdc in next 2 ch, sc in next 2 ch, sl st in last ch.
- FO leaving a short tail for attaching. Repeat for all leaves, working in sets of 3 to attach along each vine.
Berry Clusters (make approximately 20)
- With brick red, 5 sc in MR. Do not join.
- Pull the MR tail tight to close, then sl st into the first sc to close the round into a small tight bobble.
- FO leaving a short tail for attaching. Repeat, grouping berries in small clusters of 2-3 along the vine.
Vine Stems
- With olive green, chain a length matching the finished panel length, roughly 75 cm, worked as a foundation chain that will lie down the mesh as the vine’s spine.
- Sl st back along the entire chain to give the stem a bit of body and a smooth finished edge.
- FO leaving tails at both ends. Make 2 stems total, one for each vine.
Finishing
Pin one stem down each side of the filet panel, about a third of the way in from each edge, before sewing anything permanently. Using the stem’s own tails and a tapestry needle, tack it to the mesh at intervals along its length. Position 5 daisies along each stem, alternating rust red and mustard gold as shown in the photo, and pin before stitching. Sew each daisy center down firmly through the mesh, then tack a set of 3 leaves and a berry cluster near the base of each flower along the stem, checking that leaves point outward from the vine and berries tuck in between blooms. Once everything is pinned and it looks right, sew each piece down through both mesh and stem, then steam-block the entire finished runner flat, gently opening the scalloped edge so it lies smooth.
Tips for Success
- Pin the entire layout of stems, daisies, leaves, and berries before sewing a single stitch; it’s much easier to adjust spacing while pieces are only pinned.
- Keep the filet mesh tension loose and even; a tight base makes the oval shaping round awkwardly rather than smoothly.
- Alternate rust and gold daisies strictly down each vine rather than randomly, so the two colors read as a clear repeating pattern from a distance.
- Attach leaves pointing slightly outward and downward from the stem, mimicking real foliage, rather than straight out perpendicular to the vine.
- Block the plain filet base on its own first, then attach flowers afterward; a pre-blocked flat base makes positioning much more accurate.
Common Mistakes to Avoid
- Working the scallop round with an inconsistent stitch count between scallops leaves uneven bumps around the oval. Fix: count sts between scallops carefully, adjusting only at the curved ends.
- Sewing daisies on before blocking the mesh causes the base to distort once steamed. Fix: block the plain panel and edging first, then applique the flowers.
- Placing both daisy petal rounds in the same tight spot makes the flower look flat instead of layered. Fix: fold the outer petal round slightly forward and down after attaching so it visibly sits behind the inner round.
- Skipping the extra sc increases at the oval’s curved ends leaves the panel pointed rather than rounded. Fix: add 2-3 extra sts at each end during the sc rounds as instructed.
- Sewing the vine stem in a perfectly straight line looks stiff. Fix: curve the stem gently side to side as you pin it down before stitching.
Ways to Customize This Pattern
- Use a single daisy color instead of alternating two for a simpler, more monochrome vine.
- Shrink the base to a round doily shape with a single central daisy cluster instead of two long vines.
- Swap brick red berries for small white bobbles for a spring or winter version of the same design.
- Work the filet base in a soft pastel instead of cream for a different seasonal palette.
- Add a third, shorter vine down the center of the runner for a fuller, more layered floral look.
Frequently asked questions
It’s possible but not recommended for this design. Working the daisies separately lets the petals layer and curve naturally; attaching them afterward gives a cleaner, more dimensional result than working directly into the filet squares.
Puckering usually means too many stitches were added at the curve. Work the extra increase stitches only at the very tip of each short end, spread over 3-4 stitches, rather than bunching them all in one spot.
Cotton is recommended because it blocks crisply and holds the filet mesh shape well. Acrylic will work, but the finished mesh will be slightly softer and less structured after blocking.
This usually means the two petal rounds weren’t separated enough. After finishing Round 3, gently fold the outer petals down and back so they sit visibly behind the inner round rather than lying in the same flat plane.
The finished Filet Lace Daisy Vine Table Runner Crochet Pattern

