Filet Mesh Maple Leaf Border Table Runner Crochet Pattern
Beginner Friendly
Perfect for those just starting their crochet journey, with clear instructions and simple techniques
Single-Day Project
A satisfying project you can complete in a single afternoon or evening.
Handmade Gift
A beautiful keepsake — free forever. Read online or print at home.
About This Filet Mesh Maple Leaf Border Table Runner Crochet Pattern
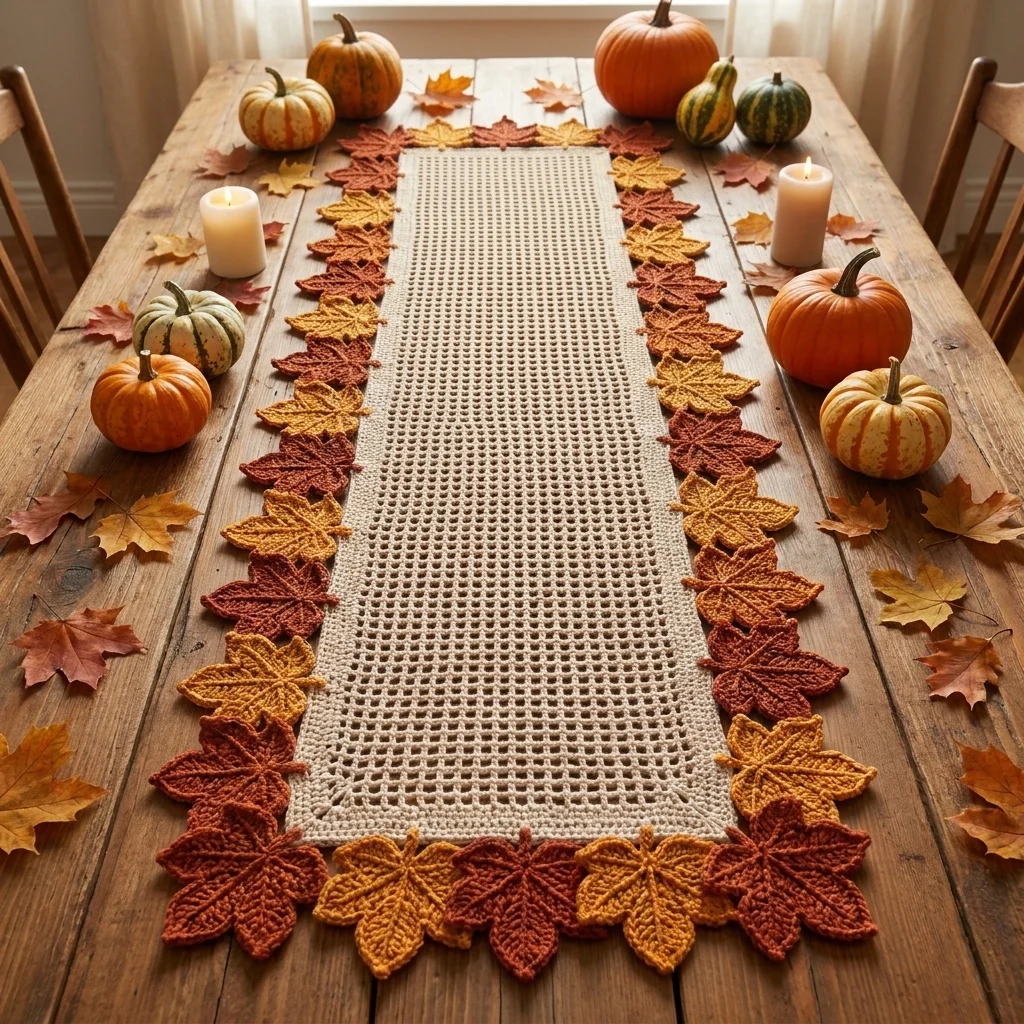
This crochet maple leaf border table runner pattern keeps the center simple, an open filet mesh rectangle in plain cream, and puts all the visual interest into a dense, continuous ring of maple leaves joined edge to edge around all four sides. Unlike designs where flowers or motifs sit scattered across the surface, here the leaves form a single unbroken frame, so the plain mesh center reads as calm negative space against a busy, textured edge.
What makes this design distinctive is the two-stage build: the mesh panel is worked first and entirely on its own, back and forth in rows, then a solid double crochet band edges the panel before the leaves are joined directly onto that band all the way around. That solid band is what gives the leaf border something sturdy to attach to, rather than trying to sew leaves onto open mesh directly. Expect to spend 14-18 hours total, with roughly half in the leaves and half in the mesh panel and edging.
This is an advanced pattern, best suited to someone comfortable maintaining an even filet mesh over a long panel and hand-joining a large number of small motifs into a continuous border, rather than someone wanting a single quick technique.
Materials
- DK weight cotton yarn, cream ~180g, mesh panel and edging band
- DK weight yarn, rust orange ~50g, leaves
- DK weight yarn, amber gold ~50g, leaves
- Crochet hook 3.5 mm (US E/4)
- Tapestry/yarn needle
- Steam iron and pressing cloth, or blocking mat and pins
- Sharp scissors
Abbreviations
chchainsl stslip stitchscsingle crochethdchalf double crochetdcdouble crochetch-spchain spacest(s)stitch(es)reprepeatFOfasten offFilet Mesh Center Panel
- With cream, ch 51. Row 1: dc in 6th ch from hook, *ch 1, skip 1 ch, dc in next ch; rep from * across. 23 mesh squares.
- Row 2: ch 4 (counts as dc + ch-1), turn, dc in next dc, *ch 1, dc in next dc; rep from * across, ending dc in top of turning ch. 23 squares maintained.
- Rep Row 2 until the panel measures approximately 68 cm long, keeping the 23-square width consistent throughout.
- FO after the final row, leaving a long tail for the edging join.
Solid Edging Band
- With cream, join at one corner of the mesh panel. Round 1: sc evenly around the entire panel, working 3 sc in each corner st to keep the rectangle flat and square.
- Round 2: ch 2 (counts as first hdc), hdc in each st around, working 3 hdc in each corner st. Join with sl st to top of ch-2.
- Round 3: repeat Round 2 once more for a firm, solid double-thick band. Join and FO, leaving a long tail.
Maple Leaf Motif (make approximately 30: mix of rust orange and amber gold)
- Ch 4, sl st in first ch to form a small foundation ring.
- Lobe 1, top center: ch 11. Starting in 2nd ch from hook: sl st, sc 2, hdc 3, dc 3 (9 sts). Sl st into ring.
- Lobe 2, upper right: ch 9. Starting in 2nd ch from hook: sl st, sc 2, hdc 3, dc 2 (8 sts). Sl st into ring.
- Lobe 3, lower right: ch 6. Starting in 2nd ch from hook: sl st, sc 3, hdc 1 (5 sts). Sl st into ring.
- Lobe 4, lower left: repeat Lobe 3 exactly. Sl st into ring.
- Lobe 5, upper left: repeat Lobe 2 exactly. Sl st into ring.
- Sl st into base of Lobe 1 to close. FO leaving a 15-20 cm tail for joining and veining.
- Repeat for approximately 30 leaves total, mixing rust and gold throughout, with extra leaves made as needed once you see your actual corner spacing.
Embroidering the Veins
- Thread each leaf’s tail onto a tapestry needle.
- Work a straight or backstitch line from the center ring up the middle of the top lobe to its tip.
- Work a shorter straight stitch out toward the tip of each of the remaining 4 lobes.
- Weave in the tail on the wrong side, or leave a short length free if that leaf will be joined at that point.
Blocking All Pieces
- Steam-block the mesh panel with its edging band flat and square, pinning the corners precisely at 90 degrees.
- Steam and pin each leaf flat with all 5 lobes spread evenly. Let dry completely before assembly.
Attaching the Leaf Border
- Lay the blocked panel flat and arrange leaves around its edge, alternating rust and gold, overlapping each leaf’s lower lobes with its neighbor’s upper lobes so the whole border reads as continuous with no gaps.
- At each of the 4 corners, angle one leaf to sit diagonally across the corner point itself, overlapping the last leaf on each adjoining side, so the border turns the corner smoothly rather than leaving a bare gap.
- Once you’re happy with the layout, whipstitch each leaf’s base directly to the solid edging band, using the leaf’s own tail, catching several stitches through the band for a secure hold.
- Whipstitch each leaf to its neighboring leaves at 1-2 overlap points as you go, working all the way around the panel in one direction until the border meets itself back at the starting point.
Finishing
Turn the finished runner over and check the back for any leaf attached only to its neighbor and not to the band itself; every leaf needs at least one solid stitch into the band to keep the border from sagging away from the center panel over time. Weave in all remaining tails. Give the whole piece a final light steam, keeping the center mesh flat and open while gently fluffing the leaf border so it keeps some natural texture rather than pressing completely flat.
Tips for Success
- Block the mesh panel and its solid band before attaching a single leaf; a flat, square base makes even leaf spacing around the border far easier.
- Make a few extra leaves beyond your estimate; corner turns often use slightly more leaves than a straight run of the same length.
- Alternate rust and gold leaves strictly around the entire border rather than switching only at corners, so the color rhythm stays consistent on all four sides.
- Angle the corner leaves diagonally rather than trying to force a straight leaf around a 90 degree turn; this keeps the border looking continuous rather than pinched.
- Attach every leaf to the solid band itself, not just to neighboring leaves, so the border stays firmly anchored to the center panel.
Common Mistakes to Avoid
- Trying to attach leaves directly to the open filet mesh instead of the solid band leaves weak, gappy joins. Fix: always work the solid double crochet band first and anchor leaves there.
- Spacing leaves evenly along the straight sides but crowding them at corners looks lopsided. Fix: plan corner leaves separately, angled diagonally, before filling in the straight runs.
- Working the mesh panel with a looser tension than the edging band causes the finished rectangle to warp slightly. Fix: keep consistent tension across both sections, or block firmly to correct minor differences.
- Leaving a visible gap where the border meets itself back at the starting point breaks the continuous frame look. Fix: make and place the final connecting leaf last, sizing the gap it needs to fill before making it.
- Skipping vein embroidery on leaves near the corners, where they’re partly obscured, still leaves visibly flat leaves at the border’s most visible turning points. Fix: vein every leaf regardless of final position.
Ways to Customize This Pattern
- Widen the mesh panel and shorten the leaf border for a more rectangular placemat version of the same design.
- Swap the mesh center for a solid color block instead of open filet for a warmer, less airy look.
- Use a single leaf color instead of alternating two for a simpler, more monochrome border.
- Add a row of small crocheted acorns tucked between leaves at each corner for extra detail.
- Scale the whole design down with a finer cotton thread and smaller hook for a matching doily or placemat set.
Frequently asked questions
Around 30 leaves covers a runner of this size, but exact counts vary with your gauge and how tightly you overlap leaves. Make extras as you go and use them to fine-tune spacing once you can see the actual border forming.
The open filet mesh doesn’t have enough solid fabric to anchor a whipstitched join securely. The solid double crochet band gives every leaf a firm, even surface to attach to all the way around the panel.
Yes. Adjust the starting chain and number of mesh rows to change the panel’s width and length, then add or remove leaves around the new perimeter to match, keeping the same overlap and joining method.
This usually means the corner leaf wasn’t angled enough. Let the corner leaf sit at a full diagonal across the point, overlapping generously with the last leaf on each adjoining side, rather than trying to turn the corner sharply.
The finished Filet Mesh Maple Leaf Border Table Runner Crochet Pattern

