Fireside Dragon Crochet Blanket Wrap Pattern
Advanced
For experienced crocheters who enjoy complex shaping, fine detail, and ambitious construction
Single-Day Project
A satisfying project you can complete in a single afternoon or evening.
Handmade Gift
A beautiful keepsake — free forever. Read online or print at home.
About This Fireside Dragon Crochet Blanket Wrap Pattern
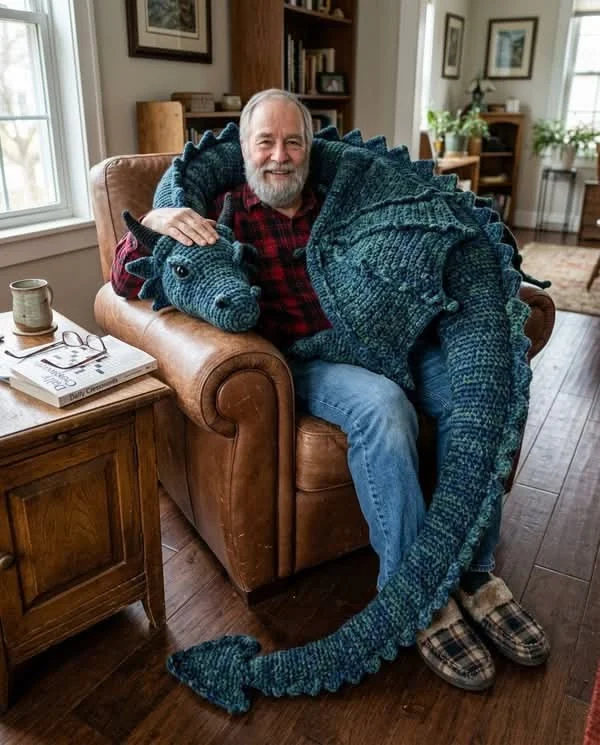
This dragon crochet blanket pattern creates a deep teal lap wrap with a sculpted dragon head, broad textured wings, a line of pointed scales, and a long tail that curls toward the floor. The reference shows a blanket-like dragon draped around a seated adult, so the main fabric stays soft and flexible while the head and tail receive light stuffing.
Allow about 55–75 hours for the separate panels, shaped details, and careful assembly. This advanced project suits crocheters comfortable with large fabric pieces, raised stitches, sculptural sewing, and adjusting stuffing by feel. Dark teal makes the main silhouette, with slightly lighter teal along the spikes and wing ribs and small black details around the eyes and nostrils.
Materials
- Bulky / category 5 yarn in deep teal, color A Approximately 3,000 m; about 3,000 g if the label gives 100 m per 100 g
- Bulky yarn in muted blue-teal, color B Approximately 500 m for spikes, ribs, eyelids, and tail fin
- Black smooth yarn Approximately 15 m for pupils, nostrils, and mouth
- Olive-gray smooth yarn Approximately 10 m for eye discs
- Crochet hooks 6 mm for main pieces; 5 mm for eyes, horns, spikes, and fin
- Polyester stuffing Approximately 400–600 g; use sparingly in the tail
- Washable woven fabric for reinforcement Two pieces, each 15 × 20 cm, with edges turned under
- Strong matching sewing thread and sewing needle For reinforcement patches and eyes
- Locking stitch markers, tapestry needle, scissors, tape measure Include several markers for assembly landmarks
Abbreviations
chchainsl stslip stitchscsingle crochetdcdouble crochetFPdcfront post double crochet around the indicated stitch postinc2 single crochet in one stitchdecsingle crochet 2 stitches togetherMRmagic ringst / stsstitch / stitchesRS / WSright side / wrong sideBObobble: work 5 unfinished double crochet into one stitch, then yarn over and draw through all 6 loops; counts as 1 stitchGauge, Construction, and Placement Map
- Use US crochet terms. Main gauge with A and the 6 mm hook: 10 sc and 12 rows = 10 × 10 cm after washing and drying flat. For a swatch, ch 21, sc in the second ch and each remaining ch for 20 sts, then work 23 more rows of 20 sc. Measure the central 10 cm.
- Texture gauge: work a second 20-st swatch using the blanket’s eight-row repeat for 24 rows. Aim for the same 10 sts and 12 rows per 10 cm, allowing the bobbles to rise above the fabric. Adjust hook size if necessary.
- Stuffed-piece gauge: approximately 10 sc and 12 rounds = 10 cm with the 6 mm hook, with no visible gaps under gentle stretching. Detail gauge with the 5 mm hook is approximately 12 sc and 14 rows = 10 cm.
- Work flat pieces with ch 1 and turn after each row unless instructed otherwise. Turning chains never count as stitches. Work head, tail, horns, and cheek pads in continuous rounds; move a marker at the start of every round.
- Lay the finished blanket RS up, foundation edge nearest you. The foundation is the bottom edge; Row 132 is the top. Left and right always refer to this flat view. The head attaches at the upper left; the tail attaches at the lower right. The upper edge drapes behind the shoulders, with the head resting on an armrest or lap.
- The main panel measures approximately 140 cm wide × 110 cm high before its narrow border. Each wing has a base about 33 cm wide and a height about 33 cm. The head is approximately 35 cm long and 19 cm wide before shaping; the tail is approximately 100 cm long. These are gauge-based estimates.
Main Blanket Panel
- With A and the 6 mm hook, ch 141.
- Row 1, RS: sc in second ch from hook and each ch across. (140 sts)
- Rows 2–4: sc in every st. (140 sts each row)
- Row 5, RS: sc in first 3 sts; repeat [BO in next st, sc in next 6 sts] 19 times; BO in next st, sc in last 3 sts. (140 sts; 20 bobbles)
- Rows 6–8: sc in every st. (140 sts each row)
- Row 9, RS: sc in first 6 sts; repeat [BO in next st, sc in next 6 sts] 19 times; sc in last st. (140 sts; 19 bobbles)
- Rows 10–12: sc in every st. (140 sts each row)
- Rows 13–132: repeat Rows 5–12 fifteen more times. (140 sts each row; 132 rows total) Push each bobble toward the RS before working the following row. Fasten off.
Blanket Border
- With RS facing and A, join at the top right corner. Border Round 1: work 140 sc across the top edge, ch 2; work 110 sc evenly down the left edge, ch 2; work 140 sc across the unused foundation loops, ch 2; work 110 sc evenly up the right edge, ch 2. Sl st to first sc. (500 sc and four ch-2 corner spaces)
- To distribute each 110-st side edge exactly, divide its 132 row ends into 22 groups of 6. Work 5 sc into each group, using five separate row ends and skipping the sixth. The corner chains bridge the turn; do not add extra corner sc in this round.
- Border Round 2: ch 1, sc in every sc; work [sc, ch 2, sc] in each corner space. Sl st to first sc and fasten off. (508 sc and four ch-2 spaces)
Textured Wing Panels — Make Two
- With A and the 6 mm hook, ch 2. Row 1, RS: sc in second ch from hook. (1 st)
- Row 2: inc. (2 sts)
- Rows 3–40: inc in first st, sc in every remaining st. Each row gains 1 st; Row 3 has 3 sts and Row 40 has 40 sts. Keep the fabric relaxed. Fasten off.
- Edging Round 1: with RS facing, join A at the tip. Work 40 sc evenly along the first side, ch 2, 40 sc across Row 40, ch 2, 40 sc evenly along the second side, ch 2; sl st to first sc. (120 sc and three ch-2 spaces) Work each side’s 40 sc into its 40 row ends, counting the tip row end separately on each side.
- Edging Round 2: ch 1, sc in every sc; [sc, ch 2, sc] in each corner space. Sl st to first sc and fasten off. (126 sc and three ch-2 spaces)
- Place the wings RS up as mirrored triangles. On each wing, mark the starting tip and points 8, 16, 24, and 32 sts along the 40-st base. With B, surface sl st four separate lines from the tip to those points, inserting the hook through gaps in the fabric. Keep loops loose enough that each wing lies flat.
- For each raised rib, turn the wing so you can work back along its surface chain. Join B at the base end and work 1 sc into each surface sl st back to the tip. The number of stitches equals the number of surface-chain loops on that individual rib. Fasten off each rib separately and bury the ends on the WS.
- Pin one wing to each upper quadrant of the blanket, with its tip pointing toward the upper center and its 40-st base extending diagonally toward the outer side. Keep each wing entirely within the blanket outline. Sew both sloping edges to the blanket, then tack each rib through to the blanket at three evenly spaced points. Leave the base edge free for a shallow, layered wing effect.
Dragon Head
- With A and the 6 mm hook, Round 1: 6 sc in MR. The starting end is the nose. (6 sts)
- Round 2: inc in every st. (12 sts)
- Round 3: [sc, inc] 6 times. (18 sts)
- Round 4: [2 sc, inc] 6 times. (24 sts)
- Round 5: [3 sc, inc] 6 times. (30 sts)
- Round 6: [4 sc, inc] 6 times. (36 sts)
- Round 7: [5 sc, inc] 6 times. (42 sts)
- Round 8: [6 sc, inc] 6 times. (48 sts)
- Rounds 9–16: sc in every st. (48 sts each round)
- Round 17: [7 sc, inc] 6 times. (54 sts)
- Round 18: [8 sc, inc] 6 times. (60 sts)
- Rounds 19–30: sc in every st. (60 sts each round)
- Mark the center underside at the round marker and the center top opposite it. Mark eye centers between Rounds 21 and 22, at stitch positions 19 and 43 counted from the round marker. Sew on the crocheted eyes after stuffing; no safety eyes are used in this design.
- Round 31: [8 sc, dec] 6 times. (54 sts)
- Round 32: [7 sc, dec] 6 times. (48 sts)
- Round 33: [6 sc, dec] 6 times. (42 sts)
- Round 34: [5 sc, dec] 6 times. (36 sts)
- Rounds 35–40: sc in every st. (36 sts each round) Stuff the muzzle and skull firmly enough to hold shape, leaving the final neck rounds soft.
- Round 41: [4 sc, dec] 6 times. (30 sts)
- Round 42: [3 sc, dec] 6 times. (24 sts) Fasten off with a long sewing tail. Leave the neck opening unclosed for attachment.
Cheek Pads — Make Two
- With A and the 6 mm hook, Round 1: 6 sc in MR. (6 sts)
- Round 2: inc in every st. (12 sts)
- Round 3: [sc, inc] 6 times. (18 sts)
- Round 4: [2 sc, inc] 6 times. (24 sts)
- Rounds 5–6: sc in every st. (24 sts each round) Sl st to next st and fasten off with a sewing tail. Leave open and add only a pinch of stuffing.
- Sew each pad to the head over Rounds 17–24, below its eye position. Flatten the lower half slightly while sewing to give the muzzle a broad, resting shape.
Eyes and Eyelids — Make Two Sets
- Eye disc, with olive-gray yarn and the 5 mm hook: Round 1: 6 sc in MR. (6 sts)
- Round 2: inc in every st. (12 sts)
- Round 3: [sc, inc] 6 times. (18 sts) Sl st to next st and fasten off with a sewing tail.
- Pupil, with black yarn: 6 sc in MR; sl st to first sc and fasten off. (6 sts) Sew one pupil to the center of each disc with small stitches.
- Eyelid, with B: ch 11. Row 1: sc in second ch from hook and each remaining ch. (10 sts)
- Row 2: sc in every st. (10 sts) Fasten off with a sewing tail.
- Sew eye discs at the marked positions, securing the whole perimeter. Curve one eyelid over the upper half of each eye and stitch both long edges down. Keep the pupil visible.
Swept Horns — Make Four
- With A and the 5 mm hook, Round 1: 4 sc in MR. (4 sts)
- Round 2: [sc, inc] twice. (6 sts)
- Round 3: sc in every st. (6 sts)
- Round 4: [2 sc, inc] twice. (8 sts)
- Round 5: sc in every st. (8 sts)
- Round 6: [3 sc, inc] twice. (10 sts)
- Round 7: sc in every st. (10 sts)
- Round 8: [4 sc, inc] twice. (12 sts)
- Rounds 9–10: sc in every st. (12 sts each round) Fasten off with a sewing tail. Leave unstuffed, flatten the base, and curve the tip backward.
- Sew one horn on either side of the skull at Rounds 25–28 and another pair at Rounds 29–32, just outside the center-top line. Secure each base with two passes of sewing.
Long Tapered Tail
- With A and the 6 mm hook, ch 48 loosely. Without twisting, sl st to first ch to form a ring. The ring is the wide attachment end.
- Round 1: ch 1, sc in each ch; do not join. (48 sts)
- Rounds 2–12: sc in every st. (48 sts each round)
- Round 13: [6 sc, dec] 6 times. (42 sts)
- Rounds 14–28: sc in every st. (42 sts each round)
- Round 29: [5 sc, dec] 6 times. (36 sts)
- Rounds 30–44: sc in every st. (36 sts each round)
- Round 45: [4 sc, dec] 6 times. (30 sts)
- Rounds 46–60: sc in every st. (30 sts each round)
- Round 61: [3 sc, dec] 6 times. (24 sts)
- Rounds 62–76: sc in every st. (24 sts each round)
- Round 77: [2 sc, dec] 6 times. (18 sts)
- Rounds 78–92: sc in every st. (18 sts each round) Add loose tufts of stuffing as you work. Keep the base pliable and avoid a continuous, tightly packed core.
- Round 93: [sc, dec] 6 times. (12 sts)
- Rounds 94–108: sc in every st. (12 sts each round)
- Round 109: dec 6 times. (6 sts)
- Rounds 110–120: sc in every st. (6 sts each round) Leave these final rounds unstuffed. Fasten off, thread through the front loops of all 6 sts, draw closed, and bury the end.
- Lay the tail in a broad curve. Mark a dorsal line running from the wide opening to the tip on the outside of that curve. This line receives the spikes and terminal fin.
Large Dorsal Spikes — Make Twelve
- With B and the 5 mm hook, ch 13. Row 1: sc in second ch from hook and each remaining ch. (12 sts)
- Row 2: dec, 8 sc, dec. (10 sts)
- Row 3: dec, 6 sc, dec. (8 sts)
- Row 4: dec, 4 sc, dec. (6 sts)
- Row 5: dec, 2 sc, dec. (4 sts)
- Row 6: dec twice. (2 sts)
- Row 7: dec. (1 st) Fasten off with a long sewing tail. Each spike is approximately 10 cm across its base and 5 cm high.
- Sew eight spikes along the blanket’s upper edge, starting 18 cm from the left corner. Space their base centers 14 cm apart. Sew through each foundation stitch, then add a second line of attachment 1 cm below the edge so the spikes stand outward.
- Sew the remaining four large spikes on the tail’s dorsal line, centered at Rounds 8, 24, 40, and 56. Orient each base lengthwise along the tail, with its point leaning toward the narrow end.
Small Dorsal Spikes — Make Twelve
- With B and the 5 mm hook, ch 9. Row 1: sc in second ch from hook and each remaining ch. (8 sts)
- Row 2: dec, 4 sc, dec. (6 sts)
- Row 3: dec, 2 sc, dec. (4 sts)
- Row 4: dec twice. (2 sts)
- Row 5: dec. (1 st) Fasten off with a sewing tail. Each spike is approximately 6.5 cm across its base and 3.5 cm high.
- Sew four spikes down the center top of the head, with base centers at Rounds 16, 23, 30, and 37. Let adjacent bases overlap slightly.
- Sew four spikes down the tail’s dorsal line, centered at Rounds 70, 82, 94, and 106.
- Sew two spikes along each outer wing base, centered approximately 10 cm and 23 cm from one base corner. Attach their bases to the wing only, preserving the wing’s free lower edge.
Terminal Tail Fin — Make Two Matching Panels
- With B and the 5 mm hook, ch 3. Row 1: sc in second ch from hook and next ch. (2 sts)
- Row 2: inc in both sts. (4 sts)
- Row 3: inc, 2 sc, inc. (6 sts)
- Row 4: inc, 4 sc, inc. (8 sts)
- Row 5: inc, 6 sc, inc. (10 sts)
- Row 6: inc, 8 sc, inc. (12 sts)
- Row 7: inc, 10 sc, inc. (14 sts)
- Row 8: inc, 12 sc, inc. (16 sts)
- Rows 9–10: sc in every st. (16 sts each row)
- Row 11: dec, 12 sc, dec. (14 sts)
- Row 12: dec, 10 sc, dec. (12 sts)
- Row 13: dec, 8 sc, dec. (10 sts)
- Row 14: dec, 6 sc, dec. (8 sts)
- Row 15: dec, 4 sc, dec. (6 sts)
- Row 16: dec, 2 sc, dec. (4 sts)
- Row 17: dec twice. (2 sts)
- Row 18: dec. (1 st) Fasten off. Each panel measures approximately 13 cm wide × 13 cm long.
- Place panels WS together. With B, whipstitch the edges together, leaving the first 4 cm of each side beside the starting edge open. Do not stuff. Slide the final 10 tail rounds between these open edges, keeping the fin flat in the plane of the tail’s curve. Sew the opening to the tail and add two short securing seams through both fin panels and the tail.
Facial Embroidery and Sculpting
- Flatten the underside of the stuffed muzzle gently with your hands. Using a long strand of A, anchor beneath one cheek, pass through the head to the opposite cheek, return through a neighboring stitch, and tighten slightly. Repeat once, then secure. The muzzle should broaden without developing a deep groove.
- Embroider two black nostrils on the upper nose over Rounds 6–8, approximately 7 cm apart. For each nostril, make three short parallel stitches spanning 2 sc, then couch them down at their centers with a small stitch.
- Embroider a shallow mouth line on each side, running from Round 7 to Round 20 about 3 cm below the eye. Use short backstitches spanning no more than 2 sc each; let the back of the line rise slightly beneath the cheek.
- With B, add a curved brow above each eyelid using four short backstitches. Keep all knots inside the head or beneath sewn-on pieces.
Head and Tail Attachment
- On the blanket WS, hand-sew one reinforcement patch behind the upper-left attachment area, centered 12 cm from the left edge and 10 cm below the top. Sew the second behind the lower-right attachment area, centered 12 cm from the right edge and 10 cm above the bottom. Sew around each patch and add two diagonal lines of stitching without pulling the crochet tight.
- Position the head’s open neck over the upper-left reinforced area, with the nose pointing beyond the left side and the top of the skull facing the blanket RS. Flatten the 24-st neck opening into two layers of 12 sts. Whipstitch it closed, then sew this closed edge to the blanket along a 12 cm line.
- Lay the soft neck rounds against the blanket and sew a second, parallel anchor line approximately 4 cm behind the first. Catch the head fabric, blanket, and reinforcement patch in each stitch. This spreads the load while allowing the head to rest naturally.
- Add the last loose stuffing to the tail base if needed. Flatten its 48-st opening into two layers of 24 sts. Whipstitch closed. Position this seam across the lower-right reinforced area, on a diagonal that directs the tail down and away from the blanket.
- Sew the closed tail base to the blanket along a line approximately 22–24 cm long. Add a second attachment line through the tail at Round 5, the blanket, and the patch. Keep both lines relaxed enough that the blanket lies flat.
- Lay the wrap across a chair and arrange the tail in a loose curve. Reposition either attachment before final securing if the weight pulls a corner sharply out of shape.
Finishing
Weave every yarn end through several stitches, reverse direction, and weave again. Check the eyes, horns, wing ribs, spikes, and both reinforced joins with a gentle pull. Smooth the stuffing into the head and tail, keeping the tail flexible enough to settle across the lap and floor.
Wash according to the yarn label and support the whole piece when lifting it wet. Press out water in towels and dry flat with the head and tail supported. To arrange the finished wrap, drape the top edge behind the shoulders, rest the dragon’s head on an armrest, and let the tail curve beside the chair. Keep the long tail clear of walking paths.
Tips for Success
- Mark every twentieth blanket stitch. Each bobble replaces one sc, so every texture row must still finish with 140 stitches.
- Compare the two wing panels before adding ribs. Block them to matching triangles so they sit evenly across the upper blanket.
- Stuff the head more firmly than the tail. A soft tail follows the curve shown in the reference and puts less strain on its attachment.
- Use contrasting removable markers for the tail’s dorsal line before sewing spikes. Check that the line remains visible on the outside of the intended curve.
- Pin the head in place on a chair before sewing. Its neck should carry only part of its weight; the muzzle should rest comfortably on the chair or lap.
Common Mistakes to Avoid
- Adding a sc after each bobble increases the panel width. Complete the bobble, then move directly to the next instructed stitch.
- Working into both a post and its top loops when adding wing details creates extra fabric. The ribs are sewn-on surface chains with sc worked into those chains only; no FPdc is required.
- Packing the tail tightly makes it heavy and rigid. Remove stuffing through the wide base before closing it until the tail bends easily into a broad curve.
- Attaching the head only to the border lets it drag the edge downward. Use the reinforced area and both anchor lines through the neck.
- Sewing spikes with one loose stitch at each end lets them flop. Stitch through every base stitch and add the specified second anchor line on the upper blanket spikes.
Ways to Customize This Pattern
- For a closer tonal match to the reference, choose B only one shade lighter than A. Strong contrast makes the dorsal line much more prominent.
- Make the blanket 20 cm wider by adding 20 plain sc at one side of every row, keeping the original 140-st texture area intact. Increase both horizontal border counts from 140 to 160.
- Shorten the tail by omitting four even rounds from each of the seven 15-round straight sections. It will have 92 rounds instead of 120 and measure approximately 77 cm at the stated gauge. Re-space spikes evenly by measured length.
- For a lighter wrap, leave the tail entirely unstuffed and flatten it before attaching the spikes. Keep light stuffing in the head so the muzzle retains its shape.
Frequently asked questions
It is an open blanket wrap for a seated adult. It has no sleeves, fasteners, or fitted hood. The separate head rests beside the wearer, while the wings and spikes sit over the blanket surface.
Keep the neck lightly stuffed, use both reinforced attachment lines, and support the muzzle on an armrest or your lap. The wrap is intended to be arranged while seated, with the chair supporting the sculpted pieces.
Yes, if it meets both gauges and makes secure seams, but smooth plied bulky yarn shows the bobbles, ribs, and facial stitches more clearly. For chenille, use matching smooth yarn for the reinforcement seams and embroidery, and check its care instructions before combining materials.
The tail is a flexible tapered tube that is arranged into a curve; it does not contain wire or a fixed bend. Reduce stuffing if it resists curving, then position the dorsal spikes along the outside of the curve before sewing them down.
The finished Fireside Dragon Crochet Blanket Wrap Pattern

