Advanced
For experienced crocheters who enjoy complex shaping, fine detail, and ambitious construction
Single-Day Project
A satisfying project you can complete in a single afternoon or evening.
Handmade Gift
A beautiful keepsake — free forever. Read online or print at home.
About This Flower Hexagon Blanket
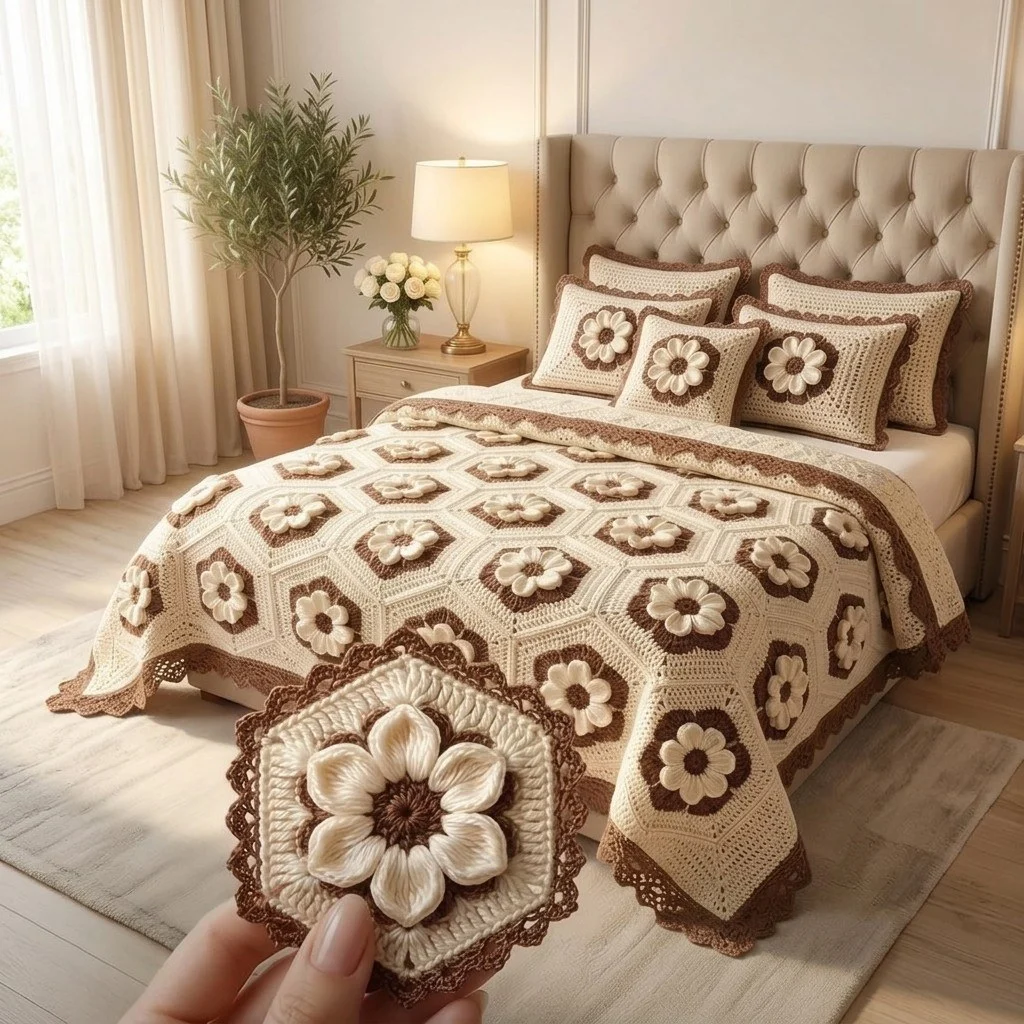
This flower hexagon crochet blanket pattern turns a single repeated motif into a bedspread that looks far more complicated than it is to work. Each hexagon holds a two-layer flower with raised petals that stand up off the fabric, worked in cream over a chocolate centre, framed by a plain hexagon in cream and beige. The petals are not appliqués stitched on flat — the second layer is anchored behind the first on its own chain loops, so the flower lifts and casts a shadow the way a real bloom does.
The motif itself takes about forty-five minutes once you have the rhythm, and a full throw of thirty-five motifs runs to roughly thirty-five to forty-five hours including joining and the border. That is a long project, but it is a portable one: every motif is finished in the hand before it ever touches the blanket, so you can carry three balls of yarn and a hook anywhere and come home with another hexagon. The joining and the scalloped chocolate border are the only parts that need a table.
It suits a confident crocheter who is comfortable working into chain spaces, around posts, and behind previous rounds. If you have made a granny square and a basic flower, you have all the individual skills — what makes this advanced is the layering, the colour management across three shades, and keeping thirty-five motifs identical in size. Worked in a cotton-blend worsted it holds its shape beautifully and washes well, which matters for something that lives on a bed.
Materials
- Worsted / aran weight cotton-blend yarn in cream approx. 1800 m / 900 g
- Worsted / aran weight yarn in warm beige approx. 650 m / 330 g
- Worsted / aran weight yarn in chocolate brown approx. 900 m / 450 g
- 4.0 mm crochet hook or size needed for gauge
- 3.5 mm crochet hook optional, for tighter flower centres
- Blunt tapestry needle for joining and weaving ends
- Stitch markers at least 6, to mark hexagon corners
- Rust-proof pins and a blocking mat for squaring up motifs
- Scissors
Abbreviations
MRmagic ringchchainsl stslip stitchscsingle crochetsc2togsingle crochet two togetherhdchalf double crochetdcdouble crochettrtreble crochetsp(s)space(es)st(s)stitch(es)skskipreprepeatBLOback loop onlyRS / WSright side / wrong sideGauge and Motif Layout
- Gauge: 14 dc and 7 rounds = 10 cm with a 4.0 mm hook, measured on a blocked motif.
- One finished hexagon measures approx. 20 cm across the flats and 23 cm point to point.
- The blanket uses 35 motifs set in 5 vertical columns of 7, with alternate columns dropped by half a hexagon so the sides interlock.
- Make 20 motifs in Colourway A (chocolate centre ring, cream hexagon) and 15 in Colourway B (chocolate centre ring, beige-into-cream hexagon). Place Colourway B motifs so no two touch.
- Blocked finished size before the border: approx. 100 x 152 cm. After the border: approx. 115 x 160 cm.
Flower — Centre and Inner Petals
- Rnd 1 (chocolate): MR, ch 1, 12 sc in ring, sl st to first sc. Pull the ring closed firmly. (12 sc)
- Rnd 2 (chocolate): ch 1, *sc in next st, ch 3, sk next st*, rep from * 5 more times, sl st to first sc. (6 sc, 6 ch-3 sps)
- Fasten off chocolate, leaving a 15 cm tail for the centre embroidery later.
- Rnd 3 (cream, inner petals): join cream with sl st in any ch-3 sp. In the same sp work (sc, hdc, 3 dc, hdc, sc). Work the same 7-stitch petal in each remaining ch-3 sp, sl st to first sc. (6 inner petals, 9 sts each counting the sl st joins)
- Do not fasten off cream. Push the petals forward toward the right side — the next round is worked behind them.
Flower — Outer Petal Layer
- Rnd 4 (cream, foundation behind the petals): fold the inner petals toward you. Working on the back of the flower, sl st around the post of any Rnd 2 sc. *Ch 4, sl st around the post of the next Rnd 2 sc*, rep from * 4 more times, ch 4, sl st to the base of the first ch-4. (6 ch-4 loops sitting behind the inner petals)
- Rnd 5 (cream, outer petals): sl st into the first ch-4 loop. In each ch-4 loop work (sc, hdc, 3 dc, tr, 3 dc, hdc, sc), sl st to first sc. (6 outer petals, 11 sts each)
- Fasten off cream, leaving a 40 cm tail for sewing the flower to the hexagon.
- The outer petals sit directly behind the inner ones and extend about 1.5 cm further. The finished flower measures approx. 11 cm across.
- Make 35 flowers in total, all in the same colours.
Hexagon Motif — Colourway A
- Rnd 1 (chocolate): MR, ch 3 (counts as first dc), 2 dc in ring, ch 1, *3 dc in ring, ch 1*, rep from * 4 more times, sl st to top of beginning ch-3. Pull ring closed. (18 dc, 6 corner ch-1 sps)
- Rnd 2 (chocolate): sl st to next ch-1 corner sp. Ch 3, ch 1, dc in same sp, *dc in each of next 3 dc, (dc, ch 1, dc) in next ch-1 sp*, rep from * 4 more times, dc in each of last 3 dc, sl st to top of beginning ch-3. (30 dc — 5 dc per side plus 6 corner sps)
- Change to cream at the final sl st of Rnd 2. Fasten off chocolate.
- Rnd 3 (cream): sl st to next corner sp. Ch 3, ch 1, dc in same sp, *dc in each of next 5 dc, (dc, ch 1, dc) in next ch-1 sp*, rep from * 4 more times, dc in each of last 5 dc, sl st to top of ch-3. (42 dc — 7 dc per side)
- Rnd 4 (cream): sl st to next corner sp. Ch 3, ch 1, dc in same sp, *dc in each of next 7 dc, (dc, ch 1, dc) in next ch-1 sp*, rep from * 4 more times, dc in each of last 7 dc, sl st to top of ch-3. (54 dc — 9 dc per side)
- Rnd 5 (cream): sl st to next corner sp. Ch 3, ch 1, dc in same sp, *dc in each of next 9 dc, (dc, ch 1, dc) in next ch-1 sp*, rep from * 4 more times, dc in each of last 9 dc, sl st to top of ch-3. (66 dc — 11 dc per side)
- Rnd 6 (cream): sl st to next corner sp. Ch 3, ch 1, dc in same sp, *dc in each of next 11 dc, (dc, ch 1, dc) in next ch-1 sp*, rep from * 4 more times, dc in each of last 11 dc, sl st to top of ch-3. (78 dc — 13 dc per side)
- Rnd 7 (cream, edging round for joining): ch 1, sc in each dc around, working 3 sc in each corner ch-1 sp, sl st to first sc. (96 sc — 15 sc per side including one corner sc at each end)
- Fasten off, leaving a 20 cm tail. Make 20 motifs in this colourway.
Hexagon Motif — Colourway B
- Work Rnds 1 and 2 exactly as Colourway A in chocolate. (30 dc at the end of Rnd 2)
- Change to warm beige at the final sl st of Rnd 2 and fasten off chocolate.
- Rnds 3 and 4 (beige): work exactly as Colourway A Rnds 3 and 4. (42 dc, then 54 dc)
- Change to cream at the final sl st of Rnd 4 and fasten off beige.
- Rnds 5, 6 and 7 (cream): work exactly as Colourway A Rnds 5, 6 and 7. (66 dc, 78 dc, then 96 sc)
- Fasten off, leaving a 20 cm tail. Make 15 motifs in this colourway.
Attaching the Flowers and Centre Detail
- Centre the flower on the hexagon so the chocolate centre sits directly over the chocolate Rnd 1 of the motif and the six outer petals point toward the six flats, not the corners.
- Pin the flower in place through the centre and at the base of each outer petal.
- Using the 40 cm cream tail and a tapestry needle, stitch the flower down through the base of each outer petal only — six small stitches, each one catching two strands of the hexagon fabric. Keep the petal edges completely free so they stay raised.
- Secure the inner petals with one tiny stitch at the very base of each, catching only the chocolate Rnd 2 of the flower. Do not stitch the inner petals to the hexagon or the layering will flatten.
- Thread the 15 cm chocolate tail from Rnd 1 of the flower and work 6 French knots in a tight ring around the magic ring opening, one between each pair of inner petals. Wrap each knot three times for a chunky bobble.
- Weave in all remaining ends on the wrong side. Repeat for all 35 motifs.
Blocking
- Wet-block each motif face down on a blocking mat so the petals hang free and do not get flattened.
- Pin all six corners out to a true hexagon, 20 cm across the flats, and leave until bone dry.
- Check every motif against the first one. Any motif more than 5 mm off needs the corners re-pinned before joining — small differences multiply across a row of seven.
Joining the Motifs
- Lay the motifs out in 5 columns of 7. Drop columns 2 and 4 by half a hexagon height so the angled sides interlock with their neighbours.
- Scatter the 15 Colourway B motifs across the layout so no two sit side by side.
- Join with a flat whip stitch in cream: hold two motifs wrong sides together and sew through the back loops only of the 15 sc along each matching side, from corner sc to corner sc.
- Join each full column from top to bottom first. Then join column to column, working one shared side at a time and pivoting at every corner without cutting the yarn.
- At every point where three motifs meet, take one extra stitch through all three corner sc to close the small hole.
- Weave in all joining ends along the inside of the seam, not across the back of a motif, so nothing shows through the cream.
Scalloped Border
- Rnd 1 (chocolate): join with sl st in any outward corner sc of the outer edge. Ch 1, work sc in each sc along every free side (15 sc per side), 3 sc in each outward point, and sc2tog across each inward valley where two motifs meet. Sl st to first sc.
- Rnd 2 (chocolate): ch 1, sc in each sc around, again working 3 sc in each outward point and sc2tog in each valley. Sl st to first sc.
- Rnd 3 (chocolate, adjusting round): ch 1, sc in each sc around, 3 sc in each outward point, sc2tog in each valley, adding or skipping single stitches along the straight runs only until the total stitch count is a multiple of 6. Sl st to first sc.
- Rnd 4 (chocolate, shells): ch 1, sc in first sc, *sk 2 sc, 5 dc in next sc, sk 2 sc, sl st in next sc*, rep from * around, ending with sl st in the first sc.
- Rnd 5 (chocolate, picot edging): sl st to the 3rd dc of the first shell, *ch 3, sl st in same st, sl st across to the 3rd dc of the next shell*, rep from * around. Sl st to join and fasten off.
- Keep the shells sitting flat at the valleys — if a valley pulls in, work the shell over the sc2tog itself rather than beside it.
Finishing
Weave in every end along a seam line or behind a dc round where the colour matches, and trim close. Give the whole blanket a final light steam from the wrong side, holding the iron above the fabric and never letting it touch — the raised petals will collapse under direct heat. Pin the outer border out to its full scalloped shape while it cools so the picots sit crisp rather than curling under.
Turn the blanket over and check the back of each flower. The anchoring stitches should be invisible from the front and the petals should spring back when you press them with a palm. If a flower leans to one side, add one more tiny stitch at the base of the opposite petal to balance it. Washed cool on a gentle cycle and dried flat, this blanket keeps its shape for years; the cotton-blend softens with every wash without the petals flattening out.
Tips for Success
- Work the flower centre with a 3.5 mm hook if your magic ring shows a hole. The tighter fabric also makes the chocolate ring read as a solid dot from across the room, which is what gives the blanket its graphic look.
- Make all 35 flowers in one sitting-spree before starting any hexagons. The petal shape drifts if you come back to it weeks later, and consistency across 35 motifs is the single thing that makes this blanket look professional.
- Mark the six corner ch-1 spaces of the first hexagon with stitch markers and move them up each round. The side counts go 3, 5, 7, 9, 11, 13 — if a side ever has an even number of dc, you have missed a corner increase.
- Carry the cream yarn up loosely inside the chocolate rounds on Colourway B rather than cutting it at every change, but never carry across more than two rounds or it will shadow through the light cream.
- Join motifs with the same yarn you used for Rnd 7, not a contrast. A cream seam disappears; any other colour draws a visible outline around every hexagon.
Common Mistakes to Avoid
- Stitching the inner petals down to the hexagon. This flattens the flower completely and you lose the shadow that makes the design work. Only the six outer petals attach to the motif, and only at their bases.
- Working Rnd 4 of the flower into stitches instead of around the posts of the Rnd 2 sc. If the ch-4 loops end up on the front, the outer petals will sit on top of the inner ones instead of behind. Undo and re-anchor — there is no fixing it later.
- Letting the hexagons grow unevenly because of tension changes between colours. Chocolate dyed yarn is often slightly stiffer than cream. Check each finished motif against your blocked sample and adjust hook size by half a step for the darker colour if needed.
- Skipping the extra stitch where three motifs meet. Those junctions carry all the stress when the blanket is pulled off a bed, and they open into visible holes within a month of use.
- Starting the shell border before the stitch count is a multiple of 6. The shells will run out of alignment and you will end the round with a half-shell in the middle of a straight edge. Use Rnd 3 to fix the count on a straight section, where no one will see it.
Ways to Customize This Pattern
- Make a matching cushion cover by joining 3 motifs across and 3 down, backing it with a plain cream hexagon panel worked in rows of dc, and finishing with the same chocolate shell border.
- Swap the colour order so the hexagon background is chocolate and the flower petals are beige. Worked as every third motif, this gives the dark checkerboard effect without changing a single stitch count.
- Stop at Rnd 5 of the hexagon instead of Rnd 6 for a 17 cm motif. A 6 x 8 layout of the smaller size makes a pram or lap blanket at roughly 100 x 130 cm.
- Add a third petal layer by repeating Rnds 4 and 5 once more with longer ch-5 loops and (sc, hdc, 4 dc, tr, 4 dc, hdc, sc) petals, for a full cabbage-rose version on just the centre motif of each column.
- Replace the French knot centre ring with a cluster of 7 chocolate bobbles worked directly into Rnd 1 of the flower for a heavier, more textured middle.
Frequently asked questions
Because the corner increases are drifting. Each corner must be a (dc, ch 1, dc) worked into the previous round’s ch-1 space only, with no extra stitches either side of it. If the increases creep one stitch along each round, they spread into a circle. Marking the six ch-1 spaces and counting the side stitches — 3, 5, 7, 9, 11, 13 — catches it within a round.
For 35 motifs at the sizes given, budget about 1800 m of cream, 900 m of chocolate and 650 m of beige. Cream carries the bulk because it does both the petal layers and the outer hexagon rounds. Buy all the cream in one dye lot at the start — the colour difference between lots is far more visible on a large flat blanket than on a small project.
Yes. Replace Rnd 7 with a join-as-you-go version: work the sc round as written, but on each shared side sl st into the matching sc of the neighbouring motif every third stitch. Work in full columns first, then attach each new column. The seam is slightly bulkier than whip stitch and shows a faint ridge on the right side, so test one join before committing.
They will, as long as the flowers are anchored at all six outer petal bases and the blanket is dried flat rather than tumbled. Wash cool on a gentle cycle in a mesh bag if your machine is rough. After drying, run your hand under the petals to lift them back up — they settle flat while damp and spring back once you loosen them.
No, and this design is written without them. The zigzag edge is softened by the three border rounds and finished with shells and picots, which fill the valleys and read as a deliberate scalloped edge. If you prefer a straight edge, work 10 half-motifs — Rnds 1 to 7 turned in rows over three sides — and set them into the side valleys before the border.
The finished Flower Hexagon Blanket

