Forest Green and Gold Hanging Basket Organizer Crochet Pattern
Advanced
For experienced crocheters who enjoy complex shaping, fine detail, and ambitious construction
Weekend Project
A satisfying weekend make — start Friday, finish Sunday, enjoy forever.
Handmade Gift
A beautiful keepsake — free forever. Read online or print at home.
About This Forest Green and Gold Hanging Basket Organizer Crochet Pattern
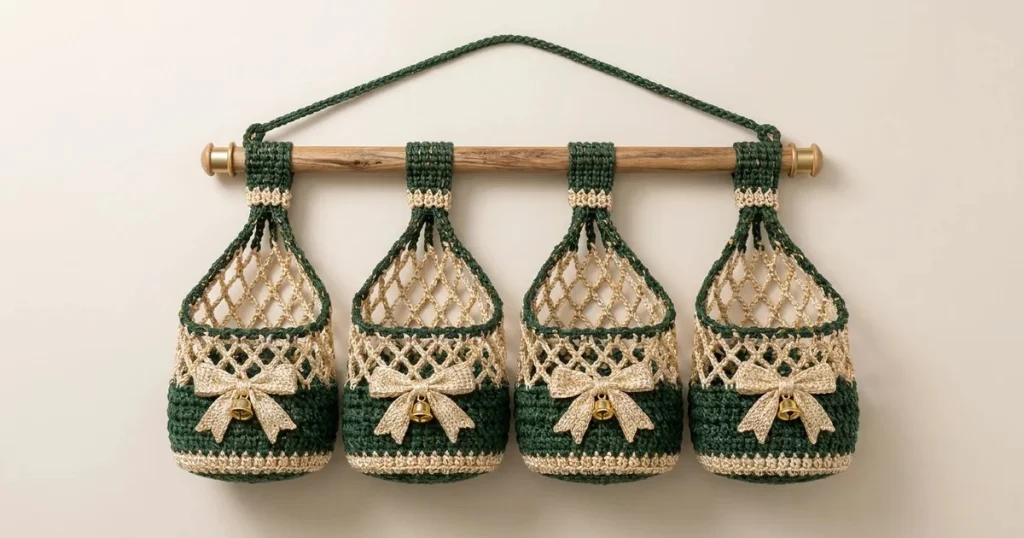
This hanging basket organizer crochet pattern creates four forest-green pouches with warm gold lattice, matching bows, and folded tabs suspended from a wooden rod. Each basket has a firm circular base, a textured lower wall, an open mesh collar, and a tapered mesh back that rises to its hanging tab.
Allow approximately 22–28 hours for the complete organizer. This advanced project suits crocheters comfortable with precise mesh placement, working into chain spaces, surface stitching, and assembling several matching components. The baskets are intended for small, lightweight household items; their open upper panels keep the contents visible.
Materials
- Forest-green DK cotton Approximately 550 m; choose a firm, tightly plied yarn
- Warm gold or champagne DK cotton Approximately 350 m; use the same thickness as the green
- Crochet hooks 3.0 mm for bases, walls, tabs, bows, and cord; 3.5 mm for mesh
- Wooden rod with end stops Approximately 65 cm long and 18–20 mm in diameter; at least 58 cm usable between stops
- Small gold bells Four, approximately 12 mm, matching the reference; optional
- Braided cotton utility cord Approximately 1.1 m, 3 mm thick, for the reinforced hanger
- Tapestry needle, stitch markers, scissors, and ruler For joining, measuring, and marking the rear attachment points
- Blocking mat and rustproof pins For matching the four mesh panels
- Wall hook and suitable wall fixing Rated for the rod, organizer, and intended contents
Abbreviations
chchainscsingle crochet, US terminologysl stslip stitchinc2 sc in the same stitchMRmagic ringBLOback loop onlyRSright sidest / stsstitch / stitchesGauge, Dimensions, and Construction
- Using the 3.0 mm hook, aim for 20 sc and 22 rows per 10 cm in blocked single crochet. Make a swatch at least 14 cm square and measure its center.
- A finished 60-stitch base should measure approximately 9.5–10 cm across. The solid wall measures approximately 6 cm above the base, and the mesh collar adds approximately 3 cm.
- With the 3.5 mm hook, a blocked chain-5 mesh arch spans approximately 1.5 cm horizontally. The separate tapered back panel measures approximately 15 cm across its lower edge and 9–10 cm high.
- Each assembled pouch measures approximately 10 cm wide, 10 cm deep, and 25 cm from base to the top of its folded tab. The complete display measures approximately 65 cm wide and 42 cm high with the hanger adjusted as directed.
- Make four identical sets: basket, triangular back panel, hanging tab, bow loop strip, two bow tails, and bow center. Make one shared hanging cord.
- Work basket rounds in a spiral unless a join is specified. Mark the first stitch of each round. Turning chains do not count as stitches; mesh chain spaces are counted separately from their sc anchors.
Basket Bases — Make Four
- Round 1: With green and the 3.0 mm hook, work 6 sc in MR. Pull the ring closed. (6 sts)
- Round 2: Inc in every st. (12 sts)
- Round 3: Repeat [sc in next st, inc] 6 times. (18 sts)
- Round 4: Repeat [sc in next 2 sts, inc] 6 times. (24 sts)
- Round 5: Repeat [sc in next 3 sts, inc] 6 times. (30 sts)
- Round 6: Repeat [sc in next 4 sts, inc] 6 times. (36 sts)
- Round 7: Repeat [sc in next 5 sts, inc] 6 times. (42 sts)
- Round 8: Repeat [sc in next 6 sts, inc] 6 times. (48 sts)
- Round 9: Repeat [sc in next 7 sts, inc] 6 times. (54 sts)
- Round 10: Repeat [sc in next 8 sts, inc] 6 times. (60 sts)
- Round 11: Sc in BLO of every st to establish the base fold. (60 sts)
Solid Basket Walls — Repeat on Each Base
- Round 12: Sc in every st through both loops. Change to gold on the final pull-through of the last sc. (60 sts)
- Round 13: With gold, sc in every st. (60 sts)
- Round 14: Sc in every st. Change to green on the final pull-through of the last sc. (60 sts)
- Round 15: With green, sc in every st. (60 sts)
- Rounds 16–24: Sc in every st for nine rounds. (60 sts in each round)
- Sl st in the next st to level the round ending; this joining stitch does not add to the count. Fasten off green. Position this transition at the center back when assembling.
Gold Mesh Collar and Green Rim
- Round 25: With the 3.5 mm hook, join gold with sc in the center-back stitch of Round 24. Repeat [ch 5, skip 2 sts, sc in next st] 19 times; ch 5, skip the final 2 sts, and sl st into the first sc. (20 chain-5 spaces and 20 sc anchors)
- Round 26: Sl st into the first chain-5 space and sc around that space. Repeat [ch 5, sc around next chain-5 space] 19 times; ch 5 and sl st into the first sc. (20 chain-5 spaces and 20 sc anchors)
- Round 27: Repeat Round 26. Fasten off gold. (20 chain-5 spaces and 20 sc anchors)
- Round 28: With green and the 3.0 mm hook, join in any chain-5 space. Work 3 sc around each of the 20 chain-5 spaces, leaving all gold sc anchors unworked. Sl st to the first sc. (60 sts)
- Round 29: Ch 1, sc in every st, and sl st to the first sc. Fasten off, leaving a 60 cm sewing tail. (60 sts)
- Lay the basket with its join at center back. Mark a continuous run of 31 rim stitches centered over the rear half of the basket: the center-back stitch plus 15 stitches on each side. These marks locate the separate back panel.
Tapered Gold Back Panels — Make Four
- Use gold and the 3.5 mm hook. Ch 31. Row 1: Sc in the second ch from the hook; repeat [ch 5, skip 2 chains, sc in next chain] 9 times, then ch 5, skip 2 chains, and sc in the final chain. Turn. (10 chain-5 spaces and 11 sc anchors over 30 foundation intervals)
- Row 2: Sl st in the first 3 chains of the first arch to reach its center. Repeat [ch 5, sc around next chain-5 space] 9 times. Leave the remaining edge anchor unworked. Turn. (9 chain-5 spaces)
- Row 3: Sl st in the first 3 chains of the first arch; repeat [ch 5, sc around next chain-5 space] 8 times. Turn. (8 chain-5 spaces)
- Row 4: Sl st in the first 3 chains of the first arch; repeat [ch 5, sc around next chain-5 space] 7 times. Turn. (7 chain-5 spaces)
- Row 5: Sl st in the first 3 chains of the first arch; repeat [ch 5, sc around next chain-5 space] 6 times. Turn. (6 chain-5 spaces)
- Row 6: Sl st in the first 3 chains of the first arch; repeat [ch 5, sc around next chain-5 space] 5 times. Turn. (5 chain-5 spaces)
- Row 7: Sl st in the first 3 chains of the first arch; repeat [ch 5, sc around next chain-5 space] 4 times. Turn. (4 chain-5 spaces)
- Row 8: Sl st in the first 3 chains of the first arch; repeat [ch 5, sc around next chain-5 space] 3 times. Turn. (3 chain-5 spaces)
- Row 9: Sl st in the first 3 chains of the first arch; repeat [ch 5, sc around next chain-5 space] 2 times. Fasten off. (2 chain-5 spaces)
- Pin the four panels to matching dimensions, approximately 15 cm across the foundation and 9–10 cm high. Dampen and allow to dry. Keep the diamonds open without stretching the yarn tight.
Green Back-Panel Edging and Attachment
- Use green and the 3.0 mm hook. With RS facing, join at the lower-left corner of one panel. Work 3 sc around each of the nine stepped chain sections along the first sloping edge. (27 sts)
- Work 3 sc around each of the two top chain-5 spaces. Mark these six stitches as the tab attachment edge. (6 top sts)
- Work 3 sc around each of the nine stepped chain sections down the opposite slope. Fasten off. Do not edge the foundation. (27 sts on second slope; 60 edging sts total)
- Place the foundation edge behind the marked rear rim, with the panel RS facing outward. The starting slipknot is not an attachment point: use the 31 actual foundation chains.
- With the reserved green rim tail, sew the 31 foundation chains to the 31 marked rim stitches, one to one. Catch the green rim stitches and the gold foundation firmly. Sew back across once more through the same attachment line, then secure the tail.
- Repeat for the remaining three baskets. The unsewn front half of each rim remains the pouch opening.
Folded Hanging Tabs — Make Four
- With gold and the 3.0 mm hook, ch 9. Row 1: Sc in the second ch from the hook and each remaining ch. Turn. (8 sts)
- Row 2: Ch 1, sc in each st. Change to green on the final pull-through. Turn. (8 sts)
- Rows 3–24: With green, ch 1, sc in each st, and turn after each row. (8 sts per row)
- Rows 25–26: Change to gold. Ch 1, sc in each st, and turn after Row 25. Fasten off after Row 26 with a 60 cm tail. (8 sts per row)
- The strip should measure approximately 4 cm wide × 12 cm long. Fold it across its length so the two gold ends meet, with green forming the loop above them.
- Place the six marked top-edge stitches of a back panel between the two gold tab ends. Center them across the middle six stitches of the eight-stitch tab width.
- Sew through the front tab end, panel edging, and back tab end across those six stitches. Secure the two outer tab stitches to their opposite tab ends, then sew a second horizontal line through the next gold row. Keep the rod channel open.
Gold Bow Loops — Make Four Strips
- With gold and the 3.0 mm hook, ch 31. Row 1: Sc in the second ch from the hook and each remaining ch. Turn. (30 sts)
- Rows 2–5: Ch 1, sc in each st, and turn after Rows 2–4. Fasten off after Row 5 with a 40 cm tail. (30 sts per row)
- Bring the two short ends together and sew their five row edges together to make a ring. Flatten the ring with this seam at the center back; each flattened bow measures approximately 7.5 cm across.
- Pinch the center into three small folds and stitch through them several times. Leave the center stitches hidden for the separate center wrap.
Shaped Bow Tails — Make Eight
- With gold and the 3.0 mm hook, ch 3. Row 1: Sc in the second ch from the hook and in the remaining ch. Turn. (2 sts)
- Row 2: Ch 1, inc in each st. Turn. (4 sts)
- Row 3: Ch 1, sc in each st. Turn. (4 sts)
- Row 4: Ch 1, inc in first st, sc in next 2 sts, inc in final st. Turn. (6 sts)
- Rows 5–8: Ch 1, sc in each st, and turn after Rows 5–7. Fasten off after Row 8, leaving a sewing tail. (6 sts per row)
- For each bow, overlap the wide Row 8 ends of two tails behind the pinched center. Angle the narrow ends down and outward. Sew through the overlapped ends and bow center.
Bow Centers and Bell Details
- Make four center strips. With gold and the 3.0 mm hook, ch 3. Row 1: Sc in the second ch from the hook and remaining ch. Turn. (2 sts)
- Rows 2–8: Ch 1, sc in both sts, and turn after Rows 2–7. Fasten off after Row 8 with a 30 cm tail. (2 sts per row)
- Wrap one strip around each pinched bow center and its overlapped tail ends. Sew the strip ends together at the back, then stitch through the center to stop the wrap rotating.
- Sew each bow to the center front of its basket, with the bow center aligned approximately with wall Round 24. Anchor the center and the outer third of each loop to the solid wall so the mesh collar remains open.
- If using bells, sew one beneath each bow center using four passes of doubled cotton yarn through its hanging loop and the solid basket wall. Secure the ends inside. Omit bells where detachable small parts would be unsuitable.
Reinforced Hanging Cord
- Cut the utility cord to approximately 110 cm. With green and the 3.0 mm hook, make a slipknot on the hook and hold the working cord beside the hook.
- Work sc around the utility cord, enclosing it completely, until approximately 85 cm is covered. Slide the crochet gently along the core as needed so no bare core shows. Fasten off and weave the yarn ends through the covering. Stitch count depends on the core diameter; the finished covered length is the controlling measurement.
- Leave approximately 12 cm of uncovered core at each end. Tie these ends securely around the rod just inside its end stops, then tuck the tails beneath the green covering. The core knots carry the hanging load.
- Adjust the knots so the covered cord rises approximately 15–17 cm above the rod at its center. Check that both knots resist slipping before hanging the organizer.
Finishing
Weave in all remaining ends through several solid stitches, reversing direction once. Shape the baskets around a dry cylindrical container approximately 9.5 cm across, lightly dampen the crochet, and let it dry fully before removing the form. Keep the bows out of the shaping pressure so their folds stay defined.
Slide the four tabs onto the rod before securing its removable end stop. Space the baskets evenly, leaving approximately 3–4 cm between neighboring tabs. Attach the hanger outside the outer tabs and place its center over the wall hook. Add lightweight contents gradually, checking that the rod stays level and the tab seams hold their shape. Keep dense items low in the solid basket section; the mesh back supports the pouch but should not be used as a handle.
Tips for Success
- Compare all four bases after Round 10. Matching their diameters now prevents uneven pouch heights later.
- Mark every fifth mesh arch on the collar. Four groups of five make it easy to confirm that all 20 spaces remain present.
- Block the tapered panels together before adding their green edging, then compare them again before sewing on the tabs.
- Keep the back-panel foundation seam directly behind the rim. A seam placed lower on the mesh can let the basket mouth fold backward.
- Use smooth cotton for the gold sections. A fuzzy metallic yarn can obscure the diamonds and make the small bow centers bulky.
Common Mistakes to Avoid
- Adding sc into the gold anchors on Round 28 increases the rim unintentionally. Work only 3 sc around each chain space for exactly 60 stitches.
- Working the tapered panel back into its first arch preserves its width. After slipping to that arch’s center, place the first new sc in the next arch so each row loses one space.
- Sewing the back panel around the entire rim closes the pouch. Attach only its 31-chain foundation to the marked rear half.
- Pulling tab seams tight enough to gather the panel creates a weak, narrow attachment. Spread the six panel stitches across the middle six tab stitches.
- A tight mesh chain can lift the basket wall and distort the mouth. Remake that mesh section with a larger hook while retaining the chain-5 repeats.
Ways to Customize This Pattern
- Use cream cotton in place of gold for a softer look while retaining the forest-green structure.
- Make a two-basket organizer on a shorter rod, keeping at least 14 cm of usable rod length per basket.
- Omit the bells and sew a small gold yarn knot beneath each bow center for a quiet, washable detail.
- For a taller solid pocket, add four green rounds after Round 24 before starting the mesh. This adds approximately 1.8 cm to the pouch height and requires extra yarn.
- Make each bow in green and reserve gold for the lattice, base stripe, and tab ends for a more restrained finish.
Frequently asked questions
No. The opening is the round green rim above the gold collar. The triangular mesh panel rises from the rear half of that rim to the hanging tab, leaving the front half accessible.
This untested design has no established load rating. Use it for lightweight items such as hair accessories, small yarn balls, or folded cloths. Assess the yarn, seams, rod, cord knots, and wall fixing together, and remove contents if the tabs or mesh stretch noticeably.
Yes, if one rod end stop is removable. Untie one hanger end, remove the stop, and slide off the tabs. Remove detachable bells, follow the yarn’s washing instructions, and reshape the baskets while damp.
Its lower edge must follow approximately half the basket circumference, about 15 cm along the curved rear rim. Block the panel to that foundation width before joining. If it still pulls inward, remake the panel with a larger mesh hook rather than stretching the attachment seam.
The finished Forest Green and Gold Hanging Basket Organizer Crochet Pattern

