Fuchsia Flower Crochet Curtain Pattern
Advanced
For experienced crocheters who enjoy complex shaping, fine detail, and ambitious construction
Single-Day Project
A satisfying project you can complete in a single afternoon or evening.
Handmade Gift
A beautiful keepsake — free forever. Read online or print at home.
About This Fuchsia Flower Crochet Curtain Pattern
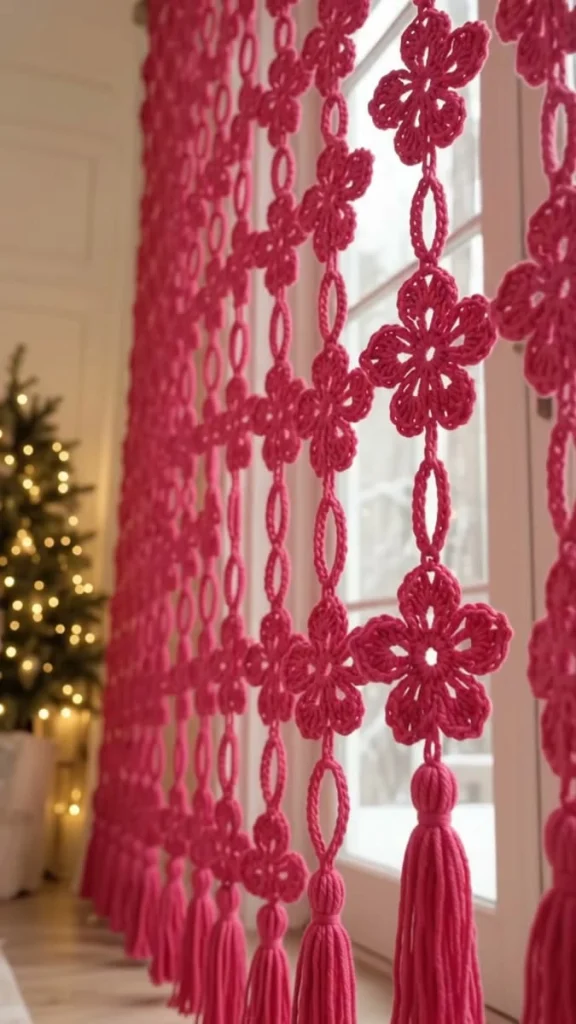
This flower crochet curtain pattern creates a bright fuchsia window panel with five-petal flowers, slender oval links, and long tassels. The open construction lets daylight pass through while the raised petal outlines give the flowers definition against the glass.
The panel uses 24 separate flowers, 24 oval links, six tassels, and a reinforced hanging band. Careful blocking, mapped joins, and matching embroidered petal veins make this an advanced project suited to crocheters who enjoy detailed assembly. Allow approximately 22–30 hours, plus drying time.
Materials
- Sport-weight mercerized cotton in vivid fuchsia Approximately 450 g / 1,350 m, including swatching allowance; choose a firmly plied yarn around 300 m per 100 g
- 3.0 mm crochet hook Adjust if needed to obtain the blocked measurements
- Tapestry needle and sharp scissors For embroidered veins, joins, and tassels
- Stitch markers For five petal anchors and hanging positions
- Blocking mat, rustproof pins, and ruler Use a full-size paper layout beneath a waterproof covering
- 14 cm tall piece of stiff cardboard For winding tassels
- Smooth curtain rod, approximately 55 cm long and up to 12 mm diameter With suitable brackets
Abbreviations
chchainsl stslip stitchscsingle crochethdchalf double crochetdcdouble crochettrtreble crochetststitchMRmagic ringGauge, Layout, and Construction
- Use US crochet terminology. For a gauge swatch, ch 23. Row 1: sc in the second ch from the hook and each remaining ch; turn. There are 22 sc. Rows 2–25: ch 1, sc in all 22 sc; turn. The turning chain never counts as a stitch. Wet-block; the central 22 stitches and 24 rows should measure 10 × 10 cm.
- The motif measurements are equally important: each finished flower measures approximately 8 cm from its upper petal tip to its lower edge and approximately 8 cm across its side joining points. Each oval measures 7 × 2.5 cm externally.
- Arrange six vertical strands. Each strand contains, from top to bottom: flower, link, flower, link, flower, link, flower, link, tassel. All flowers face forward with one petal pointing straight up.
- The 106-stitch band measures approximately 48 cm wide and 3 cm tall. Four flowers and four links contribute approximately 60 cm below it; the trimmed tassels add 14 cm. Finished length is approximately 77 cm.
- Work flowers and links in joined rounds without turning. Beginning chains and joining slip stitches do not count unless specifically stated. Leave 25 cm tails on motifs for assembly.
Five-Petal Flowers — Make 24
- Round 1: work 10 sc in an MR. Join with a sl st to the first sc. Secure the ring with a small central opening of approximately 4 mm rather than pulling it completely shut. There are 10 sc.
- Round 2: sl st in the next sc; this is the starting anchor. Repeat the following five times: ch 6, skip the next sc, sl st in the following sc. The fifth repeat returns to the starting anchor. There are five ch-6 spaces and five anchor slip stitches.
- Round 3: into each ch-6 space work sc, hdc, 3 dc, tr, 3 dc, hdc, sc; then sl st into the next anchor slip stitch. Repeat around all five spaces. There are 11 petal stitches per petal, 55 petal stitches total, and five separating slip stitches. The tr is stitch 6 of each petal.
- Round 4: work one sl st through the back loop of each of the 11 stitches of the next petal, then sl st into its separating slip stitch. Repeat for all five petals. There are 60 edging slip stitches. Keep these loose enough that the petals lie flat. Fasten off.
- Shape the flower with one petal uppermost. Mark the upper petal tip, the farthest-left and farthest-right points, and the valley between the two lower petals. These are the upper, side, and lower joining positions.
Embroidered Petal Veins — Complete All 24 Flowers
- Thread a 60 cm length of matching fuchsia yarn. Secure it on the back beneath several center stitches, keeping the central opening clear.
- For each petal, embroider one straight vein from the base of its ch-6 space to just beneath the outer tr. Catch the foundation chain midway with a tiny couching stitch so the long vein cannot lift away from the flower.
- Repeat on all five petals. Keep the yarn relaxed enough that the flower remains flat. Weave the ends through the back of the center stitches in two directions.
Open Oval Links — Make 24
- Foundation: ch 32. Without twisting the chain, join with a sl st to the first ch. Leave a 25 cm starting tail.
- Round 1: ch 1, sc in each of the 32 foundation chains. Join to the first sc. There are 32 sc. Mark sc 1 and sc 17; these opposite points will become the narrow ends.
- Round 2: ch 1, sc in each sc around. Join to the first sc. There are 32 sc. Fasten off with a 25 cm tail.
- During blocking, pull the marked stitches apart lengthwise and shape the ring into a narrow oval measuring 7 × 2.5 cm. Do not sew the two long sides together.
Reinforced Hanging Band
- Foundation: ch 107.
- Row 1: sc in the second ch from the hook and each remaining ch; turn. There are 106 sc.
- Rows 2–7: ch 1, sc in each of the 106 sc; turn. Each row has 106 sc. Fasten off after Row 7.
- Mark stitches 9, 27, 45, 62, 80, and 98 along the foundation edge. These six positions are the centers of the flower strands.
- Make seven rod tabs. For each tab, ch 7. Row 1: sc in the second ch from the hook and across; turn. There are 6 sc. Rows 2–14: ch 1, sc in all 6 sc; turn. Fasten off with a 40 cm sewing tail. Each tab measures approximately 2.7 × 5.8 cm.
- Center tabs at stitches 4, 20, 37, 53, 70, 87, and 103 along the upper band edge. Sew one short end of each tab to the front of the upper two band rows. Fold it over the rod and sew its other short end to the back at the same position, making a closed hanging loop. Keep the band untwisted.
Blocking and Joining the Flower Lattice
- Soak the flowers, links, band, and tabs in cool water according to the yarn label. Press out water in a towel. Pin flowers to 8 cm, links to 7 × 2.5 cm, and the band to approximately 48 × 3 cm. Let everything dry completely before joining or sewing tabs.
- Lay out six columns with four flowers in each. Position flower centers approximately 8 cm apart horizontally and 15 cm apart vertically. Put one link beneath every flower, including the bottom flower in each column.
- Join the upper marked end of the first link to the lower valley of the first flower. Use four whipstitches through two neighboring stitches on each piece. Secure the seam with two small backstitches on the reverse, without cinching the oval closed.
- Join the lower marked end of that link to the upper petal tip of the next flower in the same way. Continue until the column has four flowers and four links. The fourth link remains beneath the bottom flower. Repeat for all six columns.
- Join adjacent flowers horizontally within each of the four rows. Bring their marked side points together and sew through two neighboring edging stitches on each flower with four whipstitches. Make five joins per row, 20 horizontal joins total. Allow the petal edges to meet without overlapping.
- Join the upper tip of each top flower to its marked position on the lower edge of the band. Spread each attachment over three band stitches and three petal-tip edging stitches. Sew across twice, then secure on the back.
- Check the panel flat before adding tassels. All six columns should end at the same level. Reblock any link that is noticeably shorter than its neighbors.
Long Tassels — Make Six
- Wrap yarn around the 14 cm height of the cardboard 65 times, keeping every wrap parallel and comfortably loose. Cut the working yarn.
- Pass a separate 45 cm length of yarn beneath all wraps at the upper edge. Tie firmly with a double knot. Slide the bundle off the cardboard and cut all loops at the opposite end. There are 130 hanging strands, plus the two tie ends.
- Set the top tie approximately 2 cm below the bottom tip of a terminal oval. Pass both tie ends through that oval tip twice, then knot them securely at the tassel top. This creates a short doubled attachment neck. Draw the tie ends down into the bundle.
- With a separate 60 cm length, wrap the bundle tightly 10–12 times approximately 2 cm below its top tie. Knot the wrap ends and bury them through the wrapped section with a needle. This forms the rounded tassel head shown in the reference.
- Hang the curtain for 24 hours, comb the strands gently with your fingers, and trim all six tassels so the total drop from each terminal oval to the cut fringe is 14 cm.
Finishing
Weave each remaining end through several stitches on the back, reverse direction, and weave again. Check the flower centers and every link attachment before trimming the tails. The finished front should show clear petal outlines, open oval links, and evenly spaced tassel heads.
Slide the tabs onto the rod and hang the panel. Let the cotton settle before making the final tassel trim. Hand-wash gently in cool water when needed, support the wet panel fully, and dry it flat to preserve the lattice spacing.
Tips for Success
- Mark the tr at the tip of every upper petal before edging; this makes the top attachment easy to locate afterward.
- Use the same blocking template for all 24 flowers. Small differences accumulate across six columns.
- Work the petal slip-stitch edging with a relaxed hand. A tight outline pulls the flower into a cup.
- Lay out all horizontal joins before sewing any of them. Rotate each flower until its upper petal and lower valley align with its links.
- Trim tassels only after hanging; the cotton and attachment knots need time to settle.
Common Mistakes to Avoid
- Making six petal spaces: Round 2 uses every second stitch of the 10-stitch center, giving exactly five spaces. Mark all five anchors before continuing.
- Crocheting into the petal foundation chains individually: work all 11 petal stitches around each entire ch-6 space so they can spread into a rounded lobe.
- Twisting an oval foundation: lay the chain flat before joining. Undo and remake a twisted ring before working its sc rounds.
- Pulling joins too tight: compressed petal tips shorten a strand. Sew only until the edges meet and check the column against the layout.
- Hanging the panel while wet: water weight can stretch the links unevenly. Dry it flat and hang only when fully dry.
Ways to Customize This Pattern
- Make a wider curtain by adding complete columns. Add approximately 8 cm of band width per column, using your measured stitch gauge to calculate the extra stitches.
- Make a longer panel by adding one flower and one link to every column. Each additional tier adds approximately 15 cm.
- Use pale pink for the petal veins while keeping the flowers, links, and tassels fuchsia for a subtle two-tone finish.
- Shorten the tassels to a 9 cm total drop for a window above a radiator, measuring all six from the bottom of their terminal links.
Frequently asked questions
Yes. Omit the 20 horizontal flower joins to make separate hanging strands attached to one band. The columns will swing and rotate more freely, so the linked lattice version gives the more stable window panel.
The stitch count forms a flexible ring; blocking establishes its elongated shape. Pin the opposite marked stitches 7 cm apart and keep the sides approximately 2.5 cm apart while drying.
Yes, but make a flower, link, and band swatch first. Thicker yarn changes the panel width, strand length, weight, and tab size together. Use your blocked motif measurements to plan the layout and choose a rod that supports the resulting weight.
Firmly plied cotton and careful blocking should provide the intended soft drape. If you prefer a crisper flower outline, test a light washable fabric stiffener on the swatch first and keep it off the tassels.
The finished Fuchsia Flower Crochet Curtain Pattern

