Garden Bloom Flower Garland Amigurumi Pattern
Beginner Friendly
Perfect for those just starting their crochet journey, with clear instructions and simple techniques
Single-Day Project
A satisfying project you can complete in a single afternoon or evening.
Handmade Gift
A beautiful keepsake — free forever. Read online or print at home.
About This Garden Bloom Flower Garland Amigurumi Pattern
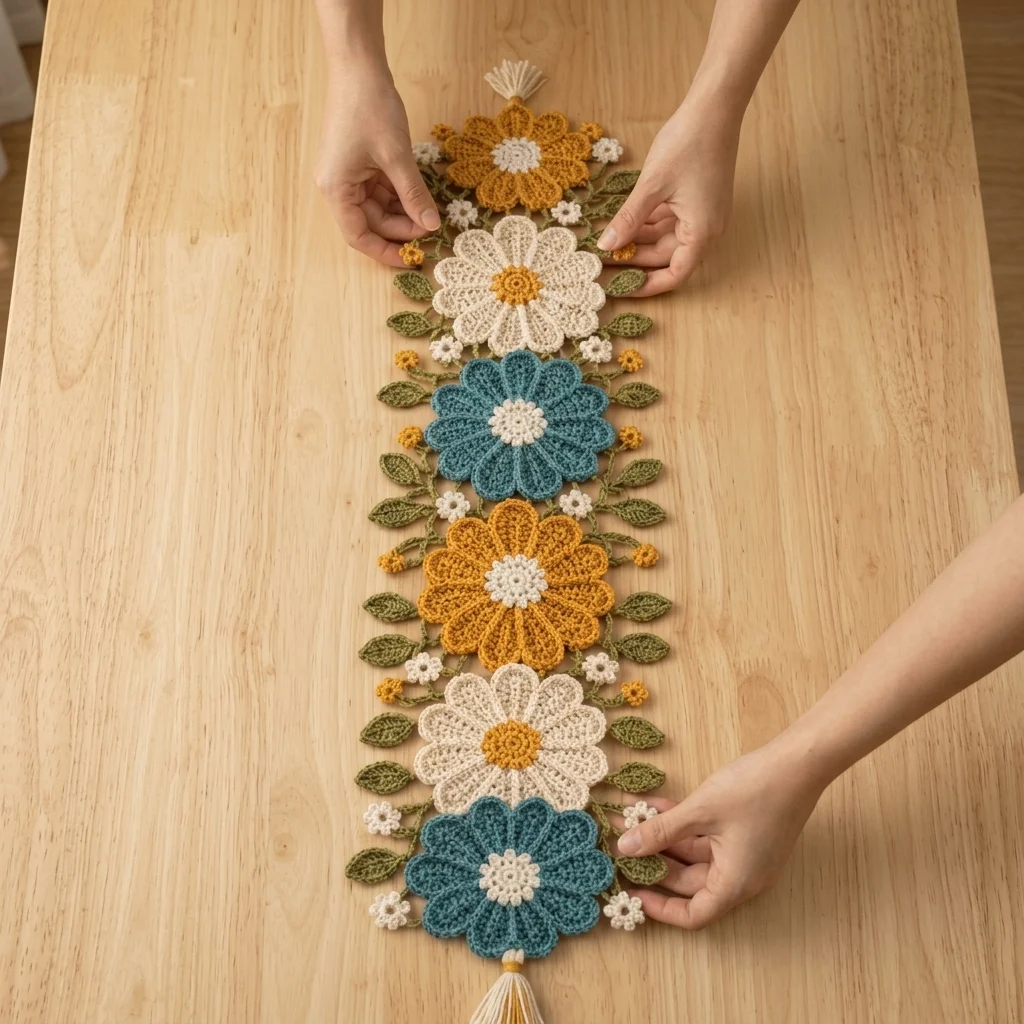
This crochet flower garland pattern builds six full-sized flowers — alternating rounded gold-and-cream blooms with pointed teal-and-cream blooms — down a vining vine of vein-textured leaves, with tiny daisy and bobble accents scattered between. Nothing about this piece is stuffed or dimensional in the amigurumi-animal sense; every motif is a flat, layered crochet flower, and the real work is in the layered petal construction and the sheer number of small pieces that get joined into one continuous garland.
Between the six large flowers, roughly fourteen leaves, and a dozen or so small accent flowers, this is a long project — plan on 14 to 18 hours across the whole thing, most of it in short, repetitive motif-making sessions rather than one long sitting. It’s the kind of piece you keep in a project bag and add a leaf or a daisy to whenever you have twenty free minutes.
This suits a confident intermediate-to-advanced crocheter who already knows their way around working into the back loops or front loops for layered petals, joining motifs as they go, and keeping a lot of small finished pieces organized before final assembly. It makes a striking table runner, a mantel garland, or a wall hanging for a nursery or reading nook.
Materials
- Mustard gold DK yarn (Color A) ~40 g
- Cream/ivory DK yarn (Color B) ~45 g
- Teal DK yarn (Color C) ~35 g
- Olive/sage green DK yarn (Color D, leaves and vine) ~50 g
- 3.25 mm crochet hook
- Yarn/tapestry needle
- Stitch markers for tracking petal-layer starting points
- Fabric or spray starch optional, for extra petal crispness
Abbreviations
chchainscsingle crochethdchalf double crochetdcdouble crochettrtreble crochetsl stslip stitchinc2 sts in same stitchdecdecrease (work 2 sts together)BLOback loop onlyFLOfront loop onlyMRmagic ringst(s)stitch(es)rndroundFOfasten offGold Bloom (make 3, rounded petals)
- With Color B, 6 sc in MR. (6 sts)
- Rnd 2: inc in each st around. (12 sts)
- Rnd 3: sc in each st around, then FO Color B, join Color A in BLO of any st. (12 sts, even)
- Petal layer 1 (Color A, working in BLO around): *in next st work (sc, hdc, 2 dc, hdc, sc), sl st in next st* repeat 6 times to form 6 rounded petals. FO.
- Join Color A in the remaining FLO of the same Rnd 3 round. Rnd: inc in each st around. (24 sts)
- Petal layer 2 (Color A, continuing from FLO round): *in next st work (sc, hdc, 3 dc, hdc, sc), sl st in next st* repeat 12 times, skipping 1 st between petals so petals from layer 2 sit offset behind layer 1. FO, weave in ends.
Teal Bloom (make 3, pointed layered petals)
- With Color B, 6 sc in MR. (6 sts)
- Rnd 2: inc in each st around. FO Color B, join Color C. (12 sts)
- Petal layer 1 (Color C, working around all 12 sts): *ch 4, sc in 2nd ch from hook, hdc in next ch, dc in next ch, sl st in same base st, skip next st* repeat 6 times to form 6 pointed petals. FO.
- Join Color C at the base of the center, working into the unused sts between layer-1 petals. Rnd: sl st, ch 5 in each of the 6 gap sts. (6 loops)
- Petal layer 2 (Color C, working over each ch-5 loop): *sc, hdc, 2 dc, tr, 2 dc, hdc, sc in loop, sl st at base* repeat 6 times to form 6 larger pointed petals behind layer 1. FO, weave in ends.
Flower Centers (make 6, one per bloom)
- With Color B (for gold blooms) or Color A (for teal blooms), 6 sc in MR. (6 sts)
- Rnd 2: inc in each st around. (12 sts)
- Rnd 3: (sc in next st, sc2tog) around. FO leaving a long tail. (8 sts)
- Stuff very lightly or leave flat, then sew centered onto the front of the matching bloom, covering the base of both petal layers.
Leaves (make 14, Color D)
- Ch 8. Row 1: starting in 2nd ch from hook, sl st, sc, hdc, dc, hdc, sc in next 6 ch (leaving last ch as tip point), 3 sc in tip ch, working back along other side: sc, hdc, dc, hdc, sc, sl st in remaining 6 ch. (18 sts total)
- FO leaving a long tail at the base for joining to the vine.
- Vein embroidery: using a short strand of Color D, work one straight stitch up the center of the leaf from base to tip.
Small Daisies (make 8, Color B with Color A centers)
- With Color B, 6 sc in MR. (6 sts)
- Rnd 2 (petals): *ch 3, sl st in 2nd ch from hook, sl st in same base st, skip next st* repeat 3 times around all 6 sts to form 3 picot-tipped petals… continue *ch 3, sc in 2nd ch from hook, sl st in same base st, skip next st* around remaining sts until 6 petals total. FO.
- Center: with Color A, 5 sc in MR, sl st to join, FO leaving a tail. Sew centered onto the daisy front.
Bobble Accents (make 10, Color A)
- With Color A, ch 2. Rnd 1: 5 hdc in 2nd ch from hook, sl st to join and close into a small ball. FO leaving a tail for attaching.
Vine Chain
- With Color D, ch 5. Row 1: sl st in 2nd ch from hook and in each ch across. (4 sts)
- Continue working a foundation-style sl st chain for approximately 85 cm, pausing every 12-14 cm to sc twice into the working chain, ch 2, and sl st back down 2 sts to form a small side branch for attaching a leaf.
- FO leaving tails at both ends.
Finishing
Lay the vine chain flat and arrange the six blooms along its length in the alternating order shown in the reference photo: gold, cream-and-gold-center, teal, gold, cream, teal. Space them evenly, leaving 12-14 cm of vine visible between each bloom’s base.
Using the long tail left on each flower, sew each bloom’s base directly to the vine at its marked position, working through a few stitches at the back-center of the flower so the join is hidden behind the petals. Attach two to three leaves at each side-branch point along the vine, angling them outward and slightly forward so they frame each flower without covering the petals.
Distribute the small daisies and bobble accents in the gaps between leaves and flowers, sewing each through its center back. Steam the whole garland lightly from the back, pinning the vine into a gentle waving line rather than a straight one, and let it cool fully before hanging or laying it out.
Tips for Success
- Make and lay out every single motif — all 6 blooms, 14 leaves, 8 daisies, 10 bobbles — before starting the vine chain, so you can plan spacing against what you actually have rather than guessing.
- Keep a stitch marker in the first stitch of each petal layer; with two offset petal layers per bloom it’s easy to lose track of where layer 2 should start relative to layer 1.
- Work petal layer 2 into the front loops only, never both loops — this is what lets the second layer sit forward and separate from layer 1 instead of collapsing flat against it.
- Vary the exact spacing between blooms by a centimeter or two rather than measuring exactly even gaps — a slightly irregular rhythm reads as more natural and garden-like.
- Sew flower centers on last, after both petal layers and the leaf/vine assembly are done, so you can adjust center placement to hide any uneven petal joins.
Common Mistakes to Avoid
- Working both petal layers into the same loop set, which flattens the two layers into one and loses the layered, dimensional look entirely.
- Making all six blooms with the same petal shape instead of alternating rounded and pointed styles, which is what gives the garland its variety in the photo.
- Joining flowers to the vine before attaching leaves, which makes it hard to angle leaves naturally around a bloom that’s already fixed in place.
- Pulling the vine chain taut when steaming and pinning, which removes the gentle curve that makes the garland look organic rather than like a straight strung line.
- Skipping vein embroidery on the leaves, which leaves them looking flat and plain next to the heavily layered flowers.
Ways to Customize This Pattern
- Swap the gold-and-teal palette for pink-and-white or lavender-and-cream for a spring or wedding-themed version.
- Shorten the vine to 3 blooms total for a shorter garland that works as a wreath accent or basket trim.
- Add a few crocheted berry clusters (small MR balls in red) among the leaves for a winter-holiday variation.
- Mount a single bloom and a few leaves onto a hair clip or brooch backing as a quick standalone accessory using the same construction.
- Work all six blooms in the same petal style instead of alternating, for a more uniform, repeating-pattern look.
Frequently asked questions
The gold blooms use rounded petals worked in the back loop, then a second layer worked in the leftover front loop, while the teal blooms use pointed petals built from chain loops. Alternating the two styles down the garland is what creates the visual variety in the reference photo rather than a repetitive single-flower pattern.
You can reduce the leaf count and skip the bobble accents entirely without affecting the garland’s structure, since both are sewn on separately rather than built into the vine. Just keep at least one leaf pair per flower so each bloom still has a visible frame around it.
The vine chain as written runs about 85 cm with six evenly spaced blooms, but the chain length is entirely adjustable since it’s worked as a simple slip-stitch foundation. Measure your intended space first and adjust both the chain length and the number of blooms proportionally.
Steam-block the finished piece pinned into a gentle wave rather than pulled straight, and let it dry fully flat before moving it. A garland that’s hung or draped before the vine chain has fully set will often develop a twist that’s hard to correct afterward.
The finished Garden Bloom Flower Garland Amigurumi Pattern

