Geranium Granny Square Sofa Cover Crochet Pattern
Beginner Friendly
Perfect for those just starting their crochet journey, with clear instructions and simple techniques
Single-Day Project
A satisfying project you can complete in a single afternoon or evening.
Handmade Gift
A beautiful keepsake — free forever. Read online or print at home.
About This Geranium Granny Square Sofa Cover Crochet Pattern
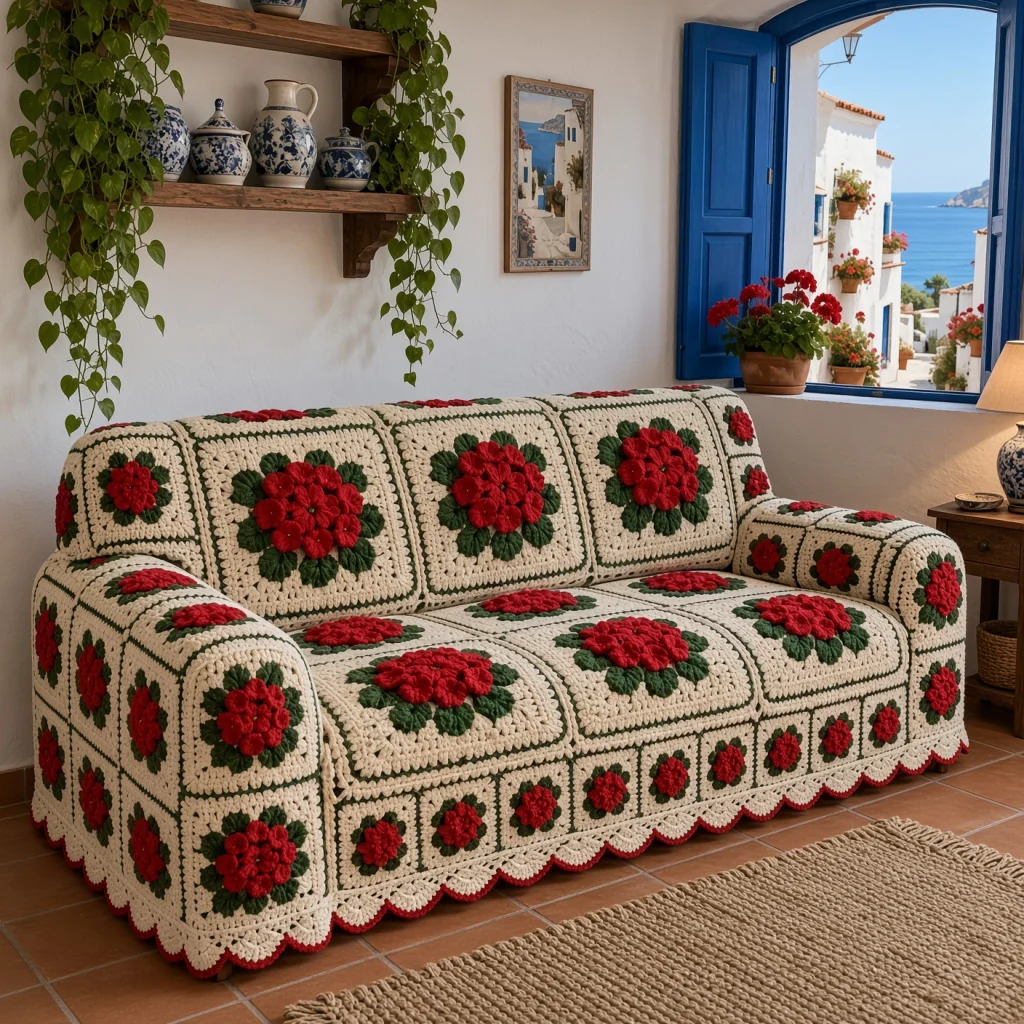
This crochet sofa cover pattern dresses a whole sofa in cream granny squares, each one topped with a raised cluster of red geraniums sitting on a ring of green leaves. Green outlines frame every square, and a lacy cream scallop with a red edge finishes the hem. It has the look of a whitewashed seaside cottage with geraniums on every windowsill.
The design uses two square sizes. Large squares cover the seat and the inside of the backrest, where the flowers are seen best, and small squares cover the arms, the top of the backrest and the front of the seat. Each geranium cluster is built from separate little five-petal flowers sewn into a dome, which gives the flowers real depth instead of a flat appliqué look. The cover is made as three separate pieces, a main cover and two arm panels, so it fits easily and comes off for washing.
This is a big project, about 150 to 180 hours for the full sofa. The squares are portable, though, and every one follows the same few steps once you’ve made the first. It suits a crocheter who is comfortable with granny squares, working behind stitches and joining many pieces neatly.
Materials
- Worsted weight acrylic or acrylic-cotton blend, cream about 2,600 m (13 skeins of 100 g / 200 m)
- Worsted weight acrylic or acrylic-cotton blend, forest green about 1,100 m (6 skeins)
- Worsted weight acrylic or acrylic-cotton blend, red about 700 m (4 skeins)
- 5 mm crochet hook
- Tapestry needle and scissors
- Stitch markers about 20
- Small amount of fiberfill optional, for fuller geranium domes on the large squares
- Cotton tape or ribbon about 3 m, optional, for ties that hold the cover in place
Abbreviations
MRmagic ringchchainscsingle crochethdchalf double crochetdcdouble crochettrtreble crochetsl stslip stitchskskipspspacest(s)stitch(es)BLOback loop onlyrndroundreprepeatRS / WSright side / wrong sideMini Geranium Flowers (make 350)
- You need 10 flowers for each large square (60) and 5 for each small square (290).
- Rnd 1: with red, MR, ch 1, 5 sc in ring, join with sl st to first sc. Pull the ring tight. (5 sts)
- Rnd 2: *(sl st, ch 2, 2 dc, ch 2, sl st) in next st; rep from * 4 more times. (5 petals)
- Fasten off, leaving a 25 cm tail for sewing.
- With cream, work a small French knot in the center of each flower.
- Each flower measures about 4 cm across.
Large Geranium Square (make 6)
- Rnd 1: with green, MR, ch 3 (counts as dc here and throughout), 11 dc in ring, join with sl st to top of ch 3. (12 sts)
- Rnd 2: ch 3, dc in same st, 2 dc in each st around, join. (24 sts)
- Rnd 3: ch 3, dc in same st, dc in next st, *2 dc in next st, dc in next st; rep from * 10 more times, join. (36 sts)
- Rnd 4 (leaves): ch 1, *sc in next st, (hdc, 2 dc, tr, 2 dc, hdc) in next st, sk next st; rep from * 11 more times, join with sl st to first sc. Fasten off. (12 leaves, 12 sc between them) The leaves will cup and overlap slightly, which is what you want.
- Rnd 5: working behind the leaves, join cream with sc around the back of any sc between two leaves, ch 5 behind next leaf, *sc around the back of next sc between leaves, ch 5 behind next leaf; rep from * 10 more times, join with sl st to first sc. (12 ch-5 sps)
- Rnd 6: sl st in first ch-5 sp, ch 3, (2 dc, ch 2, 3 dc) in same sp, ch 1, [(3 dc, ch 1, 3 dc) in next sp, ch 1] twice, *(3 dc, ch 2, 3 dc) in next sp, ch 1, [(3 dc, ch 1, 3 dc) in next sp, ch 1] twice; rep from * 2 more times, join to top of ch 3. (6 groups per side, 72 dc)
- Rnd 7: sl st in next 2 dc and in corner ch-2 sp, ch 3, (2 dc, ch 2, 3 dc) in same sp, ch 1, *3 dc in next ch-1 sp, ch 1; rep from * to next corner, **(3 dc, ch 2, 3 dc) in corner sp, ch 1, 3 dc in each ch-1 sp to next corner with ch 1 between groups; rep from ** 2 more times, join. (7 groups per side, 84 dc)
- Rnds 8-12: rep Rnd 7, adding 1 group per side each rnd. (Rnd 8: 96 dc, Rnd 9: 108 dc, Rnd 10: 120 dc, Rnd 11: 132 dc, Rnd 12: 12 groups per side, 144 dc) Fasten off cream.
- Rnd 13: join green in any corner ch-2 sp, ch 1, (sc, ch 2, sc) in same sp, *sc in each dc and each ch-1 sp to next corner, (sc, ch 2, sc) in corner sp; rep from * 2 more times, sc in each dc and ch-1 sp to end, join. Fasten off. (49 sc per side between corner sps, 196 sc)
- The square measures about 40 cm. Block it flat before adding the flowers.
Small Geranium Square (make 58)
- Rnd 1: with green, MR, ch 3, 11 dc in ring, join. (12 sts)
- Rnd 2: ch 3, dc in same st, 2 dc in each st around, join. (24 sts)
- Rnd 3 (leaves): ch 1, *sc in next st, (hdc, dc, tr, dc, hdc) in next st, sk next st; rep from * 7 more times, join with sl st to first sc. Fasten off. (8 leaves, 8 sc between them)
- Rnd 4: working behind the leaves, join cream with sc around the back of any sc between two leaves, ch 4 behind next leaf, *sc around the back of next sc, ch 4 behind next leaf; rep from * 6 more times, join. (8 ch-4 sps)
- Rnd 5: sl st in first ch-4 sp, ch 3, (2 dc, ch 2, 3 dc) in same sp, ch 1, (3 dc, ch 1, 3 dc) in next sp, ch 1, *(3 dc, ch 2, 3 dc) in next sp, ch 1, (3 dc, ch 1, 3 dc) in next sp, ch 1; rep from * 2 more times, join. (4 groups per side, 48 dc)
- Rnd 6: work as Large Square Rnd 7. (5 groups per side, 60 dc)
- Rnd 7: rep Rnd 6. Fasten off cream. (6 groups per side, 72 dc)
- Rnd 8: join green in any corner sp and work as Large Square Rnd 13. Fasten off. (25 sc per side between corner sps, 100 sc)
- The square measures about 20 cm.
Attaching the Geranium Clusters
- Large squares: arrange 7 flowers in a ring on the green center disc, with their outer petals just touching the base of the leaves. Sew each one down through its center and two or three petals using its red tail.
- If you want a fuller dome, tuck a pinch of fiberfill in the middle of the ring.
- Sew 3 more flowers on top, in the middle of the ring, overlapping the inner petals of the ring flowers. (10 flowers)
- Small squares: sew 4 flowers in a ring on the center disc, then 1 on top in the middle. (5 flowers)
- Keep all stitches on the back inside the green disc, so nothing shows through the cream.
Joining the Squares
- Join method: hold two squares WS together and, with green, sl st through the BLO of each pair of matching sts, including the corner ch-2 sps. This leaves a raised green ridge on the RS between squares.
- Main cover, Row A (top of backrest): join 6 small squares in a row.
- Row B (inside of backrest): join 3 large squares in a row.
- Row C (seat): join 3 large squares in a row.
- Rows D and E (front of seat): join 6 small squares in each row.
- Join Row A to Row B, Row B to Row C, Row C to Row D and Row D to Row E. Where two small squares meet one large square, the small side has 3 more sts. Work 2 small sts together with 1 large st at the seam between the small squares and at the middle of each small square, so the edges finish together.
- Arm panels (make 2): join 20 small squares into a panel 5 squares across and 4 squares long. The panel runs from the inside of the arm, over the top and down the outside.
- The main cover measures about 120 x 140 cm, and each arm panel about 100 x 80 cm, before the edging.
Scalloped Edging
- Work this edging along the bottom of Row E on the main cover (6 squares) and along one long edge of each arm panel (4 squares), which will be the bottom of the outside arm.
- Row 1 (RS): join cream at the right end. Work 24 sc evenly along each square, then 1 more sc at the end. (145 sts for the main cover, 97 sts for each arm panel)
- Row 2: ch 1, turn, sc in first st, *sk next 2 sts, 7 dc in next st, sk next 2 sts, sc in next st; rep from * across. (24 shells for the main cover, 16 for each arm panel)
- Row 3: ch 1, turn, sc in first sc, *ch 2, dc in next dc, (ch 1, dc in next dc) 6 times, ch 2, sc in next sc; rep from * across. Fasten off cream.
- Row 4: join red in first sc, ch 1, sc in same st, *2 sc in next ch-2 sp, sc in next dc, (sc in next ch-1 sp, sc in next dc) 6 times, 2 sc in next ch-2 sp, sc in next sc; rep from * across. Fasten off. (18 sc per scallop: 433 sts for the main cover, 289 for each arm panel)
Finishing
Weave in all ends on the WS, hiding green ends along the green joining ridges and cream ends inside the granny clusters. Wet block the main cover and arm panels flat, pinning the scallops out so each one opens evenly.
Lay the main cover over the sofa with Row A over the top of the backrest and the scallops hanging at the front. Tuck the seam between Rows B and C deep into the crease between the seat and the back. Drape an arm panel over each arm with the scalloped edge on the outside. If the cover slides, sew short pieces of cotton tape to the WS at the corners and tie them around the sofa legs or tuck them under the cushions.
Tips for Success
- Make the squares in stages: all green centers and leaves first, then all cream rounds, then all green outlines. You’ll get faster and the squares will come out more consistent in size.
- Work Rnd 5 (large) and Rnd 4 (small) firmly behind the leaves. If those chains are loose, the square won’t sit flat and the corners will curl.
- Sew the flowers on before joining any squares. It’s much easier to reach the back of a single square than a full sofa cover.
- Use acrylic or an acrylic-cotton blend. A sofa cover gets sat on and washed often, and pure wool will felt and pill.
- Lay out all the squares on the floor before joining. Check that the large and small rows line up and adjust any square that is noticeably smaller.
Common Mistakes to Avoid
- Working the cream round into the leaves instead of behind them. The leaves then get pulled flat and lose their shape. Always work around the back of the sc between leaves.
- Putting corners in the wrong spaces in Rnd 6 (large) or Rnd 5 (small). If the square turns out lopsided, count the spaces again: corners go in every third ch-5 sp on large squares and every second ch-4 sp on small squares.
- Flat geranium clusters. If the flowers look like a flat circle, the top layer is too small. Make sure the top flowers overlap the inner petals of the ring, and add a little fiberfill on large squares.
- Wavy scallops. If the edging ruffles, Row 1 has too many sts. Stick to exactly 24 sc per square plus 1.
- Joining on the wrong side. If the green ridges are on the back, the cover looks flat and unframed. Always join with WS together so the ridge sits on the RS.
Ways to Customize This Pattern
- Change the flower color: pink, coral or white geraniums all work with the same green leaves and cream background.
- Make a matching cushion: join 4 large squares into a front and back, or use 4 small squares for a smaller cushion.
- Make a blanket instead: 4 large squares by 5 large squares, with the scalloped edging on all four sides, gives a throw about 160 x 200 cm.
- Fit a larger sofa: each additional seat needs 2 more large squares (one for the back, one for the seat) and 4 more small squares (two in Row A and one each in Rows D and E).
- Leave out the 3D flowers and work Rnds 1 and 2 in red instead of green for a quicker, flatter version.
Frequently asked questions
Measure the seat width and depth, the backrest height and the arm length. Divide by 40 cm for large squares or 20 cm for small squares to find how many you need in each row, then follow the same joining order.
The flowers are soft and sewn flat at the center, so they are comfortable on the seat. If you prefer a flatter seat, sew only the 7-flower ring on the seat squares and skip the top 3 flowers.
Wash each piece separately on a gentle cool cycle in a mesh laundry bag, then dry flat. Red yarn can bleed, so wash a test square first or use a color catcher sheet.
Yes. Work the green outline round of each new square and join it to its neighbor with a sl st through each matching stitch. It saves time, but you need to attach the flowers before joining, so plan each square fully first.
The finished Geranium Granny Square Sofa Cover Crochet Pattern

