Giant Orange Octopus Hooded Blanket Crochet Pattern
Advanced
For experienced crocheters who enjoy complex shaping, fine detail, and ambitious construction
Single-Day Project
A satisfying project you can complete in a single afternoon or evening.
Handmade Gift
A beautiful keepsake — free forever. Read online or print at home.
About This Giant Orange Octopus Hooded Blanket Crochet Pattern
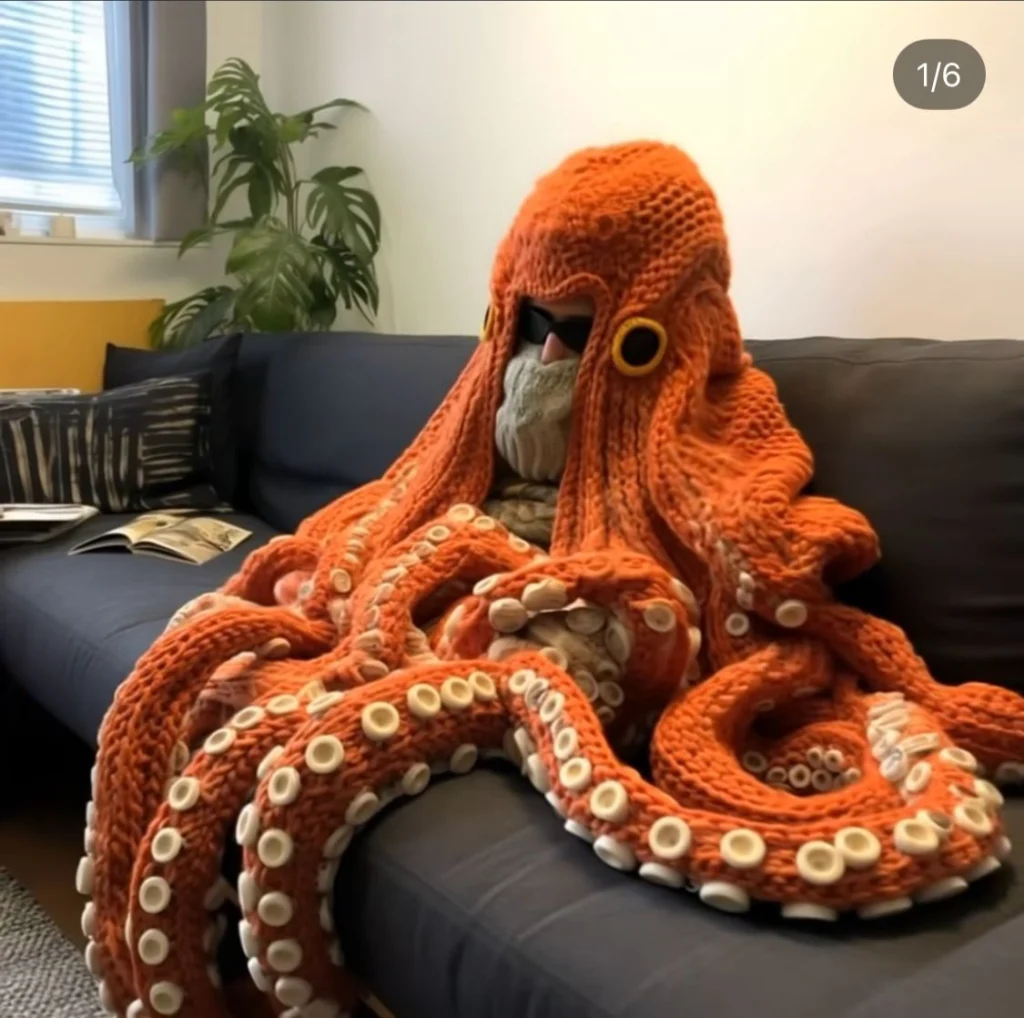
This octopus hooded blanket crochet pattern creates the oversized orange hood, flowing shoulder covering, and eight curling arms seen in the reference. Cream suction cups run along the tentacles, while black eyes with golden rims sit beside the open face. It is a wearable blanket for seated use, with hollow tentacles that drape across your lap and the sofa.
The construction combines a shaped crown, an open hood, an expanding cape, eight tapered tubes, and individually crocheted suction cups. Allow approximately 90–130 hours, including the substantial amount of sewing. This advanced project suits crocheters who enjoy large sculptural pieces and are comfortable adjusting fit from a gauge swatch. The beard and sunglasses in the photograph belong to the wearer and are not part of the crochet design.
Materials
- Orange bulky yarn, category 5 Approximately 3,600 m; about 3,600 g at 100 m per 100 g. Choose a soft, plied yarn with clear stitch definition.
- Cream worsted yarn, category 4 Approximately 900 m for 192 suction cups.
- Black worsted yarn, category 4 Approximately 25 m for two eye disks.
- Golden yellow worsted yarn, category 4 Approximately 25 m for the eye rims.
- Crochet hooks 6 mm for orange fabric; 4 mm for suction cups and eyes, or sizes needed for gauge.
- Stitch markers At least 12, including one distinctive round marker.
- Large blunt yarn needle, scissors, and measuring tape Use a needle that passes through the bulky stitches without splitting the yarn.
- Smooth contrasting waste yarn For marking the center back, tentacle undersides, and cup positions.
Abbreviations
chchainscsingle crochet, US terminologysl stslip stitchinc2 single crochet in the same stitchdecsingle crochet 2 stitches togetherMRmagic ringBLOback loop onlyst / stsstitch / stitchesR / Rndrow / roundRS / WSright side / wrong sideGauge, Dimensions, and Construction Notes
- Main gauge: 10 sc and 12 rows or rounds = 10 cm with orange bulky yarn and the 6 mm hook, measured after washing and drying flat. Make separate flat and tubular swatches; change hook size if their gauges differ.
- Detail gauge: 18 sc and 20 rows = 10 cm with worsted yarn and the 4 mm hook. Each finished suction cup is approximately 3–3.5 cm across; each eye is approximately 6.5 cm across.
- To make the flat main swatch, ch 21, sc in the second ch from the hook and each remaining ch for 20 sc. Work 23 more rows of 20 sc, using ch 1 and turn at each row end. Measure the central 10 cm.
- Finished dimensions at gauge: crown approximately 29 cm across; hood approximately 32 cm from crown top to lower back edge; cape approximately 120 cm across its lower edge and 30 cm deep; tentacles approximately 60 cm long, excluding the cup projection.
- The hood is deliberately oversized. Its lower edge covers the back and sides of the head; the cape stays open down the front. The full crown-to-tentacle-tip length is approximately 122 cm when laid flat, although the rounded crown makes this measurement approximate.
- Work rounds in a continuous spiral unless instructed to join. Mark the first stitch and move the marker every round. Work through both loops unless BLO is specified. Turning ch 1 never counts as a stitch.
- Repeat the entire instruction inside parentheses the stated number of times. Counts in parentheses at the end of an instruction are the finished stitch totals.
- No stuffing, wire, safety eyes, or internal armature is used. The hollow tentacles flatten naturally, and their curls are formed with sewn tucks.
Orange Hood Crown
- Rnd 1: With orange and the 6 mm hook, work 6 sc in MR. (6 sts)
- Rnd 2: Inc in each st. (12 sts)
- Rnd 3: (Sc in next st, inc) 6 times. (18 sts)
- Rnd 4: (Sc in next 2 sts, inc) 6 times. (24 sts)
- Rnd 5: (Sc in next 3 sts, inc) 6 times. (30 sts)
- Rnd 6: (Sc in next 4 sts, inc) 6 times. (36 sts)
- Rnd 7: (Sc in next 5 sts, inc) 6 times. (42 sts)
- Rnd 8: (Sc in next 6 sts, inc) 6 times. (48 sts)
- Rnd 9: (Sc in next 7 sts, inc) 6 times. (54 sts)
- Rnd 10: (Sc in next 8 sts, inc) 6 times. (60 sts)
- Rnd 11: (Sc in next 9 sts, inc) 6 times. (66 sts)
- Rnd 12: (Sc in next 10 sts, inc) 6 times. (72 sts)
- Rnd 13: (Sc in next 11 sts, inc) 6 times. (78 sts)
- Rnd 14: (Sc in next 12 sts, inc) 6 times. (84 sts)
- Rnd 15: (Sc in next 13 sts, inc) 6 times. (90 sts)
- Rnds 16–21: Sc in each st for 6 rounds. (90 sts per round)
- Sl st in the next st and fasten off. Number the 90 stitches of the final round from the original round marker. Mark sts 1–30 as the front brow; these remain unworked during the next section. Sts 31–90 form the sides and back.
Open Hood Sides and Back
- R 1, RS: Join orange in crown st 31. Ch 1, sc in sts 31–90, leaving the marked 30 front stitches unworked. Ch 1, turn. (60 sts)
- R 2: Sc in each st. Ch 1, turn. (60 sts)
- Rs 3–23: Repeat R 2 for 21 rows. (60 sts per row)
- R 24: Sc in each st. Ch 1, turn. (60 sts)
- Check the hood on the intended wearer now. The opening consists of the 30-stitch brow and two 24-row side edges. The face should remain fully exposed, and the lower edge should reach the shoulders. Do not fasten off; continue into the cape.
Expanding Shoulder Cape
- R 1: (Sc in next 11 sts, inc) 5 times. Ch 1, turn. (65 sts)
- R 2: (Sc in next 12 sts, inc) 5 times. Ch 1, turn. (70 sts)
- R 3: (Sc in next 13 sts, inc) 5 times. Ch 1, turn. (75 sts)
- R 4: (Sc in next 14 sts, inc) 5 times. Ch 1, turn. (80 sts)
- R 5: (Sc in next 15 sts, inc) 5 times. Ch 1, turn. (85 sts)
- R 6: (Sc in next 16 sts, inc) 5 times. Ch 1, turn. (90 sts)
- R 7: (Sc in next 17 sts, inc) 5 times. Ch 1, turn. (95 sts)
- R 8: (Sc in next 18 sts, inc) 5 times. Ch 1, turn. (100 sts)
- R 9: (Sc in next 19 sts, inc) 5 times. Ch 1, turn. (105 sts)
- R 10: (Sc in next 20 sts, inc) 5 times. Ch 1, turn. (110 sts)
- R 11: (Sc in next 21 sts, inc) 5 times. Ch 1, turn. (115 sts)
- R 12: (Sc in next 22 sts, inc) 5 times. Ch 1, turn. (120 sts)
- Rs 13–35: Sc in each st, ch 1 and turn at the end of each row, for 23 rows. (120 sts per row)
- R 36: Sc in each st. Fasten off. (120 sts)
- Mark the lower edge into eight consecutive groups of 15 sts. Number these groups 1–8 from left to right with the cape RS facing you. Place a center-back marker between groups 4 and 5.
Hood and Front-Edge Border
- With the RS facing, join orange at one lower front corner of the cape. Ch 1. Work 36 sc up the cape row ends, then 24 sc up the hood row ends, placing one sc in each row end. (60 sts worked)
- Work sc in each of the 30 unworked brow stitches. (90 sts worked in total)
- Work 24 sc down the opposite hood edge and 36 sc down the opposite cape edge. (150 sts in the complete border)
- Fasten off. Do not work across the 120-stitch lower cape edge. Lay the border flat; if it pulls the opening inward, undo it and use a larger hook while retaining the same stitch count.
Tapered Orange Tentacles — Make Eight
- Foundation: With orange and the 6 mm hook, ch 30 loosely. Without twisting, sl st in the first ch to form a ring. The joining sl st does not count as a stitch.
- Rnd 1: Ch 1, sc in each foundation ch. Continue in a spiral. (30 sts)
- Rnds 2–12: Sc in each st for 11 rounds. (30 sts per round)
- Rnd 13: (Sc in next 3 sts, dec) 6 times. (24 sts)
- Rnds 14–30: Sc in each st for 17 rounds. (24 sts per round)
- Rnd 31: (Sc in next 2 sts, dec) 6 times. (18 sts)
- Rnds 32–48: Sc in each st for 17 rounds. (18 sts per round)
- Rnd 49: (Sc in next st, dec) 6 times. (12 sts)
- Rnds 50–66: Sc in each st for 17 rounds. (12 sts per round)
- Rnd 67: Dec 6 times. (6 sts)
- Rnds 68–72: Sc in each st for 5 rounds. (6 sts per round)
- Fasten off with a 25 cm tail. Thread the tail through the front loops of the remaining 6 sts and draw closed. Secure inside the tip. Leave the foundation end open and the entire tube unstuffed.
- Flatten the foundation ring with the beginning-of-round position at one side fold. There are 15 foundation stitches on each flattened layer. Mark the center of the upward-facing layer as the underside; extend this center line toward the tip with loose waste-yarn stitches.
Cream Suction Cups — Make 192
- Make 24 cups for each of the eight tentacles. Use cream worsted yarn and the 4 mm hook. Keep the center flat and the outer wall firm.
- Rnd 1: Work 6 sc in MR. (6 sts)
- Rnd 2: Inc in each st. (12 sts)
- Rnd 3: (Sc in next st, inc) 6 times. (18 sts)
- Rnd 4: Working BLO, sc in each st. (18 sts)
- Rnd 5: Sc in each st. Sl st in the next st and fasten off with a 35 cm sewing tail. (18 sts; joining sl st excluded)
- Push the center gently inward so the RS of the base is inside the shallow cup and the open rim faces outward. Do not stuff or close the rim. The unused front loops of Rnd 3 form an attachment ridge around the cup base.
Place and Sew the Suction Cups
- Lay each tentacle with its marked underside facing upward. Temporarily insert a flat piece of cardboard inside while pinning so the two layers remain separate; remove it before finishing.
- Make two lengthwise cup lines, each approximately 1.5 cm to either side of the underside center line on the broad portion. Bring the lines gradually closer together as the tube narrows.
- On the first line, center one cup at each of tentacle Rnds 6, 11, 16, 21, 26, 31, 36, 41, 46, and 51. On the second line, center one cup at each of Rnds 8, 13, 18, 23, 28, 33, 38, 43, 48, and 53. This gives 20 staggered cups.
- Place the remaining four cups directly on the center line at Rnds 57, 61, 65, and 69. Each tentacle now has 24 cups; eight tentacles use 192 cups.
- Sew each cup through its unused Rnd 3 front loops and the surface of the orange tube. Catch only the near wall of the tube. Secure all the way around the cup base, keeping Rnds 4–5 and their open rim free.
- At the narrow tip, allow the cup rims to flare beyond the orange tube. Keep the cup bases individually anchored rather than sewing neighboring rims together. Remove all placement markers and cardboard.
Black Eyes with Golden Rims — Make Two
- Rnd 1: With black worsted yarn and the 4 mm hook, work 6 sc in MR. (6 sts)
- Rnd 2: Inc in each st. (12 sts)
- Rnd 3: (Sc in next st, inc) 6 times. (18 sts)
- Rnd 4: (Sc in next 2 sts, inc) 6 times. (24 sts)
- Rnd 5: (Sc in next 3 sts, inc) 6 times. Change to golden yellow on the final pull-through of the last sc. (30 sts)
- Rnd 6: (Sc in next 4 sts, inc) 6 times. (36 sts)
- Rnd 7: Sc in each st. Sl st in the next st and fasten off with a 60 cm sewing tail. (36 sts; joining sl st excluded)
- Shape the final round into a slightly raised rim around the black center. Leave the disks unstuffed, with all yarn ends secured on the reverse.
- With the hood on a head form or the intended wearer, pin one eye to each side. Center each disk at hood-side R 8, approximately 6 cm behind the corresponding face-opening edge. The gold rim should remain entirely on the orange fabric.
- Remove the hood before sewing. Stitch around each outer rim, then use black yarn to make four small anchoring stitches through the black disk and hood, evenly spaced just inside the gold rim. Keep the reverse smooth against the wearer.
Join the Eight Tentacles
- Lay the cape RS up with its 120-stitch lower edge nearest you. Arrange the tentacles beyond that edge so their tips point away from the hood and their suction cups face the cape WS, toward the wearer’s lap.
- For tentacle 1, align its flattened foundation opening with cape group 1. Match the 15 pairs of foundation stitches to the 15 cape stitches. Use orange yarn to sew through both tube layers and the corresponding cape stitch, closing the tube top and attaching it in the same seam.
- Repeat for tentacles 2–8, using one 15-stitch cape group per tentacle. All 120 cape stitches are used once; no gap or overlap is added between neighboring bases.
- Make a second pass through the same attachment points in the opposite direction. Keep both passes relaxed enough for the cape edge to bend freely. Secure the yarn ends inside the tentacle bases.
- Lift the blanket by the cape with the tentacles supported underneath. Check each join for missed layers or stretched stitches before forming the curls.
Shape the Tentacle Curls
- Number the attached tentacles 1–8 from left to right with the cape RS facing you. Tentacles 1, 3, 6, and 8 receive tighter tip curls; tentacles 2, 4, 5, and 7 receive softer bends.
- For each tighter curl, lay the tentacle on its side and curve the final 15 cm toward the suction-cup surface. Bring the orange fabric at Rnd 70 against the orange fabric at Rnd 55. Pin at the side edges, keeping the cups free.
- With orange yarn, make four short sewing passes through the touching side surfaces at each of the two side edges. Catch several stitch bars per pass and secure inside the fabric. These tacks hold a loose loop without closing the tube across its width.
- For each softer bend, work two small tucks on the suction-cup side, between the cup bases: bring Rnd 58 toward Rnd 61 and Rnd 64 toward Rnd 67. At each tuck, take three short stitches across a 1 cm area, drawing the two rounds approximately 1 cm closer together.
- Arrange the eight arms across a sofa and rotate the free lengths gently so some cream cups show. The sewn bends establish the tip shapes; the remaining lengths are intentionally free to drape.
Finishing
Weave orange ends through several stitches on the inside of the hood, cape, or tentacles, then reverse direction before trimming. Secure the cream ends beneath their cup bases. Check every suction cup by gently pulling its rim, and reinforce any base that lifts away from the tentacle.
Wash according to the yarn label and support the entire blanket when moving it wet. Dry flat with the hood rounded over folded towels and the tentacles arranged in broad curves. Once dry, try the blanket while seated and spread its weight over your lap and the sofa. Keep the open front free; this design has no neck fastening.
Tips for Success
- Make the first 24 cups as a batch and sew them onto one tentacle. This reveals your actual cup spacing and lets you estimate yarn use before making the remaining 168.
- Mark the tentacle underside before attaching cups. A continuous waste-yarn line prevents the two cup rows from wandering around the tube.
- Support the cape on a table while sewing the tentacle bases. Hanging arms can stretch the lower edge and distort otherwise even seams.
- Check the hood before adding the heavy tentacles. Fit corrections are much easier while the hood and cape can be handled independently.
- Keep a finger inside the tube behind every cup attachment. You can feel immediately if the needle catches the opposite wall.
Common Mistakes to Avoid
- Working across all 90 crown stitches when starting the hood sides closes the face opening. Work only the specified 60 stitches and reserve the front 30 for the brow.
- Adding increases to the cape turning chain makes the lower edge too wide. The ch 1 never counts; each shaping row adds exactly five stitches.
- Sewing around the suction-cup rim flattens the cup into a disk. Attach through the unused loops around its base and leave both wall rounds free.
- Joining a tentacle through only one foundation layer leaves an open pocket at the cape hem. Catch both layers at each of the 15 joining points.
- Pulling the curl tacks very tight creates hard puckers. Release the thread and resew with the tentacle already resting in a gentle curve.
Ways to Customize This Pattern
- Use rust orange for the main fabric and oatmeal for the cups to create a quieter version of the reference colors. Keep the black centers and gold eye rims for definition.
- Lengthen every tentacle by 10 cm by adding 12 plain rounds immediately after Rnd 30. Shift all later shaping and cup-placement round numbers forward by 12; add four cups to each extended section, two on each underside line.
- For an asymmetric display, use the tighter curl treatment on only the two outer tentacles and leave the center arms with soft bends.
- Add subtle orange surface texture with short running stitches in a slightly darker orange around the crown and along the outer tentacle surfaces. Keep the hood interior and face edge smooth.
Frequently asked questions
It is an open-front adult hooded blanket inspired by the photographed garment. The hood covers the head and shoulders, the cape drapes over the back, and eight hollow tentacles spread across the lap. No part requires stuffing.
Adjust the 24 straight hood rows before beginning the cape. Adding or removing two rows changes the depth by approximately 1.7 cm at gauge while preserving the 60-stitch lower edge. Change the border count by the same number of rows on each hood side. A width adjustment requires recalculating the crown and cape increases.
Worsted yarn creates smaller, clearer cup rims without adding excessive bulk. Using the orange bulky yarn for the cups would make them substantially larger and heavier, especially near the tapered tips.
The sewn tucks hold the specified tip bends, while the hollow lengths move like a blanket. Arrange them over sofa cushions for larger loops. They are flexible and do not stand independently.
Follow the yarn care instructions and your machine’s capacity limit. The wet blanket will be much heavier than the dry piece, and the many cup attachments need gentle handling. If machine washing is unsuitable, wash in a large basin and lift the blanket with support underneath the entire piece.
The finished Giant Orange Octopus Hooded Blanket Crochet Pattern

