Golden Blossom Crochet Table Runner Pattern
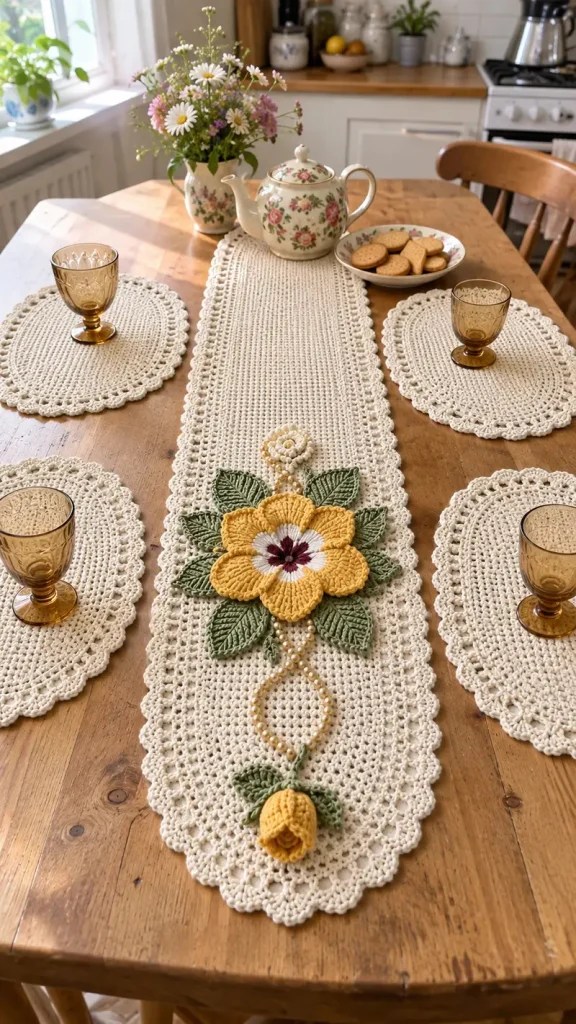
Advanced
For experienced crocheters who enjoy complex shaping, fine detail, and ambitious construction
Single-Day Project
A satisfying project you can complete in a single afternoon or evening.
Handmade Gift
A beautiful keepsake — free forever. Read online or print at home.
About This Golden Blossom Crochet Table Runner Pattern
This floral crochet table runner pattern pairs an ivory oval-ended base with a raised golden flower, olive-green leaves, and a trailing rosebud. Scalloped lace frames the narrow runner, while a white flower center and burgundy embroidery echo the rich contrast in the reference photograph.
This advanced project combines a flat foundation, separately shaped end panels, dimensional appliqués, embroidered leaf veins, and a pearl-colored crochet cord. Allow approximately 25–35 hours for crocheting, blocking, and assembly. It suits crocheters who enjoy detailed decorative work and want a centerpiece for a sideboard or dining table. The instructions make the runner; the separate placemats in the photograph are not included.
Materials
- Sport-weight mercerized cotton, approximately 125 m per 50 g Ivory: 300 g; golden yellow: 50 g; olive green: 50 g; white, burgundy, and pale gold: 10 g each
- 2.5 mm crochet hook Adjust to obtain the blocked gauge
- Tapestry needle and fine embroidery needle For seams, appliqués, and surface embroidery
- Stitch markers At least six
- Blocking mat, rustproof pins, measuring tape, and scissors For shaping the assembled base
Abbreviations
chchainsl stslip stitchscsingle crochethdchalf double crochetdcdouble crochetinc2 single crochet in the same stitchsc2togsingle crochet 2 stitches togetherMRmagic ringRSright sideUS terminology. Counts in parentheses are completed stitch counts. Turning chains do not count as stitches. Work through both loops unless directed otherwise. Join rounds only where instructed.
Gauge, Dimensions, and Construction
- Blocked gauge: 20 sc and 22 rows = 10 × 10 cm. Make a swatch of 27 sc for 28 rows, wash gently, dry flat, and measure the central 10 cm.
- The center rectangle measures approximately 20.5 × 63.5 cm. Two semicircular end panels add approximately 9 cm at each end. The lace adds approximately 2 cm around the perimeter, giving an estimated finished size of 24 × 86 cm.
- Make the rectangle, attach the two end panels, and add the continuous edging. Block this base before attaching the flower, eight large leaves, rosebud, three small leaves, rosette, and decorative cord.
- Use the photograph as a placement guide: concentrate the flower arrangement toward one end, leaving the other end mostly clear for display. These are decorative appliqués; no stuffing or eyes are required.
Ivory Center Rectangle
- Foundation: With ivory, ch 42.
- Row 1: Sc in the second ch from the hook and each remaining ch; turn. (41)
- Rows 2–140: Ch 1, sc in each stitch; turn. (41 per row)
- Fasten off. Mark each short edge and both long edges. Each long edge has 140 row ends; each short edge has 41 stitches or foundation-chain positions.
Semicircular End Panels — Make Two
- Row 1: With ivory, work 3 sc in MR; turn without joining. Pull the ring closed. (3)
- Row 2: Ch 1, inc in each stitch; turn. (6)
- Row 3: Ch 1, repeat [sc 1, inc] 3 times; turn. (9)
- Row 4: Ch 1, repeat [sc 2, inc] 3 times; turn. (12)
- Row 5: Ch 1, repeat [sc 3, inc] 3 times; turn. (15)
- Row 6: Ch 1, repeat [sc 4, inc] 3 times; turn. (18)
- Row 7: Ch 1, repeat [sc 5, inc] 3 times; turn. (21)
- Row 8: Ch 1, repeat [sc 6, inc] 3 times; turn. (24)
- Row 9: Ch 1, repeat [sc 7, inc] 3 times; turn. (27)
- Row 10: Ch 1, repeat [sc 8, inc] 3 times; turn. (30)
- Row 11: Ch 1, repeat [sc 9, inc] 3 times; turn. (33)
- Row 12: Ch 1, repeat [sc 10, inc] 3 times; turn. (36)
- Row 13: Ch 1, repeat [sc 11, inc] 3 times; turn. (39)
- Row 14: Ch 1, repeat [sc 12, inc] 3 times; turn. (42)
- Row 15: Ch 1, repeat [sc 13, inc] 3 times; turn. (45)
- Row 16: Ch 1, repeat [sc 14, inc] 3 times; turn. (48)
- Row 17: Ch 1, repeat [sc 15, inc] 3 times; turn. (51)
- Row 18: Ch 1, repeat [sc 16, inc] 3 times; turn. (54)
- Row 19: Ch 1, repeat [sc 17, inc] 3 times; turn. (57)
- Row 20: Ch 1, repeat [sc 18, inc] 3 times. (60)
- Fasten off with a sewing tail. The straight diameter contains 20 row ends on each side of the starting ring. Mark these 40 positions plus the center ring as 41 attachment positions. The curved perimeter consists only of the 60 stitches of Row 20.
Join the Base and Work the Lace Border
- With RS facing upward, pin one end panel to each short edge of the rectangle. Match the center ring to the central stitch, then match 20 row ends to the 20 stitches on either side. Whipstitch through the edge loops, using one sewing pass per matched position. Keep the seam flexible.
- Border Round 1: Join ivory at a long-edge midpoint. Ch 1, work 1 sc in each of the 140 row ends along each long side and 1 sc in each of the 60 stitches around each curved end. Do not add corner stitches at the seams. Join with sl st to the first sc. (400)
- Border Round 2: Ch 1, repeat [sc in next stitch, ch 1, skip next stitch] 200 times. Join with sl st to the first sc. (200 sc and 200 ch-1 spaces)
- Border Round 3: Sl st into the first ch-1 space. Ch 1, repeat [5 dc in the current ch-1 space, sc in the next ch-1 space] 100 times, advancing directly to the next unused space after each repeat. Leave all Round 2 sc unworked. Join with sl st to the first dc. (100 shells and 100 anchoring sc; 600 stitches)
- Fasten off and weave in ends. Wet-block the base, opening the eyelets and pinning each shell into a gentle curve. Let dry completely.
White Flower Center
- Round 1: With white, 6 sc in MR. Work in a spiral. (6)
- Round 2: Inc in each stitch. (12)
- Round 3: Repeat [sc 1, inc] 6 times. (18)
- Round 4: Repeat [sc 2, inc] 6 times. (24)
- Round 5: Repeat [sc 3, inc] 6 times. (30)
- Round 6: Repeat [sc 4, inc] 6 times. (36)
- Sl st in the next stitch and fasten off with a long sewing tail. Block flat to approximately 4–4.5 cm across.
Golden Petals — Make Six
- Foundation: With golden yellow, ch 7. The foundation’s starting end will become the narrow petal base.
- Round 1: Sc in the second ch from the hook, hdc in the next ch, dc in the next 3 ch, 5 dc in the last ch. Continue along the opposite side of the foundation: dc in the next 3 ch, hdc in the next ch, sc in the last ch. Join with sl st to the first sc. (15)
- Round 2: Ch 1, sc in the next 2 stitches, hdc in the next 3 stitches, inc in each of the next 5 stitches, hdc in the next 3 stitches, sc in the last 2 stitches. Join with sl st to the first sc. (20)
- Round 3: Ch 1, sc in the next 5 stitches, repeat [sc 1, inc] 5 times, sc in the last 5 stitches. Join with sl st to the first sc. (25)
- Fasten off with a sewing tail. Pin each petal into a broad oval approximately 4.5–5 cm long. Pinch the narrow foundation end and secure it with two small stitches to give the petal a shallow cup.
Large Olive Leaves — Make Eight
- Foundation: With olive green, ch 13.
- Round 1: Sc in the second ch from the hook, hdc in the next 2 ch, dc in the next 7 ch, hdc in the next ch, 3 sc in the last ch. Continue down the opposite side: hdc in the next ch, dc in the next 7 ch, hdc in the next 2 ch, sc in the last ch. Join with sl st to the first sc. (25)
- Round 2: Ch 1, sc in the next 11 stitches, inc in the next stitch, work [sc, ch 2, sc] in the next stitch, inc in the next stitch, sc in the last 11 stitches. Join with sl st to the first sc. (28 sc and one ch-2 tip)
- Fasten off with a long tail. With olive yarn, embroider a central line from the foundation’s starting end to the pointed tip. Add six diagonal veins on each side, ending just inside the outer edge. Keep the embroidery loose enough for the leaf to remain flat.
- Block to approximately 6–7 cm long. Leave the tip slightly lifted when sewing the leaf onto the runner.
Trailing Golden Rosebud
- Foundation: With golden yellow, ch 22.
- Row 1: Sc in the second ch from the hook and each remaining ch; turn. (21)
- Row 2: Ch 1, repeat [sc in next stitch, 3 dc in next stitch, sc in next stitch] 7 times; turn. (35)
- Row 3: Ch 1, repeat [sc in next stitch, hdc in next stitch, 3 dc in next stitch, hdc in next stitch, sc in next stitch] 7 times. (49)
- Fasten off with a long tail. Roll the strip loosely, keeping the foundation edge aligned and the scalloped edge open. Stitch through the foundation layers to hold a tapered bud approximately 3–4 cm long. Leave a small opening at its outer end.
Small Leaves — Make Three
- Foundation: With olive green, ch 8.
- Round 1: Sc in the second ch from the hook, hdc in the next ch, dc in the next 3 ch, hdc in the next ch, 3 sc in the last ch. Continue along the other side: hdc in the next ch, dc in the next 3 ch, hdc in the next ch, sc in the last ch. Join with sl st to the first sc. (15)
- Fasten off with a sewing tail. Embroider a central vein from base to tip. Block to approximately 3–4 cm long.
- Reserve two leaves for the rosebud and one for the upper ivory rosette.
Ivory Rosette
- Foundation: With ivory, ch 16.
- Row 1: Sc in the second ch from the hook and each remaining ch; turn. (15)
- Row 2: Ch 1, repeat [sc in next stitch, 5 dc in next stitch, sc in next stitch] 5 times. (35)
- Fasten off with a long tail. Roll the strip into a small open rose and sew through its foundation edge to secure all layers.
- Use pale-gold yarn to embroider three small French knots in its center. Finish at approximately 2.5–3 cm across.
Pearl-Colored Crochet Cord
- With pale gold, ch 161.
- Starting in the second ch from the hook, sl st in each ch. (160 sl st)
- Fasten off with a sewing tail. Relax the cord with a light mist of water, without stretching it. Its expected length is approximately 65–75 cm; the exact length depends on chain tension.
- Using ivory yarn, sew 24 evenly spaced French knots along the cord, approximately 2.5 cm apart, to suggest the photograph’s pearl-like accents without adding separate beads.
Finishing
Lay the dry runner flat with the decorated end nearest you. Measure all placements from the outer scalloped tip of that end. Place the golden flower center approximately 30 cm from the tip, centered across the runner. Arrange the six petals evenly around it, overlapping their narrow bases beneath the white disk by about 1 cm. Sew the petal bases and inner side edges to the runner, leaving the rounded outer edges free. Sew the white disk over the joins.
Embroider eight burgundy spokes from the center of the white disk outward for 8–12 mm. Add short branching stitches near their outer ends and a tight cluster of burgundy French knots at the center. Catch only the upper fabric loops where possible so the back stays tidy.
Arrange four large leaves on either side of the flower, with their bases concealed beneath the petals and their tips pointing diagonally outward. Keep every leaf inside the lace border. Sew along each central vein and add two small edge tacks per leaf. Place the ivory rosette approximately 41 cm from the decorated tip, with its small leaf beneath it.
Set the golden rosebud approximately 9 cm from the decorated tip, its opening pointing toward that tip. Sew the two remaining small leaves behind it. Arrange the pale-gold cord from the rosette toward the flower, hide part beneath the petals, then form a crossed loop between the flower and rosebud. Tack the cord every 2–3 cm and at each crossing. Hide any excess beneath the flower. Secure the bud through several foundation layers and weave in all ends.
Give the lace a final gentle blocking without flattening the petals or rosebud. Use the raised arrangement as a decorative area and place cups, plates, and hot serving dishes on a separate flat surface or suitable protective mat.
Tips for Success
- Mark the center ring and both ends of each semicircle before sewing. This keeps the curved panels centered on the 41-stitch rectangle.
- Count the first border round in four sections: 140, 60, 140, and 60 stitches. Correct this foundation before starting the eyelets.
- Block all six petals together so their sizes match before arranging them around the white center.
- Pin every appliqué and the entire cord in position before sewing. Check that the rosebud, crossed loop, and main flower stay on the runner’s center line.
- Use short embroidery lengths for the leaf veins; long cotton strands tend to twist and tighten the leaf fabric.
Common Mistakes to Avoid
- Counting turning chains as stitches widens the center panel. Keep every row at 41 sc and place markers in its first and last stitches.
- Sewing the semicircle’s curved edge to the rectangle reverses the intended shape. Attach its straight row-end edge and leave all 60 outer stitches available for the border.
- Adding extra stitches at the four panel joins changes the lace repeat. Work the stated 400-stitch border without additional corner increases.
- Pulling leaf embroidery tight makes the leaves curl into cups. Loosen each vein before securing the yarn.
- Sewing around every petal edge flattens the flower. Secure the inner portion and let the rounded outer edges lift naturally.
Ways to Customize This Pattern
- Make a longer runner by adding 22 rows to the rectangle for approximately 10 cm of extra length. Each such extension adds 44 stitches to Border Round 1, 22 eyelet spaces, and 11 shells.
- Replace the golden petals with muted rose or soft apricot while keeping the white and burgundy center.
- Use two closely related olive shades, alternating four leaves in each shade, to emphasize the layered foliage.
- Omit the ivory knots on the decorative cord for a quieter, easier-to-launder finish.
- For a paired floral arrangement, make a second complete appliqué set and mirror its placement at the opposite end, keeping the middle clear.
Frequently asked questions
No. These instructions make the long scalloped runner and its floral decoration. The separate oval placemats would require their own construction and sizing.
Separate semicircular panels give the long center straight sides while providing rounded ends with predictable stitch counts. A flexible seam and blocking help the three panels lie together smoothly.
Yes. Replace the embroidered knots with washable pearl-colored beads and sew each one individually with strong thread. Check their care instructions and remove the runner from use if any attachment loosens.
Follow the cotton yarn’s care label. Gently hand-wash, support the wet runner as you lift it, press out moisture in a towel, and dry flat. Reshape the petals and open the rosebud with your fingers before it dries.
The finished Golden Blossom Crochet Table Runner Pattern

