Golden Dahlia Popcorn Flower Granny Square Bedspread
Advanced
For experienced crocheters who enjoy complex shaping, fine detail, and ambitious construction
Single-Day Project
A satisfying project you can complete in a single afternoon or evening.
Handmade Gift
A beautiful keepsake — free forever. Read online or print at home.
About This Golden Dahlia Popcorn Flower Granny Square Bedspread
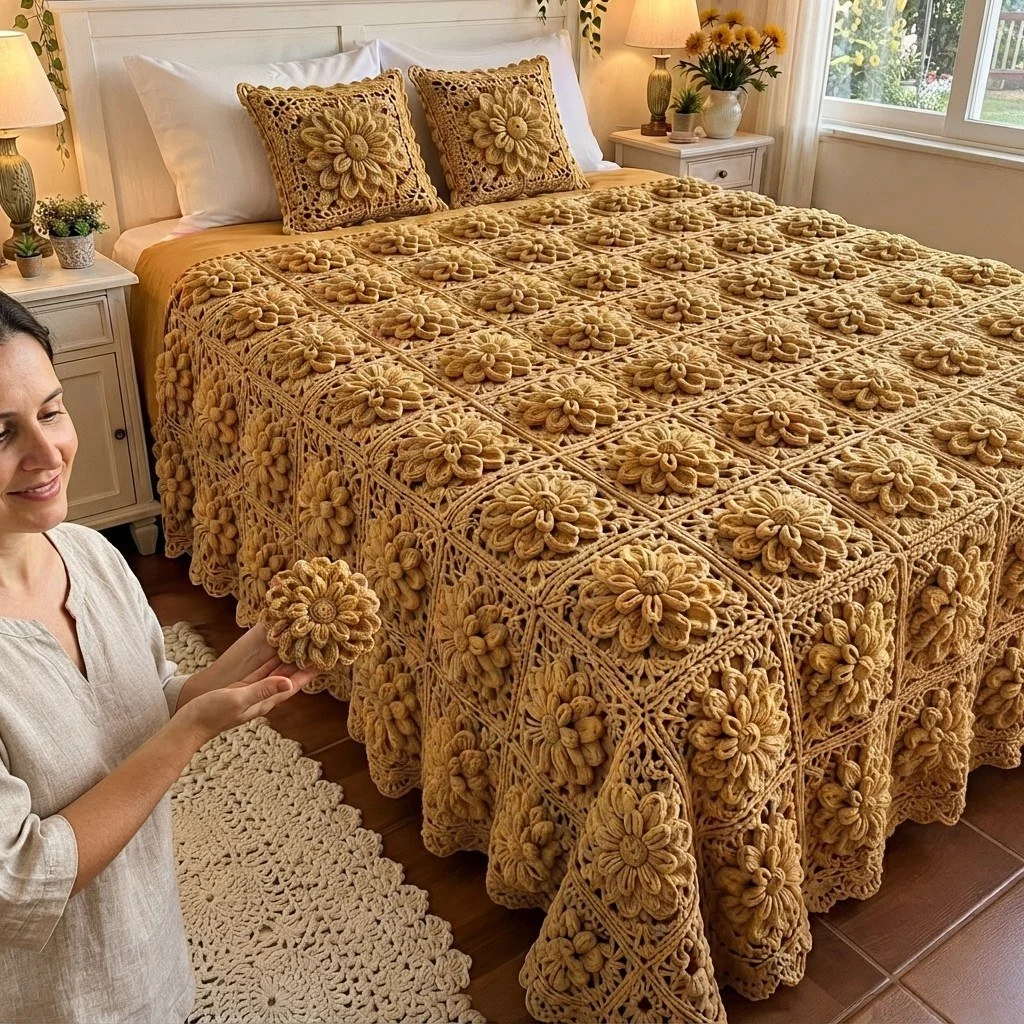
This popcorn flower granny square blanket pattern turns one richly textured motif into a full honey-gold bedspread, the kind that hangs over the sides of the bed and holds its shape for decades. Each square carries a three-layer dahlia worked entirely in popcorn-tipped petals: a small inner ring of eight petals, a medium ring behind it, and a wide outer ring that spills almost to the corners of the square. The petal layers are not sewn on afterwards — each one is anchored to hidden chain spaces worked behind the layer before it, so the flower builds outwards in real depth, and the fabric underneath stays flat and dense enough to sleep under.
Two close shades of gold do the quiet work here. The flower is worked in Honey Gold, and the lattice frame around it switches to a slightly paler Golden Wheat, so the petals read as raised even in flat light. The squares are finished individually, blocked, then joined with wrong sides together and a slip-stitch seam, which pushes a visible ridge to the right side — that soft grid of lines you can see between the flowers. A three-round scalloped border finishes the outer edge all the way around the drop.
This is a long project, not a hard one round by round. A single motif takes about 45 minutes once you have the rhythm, and a full 9 x 10 grid runs to roughly 70-90 hours including joining, border and blocking. It suits a confident crocheter who is comfortable with popcorns, working behind a previous round, and keeping gauge consistent across many repeats. If you have never worked a layered flower before, make three practice motifs first — the third one will look noticeably better than the first, and you will want all ninety to match.
Materials
- Aran / worsted smooth acrylic or acrylic-cotton blend in Honey Gold approx. 2,400 g (~4,100 m) for the flowers
- Aran / worsted yarn in Golden Wheat, a half-shade paler approx. 1,600 g (~2,700 m) for the lattice and border
- 5.0 mm crochet hook main hook, for the square rounds, joining and border
- 4.5 mm crochet hook for the flower centre and all three petal layers, so petals stay firm
- Blunt tapestry needle for ends and seams
- Stitch markers at least 8, to mark corners and hidden anchor stitches
- Blocking mats and rust-proof pins enough for 6-9 motifs at a time
- Steam iron or garment steamer for blocking acrylic
- Tape measure and sharp scissors
Abbreviations
MRmagic ringchchainsl stslip stitchscsingle crochethdchalf double crochetdcdouble crochetpcpopcorn: 5 dc in same stitch, drop loop, insert hook front to back in top of first dc, pick up dropped loop, pull throughsp(s)space(s)st(s)stitch(es)rnd(s)round(s)reprepeatBLback loop onlyRS / WSright side / wrong sideGauge and Motif Count
- Gauge: one finished motif measures 20 cm x 20 cm after blocking, using Aran yarn, a 5.0 mm hook for the square rounds and a 4.5 mm hook for the flower.
- Check point: Rnds 1-3 of the flower (before any petals) should measure 6.5-7 cm across. If larger, drop to a 4.0 mm hook for the flower; if smaller, go up to 5.0 mm.
- Bedspread as shown: 9 motifs across x 10 motifs down = 90 motifs, finishing at roughly 180 cm x 200 cm. This covers a queen bed with a drop on both sides and over the foot.
- Double bed: 8 x 9 = 72 motifs, roughly 160 cm x 180 cm. Single bed: 6 x 9 = 54 motifs, roughly 120 cm x 180 cm.
- Make all motifs before joining. Work them in batches of nine and block each batch, so size drift is caught early rather than at motif sixty.
Flower Centre and Petal Layer 1 (make 90)
- With 4.5 mm hook and Honey Gold, Rnd 1: MR, ch 1, 8 sc in ring, join with sl st to first sc. Pull ring closed tightly. (8 sc)
- Rnd 2: ch 1, 2 sc in each st around, join with sl st to first sc. (16 sc)
- Rnd 3 (anchor round): ch 1, sc in first st, ch 3, skip next st, *sc in next st, ch 3, skip next st; rep from * 6 more times, join with sl st to first sc. (8 sc, 8 ch-3 sps) Place a marker around the stem of each of the 8 sc.
- Rnd 4 (petal layer 1): sl st into first ch-3 sp, ch 1, in same sp work (sc, hdc, pc, hdc, sc), *in next ch-3 sp work (sc, hdc, pc, hdc, sc); rep from * 6 more times, join with sl st to first sc. (8 petals, 40 sts) Each petal should stand up slightly; do not flatten them.
Petal Layers 2 and 3
- Rnd 5 (hidden anchor round): fold the layer-1 petals forward towards you. Working behind them, sl st around the stem of the first marked Rnd 3 sc, ch 1, sc around that same stem, ch 4, *sc around the stem of the next marked Rnd 3 sc, ch 4; rep from * 6 more times, join with sl st to first sc. (8 sc, 8 ch-4 sps) Move the markers to the stems of these 8 new sc.
- Rnd 6 (petal layer 2): sl st into first ch-4 sp, ch 1, in same sp work (sc, hdc, dc, pc, dc, hdc, sc), *in next ch-4 sp work (sc, hdc, dc, pc, dc, hdc, sc); rep from * 6 more times, join with sl st to first sc. (8 petals, 56 sts) These petals sit between and behind the layer-1 petals.
- Rnd 7 (hidden anchor round): fold all petals forward. Working behind them, sl st around the stem of the first marked Rnd 5 sc, ch 1, sc around that same stem, ch 5, *sc around the stem of the next marked Rnd 5 sc, ch 5; rep from * 6 more times, join with sl st to first sc. (8 sc, 8 ch-5 sps) Move the markers to these 8 new sc.
- Rnd 8 (petal layer 3): sl st into first ch-5 sp, ch 1, in same sp work (sc, hdc, 2 dc, pc, 2 dc, hdc, sc), *in next ch-5 sp work (sc, hdc, 2 dc, pc, 2 dc, hdc, sc); rep from * 6 more times, join with sl st to first sc. (8 petals, 72 sts) Fasten off Honey Gold and weave in the end on the back of the flower.
- Check: the flower should now measure 13-14 cm across the widest point, with three clearly separated rings of petals and all 24 popcorns facing you.
Squaring the Motif
- Rnd 9 (final hidden anchor round): with 5.0 mm hook and Honey Gold, fold all petals forward. Working behind them, join with sl st around the stem of the first marked Rnd 7 sc, ch 1, sc around that same stem, ch 6, *sc around the stem of the next marked Rnd 7 sc, ch 6; rep from * 6 more times, join with sl st to first sc. (8 sc, 8 ch-6 sps) Remove the markers.
- Rnd 10 (square established): sl st into first ch-6 sp, ch 3 (counts as dc), 2 dc in same sp, ch 2, 3 dc in same sp [first corner made], 3 dc in next ch-6 sp [side], *(3 dc, ch 2, 3 dc) in next ch-6 sp, 3 dc in next ch-6 sp; rep from * 2 more times, join with sl st to top of ch-3. (36 dc, 4 corner ch-2 sps; 9 dc along each side)
- Rnd 11: sl st to next corner ch-2 sp, ch 3 (counts as dc), (dc, ch 2, 2 dc) in same sp, dc in each of next 9 dc, *(2 dc, ch 2, 2 dc) in next corner sp, dc in each of next 9 dc; rep from * 2 more times, join with sl st to top of ch-3. (52 dc, 4 corner sps; 13 dc along each side) Fasten off Honey Gold.
- Rnd 12 (colour change): join Golden Wheat with sl st in any corner ch-2 sp, ch 3 (counts as dc), (dc, ch 2, 2 dc) in same sp, dc in each of next 13 dc, *(2 dc, ch 2, 2 dc) in next corner sp, dc in each of next 13 dc; rep from * 2 more times, join with sl st to top of ch-3. (68 dc, 4 corner sps; 17 dc along each side)
- Rnd 13 (open lattice round): sl st to next corner ch-2 sp, ch 4 (counts as dc + ch 1), dc in same sp, *dc in next dc, [ch 1, skip 1 dc, dc in next dc] 8 times, (dc, ch 2, dc) in corner sp; rep from * 2 more times, then dc in next dc, [ch 1, skip 1 dc, dc in next dc] 8 times, ch 2, join with sl st to 3rd ch of beginning ch-4. (9 dc and 8 ch-1 sps along each side, plus 2 dc at each corner; 4 corner ch-2 sps)
- Rnd 14 (edging round): ch 1, sc in same st, *sc in each dc and 1 sc in each ch-1 sp along the side to the corner sp, (sc, ch 2, sc) in corner ch-2 sp; rep from * around, join with sl st to first sc. (19 sc along each side between corner ch-2 sps; 76 sc total) Fasten off, leaving a 15 cm tail.
- Block each finished motif to a true 20 cm square, pinning the four corners and the midpoint of each side, and steam lightly from 10 cm above the work. Do not press the popcorns flat.
Joining the Motifs
- Lay all blocked motifs out in the full grid (9 across x 10 down for the bedspread shown) and check that every flower faces the same way, so the petal overlap runs in one direction across the whole bed.
- Join in vertical strips first. Hold two motifs with WRONG sides together and RS facing outwards, corners matching. With 5.0 mm hook and Golden Wheat, insert the hook through the corner ch-2 sp of both motifs and draw up a loop.
- Sl st through both corner sps, then sl st through the matching pairs of sc along the edge, working through both loops of both motifs: 19 sl sts along the side. Finish with a sl st through both corner ch-2 sps at the far end. Keep the slip stitches loose — tight sl sts make the seam shorter than the motifs.
- Do not fasten off between motifs in a strip: continue straight on to the next pair, and only cut the yarn at the end of each strip. (10 motifs per strip = 9 seams.)
- When all 9 strips are complete, join the strips to each other the same way, working one long seam the full length of each strip. At each four-corner meeting point, work the sl st through all four corner spaces together so no hole forms.
- Check the right side: every seam should show as a soft raised ridge between the squares. If a seam sits flat or sunken, you joined with right sides together — undo it and reverse the motifs.
Scalloped Border
- Rnd 1: with 5.0 mm hook and Golden Wheat, join in any outer corner ch-2 sp, ch 1, 3 sc in same sp, then sc in each sc along the edge and 1 sc in each joining seam, working 3 sc in each of the remaining outer corner sps. Join with sl st to first sc. Along each edge you should have 19 sc per motif plus 1 sc per seam.
- Rnd 2: ch 1, sc in each sc around, working 3 sc in the centre sc of each corner group. As you work each side, add or skip one stitch as needed so the stitch count along each side is a multiple of 3. Join with sl st to first sc.
- Rnd 3 (arch round): ch 1, sc in same st, *ch 3, skip 2 sc, sc in next sc; rep from * around, working (ch 3, sc, ch 3) in each corner stitch so the corners stay flat. Join with sl st to first sc.
- Rnd 4 (scallops): sl st into first ch-3 sp, ch 3 (counts as dc), 4 dc in same sp, *sl st in next sc, 5 dc in next ch-3 sp; rep from * around, join with sl st to top of ch-3. Each ch-3 arch becomes one 5-dc shell.
- Rnd 5 (picot finish): ch 1, sc in same st, *sc in each of next 2 dc, (sc, ch 3, sl st in 3rd ch from hook, sc) in next dc [picot at the top of the shell], sc in each of next 2 dc, sc in next sl st; rep from * around, join with sl st to first sc. Fasten off and weave in all ends on the wrong side.
Finishing
Weave every end into the wrong side of the dc rounds, not into the petal layers — ends hidden among the popcorns will work their way out with washing. Run each tail through at least 8 cm of fabric, split the plies once halfway along, then double back 2 cm and cut. On a piece this size it is worth doing the ends in batches as you go rather than facing ninety of them at the end.
Block the finished bedspread as a whole. Lay it flat on a clean sheet on the floor, square the outer edges with a tape measure, and pin the border scallops out one by one so each picot sits at the same depth. Steam the Golden Wheat lattice and the border thoroughly, holding the iron above the fabric rather than on it, and steam only lightly around the flowers so the popcorns keep their loft. Leave it pinned until completely dry, usually overnight.
Once dry, lay it on the bed and let the drop settle for a day before judging the length — the weight of the fabric pulls the lower rows down by a few centimetres. Wash on a cool gentle cycle in a large machine or by hand in the bath, support the full weight when lifting it wet, and dry flat. Do not tumble dry: heat will crush the petal layers that give this blanket its whole character.
Tips for Success
- Work the flower on a 4.5 mm hook and the square on a 5.0 mm hook. The smaller hook keeps the popcorns tight and standing; the larger hook keeps the lattice rounds from cupping around the raised centre.
- When closing a popcorn, insert the hook from front to back into the top of the first dc and pull the dropped loop through firmly, then chain nothing. A popcorn closed loosely flops forward and the petal loses its rounded tip.
- Mark the eight anchor stitches before each hidden round and move the markers as soon as the round is done. Counting anchors by feel through three layers of petals is how most motifs end up lopsided.
- Make and block nine motifs, then measure all nine. If they vary by more than 5 mm, adjust tension now rather than after fifty squares — blocking can correct 5 mm, not 15 mm.
- Join in strips and finish each strip completely, including weaving its ends, before starting the next. The project stays manageable in your lap much longer that way.
Common Mistakes to Avoid
- Working the hidden anchor rounds into the petal stitches instead of around the stems of the sc below. This buries the previous layer and the flower goes flat. The anchor sc must go around the post of the marked sc, with the petals folded forward out of the way.
- Pulling the joining slip stitches tight. A tight seam gathers the edge and makes the bedspread ripple at the sides. Use the 5.0 mm hook for the seam and keep each sl st loose enough to slide along the hook shaft.
- Skipping the wrong number of dc in Rnd 13. With 17 dc per side the sequence is dc, then [ch 1, skip 1, dc] eight times, which uses exactly 17 stitches and leaves 9 dc on that side. If you end up mid-repeat at the corner, recount Rnd 12 first — that is where the error usually is.
- Joining motifs with right sides together. The ridge then forms on the back and the right side shows a flat valley. Always hold wrong sides together so the seam ridge faces out.
- Pressing the blanket instead of steaming above it. One pass of a hot iron flattens the popcorns permanently and no amount of re-blocking brings them back.
Ways to Customize This Pattern
- Work only two petal layers (stop after Rnd 6 and go straight into Rnd 9, using ch-5 instead of ch-6) for a lighter, faster blanket — this cuts roughly 15 minutes and 10 g from every motif.
- Scatter the colour: keep the Golden Wheat lattice on every square but work the flowers in three related tones — honey, caramel and pale gold — placing the palest flowers at the centre of the bed and the deepest at the drop.
- Make a matching throw at 5 x 6 motifs (about 100 cm x 120 cm) and use the same border, or a single motif worked flat and backed with fabric for a cushion front.
- Swap the picot edging for a plain scallop by ending after Rnd 4 of the border, which suits a bed with a tailored valance better than the picot finish.
- Use a cotton-rich Aran instead of acrylic for a cooler summer bedspread. Expect motifs to come out about 1 cm smaller, so add an extra row of motifs to the length.
Frequently asked questions
Each blocked motif is 20 cm square and weighs roughly 45 g in Aran yarn. The version shown is 9 x 10 = 90 motifs, about 180 cm x 200 cm and around 4 kg finished. For a double bed use 8 x 9 (72 motifs, 160 cm x 180 cm) and for a single 6 x 9 (54 motifs, 120 cm x 180 cm). Measure your mattress width plus the drop you want on each side, then divide by 20 and round up.
You can, and it gives the petals a lovely sheen, but chenille worms badly in popcorns because of the number of loops pulled through one stitch. If you use it, go down to a 4.0 mm hook for the flower, keep your working loop short, and avoid pulling the finished blanket lengthwise. For a bedspread that gets daily use, a smooth Aran acrylic holds the popcorn shape far better over time.
Yes. Work Rnd 14 as the join: when you reach a side that meets a finished neighbour, replace each sc with a sc worked normally followed by dropping the loop, inserting the hook into the matching sc of the neighbour and pulling the loop through. You lose the raised ridge seen in the photo, and you cannot block the motifs individually, so the finished grid will need more careful whole-piece blocking.
That is almost always Rnd 10. If the eight ch-6 loops of Rnd 9 are pulled tight, or if you worked only 3 dc into the corner spaces instead of the full (3 dc, ch 2, 3 dc), the square cannot spread to the width the flower needs. Count 36 dc in Rnd 10 and 52 in Rnd 11 before going on. Mild curling disappears with blocking; a square that cups like a bowl needs Rnd 10 reworked.
One colour works and looks closer to a traditional heirloom bedspread, since the texture alone carries the design. The half-shade difference between Honey Gold and Golden Wheat mainly helps the flowers stand out in flat daylight. If you go with a single shade, consider adding a fourth petal layer or a deeper scallop border so the surface keeps enough contrast.
The finished Golden Dahlia Popcorn Flower Granny Square Bedspread

