Golden Daisy Lace Curtain Crochet Pattern
Advanced
For experienced crocheters who enjoy complex shaping, fine detail, and ambitious construction
Single-Day Project
A satisfying project you can complete in a single afternoon or evening.
Handmade Gift
A beautiful keepsake — free forever. Read online or print at home.
About This Golden Daisy Lace Curtain Crochet Pattern
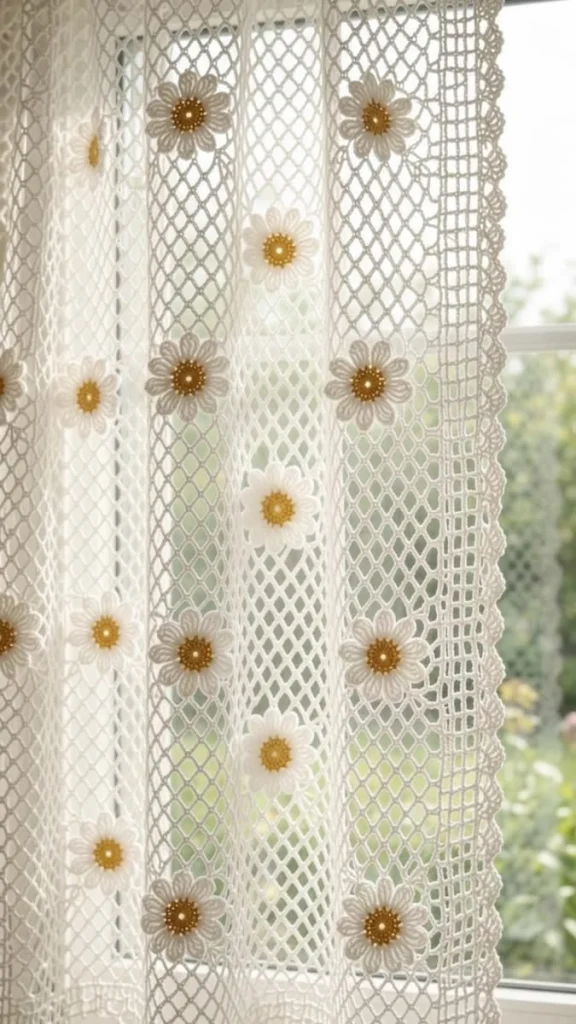
This daisy curtain crochet pattern pairs an airy ivory diamond mesh with separate white-petaled flowers and warm golden centers. Inspired by the reference curtain, it has a narrow square-mesh border and small scallops that frame the flowers without making the fabric feel heavy.
The curtain is worked as one rectangular net panel, then finished with an integrated rod pocket and 18 individually crocheted daisies. Allow approximately 35–45 hours for the crochet, careful motif placement and blocking. This advanced project suits crocheters comfortable with fine cotton, tall stitches, lace shaping and nearly invisible sewing.
Materials
- Ivory size 10 crochet cotton Approximately 1,200–1,400 m, including petals and borders; buy the same dye lot.
- Golden ochre size 10 crochet cotton Approximately 80 m for 18 flower centers.
- 1.75 mm crochet hook Adjust if needed to obtain the blocked mesh gauge.
- Fine tapestry needle and scissors For joining flowers and securing cotton ends.
- Locking markers, rustproof pins and blocking surface A measuring tape and contrasting basting thread are also useful.
- Slim curtain rod Up to approximately 12 mm diameter for the specified pocket.
Abbreviations
chchainsl stslip stitchscsingle crochethdchalf double crochetdcdouble crochettrtreble crochetMRmagic ringststitchspspaceRSright sideUS crochet terminology. Instructions in parentheses are repeated the stated number of times. Turning chains count only where explicitly stated. Work joined rounds for flowers; work turned rows for the curtain.
Gauge, Dimensions and Construction
- Blocked diamond-mesh gauge: four full ch-5 arches across a straight mesh row measure 6 cm; 10 mesh rows measure 8 cm. Measure between the anchoring stitches, away from the edges.
- Make a swatch with ch 50 and follow the panel instructions using eight arches instead of 32. Work 20 mesh rows. The blocked mesh should measure approximately 12 cm wide by 16 cm high.
- Target panel size before borders: 48 cm wide by 96 cm high. The side borders add approximately 2 cm on each side. Bottom finishing adds approximately 2 cm; the folded rod pocket adds approximately 4 cm above the mesh.
- Target finished daisy diameter: approximately 7 cm. Make and block one flower before producing the remaining 17.
- The finished curtain is approximately 52 × 102 cm. Border and pocket row heights depend on tension; the mesh gauge is the primary sizing requirement. No stuffing, safety eyes or facial embroidery are used for this curtain.
Ivory Diamond-Mesh Panel
- Foundation: with ivory, ch 194 loosely. Mark the first and last chain if helpful.
- Row 1: sc in second ch from hook, (ch 5, skip 5 foundation chains, sc in next chain) 32 times. Turn. There are 32 full arches and 33 sc; all 193 available foundation chains are accounted for.
- Row 2, offset row: ch 5, sc in first ch-5 arch, (ch 5, sc in next ch-5 arch) 31 times, ch 2, dc in the final edge sc of Row 1. Turn. There are 31 full ch-5 arches, one beginning half-space and one ending half-space; the starting ch 5 forms the beginning half-space.
- Row 3, straight row: ch 1, sc in the dc at the edge, (ch 5, sc in next full ch-5 arch) 31 times, ch 5, sc in the beginning ch-5 half-space of the previous row. Turn. There are 32 full arches and 33 sc. Do not anchor into the ending ch-2 half-space beside the first sc.
- Rows 4–119: repeat Rows 2 and 3 a further 58 times. Even-numbered rows have 31 full arches plus two half-spaces; odd-numbered rows have 32 full arches.
- Row 120: repeat Row 2. Fasten off. Mark all four corners and retain the distinction between the top half-spaces and the full arches.
- Wet-block the panel to 48 × 96 cm, keeping its edges straight and its diamonds evenly opened. Allow it to dry completely before adding borders.
Foundation Border Around the Panel
- With RS facing, join ivory at the top-left corner. Work clockwise. Each corner has its own ch-2 sp, separate from the counted edge stitches.
- Border round 1, top: ch 1, work 3 sc in the first half-space, 4 sc in each of the 31 full arches, and 3 sc in the final half-space. There are 130 sc across the top. Ch 2 for the corner.
- Border round 1, right side: work 2 sc around the side of each of the 120 mesh rows, giving 240 sc. Ch 2 for the corner. Avoid catching only one strand of a tall edge stitch.
- Border round 1, bottom: work into the unused foundation-chain loops. Work 2 sc at the edge anchor chain; for each of the 32 foundation intervals, work 1 sc in each of the five skipped chains and 1 sc at the next anchor chain. There are 194 sc across the bottom. Ch 2 for the corner.
- Border round 1, left side: work 2 sc around each of the 120 row ends, giving 240 sc. Ch 2 and join with sl st to the first sc. Total: 804 sc and four ch-2 corner spaces. Fasten off.
- The top and bottom counts differ because their structures differ. Keep the border relaxed and flat; do not force the top to match the bottom stitch count.
Square-Mesh Side Borders — Make on Both Sides
- Work each side separately across its 240 sc. Leave the corner ch-2 spaces unworked. Attach ivory at whichever end allows the first row to be worked with RS facing.
- Side row 1: ch 1, sc in first sc, (ch 2, skip 2 sc, sc in next sc) 79 times, ch 2, skip 1 sc, sc in last sc. Turn. There are 80 ch-2 spaces and 81 sc; 240 base stitches are consumed.
- Side row 2: ch 1, sc in first sc, (ch 2, sc in next sc) 80 times, working into the sc anchors and passing over each ch-2 sp. Turn. There are 80 spaces and 81 sc.
- Side rows 3–4: repeat Side row 2. Keep this strip approximately 1.2–1.5 cm wide before the scallops.
- Side row 5, scallops: ch 1, sc in first sc. Across the next four spaces, work 5 dc in first sp, sc in next sc, sl st in second sp, sc in next sc, 5 dc in third sp, sc in next sc, sl st in fourth sp, sc in next sc. Repeat this four-space sequence 20 times total. There are 40 five-dc shells, 40 sl st and 81 sc. Fasten off.
- Repeat on the opposite side. Block both strips to equal widths, aiming for approximately 2 cm per side including the scallops.
Bottom Scalloped Band
- With RS facing, join ivory to the first of the 194 bottom border sc. Work only across these stitches; the side-border ends remain free.
- Bottom row 1: ch 1, sc in first sc, (ch 2, skip 2 sc, sc in next sc) 64 times, sc in final sc. Turn. There are 64 ch-2 spaces and 66 sc; the final two sc are adjacent.
- Bottom row 2: ch 1, sc in each of the first two sc, (ch 2, sc in next sc) 64 times. Turn. There are 64 spaces and 66 sc.
- Bottom row 3: ch 1, sc in first sc. Across the 64 spaces, repeat (5 dc in next sp, sc in next sc, sl st in next sp, sc in next sc) 32 times. Sc in the final adjacent edge sc. There are 32 shells, 32 sl st and 66 sc. Fasten off.
- Using matching cotton, join the short ends of this band to the lower ends of the side borders with small whipstitches. Keep these joins flat and leave the scallop tips free.
Folded Rod Pocket
- Join ivory at the top-left corner with RS facing. Work across the 130 top border sc only.
- Pocket row 1: ch 3, counting as first dc, dc in each of the remaining 129 sc. Turn. There are 130 dc.
- Pocket rows 2–10: ch 3, counting as first dc, dc in each of the next 129 stitches, including the top of the previous turning chain as the final stitch. Turn after each row. There are 130 dc per row.
- The strip should measure approximately 8 cm deep. If necessary, adjust only the number of pocket rows to reach 8 cm, recording your final total. Fasten off with a sewing length.
- Fold the strip to the wrong side so its final row meets the base of Pocket row 1. Sew each of its 130 stitches to the corresponding base stitch without gathering. The folded pocket projects approximately 4 cm above the mesh.
- Leave both short ends open. Test the rod before securing the final sewing end; the pocket must slide freely. Tack the upper ends of the side borders neatly to the pocket corners without closing the openings.
Golden Daisy Centers — Make 18
- Round 1: with golden ochre, work 6 sc in MR. Join with sl st to first sc. Tighten the ring securely. There are 6 sc.
- Round 2: ch 1, work 2 sc in each stitch around; join. There are 12 sc.
- Round 3: ch 1, (sc in next stitch, 2 sc in next stitch) 6 times; join. There are 18 sc.
- Round 4: ch 1, (sc in next 2 stitches, 2 sc in next stitch) 6 times; join. There are 24 sc. Fasten off and secure the center-ring tail through several stitches on the reverse.
- Keep the centers flat. Do not cup or stuff them; the slightly raised petal bases will provide the surface texture.
Ivory Loop Petals — Work on All 18 Centers
- Petal foundation round: join ivory in any of the 24 center stitches. Repeat (sl st in next available center stitch, ch 9, sl st in next center stitch) 12 times around, starting the first repeat in the joining stitch. Each repeat uses two different center stitches. There are 12 ch-9 loops and 24 anchoring sl st.
- Petal round: in each ch-9 loop work sc, hdc, 2 dc, 4 tr, 2 dc, hdc, sc. Work around the chain loop rather than into its individual chains. Repeat for all 12 loops. There are 12 stitches per petal and 144 petal stitches total.
- Join with sl st to the first petal sc. Fasten off, leaving a 70 cm ivory sewing tail. Pass the tail through the backs of the petal bases to the reverse of the flower.
- Spread the 12 petals evenly, allowing adjacent petal bases to overlap slightly while keeping the tips separate. Damp-block each daisy to approximately 7 cm diameter.
Daisy Layout and Invisible Attachment
- Lay the blocked curtain RS up. Measure positions from the left and top edges of the original 48 × 96 cm mesh rectangle, excluding all borders and the rod pocket.
- Place flowers in six horizontal bands. Measured down from the mesh top, the band centers are 8, 24, 40, 56, 72 and 88 cm.
- In bands 1, 3 and 5, place flower centers 8, 24 and 40 cm from the mesh left edge. In bands 2, 4 and 6, place them 10, 26 and 42 cm from the mesh left edge. This uses all 18 daisies and creates a gentle stagger.
- Baste each golden center over the mesh. With its ivory tail, sew around the ivory petal bases, catching nearby mesh chains with small stitches. If the center falls over an open diamond, distribute the attachment among the surrounding strands without pulling them inward.
- Tack the tips of six alternating petals to the nearest mesh strands. Where a tip falls inside a mesh opening, move the tack slightly toward the petal base until it meets a strand. Leave the other six tips free for gentle relief.
- Check the reverse after every flower. Secure the tail through the backs of the flower stitches, then weave it in. Do not run long threads across open mesh spaces.
Finishing
Weave in all remaining ends through solid stitches or the backs of the flowers. Soak the curtain briefly in cool water, support its weight as you lift it, and press out excess water in a towel. Pin the mesh rectangle square, straighten the side bands and open the scallops with your fingers. Keep the flowers rounded instead of stretching their petals into points.
Let the curtain dry completely before hanging it. Slide the rod through the pocket and ease the fabric into soft folds. The daisies should sit lightly against the net, with their golden centers visible through the folds and the scalloped sides hanging freely.
Tips for Success
- Mark the first full arch on each offset row. It prevents the small edge half-spaces from being mistaken for full repeats on the following row.
- Count 32 arches after every straight row. Correct a missed arch immediately, before the sloping mesh makes it harder to locate.
- Pin a paper circle approximately 7 cm across under the first flower while blocking, then use it to keep all 18 daisies consistent.
- Attach flowers with the curtain lying flat. A suspended panel stretches under its own weight and can distort the placement.
- Keep the rod-pocket sewing loose enough to match the top edge width; a tight seam will gather the curtain permanently.
Common Mistakes to Avoid
- Working into the ch-2 edge half-space at the start of a straight row adds an arch. Begin with sc in the edge dc, then find the first full ch-5 arch.
- Placing only one sc per mesh row along a side makes the border draw up. Work the specified two stitches around each row end.
- Using a center stitch twice for neighboring petal loops produces too many petals. Mark the center in pairs and use each of its 24 stitches once.
- Sewing only through the golden center leaves the heavy petals flopping forward. Attach the ivory bases and six alternating tips as directed.
- Hanging the curtain while damp can lengthen the cotton unevenly. Dry it flat to its measured shape before fitting the rod.
Ways to Customize This Pattern
- Make a matching pair of panels and mirror the staggered flower layout on the second panel.
- For a shorter café curtain, work 80 mesh rows instead of 120. Use four flower bands centered 8, 24, 40 and 56 cm below the mesh top; change each side foundation border to 160 sc and its first square-mesh row to 53 regular repeats followed by no shortened final repeat, giving 53 spaces and 54 anchors. Finish with alternating shell and slip-stitch spaces, ending with a shell.
- Use soft white petals against an unbleached ivory mesh for a subtle tonal difference while retaining the golden centers.
- For flatter flowers, tack all 12 petal tips to nearby mesh strands instead of alternating tips.
Frequently asked questions
No. Each daisy is crocheted separately, blocked and then sewn to the finished mesh. This keeps the flowers rounded and lets you place them accurately without interrupting the diamond repeats.
The top is worked around broad chain arches, while the bottom is worked into individual foundation-chain loops. Their stitch counts serve different structures. Both edges should block to the same 48 cm mesh width before the side bands are included.
You can, but every measurement will change, including the flowers and rod pocket. Make both a mesh swatch and a complete daisy, then calculate the new dimensions from your blocked measurements. Thicker cotton also creates a heavier curtain.
Follow the cotton manufacturer’s care instructions. Hand washing in cool water and drying flat gives you the most control over the open mesh and raised petals. Reshape the scallops and flowers while damp, and avoid hanging the curtain until fully dry.
The finished Golden Daisy Lace Curtain Crochet Pattern

