Golden Fan Filet Crochet Table Runner Pattern
Advanced
For experienced crocheters who enjoy complex shaping, fine detail, and ambitious construction
Weekend Project
A satisfying weekend make — start Friday, finish Sunday, enjoy forever.
Handmade Gift
A beautiful keepsake — free forever. Read online or print at home.
About This Golden Fan Filet Crochet Table Runner Pattern
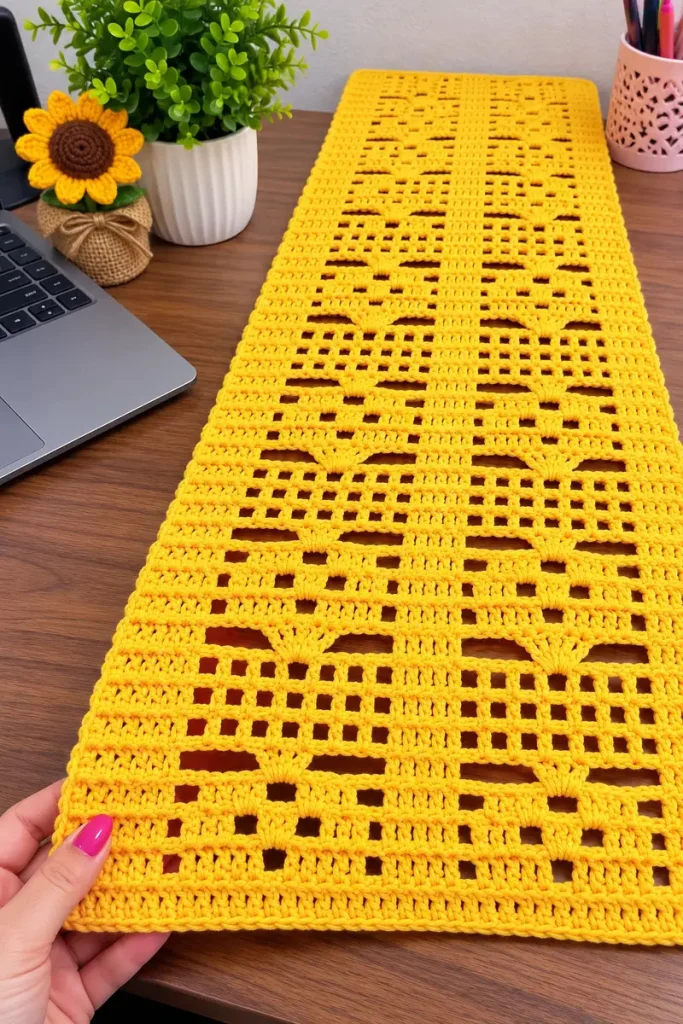
This filet crochet table runner pattern pairs two golden-yellow lace panels with a solid central band and a substantial frame. Open mesh, filled blocks, and raised-looking fan groups echo the repeating geometric lace in the reference photograph. The finished piece stays flat and rectangular, with no added decorations.
Allow approximately 18–24 hours for the crochet, joining, and finishing, plus drying time. This advanced project suits crocheters comfortable reading filet sequences, working into individual chain stitches, and balancing a border around several joined pieces. The instructions below are an original interpretation of the photograph, with a repeat designed specifically for this runner.
Materials
- Golden-yellow sport-weight cotton Approximately 900–1,100 m; buy the full amount in one dye lot
- 3.0 mm crochet hook Adjust to achieve the blocked gauge
- Tapestry needle For mattress seams and weaving ends
- Stitch markers Mark panel corners, repeat boundaries, and border corners
- Blocking mats, rustproof pins, and measuring tape Blocking wires are helpful for the long edges
Abbreviations
chchainsl stslip stitchscsingle crochetdcdouble crochetst / stsstitch / stitchesRS / WSright side / wrong sideOopen filet cell: ch 2, skip 2 positions, dc in next positionSsolid filet cell: dc in each of the next 3 positionsGauge, Dimensions, and Pattern Reading
- Use US crochet terminology. Target blocked gauge is 20 dc positions and 12 rows per 10 cm in the lace fabric. A dc position means one dc or one chain stitch; measure over several repeats rather than across one fan.
- Each lace panel has 25 positions across and 84 rows. Aim for approximately 12.5 × 70 cm per panel. The center strip has 7 dc and 84 rows, approximately 3.5 × 70 cm. The assembled center measures about 28.5 × 70 cm before edging.
- The four-round border adds approximately 2 cm on each side, giving a finished size of about 33 × 74 cm. These measurements are estimates governed by your blocked gauge.
- Ch 3 at the beginning of a dc row counts as its first dc. Turn after every panel and strip row. Work the last stitch into the top of the previous row’s beginning ch 3.
- Every filet row starts with one dc, supplied by the beginning ch 3, followed by eight cells. Each cell uses three positions and produces three positions: 1 + (8 × 3) = 25. Read each written sequence in the direction you are crocheting.
- When a solid cell crosses a ch-2 space, work one dc into each individual chain and one dc into the following dc. For an open cell, skip two positions whether those positions are dc or chains.
First Lace Panel
- Foundation: Ch 27. Row 1, RS: Dc in fourth ch from hook and each remaining ch. The three skipped chains count as the first dc. Turn. (25 dc)
- Row 2, WS: Ch 3, work O eight times. Turn. (8 open cells; 25 positions)
- Row 3: Ch 3; work O, S, O, O, O, O, S, O. Turn. (25 positions)
- Row 4: Ch 3; work O, S, S, O, O, S, S, O. Turn. (25 positions)
- Row 5: Ch 3, dc in each remaining dc or chain. Turn. (25 dc)
- Row 6, fan row: Ch 3; twice work the following sequence: ch 3, skip 5 dc, work 5 dc in the next dc, ch 3, skip 5 dc, dc in the next dc. Turn. Each sequence consumes 12 stitches and produces 12 positions. (13 dc and 12 chains; 25 positions)
- Row 7: Ch 3; twice work the following sequence: dc in each of the next 3 chains, dc in each of the next 5 dc, dc in each of the next 3 chains, dc in the next dc. Turn. Do not work around the chain spaces. (25 dc)
- Row 8: Ch 3, work O eight times. Turn. (25 positions)
- Row 9: Ch 3; work O, O, S, O, O, S, O, O. Turn. (25 positions)
- Row 10: Ch 3; work O, S, O, S, S, O, S, O. Turn. (25 positions)
- Row 11: Ch 3; work O, O, S, O, O, S, O, O. Turn. (25 positions)
- Row 12: Ch 3, work O eight times. Turn. (25 positions)
- Row 13: Ch 3, dc in every remaining dc or chain. Turn. (25 dc)
- Rows 14–73: Repeat Rows 2–13 five more times. Maintain 25 positions in every row. This gives six complete 12-row repeats after the foundation row.
- Rows 74–83: Repeat Rows 2–11 once. Maintain 25 positions per row.
- Row 84: Ch 3, dc in every remaining dc or chain. (25 dc) Fasten off. Mark Row 1 as the lower edge and retain the RS marker.
Second Lace Panel
- Work the foundation and Rows 1–13 exactly as for the first panel. (25 positions per row)
- Rows 14–73: Repeat Rows 2–13 five more times. (25 positions per row)
- Rows 74–83: Repeat Rows 2–11 once. (25 positions per row)
- Row 84: Ch 3, dc in every remaining dc or chain. (25 dc) Fasten off. Mark the lower edge and RS to match the first panel.
Solid Center Strip
- Foundation: Ch 9. Row 1, RS: Dc in fourth ch from hook and each remaining ch. The skipped three chains count as the first dc. Turn. (7 dc)
- Rows 2–84: Ch 3, dc in each of the next 6 dc. Turn after each row except Row 84. (7 dc per row) Fasten off, leaving a 150 cm sewing tail.
- Wet-block both panels and the center strip separately to the same 70 cm length. Match row boundaries carefully. Let all three pieces dry completely before joining.
Joining the Three Pieces
- Lay the pieces RS up in this order: lace panel, center strip, lace panel. Keep all Row 1 edges at the same short end. Place markers through corresponding row ends every 12 rows and at Row 84.
- Join one long edge of the strip to the adjacent panel using a flat mattress seam. For each row, take one small horizontal bar immediately inside the panel’s edge and the corresponding bar inside the strip’s edge. Make exactly 84 paired seam steps.
- Tighten the seam gently every 6–8 rows until the edges meet without overlapping. Keep the strip flat and the row ends level.
- Join the second panel to the remaining strip edge in the same way, again making 84 paired seam steps. Secure the tails. The short ends now contain 25 + 7 + 25 = 57 stitches; seams do not add stitches.
Four-Round Border
- Round 1: With RS facing, join yarn in the first stitch of a short end, immediately after a long edge. Ch 1, which does not count as a stitch. Work sc in each of the 57 stitches across that short end; ch 2 for the corner. Work 2 sc around each of the 84 row ends along the long side; ch 2. Work 57 sc across the opposite short end, using the unused foundation loops; ch 2. Work 2 sc around each of the 84 row ends on the remaining long side; ch 2. Sl st to the first sc. (450 sc and 4 corner spaces)
- Round 2: Sl st in each of the next 2 sc so the round begins at the third sc of the first short side. Ch 3, counting as a dc. Dc in each remaining sc to the corner. In every corner space work (2 dc, ch 2, 2 dc), and dc in every side sc. After the last corner, dc in the first 2 sc of the starting side; sl st to the top of the beginning ch 3. (466 dc and 4 corner spaces; 61 stitches on each short side and 172 on each long side)
- Round 3: Ch 3, dc in every side dc. In each corner space work (2 dc, ch 2, 2 dc). Sl st to the top of the beginning ch 3. (482 dc and 4 corner spaces; 65 stitches on each short side and 176 on each long side)
- Round 4: Ch 1, sc in every side dc. In each corner space work (sc, ch 2, sc). Sl st to the first sc. (490 sc and 4 corner spaces; 67 stitches on each short side and 178 on each long side) Fasten off.
Finishing
Weave each end through the solid stitches in two directions, keeping tails away from the open mesh. Soak the runner according to the yarn label, press out excess water in a towel, and lay it flat. Pin the corners first, then straighten the central strip and both long edges.
Ease the fan bridges open without stretching their five-stitch groups flat. Check that the two panels have the same width and that the diagonals of the rectangle measure equally. Let the runner dry completely before unpinning. The finished fabric should lie smoothly on the table with a clear, straight center band.
Tips for Success
- Mark stitches 7, 13, 19, and 25 before each fan row. The fans go into stitches 7 and 19; the separating and ending anchors go into stitches 13 and 25.
- Keep the fan-row ch-3 bridges relaxed. If they pull the swatch inward after blocking, use a hook 0.25 mm larger for that row alone and check again.
- Count all 25 positions after every fan recovery row. Working into individual chains makes the following filet cells easier to align.
- Compare the panels after each 12-row repeat. Correct a tension difference before it grows into several centimeters.
- Place a marker after every 12 row ends while working the first border round; each marked section receives exactly 24 sc.
Common Mistakes to Avoid
- Adding a dc before the first filet cell creates 26 positions. The beginning ch 3 already supplies the first dc; start the written cell sequence immediately.
- Counting a ch-2 space as one position shifts the solid blocks. It represents two positions, followed by the cell’s anchoring dc.
- Skipping only four stitches beside a fan moves its anchor. Each half-panel must consume five skipped stitches, one fan stitch, five skipped stitches, and one anchor.
- Pulling the mattress seams tight shortens the center. Loosen the seam in small sections until all 84 row boundaries align.
- Adding extra border stitches at the seams makes the short edges flare. Work exactly 57 sc across each short end in Round 1, without inserting stitches into the seam itself.
Ways to Customize This Pattern
- Lengthen both panels by inserting another full Rows 2–13 repeat before the final partial repeat. Add 12 rows to the center strip and 24 sc to each long edge of Border Round 1.
- For a wider center band, make its foundation ch 12 and work 10 dc per row. Each short edge then has 60 stitches before edging; add three stitches to every stated short-side border count.
- Use warm ivory cotton for a quieter version while keeping the same gauge, fan placement, and joining method.
- Work only the final sc border round in deep ochre for a narrow contrasting outline. Join the new color at the beginning of Round 4.
Frequently asked questions
No. This is an original pattern inspired by the photograph’s yellow rectangular runner, paired lace panels, solid center, and repeating fan shapes. The photograph does not reveal an exact stitch chart.
Separate construction lets you block the two lace panels evenly and adjust the solid strip’s row height before joining. The flat seams also reinforce the long central band.
Block all three pieces first. If their row boundaries still will not align without pulling, remake the strip with a slightly larger hook. Keep its 84 rows so each seam remains a one-row-to-one-row join.
Yes, but the runner will be wider, longer, and heavier. Make and block the 13-row panel swatch first, then use its measured width and row height to estimate the finished dimensions and yarn requirement.
The finished Golden Fan Filet Crochet Table Runner Pattern

