Golden Ginkgo Crochet Bedspread Pattern
Beginner Friendly
Perfect for those just starting their crochet journey, with clear instructions and simple techniques
Single-Day Project
A satisfying project you can complete in a single afternoon or evening.
Handmade Gift
A beautiful keepsake — free forever. Read online or print at home.
About This Golden Ginkgo Crochet Bedspread Pattern
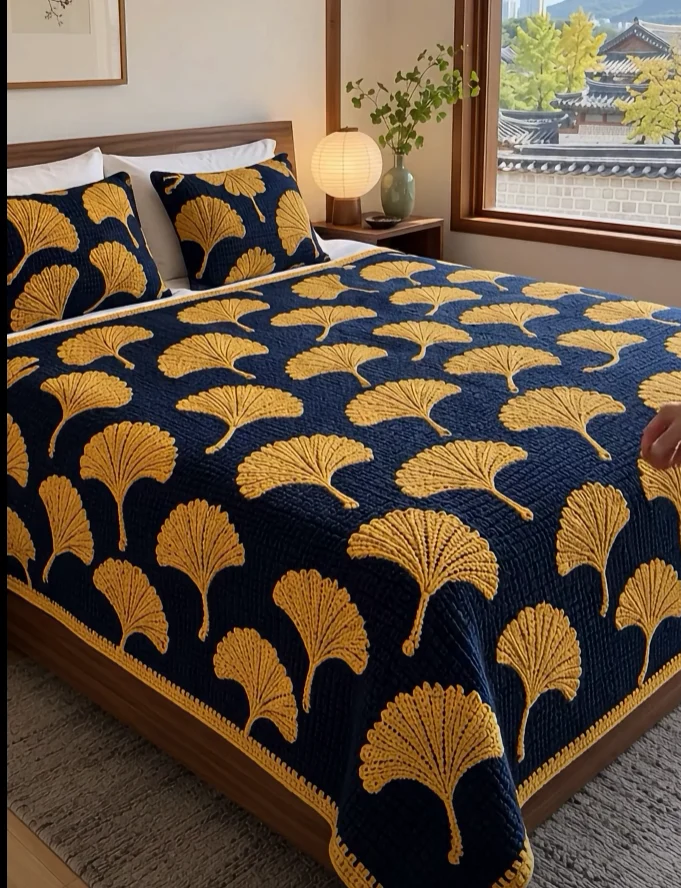
This ginkgo crochet bedspread pattern pairs a deep navy waffle-stitch base with forty raised golden ginkgo leaves, a ribbed gold border and two matching envelope pillow covers. The leaves are worked separately as fan-shaped appliqués with post-stitch ribs that radiate out from the stem like real ginkgo veins, then a small notch is pulled into the top of each one to give it that unmistakable split-leaf shape.
The base is made in three long panels so you never have a full-size bedspread in your lap until the very end. The panels are joined with an invisible mattress stitch, bordered, and only then do the leaves go on. That order lets you lay out the leaves on the bed itself and move them around until the scatter looks right before you sew a single stitch.
Expect around 90 to 110 hours from start to finish, with the leaves making good portable projects in between panel rows. This is a pattern for crocheters who are comfortable with front and back post stitches, reading stitch counts, and blocking. It suits anyone who wants one statement piece for a bedroom rather than a quick weekend make.
Materials
- Worsted / aran yarn in navy about 11,000 m total (bedspread ~8,800 m, pillow covers ~2,200 m), same dye lot
- Worsted / aran yarn in golden mustard about 2,200 m total (leaves ~1,450 m, borders and pillow edging ~750 m)
- 5 mm crochet hook for the base panels, border and pillow covers
- 4.5 mm crochet hook for the leaves, so they stay firm and flat
- Tapestry needle blunt tip, large eye
- Locking stitch markers about 20
- Rustproof T-pins or blocking pins a large box, for blocking and leaf placement
- Blocking mats and a steamer or spray bottle
- Two pillow inserts 50 x 70 cm
Abbreviations
chchainsl stslip stitchscsingle crochethdchalf double crochethdc3Lhalf double crochet worked in the third loop (the horizontal bar behind the back loop)dcdouble crochetfpdcfront post double crochetbpdcback post double crochetrev screverse single crochet (crab stitch)MRmagic ringst(s)stitch(es)spspacereprepeatRS / WSright side / wrong sideBase Panels (make 3, navy, 5 mm hook)
- Foundation: ch 101. Dc in 3rd ch from hook and in each ch across. Turn. (99)
- Row 2 (RS), Row A: ch 2 (does not count as a st throughout), dc in first st, *fpdc around next st, dc in next 2 sts; rep from * 32 times in total, fpdc around next st, dc in last st. Turn. (99)
- Row 3 (WS), Row B: ch 2, dc in first st, *dc in next st, fpdc around next 2 sts; rep from * 32 times in total, dc in next st, dc in last st. Turn. (99)
- Rows 4-184: Rep Rows 2 and 3, ending with a Row A repeat on Row 184. Each row has 99 sts. Fasten off and weave in ends.
- Block each panel to roughly 66 x 230 cm. If your panel comes up short after blocking, add rows in pairs (one Row B, one Row A) so the last row is always a Row A.
Joining the Panels
- Lay two panels side by side, RS up, with the foundation edges lined up at the same end.
- With navy yarn and a tapestry needle, join the long edges with mattress stitch, catching the post of the edge dc on each side, one stitch per row-end. Pull each stitch just snug so the seam closes without puckering.
- Join the third panel to the other long side of the center panel in the same way.
- Weave in all ends along the seams. The joined base should measure about 198 x 230 cm.
Bedspread Border
- Rnd 1 (navy, RS): Join navy in any corner. Ch 1, sc evenly around: 1 sc in each st along the top and bottom edges (plus 1 sc in each seam), 3 sc over every 2 row-ends along the long sides, and 3 sc in each corner. Join with sl st to first sc. Fasten off navy. Each side must have an odd number of sts between corners; add or skip one sc near the middle of a side if needed.
- Rnd 2 (gold): Join gold in the center sc of any corner. Ch 2, 3 hdc in same st, *hdc in each st to next corner center st, 3 hdc in corner center st; rep from * twice more, hdc in each st to end. Join with sl st to first hdc. (Each side gains 2 sts.)
- Rnd 3: Ch 2, 3 hdc3L in corner center st, *hdc3L in each st to next corner center st, 3 hdc3L in corner center st; rep from * twice more, hdc3L in each st to end. Join. (Each side gains 2 sts.)
- Rnd 4: Rep Rnd 3. (Each side gains 2 sts.)
- Rnd 5: Ch 1, rev sc in each st around, working 2 rev sc in each corner center st. Join, fasten off and weave in ends. The finished bedspread measures about 206 x 238 cm.
Large Ginkgo Leaf (make 28, gold, 4.5 mm hook)
- Row 1 (RS): MR, ch 2 (does not count as a st throughout), 6 dc in ring, pull ring closed. Turn. (6)
- Row 2 (WS): Ch 2, dc in first st, 2 dc in each of next 5 sts. Turn. (11)
- Row 3 (RS): Ch 2, 2 dc in first st, *fpdc around next st, 2 dc in next st; rep from * 4 more times. Turn. (17: six 2-st gaps and 5 ribs)
- Row 4 (WS): Ch 2, dc in first st, 2 dc in next st, *bpdc around next st (the rib), dc in next st, 2 dc in next st; rep from * 4 more times. Turn. (23)
- Row 5 (RS): Ch 2, dc in first 2 sts, 2 dc in next st, *fpdc around next st, dc in next 2 sts, 2 dc in next st; rep from * 4 more times. Turn. (29)
- Row 6 (WS): Ch 2, dc in first 3 sts, 2 dc in next st, *bpdc around next st, dc in next 3 sts, 2 dc in next st; rep from * 4 more times. Turn. (35)
- Row 7 (RS): Ch 2, dc in first 4 sts, 2 dc in next st, *fpdc around next st, dc in next 4 sts, 2 dc in next st; rep from * 4 more times. Turn. (41)
- Row 8 (WS): Ch 2, dc in first 5 sts, 2 dc in next st, *bpdc around next st, dc in next 5 sts, 2 dc in next st; rep from * 4 more times. Turn. (47)
- Row 9 (RS): Ch 2, dc in first 6 sts, 2 dc in next st, *fpdc around next st, dc in next 6 sts, 2 dc in next st; rep from * 4 more times. Turn. (53)
- Row 10 (WS): Ch 2, dc in first 7 sts, 2 dc in next st, *bpdc around next st, dc in next 7 sts, 2 dc in next st; rep from * 4 more times. Turn. (59)
- Row 11 (RS, edging): Ch 1, sc in first 9 sts, *(sc, ch 1, sc) in next st (the rib), sc in next 9 sts; rep from * 4 more times. (64 sc and 5 ch-1 sps)
- Straight edge and stem: Do not turn. Rotate and work 20 sc evenly down the straight edge (2 sc per row-end) to the center ring. Ch 16, sl st in back bump of 2nd ch from hook and each ch back to the leaf (15 sl st). Work 20 sc evenly up the other straight edge. Join with sl st to first sc of Row 11. Fasten off, leaving a 1 m tail for sewing.
- Notch: Cut a 30 cm gold strand. From the WS, bring it up at the base of the (sc, ch 1, sc) on the center (3rd) rib, run it down behind that rib through Rows 10 and 9, and back up beside your starting point. Pull gently until the edge dips into a shallow V about 1 cm deep, then knot on the WS and trim.
- Block flat into a half-fan about 22 cm wide, pinning each rib straight. Let dry completely.
Medium Ginkgo Leaf (make 20, gold, 4.5 mm hook)
- Rows 1-8: Work as for Large Ginkgo Leaf. (47)
- Row 9 (RS, edging): Ch 1, sc in first 7 sts, *(sc, ch 1, sc) in next st (the rib), sc in next 7 sts; rep from * 4 more times. (52 sc and 5 ch-1 sps)
- Straight edge and stem: Do not turn. Work 16 sc evenly down the straight edge (2 sc per row-end), ch 13, sl st in back bump of 2nd ch from hook and each ch back (12 sl st), work 16 sc evenly up the other straight edge. Join with sl st to first sc of Row 9. Fasten off, leaving a 1 m tail.
- Notch: Work as for the large leaf, running the strand down through Rows 8 and 7 so the V is about 1 cm deep.
- Block flat to about 18 cm wide and let dry.
Pillow Cover Fronts (make 2, navy, 5 mm hook)
- Foundation: Ch 107. Dc in 3rd ch from hook and in each ch across. Turn. (105)
- Row 2 (RS), Row A: Ch 2, dc in first st, *fpdc around next st, dc in next 2 sts; rep from * 34 times in total, fpdc around next st, dc in last st. Turn. (105)
- Row 3 (WS), Row B: Ch 2, dc in first st, *dc in next st, fpdc around next 2 sts; rep from * 34 times in total, dc in next st, dc in last st. Turn. (105)
- Rows 4-40: Rep Rows 2 and 3, ending with a Row A repeat. Fasten off. Block to 70 x 50 cm.
- Before assembling, sew 2 large and 2 medium leaves onto each front (see Finishing).
Pillow Cover Back Halves (make 4, navy, 5 mm hook)
- Foundation: Ch 107. Dc in 3rd ch from hook and in each ch across. Turn. (105)
- Rows 2-22: Work Row A and Row B alternately as for the pillow fronts, ending with a Row A repeat. (105)
- Rows 23-24: Ch 1, sc in each st across. Turn. (105)
- Fasten off. Each half measures about 70 x 29 cm, and two halves overlap by about 8 cm at the back of each pillow.
Pillow Cover Assembly
- Lay one finished front WS up. Place one back half on top, RS up, with its foundation edge along the top edge of the front. Place a second back half RS up with its foundation edge along the bottom edge, so the two sc bands overlap in the middle. Pin all layers.
- Rnd 1 (gold): Turn the stack so the front faces you. Join gold in any corner and sc through all layers around: 1 sc in each st along the top and bottom, 3 sc over every 2 row-ends along the sides, and 3 sc in each corner. Join with sl st to first sc.
- Rnd 2: Ch 1, rev sc in each st around. Join, fasten off and weave in ends. Slip the insert in through the envelope opening.
Finishing
Spread the bordered bedspread over the bed it is meant for, so you can see exactly where the top surface ends and the drop begins. Lay out the 24 large and 16 medium leaves you set aside for the bedspread, pointing them in different directions and varying the stem angles so the scatter looks like leaves that fell rather than a grid. Keep the leaves about 4 cm clear of the gold border, and let a few sit right over the edge of the mattress so they show on the drop. Pin each leaf in place with T-pins and take a photo of the layout before you move anything.
Working one leaf at a time, use its gold tail to backstitch through the sc edging all the way around, catching only the top layer of the waffle texture so the stitches stay hidden on the underside. Tack the stem down every 2 cm, giving it a gentle curve. Sew the pillow leaves the same way onto the fronts before you assemble the covers. When every leaf is attached, weave in all remaining ends and give the whole bedspread a light final steam to settle the leaves into the base.
Tips for Success
- Place a locking marker in every rib stitch on Rows 3 and 4 of each leaf. After that the ribs are easy to see, and you will never lose your place in the gap counts.
- Make the leaves on the smaller 4.5 mm hook even if your base gauge is spot on. A firm leaf keeps its fan shape and does not stretch out of shape when it is sewn down.
- Count stitches at the end of every waffle row for the first ten rows of each panel. If a row ends with the wrong stitch, the cells drift, and that is much easier to fix early.
- Wind the gold sewing tail into a small butterfly and clip it to the leaf so it does not tangle while you work on the panels.
- Block all the leaves in batches before placing any of them. Unblocked leaves cup slightly and will make your layout look uneven.
Common Mistakes to Avoid
- Ruffling leaves: this usually means the 2 dc increase was worked in the wrong place or an extra increase slipped in. Check that each gap grows by exactly one stitch per row and that the row total matches the count in brackets.
- Ribs that sink instead of standing up: on WS rows the rib must be a bpdc, not an fpdc. Working fpdc from the wrong side pushes the rib to the back of the leaf.
- Wavy panel seams: pulling the mattress stitch too tight gathers the panels. Stop every 20 cm and check that the seam lies as flat as the fabric beside it.
- Sewing leaves onto the pillow fronts after assembly: once the envelope is closed you cannot reach the back of the front. Attach the leaves first, then join the layers.
- A border that ripples or cups: if Rnd 1 ripples, you have too many sc along the sides; if it pulls in, too few. Adjust the ratio of sc to row-ends before moving on to the gold rounds.
Ways to Customize This Pattern
- Make a throw instead of a bedspread: work 2 panels of 99 sts and 120 rows for a throw about 132 x 150 cm, plus border, and use 12 to 15 leaves.
- Change the palette: deep green with cream leaves, charcoal with copper, or terracotta with ivory all keep the same strong contrast.
- Go autumnal: make the leaves in three shades of gold, ochre and pale yellow, mixed randomly, for a more natural fallen-leaf look.
- Add a third leaf size by stopping the large leaf after Row 6 and working the edging there (sc in first 5 sts, then (sc, ch 1, sc) in each rib and sc in the next 5 sts).
- Replace the envelope pillow backs with plain gold backs for a reversible look, or skip the pillows and make a matching bolster.
Frequently asked questions
You can, but the waffle stitch makes this bedspread very heavy, and a full-width piece of nearly 300 stitches gets hard to handle and slow to turn. Panels are lighter to work on, easier to block evenly, and the mattress-stitch seams disappear into the waffle texture.
The leaf is worked in rows, so you face the front on odd rows and the back on even rows. A front post stitch on RS rows and a back post stitch on WS rows both push the rib toward the front of the leaf, which keeps every vein raised on the same side.
If you use acrylic or an acrylic blend, machine wash it on a cold, gentle cycle in a large-capacity machine, then dry it flat across two drying racks or a clean sheet, because the wet weight will stretch it if it hangs. Cotton versions get even heavier when wet, so a laundromat machine and flat drying are the safest choice.
No. The design works because the leaves look scattered. Using two sizes and turning them in different directions is what gives the bedspread movement, so feel free to shift the mix toward more large or more medium leaves as long as you keep the total close to 40.
The finished Golden Ginkgo Crochet Bedspread Pattern

