Golden Plum Diamond Lace Crochet Curtain Pattern
Advanced
For experienced crocheters who enjoy complex shaping, fine detail, and ambitious construction
Single-Day Project
A satisfying project you can complete in a single afternoon or evening.
Handmade Gift
A beautiful keepsake — free forever. Read online or print at home.
About This Golden Plum Diamond Lace Crochet Curtain Pattern
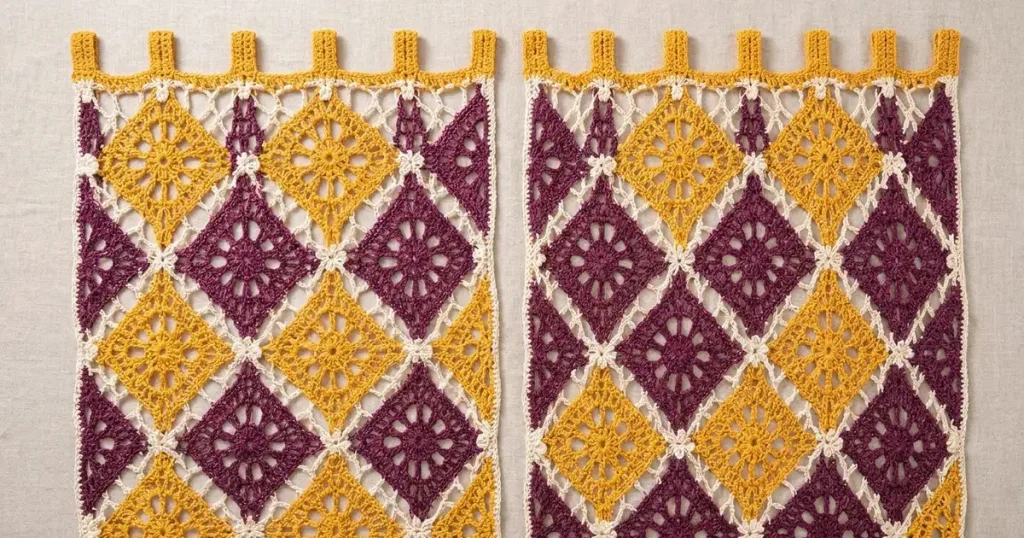
This diamond lace crochet curtain pattern pairs golden yellow and deep plum floral diamonds with an ivory mesh background and golden hanging tabs. The colors, open flower centers, and pointed motifs take their inspiration from the photographed curtain pair.
This original interpretation uses individually framed diamonds assembled into two rectangular panels. Its regular arrangement makes the dimensions repeatable while retaining the reference’s airy, geometric character. Allow approximately 35–45 hours for the pair, including blocking, mesh lacing, and assembly. It suits experienced crocheters who enjoy fine cotton, careful joining, and finishing that gives lace its final shape.
Materials
- Smooth sport-weight cotton, approximately 250 m per 100 g Golden yellow: 150 g; deep plum: 100 g; ivory: 150 g, including swatching allowance
- 3.0 mm crochet hook Adjust if needed to obtain the blocked motif measurements
- Tapestry needle and small scissors For lacing, joining, and securing ends
- Locking stitch markers At least eight for marking tips and frame corners
- Blocking mat, rustproof pins, and measuring tape A square paper template beneath a waterproof layer helps with framing
- Curtain rod Approximately 12–18 mm diameter; tabs are sewn closed around their loops
Abbreviations
chchainscsingle crochetdcdouble crochetsl stslip stitchst / stsstitch / stitchesspspaceMRmagic ringRSright sideUS crochet terminology is used. Beginning ch 3 counts as one dc where stated. Beginning ch 1 never counts as a stitch. Instructions between asterisks are repeated as directed.
Gauge, Dimensions, and Construction
- Gauge: 24 dc and 11 dc rows measure approximately 10 × 10 cm after washing and blocking. Make a swatch with ch 27; dc in the fourth ch from the hook and each remaining ch for 25 dc, counting the skipped three chains as the first dc. Work 12 rows total, beginning subsequent rows with ch 3, skipping the first dc, and working through the remaining stitches.
- The more important project gauge is one colored motif: approximately 11.5–12 cm along each side, or approximately 16.5–17 cm between opposite corners when positioned as a diamond. Its finished ivory frame measures 17 × 17 cm, including the corner spaces.
- Make 16 framed motifs: eight golden yellow and eight deep plum. Each panel uses eight motifs arranged two across and four down. Before edging, each assembled panel measures approximately 34 × 68 cm.
- The ivory perimeter edging and golden header bring each fabric panel to approximately 35 × 70 cm. Folded tabs add approximately 5 cm above the header, giving an overall hanging size of approximately 35 × 75 cm per panel.
- All motifs are worked with the RS facing throughout the rounds. Tabs and headers are worked back and forth. Keep the panels unlined to preserve the open mesh.
Floral Diamond Motifs — Make Eight in Each Color
- Round 1: Make an MR. Ch 3, counting as the first dc, then work 23 dc into the ring. Join with a sl st to the top of the beginning ch 3. Tighten the ring securely. Count: 24 dc.
- Round 2: Ch 1, sc in the same st. *Ch 3, skip the next dc, sc in the next dc; repeat from * ten more times. Ch 3, skip the final dc, and join to the first sc. Count: 12 sc and 12 ch-3 spaces.
- Round 3: Sl st into the first ch-3 sp. Ch 3, counting as the first dc, and work 2 dc in that sp; ch 2. Work 3 dc and ch 2 in each of the remaining 11 ch-3 spaces. Join to the top of the beginning ch 3. Count: 36 dc and 12 ch-2 spaces.
- Round 4: Sl st across to the first ch-2 sp. In that sp work ch 3, 2 dc, ch 3, 3 dc; the beginning ch 3 counts as a dc. Ch 1. In each of the next two ch-2 spaces work 3 dc, ch 1. *In the next ch-2 sp work 3 dc, ch 3, 3 dc, ch 1; in each of the next two ch-2 spaces work 3 dc, ch 1; repeat from * twice more. Join to the top of the beginning ch 3. Count: 48 dc, four ch-3 corner spaces, and 12 ch-1 spaces.
- Fasten off. Mark all four ch-3 corners. Each side, measured between corner spaces, contains 12 dc and three ch-1 spaces. Block with the corners pointing up, right, down, and left. These are the four diamond tips.
Ivory Frames — Work Around All 16 Diamonds
- Frame round 1: With ivory, join with a sc in the top diamond corner space. *Ch 27, sc in the next diamond corner space; repeat from * twice more. Ch 27 and join to the first sc. Count: four anchoring sc and four ch-27 arches. Keep the chains untwisted.
- Frame round 2: Ch 1, sc in the same anchoring sc. *Sc in each of the first 13 chains of the next arch; in its 14th chain work sc, ch 2, sc; sc in each of the remaining 13 chains; sc in the next anchoring sc; repeat from * twice more. Work the same sequence across the final arch, omitting the final sc because the first anchoring sc has already been worked. Join to the first sc. Count: 116 sc and four ch-2 corner spaces.
- Fasten off. Each straight frame side has 29 sc between its corner spaces: one corner sc, 13 chain stitches worked in sc, one diamond-tip anchor, 13 chain stitches worked in sc, and one corner sc. The diamond tip is the 15th sc on that side.
- Pin the frame to a 17 cm square with the diamond tips at the midpoints of its sides. The frame corners sit outside the midpoints of the colored diamond edges. The four large openings will be divided by lacing in the next section.
Ivory Mesh Lacing — Four Openings per Motif
- Keep one motif pinned to its square template. For each triangular opening, identify the two neighboring diamond tips and the outer frame corner between them. Call the first tip A, the second tip B, and the frame corner C.
- On the colored edge from A to B, mark its three ch-1 spaces in order as D1, D2, and D3. These sit approximately one-quarter, halfway, and three-quarters along the diamond edge.
- On the frame segment from A toward C, mark the fifth and tenth sc after the tip anchor as L1 and L2. On the frame segment from B toward C, mark the fifth and tenth sc after its tip anchor as R1 and R2. Count away from the tips, excluding the anchor stitches.
- Cut a 90 cm length of ivory and thread the needle. Secure it at D1. Lace in this exact order: D1 to L1 to D2 to L2 to D3 to C to D1 to R2 to D2 to R1 to D3. Pass under both top loops at each marked frame stitch, through the colored ch-1 spaces, and through the frame corner space at C.
- Keep each strand straight with light tension. At crossings, let the strands cross freely. Secure the end at D3 and weave the tail through the backs of the colored stitches. Repeat for the remaining three openings.
- Complete all 16 motifs. Remove the pins only after the frames lie flat and the lacing supports the openings without pulling the diamond off center. This needle-laced mesh is a structural part of this original construction.
Panel Layout and Joining
- Lay out panel one in four rows, reading left to right from the top: golden yellow and plum; plum and golden yellow; golden yellow and plum; plum and golden yellow.
- Lay out panel two with the colors reversed in every row: plum and golden yellow; golden yellow and plum; plum and golden yellow; golden yellow and plum. Keep every diamond tip centered on a frame side.
- With RS facing upward, place adjacent frame edges together without overlapping them. Using ivory, whipstitch corresponding stitches through both top loops, matching all 29 sc along each shared edge. At each end, sew the corresponding corner spaces together with two small stitches.
- Join the two motifs within each row first. Join the four completed rows next. At each four-motif intersection, pass through all four corner spaces twice, drawing them together without making a hard knot on the surface.
- Repeat for panel two. A joined horizontal seam matches 58 sc across its two motif edges; the central corner spaces are secured separately. Weave in the joining tails along the ivory frame stitches.
Ivory Perimeter Edging — Both Panels
- With the RS facing, join ivory in the upper-left outer corner space. Ch 1 and work 3 sc in that space, marking the middle sc as the corner.
- Across the top, work 1 sc in each of the 29 frame stitches of the first motif, 1 sc through the joined pair of corner spaces at the internal junction, and 1 sc in each of the 29 frame stitches of the second motif. Work 3 sc in the upper-right outer corner space. Count between the outer corner groups: 59 sc.
- Down the right side, work 1 sc in each frame stitch, with 1 sc through the joined corner spaces at each of the three internal junctions. Work 3 sc in the lower-right outer corner space. Count between the outer corner groups: 119 sc.
- Work across the bottom as for the top, then work 3 sc in the lower-left outer corner space. Work up the left side as for the right. Join to the first sc and fasten off. Total: 368 sc, comprising two edges of 59 sc, two edges of 119 sc, and four groups of 3 corner sc.
Golden Header — Both Panels
- Row 1: With the RS facing, join golden yellow in the marked middle sc of the upper-right corner. Ch 1, sc in that stitch and in every stitch across the top through the marked middle sc of the upper-left corner. Count: 63 sc. This includes the 59 top-edge stitches and two stitches from each corner group.
- Row 2: Ch 1, turn, sc in every st. Count: 63 sc.
- Row 3: Ch 1, turn, sc in every st. Count: 63 sc. Fasten off. The header should lie flat; block it to the panel width without stretching the stitches open.
Golden Hanging Tabs — Make 12
- Row 1: With golden yellow, ch 7. Sc in the second ch from the hook and each remaining ch. Count: 6 sc.
- Rows 2–30: Ch 1, turn, sc in every st. Count: 6 sc in each row. At a tab gauge of approximately 28 sc and 30 rows per 10 cm, each strip measures approximately 2.1 × 10 cm. Fasten off, leaving a 35 cm sewing tail.
- For each panel, mark six attachment spans on the 63-stitch header: stitches 1–6, 12–17, 24–29, 35–40, 47–52, and 58–63, counting consistently from either end.
- Fold each strip in half with its short ends together. Place one end on the front of the header and the other directly behind it at its marked span. Sew all six stitches of each end to the corresponding header stitches. Add a second line of small stitches through the header immediately below the first.
- The six folded tabs project approximately 5 cm above each header. Slide the rod through the loops and check that the header hangs level before securing the final sewing tails.
Finishing
Weave every tail through several stitches, reverse direction, and weave back again. Pay particular attention to the flower centers, ivory lacing anchors, and tab seams. Trim only after the ends are secure.
Wash according to the cotton label, press out excess water in a towel, and pin each panel flat to approximately 35 × 70 cm below the tabs. Keep the side edges straight and the flower centers aligned. Let the curtains dry completely before hanging. The finished pair should feel light and flexible, with the ivory mesh holding the colored diamonds clearly apart.
Tips for Success
- Block the first colored diamond before making the remaining 15. A small difference in its diagonal measurement affects every frame and seam.
- Mark the 14th chain of each ch-27 arch before working frame round 2. This keeps every outer corner centered.
- Lace while the motif is pinned. Tightening strands in your hands can turn a square frame into a shallow bowl.
- Use short joining lengths of ivory, approximately 60–80 cm, to reduce abrasion as the yarn passes repeatedly through cotton stitches.
- Hang the completed panels briefly before the final blocking check. Reinforce a tab seam immediately if its header stitches spread under the panel’s weight.
Common Mistakes to Avoid
- Placing a square corner in every second space of motif round 4 creates six corners. Place corners in every third space to obtain exactly four.
- Counting the frame’s corner chain as an ordinary sc produces uneven sides. The 14th chain receives sc, ch 2, sc; each completed side then has 29 sc.
- Pulling the lacing tight shifts the flower toward a frame corner. Repin the motif and ease the affected strand before fastening its tail.
- Skipping the ivory stitch at an internal perimeter junction shortens the border. Each top and bottom edge needs one junction stitch; each long side needs three.
- Sewing tabs to only the top loops of the header can stretch the edge. Attach both tab ends and add the second reinforcing seam below the first.
Ways to Customize This Pattern
- For longer curtains, add complete two-motif rows. Each row adds approximately 17 cm and requires one golden yellow and one plum motif per panel.
- For wider panels, add a full motif column. Each added column contributes approximately 17 cm; continue the alternating color arrangement and recalculate the header from the completed top edge.
- Keep the ivory mesh and replace golden yellow with ochre or antique gold for a quieter version of the same palette.
- Use all golden yellow diamonds in one panel and all plum diamonds in the other while keeping the ivory frames and golden tabs consistent.
- For a thicker rod, extend every tab by the same even number of rows. Every additional six rows adds approximately 1 cm to the folded hanging height at the stated tab gauge.
Frequently asked questions
No. This is an original pattern inspired by its golden yellow and plum floral diamonds, ivory openwork, and hanging tabs. The reference uses a more continuous diagonal arrangement; this version frames complete diamonds individually to provide a fully specified rectangular construction.
The loose chain arches need blocking and lacing to establish their square shape. If the frame still pulls inward when pinned to 17 cm, check chain tension and the colored motif size. Adjust your hook and remake the sample rather than forcing short chains to stretch excessively.
Yes, but the same stitch counts will produce smaller diamonds and panels. Complete a framed sample first. Multiply its blocked width by two for the panel width and its height by four for the fabric height before edging, then add rows or columns as needed.
Follow the yarn label. A gentle hand wash is useful for protecting the needle-laced mesh and tab seams. Support the wet panels fully, avoid wringing, and dry them flat to their blocked dimensions.
The finished Golden Plum Diamond Lace Crochet Curtain Pattern

