Golden Rose Motif Bedspread Crochet Pattern
Advanced
For experienced crocheters who enjoy complex shaping, fine detail, and ambitious construction
Multi-Day Project
A rewarding 12+ hour journey — perfect for dedicated crafters who love detailed work.
Handmade Gift
A beautiful keepsake — free forever. Read online or print at home.
About This Golden Rose Motif Bedspread Crochet Pattern
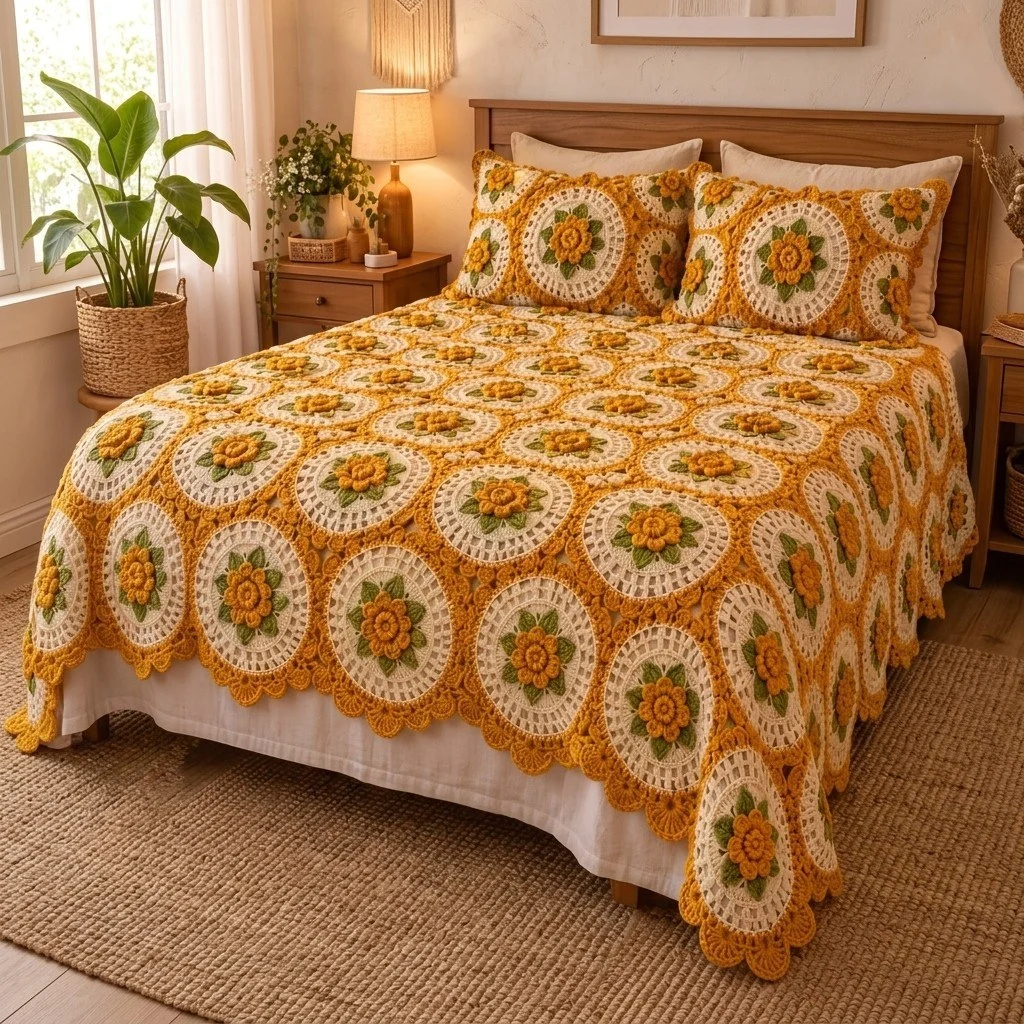
This crochet flower bedspread pattern builds a full double-bed cover out of one repeating hexagon motif: a cream textured disc, a deep golden frame with a shell edge, four sage leaves, and a two-layer rose worked separately and sewn on top. The raised flowers are what make it look like an heirloom piece rather than a modern granny blanket. Nothing in the motif is printed or appliquéd with fabric — the texture comes from a spoke round of dc-and-chain mesh, a back-loop ridge that separates the cream field from the gold ring, and petals that stand up off the surface because the second petal layer is worked into chain loops behind the first.
It is a long project, honestly. One motif takes around 30 minutes once you have the rhythm, and the full bedspread needs about 180 of them, so plan on 90 to 120 hours spread over several months. The good news is that it is extremely portable work: the discs, flowers and leaves are all small enough to carry, and the joining happens as you go, so the blanket only becomes heavy in the last third of the build. There is no row counting over 200 stitches and no long seams at the end.
This one is for crocheters who are comfortable with motif work and want a real showpiece. You need to be confident with magic rings, working into chain spaces, join-as-you-go shells and colour changes at the start of a round. If you have made a granny-square blanket before and want to step up, this is a good next project — the individual rounds are not difficult, but the motif count, the blocking and the consistency across 180 pieces are what make it advanced.
Materials
- DK weight 100% cotton in cream / ecru approx. 2000 g (main disc)
- DK weight 100% cotton in golden mustard approx. 1700 g (frames, joining, border)
- DK weight 100% cotton in deep amber approx. 500 g (inner petals)
- DK weight 100% cotton in sage green approx. 250 g (leaves)
- 4.0 mm crochet hook main hook
- 3.5 mm crochet hook optional, for firmer flowers
- Tapestry needle blunt tip, for sewing and ends
- Stitch markers at least 8, to mark hexagon corners
- Blocking mats and rustproof pins or a steam iron and a towel
- Scissors and a small project bag for batch work
- Two 50 x 50 cm cushion forms only if you make the optional shams
Abbreviations
MRmagic ringchchainst(s)stitch(es)sl stslip stitchscsingle crochethdchalf double crochetdcdouble crochetinc2 sc in the same stitchsc2togsingle crochet 2 stitches togetherBLOback loops onlyskskipspspacepicotch 2, sl st in 2nd ch from hookreprepeatRS / WSright side / wrong sideFOfasten offGauge and Layout
- Gauge: 16 sc and 18 rounds = 10 x 10 cm in cream cotton on a 4.0 mm hook, worked firmly.
- One finished motif measures approximately 15 cm flat side to flat side and 17 cm point to point, including the shell edge, after light blocking.
- The bedspread uses 180 motifs: 10 long rows of 11 motifs alternating with 8 short rows of 10 motifs, offset by half a motif, which is how hexagons tile.
- Hold the hexagons with two flat sides horizontal (top and bottom) and two points to the left and right; rows run left to right across the bed.
- The offset rows leave shallow notches down the two long edges. These are filled and evened out by the border, not by half motifs.
- Finished size after blocking and bordering: approximately 155 cm wide x 205 cm long, which covers a standard double bed with a drop on three sides.
- For a single bed work 7 motifs per long row and 13 rows total; for a queen work 13 motifs per long row and 21 rows total.
- Make all 180 cream discs first, then all the frames, then the flowers and leaves, or work motif by motif — both routes end in the same place, but batch work keeps your tension even.
Rose Flower (make 180)
- With deep amber, make a MR. Round 1: 6 sc in MR, join with sl st to first sc (6).
- Round 2 (first petal layer): in each of the 6 sts work (sl st, ch 2, 3 dc, ch 2, sl st) all in the same st. You now have 6 small cupped petals. Do not fasten off (6 petals).
- Round 3 (colour change): change to golden mustard. Working behind the Round 2 petals, *ch 4, insert the hook from the back around the stem between the next two petals and sl st*; rep from * 6 times in total, ending with a sl st into the base of the first ch-4 (6 ch-4 loops).
- Round 4 (second petal layer): in each ch-4 loop work (sl st, ch 2, 5 dc, ch 2, sl st). You now have 6 larger petals standing out behind and above the first layer (6 petals).
- FO leaving a 40 cm tail for sewing. Pull the magic ring tight from the back and weave that short end in now.
- Press each finished flower face down under a damp cloth for a moment only — do not flatten the petals, you only want the layers to settle.
Leaves (make 720 — four per motif)
- With sage green, ch 9.
- Working into the back bumps of the chain, start in the 2nd ch from hook: sl st 1, sc 1, hdc 1, dc 2, hdc 1, sc 1 (7 sts worked along the first side).
- Work 3 sc in the last ch to turn the leaf tip.
- Working back along the opposite side of the foundation chain: sc 1, hdc 1, dc 2, hdc 1, sc 1, sl st 1 (7 sts).
- FO leaving a 20 cm tail. The leaf is a pointed oval about 5 cm long with a narrow base and a rounded tip.
- Thread the starting tail back through the base of the leaf so only one tail is left to sew with.
Hexagon Motif (make 180)
- With cream, make a MR. Round 1: 6 sc in MR, join with sl st to first sc (6). Work all following rounds joined, with a ch 1 that does not count as a stitch unless stated.
- Round 2: 2 sc in each st around (12).
- Round 3: *sc 1, inc* rep around (18).
- Round 4: *sc 2, inc* rep around (24).
- Round 5: *sc 3, inc* rep around (30).
- Round 6: *sc 4, inc* rep around (36).
- Round 7 (spoke round): ch 4 (counts as dc + ch 1), sk 1 st, *dc in next st, ch 1, sk 1 st*; rep from * around and join to the 3rd ch of the starting ch-4 (18 dc and 18 ch-1 sps). This is the open ring of radiating spokes.
- Round 8: ch 1, *sc in next dc, 2 sc in next ch-1 sp*; rep from * around and join (54).
- Round 9: ch 1, *sc 8, inc* rep around and join (60).
- Round 10 (colour change and ridge): change to golden mustard. Ch 1, working in BLO, sc in each st around and join (60). This ridge is the crisp line between the cream field and the gold frame.
- Round 11 (hexagon round): ch 3 (counts as first dc), dc in the same st, ch 2, dc in the same st — this is corner 1 — then dc in next 14 sts; *(dc, ch 2, dc) in next st, dc in next 14 sts*; rep from * 4 more times and join to the top of the ch-3 (64 dc and 6 ch-2 corner sps; 16 dc along each straight side between corners… see note below).
- Correction check for Round 11, work it exactly like this: *(dc, ch 2, dc) in next st, dc in next 10 sts*; rep from * 6 times in total and join to the top of the first dc (72 dc and 6 ch-2 corner sps, with 12 dc along each side between the corner spaces; 11 sts of Round 10 are used per repeat, 66 of the 60… ) — if your Round 10 count is 60, first work Round 10b: ch 1, *sc 9, inc* rep around and join (66), then work Round 11 as given.
- Round 10b (worked by everyone, after Round 10): ch 1, *sc 9, inc* rep around and join (66).
- Round 11 (final, the one to follow): ch 3 (counts as first dc), ch 2, dc in the same st, dc in next 10 sts, *(dc, ch 2, dc) in next st, dc in next 10 sts*; rep from * 5 more times and join to the top of the ch-3 (72 dc, 6 ch-2 corner sps, 12 dc per side). Place a marker in each ch-2 corner sp.
- Round 12 (shell edge): sl st into any ch-2 corner sp, ch 1, (sc, ch 2, sc) in that corner sp; then along the side: *sk 1 dc, 5 dc in next dc, sk 1 dc, sl st in next dc*; rep from * twice more to finish the side (3 shells per side, 12 dc used); **(sc, ch 2, sc) in next corner sp, then 3 shells along the next side**; rep from ** around and join to the first sc (18 shells and 6 corners). FO and weave in ends.
- Block each motif flat to 15 cm flat side to flat side. The shells should sit flat, not curl forward.
Joining as You Go
- Motif 1 of the blanket is worked complete, through Round 12, with no joining.
- Every following motif is worked through Round 11 complete, then joined to its neighbours during Round 12.
- To join a shell: work the first 2 dc of the 5-dc shell, drop the working loop, insert the hook front to back through the centre (3rd) dc of the matching shell on the finished motif, pick the loop back up and pull it through, then work the remaining 3 dc into your own stitch. The shells interlock without a visible seam.
- To join a corner: work the first sc of the corner, ch 1, sl st into the ch-2 corner sp of the finished motif, ch 1, then work the second sc of your corner into your own ch-2 sp.
- Join all 3 shells and both corners of every shared side. Where three motifs meet, join the corner into the same shared ch-2 sp that the first two already used.
- Build the blanket in rows: complete a full long row of 11, then the offset row of 10 above it (each motif in a short row joins along two sides to the row below), then the next long row of 11, which joins along three sides.
- Keep every join on the right side and always enter the neighbouring shell from the same direction, or the texture will twist where you changed habit.
- Weave the ends of each motif in before you join the next one. With 180 motifs this is the single thing that decides whether the project stays enjoyable.
Attaching the Flowers and Leaves
- Lay a finished, blocked motif right side up. Find Round 5 of the cream disc — the last plain round before the spoke ring.
- Pin 4 leaves on top of the cream disc with their bases pointing at the centre, placed at the 12, 3, 6 and 9 o’clock positions, tips reaching just past the spoke round.
- Sew each leaf down with the sage tail: small whip stitches along the base and up both sides of the lower half only. Leave the top half of each leaf loose so it lifts off the surface.
- Centre the rose over the leaf bases so the first petal layer hides them completely. The amber centre should sit exactly over the magic ring of the disc.
- Using the golden mustard tail, stitch the rose down by catching the back of each of the 6 outer petals at its base and the fabric underneath. Do not stitch through the petal fronts.
- Work a second pass through the back of the inner amber layer so the flower cannot flop sideways in the wash. Fasten off and bury the tail under the petals.
- Check from the side: the rose should stand 1.5 to 2 cm proud of the cream disc and the leaf tips should lift slightly.
Scalloped Border
- Round 1 (evening round): join golden mustard in any corner along the top edge. Ch 1 and sc evenly all the way around the joined blanket: sc 1 in each dc, 3 sc in the top of each shell that sits on the outer edge, sc 1 in each corner ch-2 sp, and sc2tog across each inner notch where two offset motifs step in. Join to the first sc.
- Round 2 (count round): ch 1, hdc in each st around, adding or skipping single stitches at the four blanket corners so the final count is a multiple of 6. Work 3 hdc in each of the four outer corner stitches. Join.
- Round 3 (shell round): ch 1, sc in first st, *sk 2 sts, 5 dc in next st, sk 2 sts, sl st in next st*; rep from * around, keeping one full shell at each blanket corner. Join (shells sit shoulder to shoulder with no gap).
- Round 4 (picot round): sl st to the first dc of any shell, then over the 5 dc of each shell work (sc in 1st dc, hdc in 2nd dc, [hdc, picot, hdc] in 3rd dc, hdc in 4th dc, sc in 5th dc), then sl st into the sl st between shells; rep around and join.
- FO, weave in the ends, and block the border edge flat so each scallop sits in the same plane as the blanket.
Optional Matching Pillow Sham (make 2)
- Square motif: work exactly as the hexagon motif through Round 10 (60 sc in golden mustard, BLO). Do not work Round 10b.
- Round 11 (square round): ch 3 (counts as first dc), ch 2, dc in the same st, dc in next 14 sts, *(dc, ch 2, dc) in next st, dc in next 14 sts*; rep from * 3 more times in total and join to the top of the ch-3 (64 dc, 4 ch-2 corner sps, 16 dc per side).
- Round 12 (shell edge): sl st into any corner sp, ch 1, (sc, ch 2, sc) in the corner sp, then along the side *sk 1 dc, 5 dc in next dc, sk 1 dc, sl st in next dc*; rep from * 3 more times to finish the side (4 shells per side); rep around (16 shells, 4 corners). FO.
- Make 16 square motifs per sham face and join them 4 x 4 using the same join-as-you-go method as the blanket. Each blocked square measures about 11 cm, giving a front panel of roughly 44 x 44 cm.
- Add a rose and 4 leaves to each square exactly as for the blanket motifs.
- Back panel: with cream, ch 82. Row 1: hdc in 2nd ch from hook and in each ch across (81). Rows 2 and on: ch 1, turn, hdc in each st across (81). Repeat until the panel matches the front, about 72 rows. FO.
- Hold the front and back together with wrong sides facing. With golden mustard, sc through both layers around three sides, working 3 sc in each outer corner. Insert the 50 x 50 cm cushion form, then sc the fourth side closed.
- Work one round of the shell round (Border Round 3) around all four edges of the sham and FO.
Finishing
Give the finished bedspread a proper wet block if you can manage it. Soak it in cool water with a little wool wash, press the water out without wringing, and lay it flat on towels. Square the corners, straighten each row of hexagons, and pin out the scalloped border so every picot sits in line. The cotton will dry stiff and then soften after the first use, and this is the step that turns a slightly wavy pile of motifs into a flat, hotel-neat cover.
Before blocking, turn the whole thing over and check the back for loose tails. Motif blankets fail at the ends, not at the stitches, so anything you can see from the back should be split and woven in two directions. Once it is dry, run a hand over the roses and re-tack any that feel loose at the base — a single extra stitch now saves a repair later.
Wash the bedspread on a cool gentle cycle inside a duvet cover or large laundry bag, and dry it flat. The raised petals will crush in a tumble dryer and never fully recover, so let it air dry and give it a light steam over the flowers, hovering the iron rather than pressing.
Tips for Success
- Batch the work by round, not by motif: make twenty cream discs to Round 9, then add twenty gold frames, then twenty flowers. Your tension stays far more even across 180 motifs than if you switch tasks every half hour.
- Mark the six corner ch-2 spaces of Round 11 with markers before you start Round 12. It is very easy to work three shells and then discover you started the side one stitch off.
- Keep a single finished, blocked motif as your reference. Lay every tenth new motif on top of it — if the new one is creeping larger, drop to a 3.75 mm hook for a while.
- Cut all your leaf lengths in advance. A 1.2 m length of sage makes one leaf with a sewing tail, and pre-cutting turns 720 leaves into something you can work through without rewinding a ball constantly.
- Sew the leaves and roses on after the motif is joined into the blanket, not before. Flat motifs are much easier to join, and the flowers will not get squashed under your arm while you work.
Common Mistakes to Avoid
- Cupped motifs. If the disc domes at Round 6 or Round 9, your sc is too tight for the increase rate. Go up half a hook size for the cream rounds only, and block firmly — do not try to add extra increases, which will make the hexagon ruffle instead.
- Skipping Round 10b. The hexagon round needs 66 stitches to divide evenly into 6 repeats of 11. Starting it from 60 will leave you short on the last side and the hexagon will come out lopsided.
- Joining the shells to the wrong dc. Always join into the centre (3rd) dc of the neighbouring shell. Joining to the 2nd or 4th dc on some motifs and the 3rd on others pulls the grid out of square over a whole row.
- Working the second petal layer into the first layer’s stitches. Round 3 of the flower must be worked behind the petals, around the stems, or the rose will lie flat and lose all its depth.
- Tumble drying. The spoke round and the petals both lose their definition in a dryer. Air dry flat, every time.
Ways to Customize This Pattern
- Make a throw instead: 5 motifs per long row and 9 rows total gives roughly 75 x 105 cm, about 40 motifs and a weekend-sized commitment compared with the full bed cover.
- Reverse the colourway: cream frames and shells with golden mustard discs gives a much brighter, more modern grid while keeping the same roses.
- Add a third petal layer: after Round 4 of the flower, work *ch 5, sl st around the stem between the next two petals* 6 times, then (sl st, ch 2, 7 dc, ch 2, sl st) in each ch-5 loop for a full cabbage rose. Use a deeper gold for the outer layer.
- Scatter the colours: work one motif in ten with a dusty rose or terracotta flower instead of gold, placed at random, so the bedspread reads as a garden rather than a repeat.
- Make a matching round cushion from a single enlarged motif: continue the cream increases to Round 12 ([sc 11, inc] x 6 = 78) before changing to gold, make two faces, and seam them around a 40 cm round form.
Frequently asked questions
Measure the width you want the finished cover to be, subtract 6 cm for the border, and divide by 14 cm (the joined pitch of one motif, which is slightly less than its 15 cm width because the shells interlock). Round to the nearest odd number for your long rows. For the length, divide by 12 cm and round up. The short offset rows always have one motif fewer than the long rows.
You can, and it will be lighter and cheaper, but the spoke round and the petals will be softer and less defined, and acrylic will not hold a block. If you use acrylic, go down to a 3.75 mm hook to keep the stitches crisp and expect the bedspread to drape more and stand up less. Mercerised cotton gives the sharp, slightly glossy look in the photo.
Four leaves per motif is what gives the layered look, but there are two shortcuts. You can work two leaves per motif, placed opposite each other, which still reads as foliage from a distance. Or you can work the leaves directly into the cream disc: after Round 6, join sage in a stitch, ch 9 and work the leaf back down to the disc, then fasten off — fewer ends to sew, though the leaves sit flatter.
That is almost always a corner-join issue rather than a counting one. At every three-motif junction all three corners must share the same ch-2 space, so the third motif joins into the space the first two already used, not into the join itself. If small holes still appear after blocking, close them with two or three whip stitches in golden mustard from the back.
Yes, but you will need to change Round 12. Work the shell round complete on every motif, then join with a flat whip stitch through the centre dc of each facing pair of shells and through each pair of corner spaces, using golden mustard. It takes longer and adds a lot of ends, but it lets you lay out all 180 motifs and rearrange the colour placement before committing.
The finished Golden Rose Motif Bedspread Crochet Pattern

