Golden Spiral Bedspread Crochet Pattern
Advanced
For experienced crocheters who enjoy complex shaping, fine detail, and ambitious construction
Single-Day Project
A satisfying project you can complete in a single afternoon or evening.
Handmade Gift
A beautiful keepsake — free forever. Read online or print at home.
About This Golden Spiral Bedspread Crochet Pattern
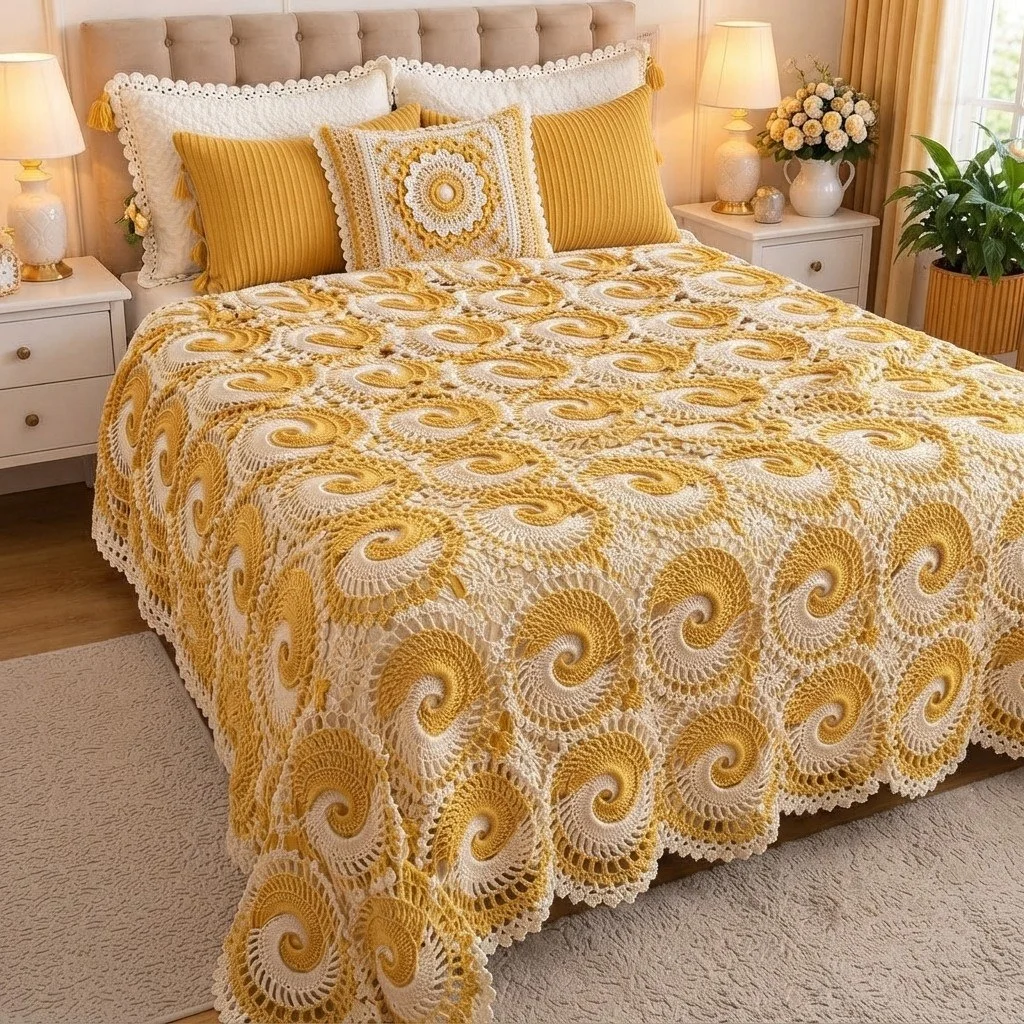
This spiral crochet bedspread pattern turns one repeated hexagon motif into a whole bed-sized cover of golden swirls. Each motif begins as a two-strand spiral worked in golden yellow and cream at the same time, so the two colours chase each other out from the centre in a true pinwheel instead of being striped round by round. The spiral is then framed into a hexagon, topped with a chain mesh and a round of lace fans, and joined to its neighbours on that final round. The fans of six motifs meet to form the open lace rosettes you can see between the swirls.
It is a long project, but a simple one to carry: a single motif takes about 25 minutes once you have the spiral rhythm, and the full 133-motif cover works out at roughly 55 to 70 hours of hooking plus blocking and border time. The work travels well because you only ever carry two balls and one hook, and the join-as-you-go round means the blanket grows in front of you instead of waiting for a terrifying sewing session at the end.
This one is for crocheters who are comfortable reading stitch counts and are ready for a genuine heirloom piece. Nothing in it is technically brutal — hdc, dc, chain mesh and shells — but the two-strand spiral needs attention for the first few motifs, and the join-as-you-go layout needs you to keep track of rows and orientation. If you have made granny-square blankets before and want something that looks far harder than it is, this is the step up.
Materials
- Aran weight mercerised cotton in golden yellow (colour A) approx. 1800 g / 18 × 100 g balls
- Aran weight mercerised cotton in soft cream (colour B) approx. 1300 g / 13 × 100 g balls
- 4 mm crochet hook or hook that gives the gauge below
- Locking stitch markers at least 4, to hold dropped spiral loops
- Blunt tapestry needle for weaving in ends
- Blocking mats and rust-proof pins or a hexagon blocking template
- Spray bottle of water or a steam iron for wet or steam blocking
- Cardboard hexagon template, 21 cm point to point optional but strongly recommended
- Sharp scissors
Abbreviations
begbeginningchchainch-spchain spacedcdouble crochet (US)FOfasten offhdchalf double crochet (US)MRmagic ringpicotch 3, sl st in 3rd ch from hookreprepeatRSright sidescsingle crochet (US)skskipsl stslip stitchspspacest(s)stitch(es)Agolden yellow yarnBcream yarnGauge, Motif Count and Layout Plan
- Gauge: one finished and blocked motif measures 21 cm point to point and 18 cm flat side to flat side. The spiral centre alone (through Pass 16) measures about 14 cm across.
- If your motif is larger, go down to a 3.5 mm hook; if smaller, go up to 4.5 mm. The exact stitch gauge matters less than the finished hexagon width, because the hexagons have to tile.
- Motifs needed for the bedspread shown: 133 in total, set out in 14 staggered rows — 7 rows of 10 motifs alternating with 7 rows of 9 motifs.
- Motifs are oriented with two flat sides at left and right and points at top and bottom, so the columns sit 18 cm apart and each new row drops 15.75 cm.
- Expected size before border: about 180 cm wide × 215 cm long. After the five border rounds: about 185 cm × 225 cm, which covers a standard double bed with a drop on three sides.
- For a different bed, work out your own count: width = number of motifs across × 18 cm; length = number of rows × 15.75 cm + 5 cm for the final row’s points.
- Each motif uses roughly 14 g of A and 8 g of B. Buy all yarn in one dye lot — across 133 motifs, a lot change shows badly.
Motif Part 1 — Two-Colour Spiral Centre
- Setup, A: with A make a MR, ch 1, work 3 hdc into the ring. Drop the A loop onto a locking stitch marker; do not cut.
- Setup, B: join B with a sl st into the ring, ch 1, work 3 hdc into the ring. (6 hdc in the ring.) Pull the ring closed. From here the centre is worked as a continuous two-strand spiral with no joins and no turning — always pick up whichever strand is lying furthest behind.
- Pass 1, A: 2 hdc in each of next 3 sts. (6 sts made by A; 12 sts around)
- Pass 2, B: 2 hdc in each of next 3 sts. (6 sts made by B; 12 sts around)
- Pass 3, A: (2 hdc in next st, hdc in next st) 3 times. (9 sts made; 18 sts around)
- Pass 4, B: (2 hdc in next st, hdc in next st) 3 times. (9 sts made; 18 sts around)
- Pass 5, A: (2 hdc in next st, hdc in next 2 sts) 3 times. (12 sts made; 24 sts around)
- Pass 6, B: (2 hdc in next st, hdc in next 2 sts) 3 times. (12 sts made; 24 sts around)
- Pass 7, A: (2 hdc in next st, hdc in next 3 sts) 3 times. (15 sts made; 30 sts around)
- Pass 8, B: (2 hdc in next st, hdc in next 3 sts) 3 times. (15 sts made; 30 sts around)
- Pass 9, A: (2 hdc in next st, hdc in next 4 sts) 3 times. (18 sts made; 36 sts around)
- Pass 10, B: (2 hdc in next st, hdc in next 4 sts) 3 times. (18 sts made; 36 sts around)
- Pass 11, A: (2 hdc in next st, hdc in next 5 sts) 3 times. (21 sts made; 42 sts around)
- Pass 12, B: (2 hdc in next st, hdc in next 5 sts) 3 times. (21 sts made; 42 sts around)
- Pass 13, A: (2 hdc in next st, hdc in next 6 sts) 3 times. (24 sts made; 48 sts around)
- Pass 14, B: (2 hdc in next st, hdc in next 6 sts) 3 times. (24 sts made; 48 sts around)
- Pass 15, A — tapering the arm: hdc in next 14 sts, sc in next 6 sts, sl st in next 4 sts. FO A and pull the tail through to the back. (24 sts worked)
- Pass 16, B — tapering the arm: hdc in next 14 sts (these are worked over A’s tapered sts), sc in next 6 sts, sl st in next 4 sts. FO B. (24 sts worked; 48 sts around the motif)
- The two arms now fade out opposite each other and the outer edge is level. Check: you must have 48 stitches around the outer edge before starting the frame.
Motif Part 2 — Hexagon Frame
- Frame Round 1 (B): join B with a sl st in the top of the last hdc of either arm, ch 1. *Sc in next 5 sts, 3 sc in next st (corner made)*; rep from * 6 times in total. Sl st to first sc. (60 sts: 6 corners, 7 sts between each pair of corner sts)
- Change to A. Sl st across to the centre st of any 3-sc corner group.
- Frame Round 2 (A): ch 1. *3 sc in corner st, sc in next 7 sts*; rep from * 6 times in total. Sl st to first sc. (72 sts: 6 corners, 9 sts between corner sts)
- Change to B. Sl st across to the centre st of any 3-sc corner group.
- Frame Round 3 (B): ch 1. *3 sc in corner st, sc in next 9 sts*; rep from * 6 times in total. Sl st to first sc. (84 sts: 6 corners, 11 sts between corner sts)
- Do not FO. The hexagon should now sit flat with crisp points. If it cups, your corner increases have slipped out of line; if it ruffles, you have an extra increase somewhere on a side.
Motif Part 3 — Lace Mesh Round
- Sl st across to the centre st of any 3-sc corner group. This stitch is the corner st for this round.
- Mesh Round (B): ch 3 (counts as first dc), ch 2, dc in same corner st. *[Ch 2, sk 2 sts, dc in next st] 3 times, ch 2, sk 2 sts, then (dc, ch 2, dc) in next corner st*; rep from * around, ending the last repeat with the ch 2, sk 2 sts before the beg corner. Sl st to top of beg ch-3.
- Count check: 30 dc and 30 ch-2 sps — one corner ch-2 sp plus four side ch-2 sps per side, with 5 dc between each pair of corner sps.
- FO B and weave in the end now, while the motif is still small and easy to handle.
Motif Part 4 — Fan Round and Join-As-You-Go
- Work this round in A. On the very first motif of the blanket, work it with no joins; on every motif after that, join it to its already-made neighbours as you go, following the layout plan.
- Fan Round (A), no joins: join A with a sl st in any corner ch-2 sp. Ch 3 (counts as dc), 4 dc in same sp, ch 2, 5 dc in same sp (corner fan pair made). *[Sc in next dc, 5 dc in next ch-2 sp] 4 times, sc in next dc, then (5 dc, ch 2, 5 dc) in next corner ch-2 sp*; rep from * around, ending the last repeat after the final sc. Sl st to top of beg ch-3. FO.
- Count check: 6 corner fan pairs, 24 side fans of 5 dc, and 30 sc. Each side carries 4 fans between its corner fans.
- Joining a side fan: work the first 2 dc of the fan into the ch-2 sp, sl st into the centre dc of the matching fan on the neighbouring motif, then work 3 dc into the same ch-2 sp of the motif in progress. The fan still has 5 dc.
- Joining a corner: work 5 dc in the corner ch-2 sp, sl st into the neighbouring motif’s corner ch-2 sp instead of working the ch 2, then work 5 dc in the same corner sp and carry on.
- Where three motifs meet at one point, make the sl st into the same corner ch-2 sp that the second motif already joined into, so all three share a single point.
- Join every fan and every corner along each shared side — 4 side fans and 2 corners per joined side. A motif in the body of the blanket is joined on all 6 sides; edge motifs are joined on 3, 4 or 5.
- Work the blanket row by row: finish and join all motifs in row 1, then add row 2, joining each new motif to its left neighbour first and then upward into the two motifs above it.
- Weave in both ends of each motif before moving on. With 133 motifs there are over 500 ends in this blanket and they are far easier to deal with one motif at a time.
Assembly and Layout
- Block each spiral motif before joining: pin it to 21 cm point to point on your template, spray until damp, and leave to dry. Unblocked motifs join unevenly and the lace fans stay crumpled.
- Lay out row 1 with 10 motifs side by side, flat sides touching, points up and down. Join motif 2 to motif 1 on one side only, motif 3 to motif 2, and so on to motif 10.
- Row 2 has 9 motifs and sits offset: each motif of row 2 nestles into the V between two motifs of row 1. Join each row 2 motif on its upper-left and upper-right sides to the row above, and on its left side to the previous motif of row 2.
- Continue alternating rows of 10 and 9 until you have 14 rows — 7 of each. You will have used 133 motifs.
- Check the growing blanket flat on a bed or floor every two rows. If it starts to skew, you have joined into a fan one position off somewhere; it is far easier to undo one motif than ten.
- The outer edge is now scalloped, with shallow notches down the left and right sides and deeper V-shaped notches along the top and bottom. The border rounds even these out.
Scalloped Lace Border
- Border Round 1 (B): join B with a sl st in the corner ch-2 sp at any outer point of the blanket. Ch 1, sc in same sp, *ch 4, sc in centre dc of next fan*; continue all the way around the outer edge, working a sc in the centre dc of every outer fan and in every outer corner ch-2 sp with ch 4 between. At each deep notch where two motifs meet along the top or bottom edge, skip the two fans nearest the joint and bridge straight across with ch 8 instead of ch 4. Sl st to first sc.
- Border Round 2 (A): ch 1, sc in same st. Sc in each sc, 4 sc in each ch-4 sp and 8 sc in each ch-8 bridge around. Sl st to first sc. Work 3 or 5 sc instead of 4 in any space that pulls or flares, and note your final total.
- Adjust the count: on this round, add or skip up to a few stitches evenly along the long edges so that the total is a multiple of 6. You need that multiple for the shell round.
- Border Round 3 (A): ch 1. *Sk 2 sts, 5 dc in next st, sk 2 sts, sc in next st*; rep from * around. Sl st to first sc. (one 5-dc shell for every 6 sts of Round 2)
- Border Round 4 (B): sl st across to the centre dc of the first shell, ch 1, sc in same st. *Ch 5, sc in centre dc of next shell*; rep from * around, ch 5, sl st to first sc.
- Border Round 5 (B): sl st into the first ch-5 sp, ch 3 (counts as dc), 2 dc in same sp, picot, 3 dc in same sp. *Sc in next sc, (3 dc, picot, 3 dc) in next ch-5 sp*; rep from * around. Sl st to top of beg ch-3. FO and weave in the end.
- The finished border gives a picot-tipped scallop about 5 cm deep all the way round, matching the lace rosettes inside the blanket.
Finishing
Weave in every remaining end on the wrong side, splitting the plies of nearby stitches so nothing works loose in the wash. Go over the whole blanket once with your fingers and pull each spiral centre gently into a round — the first few passes of the two-strand spiral like to sit slightly skewed and a little coaxing sets them straight.
Block the finished cover. Lay it out damp on a clean sheet on a spare bed or on the floor, square up the edges with a tape measure, pin the border scallops out one by one, and leave it to dry fully, which can take a day or more for cotton this heavy. Blocking is what turns the chain mesh and fans from a bumpy texture into open lace, so do not skip it even though the piece is large. Once dry, lay the bedspread with one row of points along the pillow end and let the sides drop evenly. Wash it on a cool gentle cycle, dry flat, and press the border lightly with steam if the scallops curl over time.
Tips for Success
- In the spiral centre, always work the strand that lies furthest behind. If you ever feel unsure which is next, look at which arm ends further back around the circle — that one goes next, every time.
- Park the resting strand on a locking stitch marker rather than letting the loop hang free. Over 133 motifs this single habit will save you a lot of unravelled passes.
- Make the motifs in batches of ten and block them together on the same template, then join a whole row at once. Uniform hexagons are what make the join-as-you-go round fast and the finished grid straight.
- Mark the first stitch of every frame round’s corner with a removable marker until you trust your corner placement. The hexagon only stays flat if the corner increases stack directly above each other.
- Wind your cream yarn into smaller cakes for the spiral passes. A full 100 g ball dangling from the back of a two-strand spiral tangles with the gold strand constantly.
Common Mistakes to Avoid
- Twisted strands in the spiral centre: if you always pass one yarn over the other when you swap, the two balls wind around each other. Alternate the direction you pick up the next strand, or give the work a half turn every few passes to undo the twist.
- Picking up the wrong arm and working two passes with the same colour: this makes one arm fat and the other thin and the swirl goes lopsided. Count stitches at the end of every pass against the numbers given — both arms must match.
- A cupping or ruffling hexagon: this almost always comes from the frame rounds, not the spiral. Recount the stitches between corners — they must be 7, then 9, then 11. An extra or missing stitch on one side throws the whole tile off and it will not join cleanly.
- Joining into the wrong fan: it is easy to be one fan out along a long side, which pulls the blanket into a slant that only shows up three rows later. Lay each new motif in place and match the fans with your fingers before you make the first sl st.
- Joining unblocked motifs: the lace fan round relaxes a lot with blocking, so unblocked motifs join tight and the blanket ends up smaller and stiffer than planned. Block first, always.
Ways to Customize This Pattern
- Change the scale: work the same motif in DK cotton with a 3.5 mm hook for an 18 cm hexagon and a lighter summer cover, or in chunky cotton with a 6 mm hook for a fast sofa throw with far fewer motifs.
- Make a matching set: four motifs joined into a square panel, backed with fabric, make a 40 cm cushion cover; a single row of seven motifs with the border worked all around makes a table runner.
- Shift the colourway: keep cream as the constant second arm and work the gold arm in a gradient — deep amber at the pillow end fading to pale honey at the foot — by changing shade every two rows of motifs.
- Simplify the edge: replace border Rounds 4 and 5 with a single round of (3 dc, ch 2, 3 dc) in every third stitch for a plain scallop with no picots, which stands up better to heavy daily use.
- Reverse the frame colours so the hexagon frame and fans are cream on gold-centred motifs and gold on cream-centred motifs, then alternate the two versions across the bed for a checkerboard effect.
Frequently asked questions
Work from the blocked motif size of 18 cm flat side to flat side and 15.75 cm per row drop. For a single bed at about 140 × 215 cm, use 8 motifs across and 14 rows, alternating 8 and 7 motifs, for 105 motifs. For a king at about 240 × 230 cm, use 13 across and 15 rows, alternating 13 and 12, for 188 motifs. Add about 2.5 cm all round for the border.
Yes. Work the fan round with no joins on every motif, then lay them out and whip stitch neighbours together through the centre dc of each matching fan and through both corner ch-2 spaces, using cream yarn. It is slower and the seam is slightly firmer than a join-as-you-go seam, but the result is just as strong and the grid is easier to square up because you can shuffle the motifs before committing.
That happens when the increases in each pass stack on top of each other instead of travelling. Each arm has three increase points per pass, and they must shift one stitch further along every pass because the number of plain stitches between them grows by one each time. If you are working the increases into the same relative spot, you will get sharp points; follow the increase sequence exactly as written and the arms will curve.
In aran cotton the double-bed version weighs roughly 3 kg once finished, which is heavy enough to need a large-drum machine. Wash cool on a gentle cycle with a mild detergent, no fabric softener, and spin on the lowest setting. Never hang it wet, as the weight will stretch the lace mesh — dry it flat on a sheet, easing the border scallops back into shape while it is still damp.
You can, and it will be lighter and warmer, but aran acrylic has more stretch and the lace mesh rounds tend to sag under the blanket’s own weight over a bed. If you use acrylic, go down a hook size to 3.5 mm to firm up the fabric, and steam block rather than wet block so the stitches set. A cotton-acrylic blend is a good middle ground.
The finished Golden Spiral Bedspread Crochet Pattern

