Golden Tulip Bouquet Crochet Table Runner
Advanced
For experienced crocheters who enjoy complex shaping, fine detail, and ambitious construction
Single-Day Project
A satisfying project you can complete in a single afternoon or evening.
Handmade Gift
A beautiful keepsake — free forever. Read online or print at home.
About This Golden Tulip Bouquet Crochet Table Runner
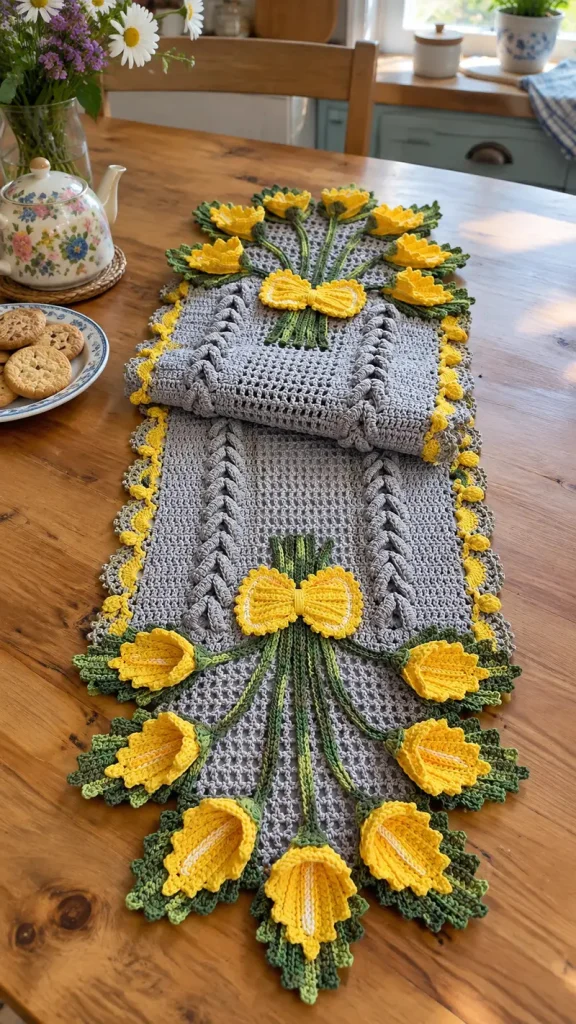
This tulip crochet table runner pattern pairs a soft gray mesh ground with raised braids, golden yellow flowers, and branching green stems. Seven cupped tulips frame each tapered end, while two yellow bows gather the stems into bouquets. Small yellow scallops brighten the long edges.
The construction follows the table runner in the reference: a flat textile with separately crocheted floral details. Allow about 35–45 hours for the mesh, tapered ends, braided cords, flowers, and careful sewing. This advanced project suits crocheters who enjoy shaping small pieces and arranging dimensional appliqués on a larger background.
Materials
- Sport-weight cotton, approximately 250 m per 100 g Gray: 450 g; golden yellow: 180 g; dark green: 120 g; olive green: 70 g; pale yellow: 10 g. Quantities include a working allowance.
- 3.0 mm crochet hook For the runner, braids, stems, and edging.
- 2.5 mm crochet hook For flowers, leaves, and bows.
- Tapestry needle and fine sewing needle Use matching yarn or strong matching sewing thread for attachment.
- Stitch markers, ruler, rustproof pins, and blocking mats For matching the two ends and positioning the bouquets.
Abbreviations
chchainsl stslip stitchscsingle crochethdchalf double crochetdcdouble crochetinc2 sc in one stitchsc2togsingle crochet 2 stitches togetherdc3togdouble crochet 3 stitches togetherdc5togdouble crochet 5 stitches togetherMRmagic ringBLOback loop onlyRSright sideGauge, Dimensions, and Construction Notes
- Use US crochet terminology. Turning chains never count as stitches. Work flat unless a section specifically says to work in rounds.
- Blocked mesh gauge with the 3.0 mm hook: 20 stitch positions and 10 rows per 10 cm. A stitch position is either one dc or one ch-1 space; 10 mesh repeats measure approximately 10 cm.
- Swatch: ch 24. Row 1: dc in fourth ch from hook and each remaining ch, treating the three skipped chains as an uncounted turning chain; 21 dc. Row 2: ch 2, turn, dc in first stitch, repeat ch 1, skip 1 stitch, dc in next stitch ten times; 11 dc and 10 spaces. Rows 3–12: ch 2, turn, dc in first dc, repeat ch 1, skip space, dc in next dc ten times. Block and measure the middle of the swatch.
- With the 2.5 mm hook, aim for approximately 24 sc and 26 rows per 10 cm. A finished petal is approximately 4 cm wide and 5 cm long.
- The gray foundation is approximately 30 cm wide and 120 cm long: a 90 cm rectangular center plus two 15 cm tapered ends. Leaves and flowers increase the maximum width to approximately 40 cm. Final measurements depend on blocking and placement.
- Counts include chain spaces where stated. Work into the tops of stitches unless instructed otherwise. Do not stuff any part; the tulips remain hollow and flexible.
Gray Mesh Center
- Row 1: with gray and the 3.0 mm hook, ch 64. Dc in fourth ch from hook and in each remaining ch; the skipped chains do not count. 61 dc.
- Row 2: ch 2, turn, dc in first stitch; repeat ch 1, skip 1 stitch, dc in next stitch 30 times. 31 dc and 30 ch-1 spaces; 61 positions.
- Rows 3–89: ch 2, turn, dc in first dc; repeat ch 1, skip next space, dc in next dc 30 times. 31 dc and 30 spaces in every row.
- Row 90: ch 2, turn, dc in every dc and make 1 dc in every ch-1 space. 61 dc. Keep yarn attached for the first tapered end.
Tapered Bouquet Ends — Make Two
- Work the first end directly after center Row 90. For the second end, join gray at an outer stitch of the unused foundation edge, positioned to work across all 61 foundation stitches. Use the same instructions for both ends.
- End Row 1: ch 2, turn as needed, dc3tog over first 3 stitches. Across the next 55 stitches, work dc in the first, then repeat ch 1, skip 1, dc in next stitch 27 times. Dc3tog over last 3 stitches. 30 dc tops, including the two decrease tops, and 27 spaces; 57 positions.
- End Rows 2–14: ch 2, turn. Dc3tog over the first 3 positions, treating a chain space as one position. Across the interior positions, dc in the first position, then repeat ch 1, skip 1 position, dc in next position until 3 positions remain. Dc3tog over the last 3 positions. Work a dc leg into a space whenever that position is a chain space.
- Check each row’s total: Row 2: 53; Row 3: 49; Row 4: 45; Row 5: 41; Row 6: 37; Row 7: 33; Row 8: 29; Row 9: 25; Row 10: 21; Row 11: 17; Row 12: 13; Row 13: 9; Row 14: 5. Each row decreases by 4 positions.
- End Row 15: ch 2, turn, dc5tog over all 5 positions, including the central chain space. 1 stitch. Fasten off.
- Block the foundation before attaching any decoration. Set the center to 30 × 90 cm and each tapered end to approximately 15 cm deep. Keep the centerline straight.
Gray Perimeter and Yellow Side Scallops
- Gray perimeter round: with RS facing and the 3.0 mm hook, join at the junction of a long straight edge and a tapered end. Work 2 sc around each of the 90 row ends along the straight side; 180 sc. Mark the first and last of these stitches.
- Continue around the first tapered end: work 2 sc around each of its 15 row ends, 3 sc in the tip stitch, then 2 sc around each of the other 15 row ends; 63 sc around this end.
- Work 180 sc along the second straight side, then 63 sc around the other tapered end in the same way. Join with sl st to first sc. 486 sc total. Do not add extra stitches at the four shoulder junctions. Fasten off.
- Yellow scallops: join yellow in the first marked stitch of either 180-stitch straight side. Repeat skip 2 sc, 5 dc in next sc, skip 2 sc, sl st in next sc 30 times. Each repeat consumes 6 gray stitches and makes one scallop. Fasten off; repeat on the other straight side. Leave both tapered ends without yellow scallops.
- Olive outline: join olive in the first gray stitch of a straight side. Sl st in each of its 180 gray stitches, working into the gray tops behind the yellow edging. Fasten off and repeat on the other side. Keep these slip stitches loose enough to preserve the blocked length.
Raised Gray Braids — Make Two
- Make three cords for each braid, six cords total. With gray and the 3.0 mm hook, ch 211. Starting in second ch from hook, sc in each chain. 210 sc. Fasten off with a sewing tail.
- Block each cord to approximately 105 cm. The cords need extra length because braiding shortens them.
- Align three cord ends and sew them together across their first 2 cm. Braid with an even, relaxed tension until the braid measures 86 cm. Secure all three strands together at this point; fold any unused cord ends beneath the braid.
- Place the braids lengthwise on the RS of the rectangular center, each approximately 5 cm inside a long gray edge. Center them between the two end seams, leaving about 2 cm clear at each end.
- Sew through the underside of each braid at every crossing, approximately every 1.5–2 cm. Catch gray dc posts underneath rather than pulling the mesh spaces closed.
Tulip Bases — Make Fourteen
- Use golden yellow and the 2.5 mm hook. Work continuous rounds, marking the first stitch.
- Round 1: 6 sc in MR. 6 sc.
- Round 2: inc in each stitch. 12 sc.
- Round 3: repeat sc in next stitch, inc in next stitch 6 times. 18 sc.
- Rounds 4–6: sc in each stitch. 18 sc in each round.
- Sl st in next stitch and fasten off, leaving a 25 cm sewing tail. Leave the cup open and unstuffed.
Sculpted Tulip Petals — Make Forty-Two
- Make three petals per flower with golden yellow and the 2.5 mm hook. Ch 4.
- Row 1: sc in second ch from hook and next 2 chains. 3 sc.
- Row 2: ch 1, turn, inc, sc in next stitch, inc. 5 sc.
- Row 3: ch 1, turn, inc, sc in next 3 stitches, inc. 7 sc.
- Row 4: ch 1, turn, inc, sc in next 5 stitches, inc. 9 sc.
- Rows 5–8: ch 1, turn, sc BLO in each stitch. 9 sc in each row.
- Row 9: ch 1, turn, sc2tog, sc in next 5 stitches, sc2tog. 7 sc.
- Row 10: ch 1, turn, sc2tog, sc in next 3 stitches, sc2tog. 5 sc.
- Row 11: ch 1, turn, sc2tog, sc in next stitch, sc2tog. 3 sc.
- Row 12: ch 1, turn, sc2tog, sc in last stitch. 2 sc.
- Petal edging: ch 1 without turning. Work 12 sc down the first side, one into each row end; 3 sc across the foundation edge; 12 sc up the other side; and 2 sc across the tip. 29 sc around the perimeter. Join with sl st to first edging sc and fasten off with a 30 cm tail.
- With pale yellow, embroider one straight line along the center of each petal, from just above Row 2 to Row 10. Use small backstitches so the line follows the petal rather than floating across it.
- To assemble each tulip, mark its base rim into three groups of 6 stitches. Center one petal foundation over each group, easing its 3 foundation stitches across the 6 rim stitches. Sew the lower side edges to the outside of the cup as far as petal Row 4.
- Overlap neighboring petal sides by approximately 5 mm and tack together through Row 7. Leave the pointed upper portions free. Curl the upper edges outward gently with your fingers. Keep one petal facing upward when placing the flower on the runner.
Ribbed Green Leaves — Make Forty-Two
- Make three leaves per tulip: two dark green and one olive. Use the 2.5 mm hook. Ch 19.
- Round 1, first side: sc in second ch from hook, hdc in next 2 chains, dc in next 12 chains, hdc in next 2 chains, and 3 sc in last chain. 20 stitches on this side including the turning group.
- Continue along the unused underside loops: hdc in next 2 chains, dc in next 12 chains, hdc in next 2 chains, and 2 sc in the same chain as the first sc. Join to first sc. 38 stitches total.
- Round 2: ch 1, sc BLO in first 17 stitches, 3 sc BLO in next stitch, sc BLO in next 20 stitches. Join to first sc. 40 sc. The 3-sc group sharpens the outer leaf tip.
- Fasten off with a 25 cm tail. Fold lengthwise and finger-press the center ridge. Each leaf should measure approximately 8–9 cm long.
- For each flower, fan three leaves behind its cup with the pointed tips projecting approximately 2–3 cm beyond the petals. Sew the leaf bases together, then stitch the flower base onto them. Leave the outer leaf halves free.
Green Bouquet Stems — Make Fourteen
- Make one set of seven stems for each end with the 3.0 mm hook. For each set, make two stems with ch 31, two with ch 37, two with ch 43, and one with ch 49.
- For every stem, sl st in second ch from hook and each remaining chain. The resulting counts are 30, 36, 42, or 48 sl st. Use dark green for one stem of each paired length, olive for the other, and dark green for the longest central stem.
- Fasten off with tails at both ends. These cords should measure approximately 15, 18, 21, and 24 cm. Block gently to those lengths; do not stretch tightly.
- Add a fine olive running stitch along each dark green stem and a dark green running stitch along each olive stem. Keep the reverse stitches short.
Yellow Bouquet Bows — Make Two
- Each bow has two shaped wings and one center band. Use golden yellow and the 2.5 mm hook. For each wing, ch 5.
- Wing Row 1: sc in second ch from hook and across. 4 sc.
- Wing Row 2: ch 1, turn, inc, sc in next 2 stitches, inc. 6 sc.
- Wing Row 3: ch 1, turn, inc, sc in next 4 stitches, inc. 8 sc.
- Wing Row 4: ch 1, turn, inc, sc in next 6 stitches, inc. 10 sc.
- Wing Rows 5–10: ch 1, turn, sc BLO in each stitch. 10 sc per row.
- Wing Row 11: ch 1, turn, sc2tog, sc in next 6 stitches, sc2tog. 8 sc.
- Wing Row 12: ch 1, turn, sc2tog, sc in next 4 stitches, sc2tog. 6 sc.
- Wing edging: ch 1, then work 12 sc down one row-end edge, 4 sc across the foundation, 12 sc up the opposite edge, and 6 sc across Row 12. 34 sc. Join and fasten off.
- Center band Row 1: ch 5, sc in second ch from hook and across. 4 sc.
- Center band Rows 2–10: ch 1, turn, sc in each stitch. 4 sc per row. Fasten off with a sewing tail.
- Place two wings with their narrower foundation edges together. Gather those edges with a running stitch, wrap the center band around the gathered join, and sew its short ends together behind the bow. Embroider three pale-yellow lines radiating outward across each wing. A completed bow is approximately 9–10 cm wide.
Bouquet Placement and Attachment
- Lay the blocked runner RS upward. For each end, define a local coordinate system: the center of the straight-to-taper seam is x = 0, y = 0; positive y points toward the tapered tip, and negative y points into the rectangular center. Measurements below are in centimeters.
- Pin seven flower bases at these positions: left upper x = -12, y = -1; left middle x = -11, y = 5; left lower x = -7, y = 10; center x = 0, y = 12; right lower x = 7, y = 10; right middle x = 11, y = 5; right upper x = 12, y = -1. Angle each cup outward and keep the central flower pointing toward the tip.
- Position the bow center at x = 0, y = -10. Place each stem’s inner end approximately 3 cm beyond this point toward the center of the runner, leaving short gathered stem tails visible above the bow.
- Run the two shortest stems to the upper flower pair, the next pair to the middle flowers, the next pair to the lower flowers, and the longest stem to the central flower. Curve the cords gently beneath the bow; tuck surplus length beneath the flower bases.
- Sew stems to the gray foundation with matching thread at approximately 1 cm intervals. Catch dc posts where possible, preserving the mesh openings.
- Sew each leaf cluster to the foundation at its base and at two further points beneath the flower. Sew each tulip cup securely through its lower rounds. Keep upper petals and leaf tips free for relief.
- Sew the bow over the gathered stems through its center band and the inner third of each wing. Mirror the entire arrangement at the opposite end. Confirm that both ends have seven flowers and one bow before securing the final tails.
Finishing
Weave gray ends along solid stitches and hide colored tails inside their matching appliqués. Turn the runner over and check every flower and braid for loose attachment points. Add a few small stitches wherever an ornament lifts enough to catch during handling.
Give the gray ground a final light damp-block, supporting the tulips with loosely rolled cloth so their cups remain open. Let everything dry completely before placing the runner on the table. Hand wash in cool water, press out moisture in a towel, and dry flat with the flowers reshaped. Lift hot serving dishes onto separate trivets.
Tips for Success
- Mark every tenth mesh row while working the center. These markers make it easier to distribute exactly 180 gray edging stitches along each straight side.
- Make one complete tulip and leaf cluster before making the remaining thirteen. Check that its petals open comfortably and its leaves support the cup.
- Pin all seven flowers at one end before sewing any of them. Adjust the angles so the central bloom and three paired blooms form a balanced fan.
- Sew the braids with the runner resting flat on a table. Holding it in your lap can shorten the mesh beneath the braid and create ripples.
- Use small stitches through the flower bases and larger spacing along the flexible stems. This holds the heavier pieces while allowing the ground to drape.
Common Mistakes to Avoid
- Counting only dc tops in a tapered row produces the wrong decreases. Count each chain space as one position; the first tapered row must finish with 57 positions.
- A tight olive slip-stitch outline can draw the long sides inward. Use a loose loop or a larger hook for this outline if the edge begins to gather.
- Sewing the petals together all the way to their tips closes the tulips. Stop the overlap seam at Row 7 and leave the upper portions free.
- Pulling embroidery tightly flattens the petal ribs. Keep the pale-yellow backstitches relaxed and reshape the petal after every few stitches.
- Attaching every leaf edge makes the bouquets stiff. Secure the bases and hidden support points, allowing the tips to lift slightly.
Ways to Customize This Pattern
- Use butter yellow for the petals and a deeper gold for the cups, keeping the gray ground and two green shades.
- For a longer table, add center mesh rows before the solid final row. Every 10 extra rows adds approximately 10 cm; add 2 gray edge stitches per added row on each side. Add center rows in multiples of 3 to preserve the six-stitch scallop repeat.
- Replace pale-yellow petal embroidery with cream for a softer vein detail. Keep the stitches fine so they do not cover the crochet texture.
- Make the runner easier to store by sewing each complete bouquet to a separate gray fabric backing shaped to fit the end, then securing that backing with small removable hand stitches.
Frequently asked questions
The cup supports the flower while three overlapping petals create the open, sculpted shape visible in the reference. This construction also lets you angle each bloom toward the edge without stuffing it.
Yes, but make both gauge swatches first. At the same stitch counts, a larger gauge produces a wider and longer runner, larger flowers, and heavier bouquets. Use your measured gauge to estimate the dimensions before buying the full yarn quantity.
Check the decrease counts, keep the gray perimeter relaxed, and block the undecorated foundation first. If an end still cups, its dc rows may be shorter than the center mesh rows; remake that end with taller dc stitches or a slightly larger hook.
They can, provided the gray foundation supports the flower bases. Position the runner so the bows and upper flower pair rest near the table ends, then let the tapered bouquets drape. Avoid leaving only the attached leaves carrying the weight of a flower.
The finished Golden Tulip Bouquet Crochet Table Runner

