Advanced
For experienced crocheters who enjoy complex shaping, fine detail, and ambitious construction
Weekend Project
A satisfying weekend make — start Friday, finish Sunday, enjoy forever.
Handmade Gift
A beautiful keepsake — free forever. Read online or print at home.
About This Gothic Sweethearts Amigurumi Pattern
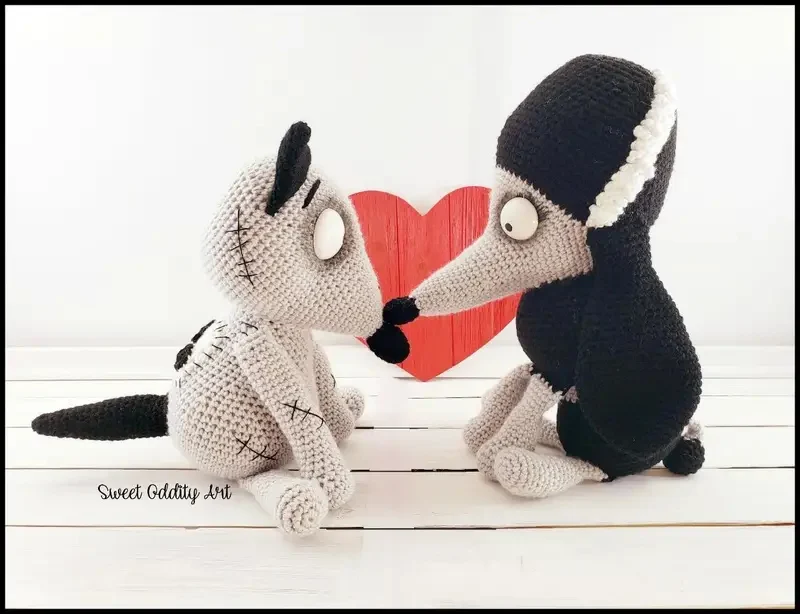
This gothic sweethearts amigurumi pattern creates a seated pair with the contrasting shapes and quiet expressions of the reference: a pale gray stitched dog and a taller black companion with a long gray muzzle. Separate ears, tapered tails, elongated feet, ivory eyes, and a raised white hair stripe give each figure its own character.
The gray dog has a rounded head, a projecting muzzle, and loose black repair stitches across its head and body. Its companion has a tall black crown, a gray lower face, a slender pointed muzzle, and long gray limbs folded beside a pear-shaped body. The red heart in the photograph is a background prop and is not part of these crocheted figures.
Allow approximately 18–24 hours for the pair, including careful assembly. This advanced project suits makers comfortable with invisible decreases, small circumferences, color changes, surface embroidery, and positioning separately stuffed pieces. The instructions are an original interpretation of the photograph.
Materials
- DK yarn in pale warm gray Approximately 160 g / 400 m for both figures
- DK yarn in black Approximately 120 g / 300 m
- DK yarn in ivory Approximately 10 g / 25 m for four eye patches
- DK yarn in white Approximately 10 g / 25 m for the raised hair stripe
- 2.5 mm crochet hook Adjust to achieve the stated dense gauge
- Black embroidery thread For repair seams, brows, and the small visible pupil
- Polyester stuffing Approximately 180–230 g for the pair
- Tapestry needle, embroidery needle, scissors, stitch markers, and long assembly pins Use contrasting markers on black yarn
- Removable contrasting yarn For marking head fronts and attachment lines
Abbreviations
MRMagic ringchChainscSingle crochet, US terminologyincWork 2 single crochets in one stitchdecInvisible decrease over the next 2 stitchessl stSlip stitchRRoundrepRepeatGauge, Dimensions, and Working Notes
- Gauge: 26 sc and 28 rounds measure 10 × 10 cm in firmly worked, lightly stuffed fabric. Make a circular swatch through 36 stitches and continue evenly before measuring across its central area. Adjust the hook until stuffing does not show.
- Expected seated dimensions: gray dog approximately 21 cm tall, 11 cm wide, and 20 cm deep including its tail; black sweetheart approximately 28 cm tall, 12 cm wide, and 18 cm deep including its projecting muzzle. Assembly angles and stuffing affect these measurements.
- Work in continuous rounds unless a row or joined round is specified. Mark the first stitch and move the marker after every round. Counts in parentheses are the completed stitch counts.
- For a color change, complete the last pull-through of the preceding stitch with the new color. Leave sewing tails approximately 35–45 cm long on large pieces and 20–25 cm long on small pieces.
- Keep the bodies firmly filled at the base and moderately filled near the neck. Stuff heads sufficiently to hold their shapes without stretching the stitches. Leave the upper portions of limbs mostly empty so they fold naturally.
- All eye patches are crocheted and sewn on; safety eyes are not used. Sew eyes before attaching each muzzle, and embroider facial details before joining the head to its body.
Gray Dog Body
- R1: With gray, work 6 sc in MR. (6)
- R2: Inc in each stitch. (12)
- R3: Rep (sc, inc) 6 times. (18)
- R4: Rep (2 sc, inc) 6 times. (24)
- R5: Rep (3 sc, inc) 6 times. (30)
- R6: Rep (4 sc, inc) 6 times. (36)
- R7: Rep (5 sc, inc) 6 times. (42)
- R8: Rep (6 sc, inc) 6 times. (48)
- R9: Sc around. (48)
- R10: Sc around. (48)
- R11: Sc around. (48)
- R12: Sc around. (48)
- R13: Sc around. (48)
- R14: Rep (6 sc, dec) 6 times. (42)
- R15: Sc around. (42)
- R16: Rep (5 sc, dec) 6 times. (36)
- R17: Sc around. (36)
- R18: Rep (4 sc, dec) 6 times. (30)
- R19: Sc around. (30)
- R20: Rep (3 sc, dec) 6 times. (24)
- R21: Sc around. (24)
- R22: Sc around. (24) Fasten off, leaving a sewing tail and the neck open. Stuff, flattening the underside slightly against the work surface.
Black Sweetheart Body
- R1: With black, work 6 sc in MR. (6)
- R2: Inc in each stitch. (12)
- R3: Rep (sc, inc) 6 times. (18)
- R4: Rep (2 sc, inc) 6 times. (24)
- R5: Rep (3 sc, inc) 6 times. (30)
- R6: Rep (4 sc, inc) 6 times. (36)
- R7: Rep (5 sc, inc) 6 times. (42)
- R8: Rep (6 sc, inc) 6 times. (48)
- R9: Sc around. (48)
- R10: Sc around. (48)
- R11: Sc around. (48)
- R12: Sc around. (48)
- R13: Sc around. (48)
- R14: Sc around. (48)
- R15: Sc around. (48)
- R16: Rep (6 sc, dec) 6 times. (42)
- R17: Sc around. (42)
- R18: Sc around. (42)
- R19: Rep (5 sc, dec) 6 times. (36)
- R20: Sc around. (36)
- R21: Sc around. (36)
- R22: Rep (4 sc, dec) 6 times. (30)
- R23: Sc around. (30)
- R24: Rep (3 sc, dec) 6 times. (24)
- R25: Sc around. (24)
- R26: Sc around. (24) Fasten off, leaving a sewing tail and the neck open. Stuff firmly at the base and gently through the upper body.
Gray Dog Head
- R1: With gray, work 6 sc in MR. This ring is the crown. (6)
- R2: Inc in each stitch. (12)
- R3: Rep (sc, inc) 6 times. (18)
- R4: Rep (2 sc, inc) 6 times. (24)
- R5: Rep (3 sc, inc) 6 times. (30)
- R6: Rep (4 sc, inc) 6 times. (36)
- R7: Rep (5 sc, inc) 6 times. (42)
- R8: Rep (6 sc, inc) 6 times. (48)
- R9: Sc around. (48)
- R10: Sc around. (48)
- R11: Sc around. (48)
- R12: Sc around. (48)
- R13: Sc around. (48)
- R14: Sc around. (48)
- R15: Sc around. (48)
- R16: Rep (6 sc, dec) 6 times. (42)
- R17: Rep (5 sc, dec) 6 times. (36)
- R18: Rep (4 sc, dec) 6 times. (30)
- R19: Rep (3 sc, dec) 6 times. (24) Stuff, shaping a rounded forehead and a slightly narrower lower head.
- R20: Rep (2 sc, dec) 6 times. (18)
- R21: Rep (sc, dec) 6 times. (12)
- R22: Dec 6 times. (6) Fasten off and draw the opening closed through the front loops. The body neck will be sewn around the underside of the head rather than into this small closure.
Gray Dog Muzzle
- R1: With gray, work 6 sc in MR, beginning at the nose end. (6)
- R2: Rep (sc, inc) 3 times. (9)
- R3: Rep (2 sc, inc) 3 times. (12)
- R4: Rep (3 sc, inc) 3 times. (15)
- R5: Rep (4 sc, inc) 3 times. (18)
- R6: Rep (2 sc, inc) 6 times. (24)
- R7: Sc around. (24)
- R8: Sc around. (24)
- R9: Sc around. (24) Fasten off with a sewing tail. Stuff lightly and pinch the nose end slightly vertically. Leave the broad base open for attachment over head R12–19.
Black Sweetheart Head and Crown
- R1: With black, work 6 sc in MR at the crown. (6)
- R2: Inc in each stitch. (12)
- R3: Rep (sc, inc) 6 times. (18)
- R4: Rep (2 sc, inc) 6 times. (24)
- R5: Rep (3 sc, inc) 6 times. (30)
- R6: Rep (4 sc, inc) 6 times. (36)
- R7: Rep (5 sc, inc) 6 times. (42)
- R8: Rep (6 sc, inc) 6 times. (48)
- R9: Sc around. (48)
- R10: Sc around. (48)
- R11: Sc around. (48)
- R12: Sc around. (48)
- R13: Sc around. (48)
- R14: Sc around. (48)
- R15: Sc around. (48)
- R16: Sc around. (48)
- R17: Sc around. (48)
- R18: Sc around. (48)
- R19: With gray, sc around. (48)
- R20: Sc around. (48)
- R21: Sc around. (48)
- R22: Sc around. (48)
- R23: Rep (6 sc, dec) 6 times. (42)
- R24: Rep (5 sc, dec) 6 times. (36)
- R25: Rep (4 sc, dec) 6 times. (30)
- R26: Rep (3 sc, dec) 6 times. (24) Stuff, keeping the crown tall and slightly flattened from side to side.
- R27: Rep (2 sc, dec) 6 times. (18)
- R28: Rep (sc, dec) 6 times. (12)
- R29: Dec 6 times. (6) Fasten off and close through the front loops.
Long Pointed Gray Muzzle
- R1: With gray, work 6 sc in MR at the tip. (6)
- R2: Sc around. (6)
- R3: Rep (sc, inc) 3 times. (9)
- R4: Sc around. (9)
- R5: Rep (2 sc, inc) 3 times. (12)
- R6: Sc around. (12)
- R7: Rep (3 sc, inc) 3 times. (15)
- R8: Sc around. (15)
- R9: Rep (4 sc, inc) 3 times. (18)
- R10: Sc around. (18)
- R11: Rep (5 sc, inc) 3 times. (21)
- R12: Sc around. (21)
- R13: Rep (6 sc, inc) 3 times. (24)
- R14: Sc around. (24)
- R15: Rep (3 sc, inc) 6 times. (30)
- R16: Sc around. (30) Fasten off with a sewing tail. Add small amounts of stuffing with a blunt tool, leaving the tip soft and the broad base moderately firm. The base fits over head R20–28.
Black Nose Tips — Make Two
- R1: With black, work 6 sc in MR. (6)
- R2: Rep (sc, inc) 3 times. (9)
- R3: Sc around. (9)
- R4: Rep (sc, dec) 3 times. (6) Add a tiny pinch of stuffing. Fasten off, leaving the base open. Sew one nose over the first two rounds of each gray muzzle, concealing the gray tip.
Ivory Oval Eyes — Make Four
- R1: With ivory, ch 5. Starting in the second chain from the hook, sc in the next 3 chains, work 3 sc in the last chain; continue along the underside, sc in the next 2 chains, then work 2 sc in the final chain, which already contains the first sc. (10)
- R2: Inc, 2 sc, inc in each of the next 3 stitches, 2 sc, inc in each of the final 2 stitches. (16) Sl st in the first stitch and fasten off with a sewing tail. Do not stuff. Each eye should measure approximately 2.2 × 1.6 cm.
- Placement: sew the dog eyes vertically over head R9–14, with approximately 8 visible stitches between their inner edges across the front. Sew the sweetheart eyes over R19–24, with approximately 10 visible stitches between their inner edges. The muzzle bases cover the lower inner edges slightly.
- Use small stitches around every edge stitch, keeping the patches flat. Leave the dog eyes blank as in the reference. Embroider one tiny black pupil near the lower inner edge of each sweetheart eye; only one will be prominent in a side view.
Gray Dog Ears — Make Two in Black
- R1: Work 6 sc in MR at the ear tip. (6)
- R2: Sc around. (6)
- R3: Rep (sc, inc) 3 times. (9)
- R4: Sc around. (9)
- R5: Rep (2 sc, inc) 3 times. (12)
- R6: Sc around. (12)
- R7: Sc around. (12)
- R8: Sc around. (12)
- R9: Rep (2 sc, dec) 3 times. (9)
- R10: Sc around. (9)
- R11: Sc around. (9) Fasten off. Leave unstuffed, flatten, and sew the open base shut with the sewing tail. Attach across head R4–7, approximately 12 stitches apart across the crown. Angle one ear upright and let the other lean backward.
Gray Arms — Make Two for Each Figure
- R1: With gray, work 6 sc in MR at the hand. (6)
- R2: Inc in each stitch. (12)
- R3: Rep (3 sc, inc) 3 times. (15)
- R4: Sc around. (15)
- R5: Rep (3 sc, dec) 3 times. (12)
- R6: Sc around. (12)
- R7: Sc around. (12)
- R8: Sc around. (12)
- R9: Sc around. (12)
- R10: Sc around. (12)
- R11: Sc around. (12)
- R12: Sc around. (12)
- R13: Sc around. (12)
- R14: Sc around. (12)
- R15: Sc around. (12)
- R16: Sc around. (12)
- R17: Sc around. (12)
- R18: Sc around. (12) For dog arms, stop here. Fill the hand and lower half lightly. Flatten the opening and sc through both layers across all 6 paired stitches. Fasten off with a sewing tail. For sweetheart arms, continue without closing.
- R19, sweetheart arms only: Sc around. (12)
- R20, sweetheart arms only: Sc around. (12)
- R21, sweetheart arms only: Sc around. (12)
- R22, sweetheart arms only: Sc around. (12) Fill the hand and lower half lightly. Flatten the opening and sc through both layers across all 6 paired stitches. Fasten off with a sewing tail.
Gray Feet and Legs — Make Two for Each Figure
- R1: With gray, work 6 sc in MR at the toe. (6)
- R2: Inc in each stitch. (12)
- R3: Rep (sc, inc) 6 times. (18)
- R4: Rep (2 sc, inc) 6 times. (24)
- R5: Sc around. (24)
- R6: Sc around. (24)
- R7: Sc around. (24)
- R8: Sc around. (24)
- R9: Rep (2 sc, dec) 6 times. (18)
- R10: Sc around. (18)
- R11: Rep (sc, dec) 6 times. (12) Stuff the foot moderately, keeping its underside flat.
- R12: Sc around. (12)
- R13: Sc around. (12)
- R14: Sc around. (12)
- R15: Sc around. (12)
- R16: Sc around. (12)
- R17: Sc around. (12)
- R18: Sc around. (12)
- R19: Sc around. (12)
- R20: Sc around. (12) For dog legs, stop here. Add only a small amount of filling above the foot. Flatten the opening and sc through both layers across all 6 paired stitches. Fasten off with a sewing tail. For sweetheart legs, continue without closing.
- R21, sweetheart legs only: Sc around. (12)
- R22, sweetheart legs only: Sc around. (12)
- R23, sweetheart legs only: Sc around. (12)
- R24, sweetheart legs only: Sc around. (12)
- R25, sweetheart legs only: Sc around. (12)
- R26, sweetheart legs only: Sc around. (12) Add a little filling to the lower leg, leaving its upper half flexible. Flatten the opening and sc through both layers across all 6 paired stitches. Fasten off with a sewing tail.
Gray Dog Long Black Tail
- R1: With black, work 6 sc in MR at the tip. (6)
- R2: Sc around. (6)
- R3: Rep (sc, inc) 3 times. (9)
- R4: Sc around. (9)
- R5: Sc around. (9)
- R6: Rep (2 sc, inc) 3 times. (12)
- R7: Sc around. (12)
- R8: Sc around. (12)
- R9: Sc around. (12)
- R10: Rep (3 sc, inc) 3 times. (15)
- R11: Sc around. (15)
- R12: Sc around. (15)
- R13: Sc around. (15)
- R14: Sc around. (15)
- R15: Rep (4 sc, inc) 3 times. (18)
- R16: Sc around. (18)
- R17: Sc around. (18)
- R18: Sc around. (18)
- R19: Sc around. (18)
- R20: Sc around. (18) Fasten off with a sewing tail. Stuff lightly so the tail can rest horizontally behind the body. Leave its base open.
Black Sweetheart Short Tail
- R1: With black, work 6 sc in MR. (6)
- R2: Inc in each stitch. (12)
- R3: Sc around. (12)
- R4: Sc around. (12)
- R5: Sc around. (12)
- R6: Rep (2 sc, dec) 3 times. (9) Fasten off with a sewing tail. Stuff lightly and leave the base open.
Black Rear Hair Panel
- Row 1: With black, ch 13. Starting in the second chain, sc in each chain. Ch 1 and turn. (12)
- Row 2: Sc across. Ch 1 and turn. (12)
- Row 3: Sc across. Ch 1 and turn. (12)
- Row 4: Sc across. Ch 1 and turn. (12)
- Row 5: Sc across. Ch 1 and turn. (12)
- Row 6: Sc across. Ch 1 and turn. (12)
- Row 7: Sc across. Ch 1 and turn. (12)
- Row 8: Sc across. Ch 1 and turn. (12)
- Row 9: Dec, 8 sc, dec. Ch 1 and turn. (10)
- Row 10: Sc across. Ch 1 and turn. (10)
- Row 11: Sc across. Ch 1 and turn. (10)
- Row 12: Dec, 6 sc, dec. Ch 1 and turn. (8)
- Row 13: Sc across. Ch 1 and turn. (8)
- Row 14: Sc across. Ch 1 and turn. (8)
- Row 15: Dec, 4 sc, dec. Ch 1 and turn. (6)
- Row 16: Sc across. (6) Fasten off. The turning chains do not count as stitches. Leave the panel flat and unstuffed; its narrow end will extend down the back of the neck.
Raised White Hair Stripe
- Row 1: With white, ch 28. Starting in the second chain, sc in each chain. Ch 1 and turn. (27)
- Row 2: Sc across. Ch 1 and turn. (27)
- Row 3: Sc across. (27) Fasten off with a long sewing tail. The strip should measure approximately 10 cm long and 1 cm wide.
- Raised edge: with the right side facing, join white in the first stitch of Row 3. Work 1 sc there; rep (ch 3, sl st in the first of those 3 chains, sc in the next 2 strip stitches) 13 times. This uses all 27 strip stitches and produces 13 picots. Fasten off.
- Pin the plain edge diagonally along one side of the black crown, beginning near R4 at the back and ending near R19 at the side of the face. Ease the strip into a gentle curve and sew both long edges down, leaving the picots raised. Place a stripe on the photograph-facing side only.
Stitched Repairs and Facial Details
- Dog head seam: using two strands of black embroidery thread, sew a slightly curved running line down the outer side of the head from R7 to R17, behind the eye. Add 7 short crossbars, each approximately 2 stitches wide, spacing them about 1 round apart.
- Dog body seam: sew a diagonal line from body R11 on one side toward R18 at the upper back. Add 6 uneven crossbars. Keep the surface thread relaxed so it does not cut into the stuffing.
- Dog limb repairs: add one 2 cm seam with 4 crossbars to the outside of one upper arm and another to the outside of one thigh. Use 2 crossing stitches at either end to create the small X marks visible in the reference.
- Dog brows: above each ivory eye, sew one short angled black stitch approximately 2 head rounds long. Position them closer to the inner eye edges without adding a mouth.
- Optional rear patch matching the dark area on the dog’s back: with black yarn, embroider 6 parallel stitches across a 4-stitch-wide area at body R17–19. Anchor the ends inside an attachment seam.
- Bring embroidery tails out beneath a future attachment point, knot securely, and bury them inside. Do not pull thread tightly through the head to sculpt the eyes; the flat eye patches should remain slightly prominent.
Finishing
Finish the faces first. After sewing on the eyes, pin the dog muzzle centrally over head R12–19, allowing its broad upper edge to overlap the bottom inner corners of the eyes slightly. Sew around the entire open base, adding a final pinch of stuffing before closing the last gap. Attach the long muzzle to the sweetheart over head R20–28 in the same way. Keep its upper surface almost level and let the tip angle gently downward. Sew both nose tips securely.
Place each body on a flat surface. Attach the flattened leg tops at body R7–10, one on each side of the front, with about 8 body stitches between their inner attachment edges. For the dog, angle the feet forward and outward. For the sweetheart, fold the flexible upper legs so the feet lie across the front of the base. Tack each leg at its fold with 2 small stitches to hold the bent pose. Sew the dog arms at body R18–20 and the sweetheart arms at R22–24. Let the hands rest beside the feet, securing each hand with a small hidden tack if needed.
Center each head above its neck opening. Pin the body’s 24-stitch neck edge to an oval approximately 8 stitches wide and 5 head rounds deep on the underside of the head. Tilt the dog head slightly upward and the sweetheart head slightly forward so the noses can meet. Sew once around the neck using every body neck stitch, add stuffing through the final gap, and sew a second reinforcing circuit. These are sewn display poses rather than movable neck joints.
Sew the dog’s tail base to the center back over body R7–12, letting the tail touch the surface for support. Sew the sweetheart’s short tail at the lower back over R5–8. Attach the wide edge of the black hair panel to the back of the sweetheart head across R16–18. Tack its side edges to the rear head through R23 and its narrow end to the upper back, covering the gray rear neck. Attach the white stripe after the panel is in place.
Check the figures together before removing all pins. Their noses should meet without forcing either neck forward. Adjust the flexible feet or the tail contact points until both sit securely. Bury every yarn end, check all small attachments with a gentle tug, and smooth the stuffing with your hands. If made for a child, embroider the eyes directly instead of adding separate patches and secure every seam especially carefully.
Tips for Success
- Place a contrasting marker at the center front of the black head before changing to gray. This keeps the muzzle centered while the white stripe curves along the side.
- Feed stuffing into the long muzzle in pea-sized pieces. A dense lump near its tip makes it droop and puts extra strain on the neck.
- Photograph the pinned pair from table height. This makes mismatched nose heights and an overly upright sweetheart head easier to spot.
- Keep the upper halves of the sweetheart legs nearly empty. Their folded pose depends on flexible fabric rather than tightly packed stuffing.
- Sew the white strip down with small white stitches beneath its picots. Pulling across the raised edge will flatten the texture.
Common Mistakes to Avoid
- A round sweetheart head loses the tall silhouette. Preserve all 10 even black rounds from R9 through R18 and distribute filling upward into the crown.
- A muzzle sewn too low leaves a large empty face. Position its upper base just beneath the eyes, with a slight overlap at their inner lower corners.
- Overstuffed legs push the figures backward. Remove filling from the upper legs, refold them, and check the seated pose before tacking the folds.
- Tight repair stitches pucker the gray fabric. Slide a blunt needle under a tight crossbar and ease it outward until the head or body returns to its original shape.
- A neck joined only around the tiny head closure can wobble. Spread the 24-stitch body opening over the larger underside oval and reinforce the full attachment.
Ways to Customize This Pattern
- Use cool silver gray instead of warm gray while keeping the black, ivory, and white accents for the same strong contrast.
- Mirror the white stripe and the dog’s repair seam when arranging the pair to face the opposite direction on a shelf.
- Work the repair embroidery in charcoal for subtler marks, or use doubled black thread for a more pronounced stitched appearance.
- Make a larger display pair with worsted yarn and an appropriately smaller-than-label hook. Swatch first; the stated dimensions apply only to the given gauge.
- Change the pose by tacking the sweetheart’s hands together near the lap and placing the dog’s hands beside its feet. Keep the original limb lengths.
Frequently asked questions
Pin both heads after the legs are attached and set the figures on a flat surface. Tilt the dog head upward and the taller head forward, then move the bodies closer until the nose tips touch. Adjust the neck attachment angle before sewing; do not stretch either muzzle.
The head has a complete gray lower band for straightforward round construction. The black panel covers the rear portion of that band and continues down the neck, creating the dark hair silhouette visible behind the face.
Round safety eyes will change the large pale oval expression. For a closer sewn alternative, embroider ivory ovals approximately 2.2 × 1.6 cm in the same positions. Safety eyes also require installation before the heads are stuffed and closed.
First check that the muzzle is lightly filled and that the head is securely joined over a broad underside area. Spread the folded feet slightly forward and make sure the body base is flat. If necessary, reopen a short section of the neck seam and reduce the forward head tilt.
The finished Gothic Sweethearts Amigurumi Pattern

