Granny Heart Puff Stitch Coaster Crochet Pattern
Beginner Friendly
Perfect for those just starting their crochet journey, with clear instructions and simple techniques
Single-Day Project
A satisfying project you can complete in a single afternoon or evening.
Handmade Gift
A beautiful keepsake — free forever. Read online or print at home.
About This Granny Heart Puff Stitch Coaster Crochet Pattern
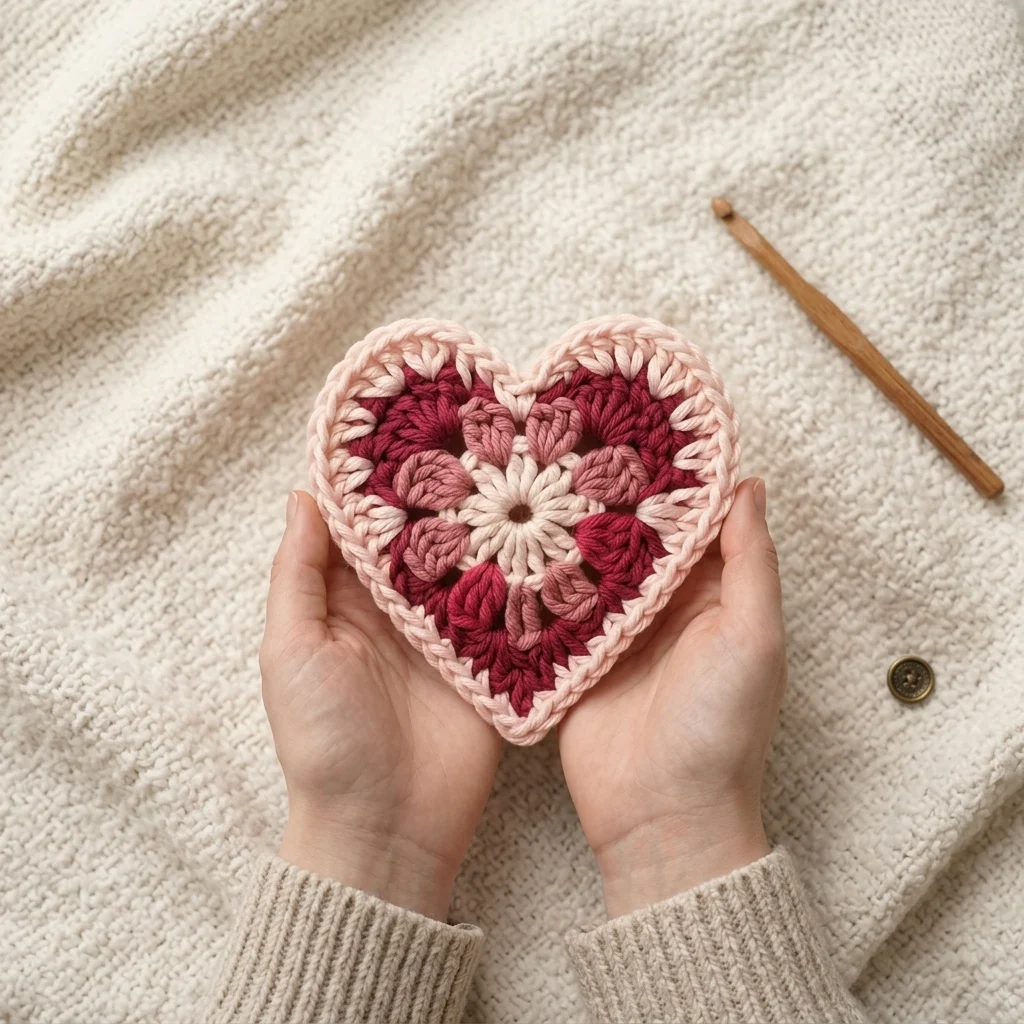
This crochet granny heart pattern builds a solid, puffy heart coaster from the inside out: a small white flower sits at the center, surrounded by a ring of dusty rose puff-stitch petals, then framed by a deep maroon outer round, all shaped into a heart rather than the usual circle or square. A soft blush border finishes the edge and holds the whole heart’s shape crisp.
What makes this design distinctive is the puff stitch construction used for both the petal and outer rounds; instead of flat single or double crochet, each stitch is worked as a small puffed cluster, giving the whole surface a soft, dimensional, almost quilted texture rather than a flat granny square look. Shaping that texture into a heart, with the two increases needed at the top lobes and the single point at the bottom, is what makes this a genuinely advanced small project rather than a beginner granny motif. Expect to spend 3-4 hours for one heart, so a set of coasters can be made in an evening or two.
This is an advanced pattern, best suited to someone comfortable with puff stitches and confident placing asymmetric increases and decreases to build a heart silhouette from a central motif, rather than someone making their first granny motif.
Materials
- Worsted weight yarn, white/cream ~5g, flower center
- Worsted weight yarn, dusty rose ~15g, petal round
- Worsted weight yarn, deep maroon/wine ~15g, outer round
- Worsted weight yarn, blush pink ~10g, border
- Crochet hook 4 mm (US G/6)
- Tapestry/yarn needle
- Steam iron and pressing cloth, or blocking mat and pins
- Sharp scissors
Abbreviations
chchainsl stslip stitchscsingle crochethdchalf double crochetdcdouble crochetpuff(yo, insert hook, pull up a loop) 3 times in same st, yo and pull through all 7 loopsMRmagic ringch-spchain spacest(s)stitch(es)reprepeatFOfasten offFlower Center
- With white, ch 2. Round 1: 10 sc in 2nd ch from hook, do not join, work in a continuous spiral. (10 sts)
- Round 2 (petals): *ch 3, sl st in same st, sl st in next st; rep from * around all 10 sts to form 10 small petals.
- Sl st to close, FO leaving a short tail.
Puff Petal Round
- Join dusty rose behind the flower petals, in a base st between two petals. Round 3: *ch 1, puff in same base st, ch 1, sl st in next base st; rep from * around all 10 sts to form 10 puffed petals framing the flower.
- FO leaving a short tail.
Heart Shaping Round
- Join maroon at the base point that will sit at the top center dip of the heart, between two puff petals. Round 4: work evenly around in puff stitch, *puff in next base st, ch 1; rep from * around, but at the two points directly above where the heart’s top two lobes will form, work 2 puffs into the same base st instead of 1, to begin building the rounded top lobes.
- Round 5: continue in puff stitch around, repeating the double-puff increase at the same two top-lobe points as Round 4, directly above the increases from the round before, to keep building the 2 rounded lobes.
- At the single base point that will become the bottom point of the heart, skip any increases through this section, and instead skip a puff every other stitch through 2-3 sts to taper the shape to a point.
- FO leaving a short tail. Weave in ends from the flower and petal rounds now, before the border, since they’ll be harder to reach afterward.
Border
- Join blush pink at the top center dip. Round 6: ch 1, sc evenly around the entire heart shape, working 3 sc at each of the 2 top-lobe peaks to keep them rounded, and working a single sc decrease at the very bottom point to keep it sharp.
- Round 7: ch 1, sc in each st around, repeating the same shaping adjustments at the top lobes and bottom point as Round 6.
- Join with sl st to first st, FO leaving a short tail for a hanging loop if desired. Weave in all remaining ends.
Finishing
Steam-block the finished heart face-down on a towel, pinning the two top lobes into full, even curves and pinning the bottom point out to a crisp, centered tip. Let it dry completely flat before using as a coaster or attaching a small loop for hanging as an ornament.
Tips for Success
- Keep puff stitch height consistent across all rounds; uneven puffs are especially visible on a small motif like this.
- Mark the two top-lobe increase points clearly before starting Round 4, so both lobes build up symmetrically.
- Work the bottom point’s decrease section gradually over 2-3 sts rather than dropping stitches abruptly, for a smooth taper rather than a blunt point.
- Block firmly with pins holding both lobes and the point in place; puff stitch fabric needs blocking to show its shape clearly.
- Weave in center and petal round tails before starting the border round, since they become much harder to access once the border is worked.
Common Mistakes to Avoid
- Placing the top-lobe increases at mismatched points on each side makes the heart lopsided. Fix: mark both increase points before starting and check they sit at truly opposite positions.
- Working the bottom point decrease all at once instead of gradually leaves a blunt, awkward tip. Fix: spread the decrease over 2-3 sts as instructed.
- Skipping blocking leaves the heart shape looking soft and undefined rather than crisp. Fix: block firmly with pins at both lobes and the point.
- Working puffs too tightly closed loses the soft, dimensional texture. Fix: keep a slightly looser tension on the final yarn-over pull-through of each puff.
- Losing count during the two petal rounds is easy since they use similar repeats. Fix: count sts after each round before moving to the next layer.
Ways to Customize This Pattern
- Scale up the yarn weight and hook size for a larger heart suited to a small pillow or hot pad.
- Swap the maroon and dusty rose for two shades of blue for a non-Valentine’s color palette.
- Add a small ribbon loop at the top center dip for hanging as an ornament.
- Make a set of 4-6 in slightly different color combinations for a coordinated coaster set.
- Stuff the heart lightly with a backing piece for a small padded sachet instead of a flat coaster.
Frequently asked questions
Lay your Round 3 flower flat and pick two base points, roughly opposite each other near what will be the top edge, to mark as the lobe centers. Use removable stitch markers so you can find the same points again in Round 5.
Yes. Switch to a bulkier yarn and larger hook, keeping the same stitch counts and round structure; the heart scales proportionally larger without needing pattern changes.
This usually means the two top-lobe increases weren’t placed at matching points, or one side got more increases than the other. Recount stitches on each side of the top center dip to confirm they match.
Worsted weight gives the puffy, dimensional texture shown in the photo. A thinner yarn will still work but will produce a flatter, less pronounced puff texture.
The finished Granny Heart Puff Stitch Coaster Crochet Pattern

