Beginner Friendly
Perfect for those just starting their crochet journey, with clear instructions and simple techniques
Single-Day Project
A satisfying project you can complete in a single afternoon or evening.
Handmade Gift
A beautiful keepsake — free forever. Read online or print at home.
About This Granny Square Dog Coat
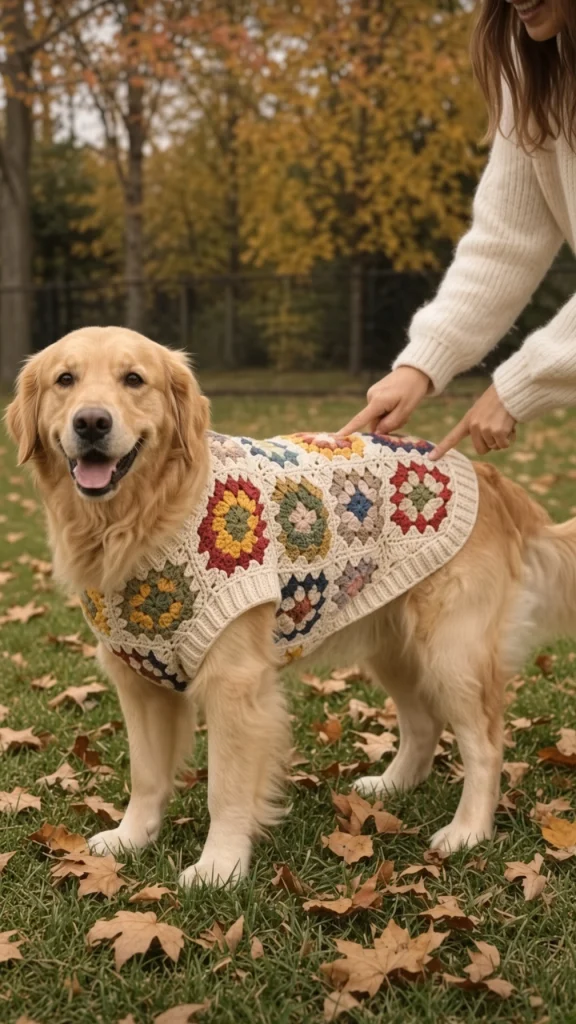
This crochet dog sweater pattern turns twelve granny squares into a coat that lies flat along the dog’s back, wraps down both sides, and fastens with a ribbed chest band underneath. The squares are cream with a small jewel-tone flower at the center of each — red, gold, olive, dusty blue, navy and blush — so no two adjacent squares match and the whole coat reads as a scrap-yarn project done deliberately rather than by accident.
The construction is a rectangle of squares with a shaped neck opening, ribbed borders worked directly onto the panel, and a separate chest band that buttons rather than ties. A tie works loose within an hour of a walk; buttons with a two-position placket let you adjust the fit as the dog’s winter coat thickens and do not come undone when they roll in the grass. The leg openings are shaped into the panel rather than cut, so there are no raw edges anywhere.
Written for three sizes: small (40 cm back), medium (53 cm), large (66 cm). The large uses twelve squares as shown; small uses six and medium eight. Plan on 14 to 18 hours for the large. It is advanced work because of the neck shaping and because getting a dog coat to actually fit takes measuring and adjusting rather than following numbers blindly — but the squares themselves are the easiest part of the project and make good travel work.
Materials
- Worsted weight wool blend in cream approx. 450 m (about 250 g) for large — squares, borders, chest band
- Small amounts of worsted weight in red, mustard gold, olive, dusty blue, navy and blush about 12 m of each
- 4.5 mm crochet hook US 7
- 4 mm hook for the ribbed borders, so they pull in
- 2 buttons, 25 mm flat, with no shank that could catch
- Tapestry needle blunt tip
- Stitch markers 6-8
- Rustproof pins 20+
- Blocking mat or towel-covered board
- Soft measuring tape for measuring the dog, not the work
- Small sharp scissors
Abbreviations
begbeginningBLOback loop onlychchaindcdouble crochetdc2togdouble crochet 2 stitches togetherhdchalf double crochetMRmagic ringreprepeatrnd(s)round(s)RSright sidescsingle crochetskskipsl stslip stitchsp(s)space(s)st(s)stitch(es)Sizing and gauge
- Gauge: one granny square measures 11 cm across after blocking. Ribbing: 16 sts and 14 rows = 10 cm.
- Small: 6 squares (2 wide x 3 long), fits 38-42 cm back length, 40-50 cm chest.
- Medium: 8 squares (2 wide x 4 long), fits 50-56 cm back length, 55-65 cm chest.
- Large: 12 squares (3 wide x 4 long), fits 63-70 cm back length, 70-85 cm chest.
- All instructions use US crochet terminology. Figures given as small (medium, large).
- The coat should cover the back from the base of the neck to just before the tail, and reach about two-thirds of the way down each side. It should never extend past the base of the tail or cover the belly, where it will get soiled.
Granny square (make 6 (8, 12))
- Rnd 1: With a jewel-tone color, MR, ch 3 (counts as dc), 11 dc in ring, pull ring closed, sl st to top of beg ch-3. (12 dc)
- Rnd 2: Ch 1, *(sc, ch 2, sc) in next dc, sl st in next dc; rep from * 5 more times, sl st to first sc. (6 small petals) Fasten off the jewel tone.
- Rnd 3: Join cream with a sl st in any sl st behind a petal. Ch 3, 2 dc in the same st, ch 2, *3 dc in next sl st, ch 2; rep from * around, sl st to top of beg ch-3. (6 groups of 3 dc, 6 ch-2 sps) Work behind the petals so they stay standing forward.
- Rnd 4 (square the round): Sl st in next 2 dc and into the first ch-2 sp, ch 3, (2 dc, ch 3, 3 dc) in same sp — first corner. *Ch 1, 3 dc in next ch-2 sp, ch 1, (3 dc, ch 3, 3 dc) in next ch-2 sp; rep from * once more, ch 1, 3 dc in next ch-2 sp, ch 1, sl st to top of beg ch-3. (Wait — count: 4 corners and 2 side groups. Rework as:) Sl st into first ch-2 sp, ch 3, (2 dc, ch 3, 3 dc) in same sp, ch 1, 3 dc in next sp, ch 1, (3 dc, ch 3, 3 dc) in next sp, ch 1, 3 dc in next sp, ch 1, (3 dc, ch 3, 3 dc) in next sp, ch 1, 3 dc in next sp, ch 1, (3 dc, ch 3, 3 dc) in next sp… this uses 7 sps of 6. Instead, work Rnd 4 as follows: (3 dc, ch 3, 3 dc) in each of 4 alternating ch-2 sps for the corners, and 3 dc in each of the 2 remaining sps, adding one extra 3-dc group into the 3-dc group of Rnd 3 between corners so each side has 1 side group. (36 dc, 4 corner ch-3 sps, 4 ch-1 sps)
- Rnd 5: Sl st in next 2 dc and into corner ch-3 sp, ch 3, (2 dc, ch 3, 3 dc) in same sp, *[ch 1, 3 dc in next ch-1 sp] twice, ch 1, (3 dc, ch 3, 3 dc) in next corner sp; rep from * twice more, [ch 1, 3 dc in next ch-1 sp] twice, ch 1, sl st to top of beg ch-3. (60 dc; 2 side groups per side)
- Rnd 6: Work as Rnd 5, with 3 side groups per side. (84 dc)
- Rnd 7 (edge round): Sl st in next 2 dc and into corner sp, ch 1, (2 sc, ch 2, 2 sc) in same sp, *sc in each dc and 1 sc in each ch-1 sp across to the next corner, (2 sc, ch 2, 2 sc) in corner sp; rep from * around, sl st to first sc. (33 sc per side between corner sps, 4 corner ch-2 sps)
- Fasten off, leaving a 40 cm tail for joining. The square should measure 11 cm, blocked.
- Make 6 (8, 12) squares, rotating the six jewel tones so you have roughly equal numbers of each and no color appears more than twice.
Joining the squares
- Block all squares to exactly 11 cm before joining. Squares that differ by even 3 mm will skew the panel, and a skewed dog coat sits crooked on the dog.
- Lay the squares out in a grid: 2 wide x 3 long (2 x 4, 3 x 4). Arrange the jewel tones so no two of the same color touch, either side by side or diagonally.
- With cream and a tapestry needle, join adjacent squares with a flat whip stitch through the back loops of the 33 sc along each touching edge, catching both corner ch-2 spaces at each end.
- Join all the vertical seams first, then all the horizontal seams. Working in that order keeps the grid square instead of letting it walk diagonally.
- Keep seams loose enough to have the same give as the fabric. A dog coat flexes constantly with movement, and tight seams are where it will eventually split.
- The joined panel should measure 22 x 33 cm (22 x 44, 33 x 44).
Neck shaping
- The neck opening is shaped into one short end of the panel. Lay the panel with that end at the top.
- Row 1 (RS): Join cream with a sl st at the top left corner. Ch 1, sc in each st across the top edge. Turn. (66 sc (66, 99))
- Row 2: Ch 1, sc in first 22 (22, 33) sc, turn — leave the remaining sts unworked. This is the left neck edge. (22 sc (22, 33))
- Rows 3-6: Ch 1, sc across to the last 2 sc, sc2tog. Turn. (Row 3: 21 (21, 32). Row 4: 20 (20, 31). Row 5: 19 (19, 30). Row 6: 18 (18, 29)) Fasten off.
- Right neck edge: rejoin cream 22 (22, 33) sts from the right edge of Row 1 and work Rows 2 to 6 as a mirror image, placing the dc2tog at the beginning of each row instead of the end.
- The center 22 (22, 33) sts of Row 1 remain unworked — this is the base of the neck opening, which sits across the top of the dog’s shoulders.
- Check the fit here before continuing. The neck opening should be roughly 4 cm larger than the dog’s measured neck circumference once the ribbing is added.
Leg openings
- The leg openings sit on the two long edges, 8 cm down from the neck end, and are shaped as notches rather than holes.
- Mark a 10 cm (11 cm, 13 cm) section on each long edge, starting 8 cm from the neck end.
- Row 1: Join cream at the start of the marked section. Ch 1, sc across the marked section only. Turn. (15 sc (17, 20))
- Rows 2-4: Ch 1, sc2tog, sc across to the last 2 sc, sc2tog. Turn. (Row 2: 13 (15, 18). Row 3: 11 (13, 16). Row 4: 9 (11, 14))
- Fasten off. Repeat on the opposite long edge at the same distance from the neck end.
- The notch lets the coat sit around the front legs without binding. Check it against the dog by laying the panel over the back — the notch should fall just behind each shoulder.
Ribbed borders
- All ribbing is worked with the 4 mm hook in BLO sc, which produces a stretchy rib that holds its shape.
- Neck ribbing, Row 1: With the 4 mm hook, join cream at one neck corner. Ch 9, sc in the 2nd ch from hook and in each ch across, sl st into the next 2 sts of the neck edge. Turn. (8 sc)
- Neck ribbing, Row 2: Sk the 2 sl st, sc in BLO of each sc across. Turn. (8 sc)
- Neck ribbing, Row 3: Ch 1, sc in BLO of each sc across, sl st into the next 2 sts of the neck edge. Turn. (8 sc)
- Rep Rows 2 and 3 all the way around the neck opening, ending with a sl st join to the first row. Fasten off.
- Outer border: work the same BLO rib all the way around the remaining edges of the panel — both long sides, the tail end, and around each leg notch — attaching every second row with 2 sl st into the panel edge. Use a 6-st rib for the leg notches and an 8-st rib elsewhere.
- At each corner, work 2 extra sl st into the panel without a rib row so the rib turns the corner without flaring.
- Fasten off and weave in all ends.
Chest band
- The band wraps under the dog’s chest and buttons to the opposite side of the coat. Its length is set by your dog’s chest measurement, not by a fixed number.
- Row 1: With the 4 mm hook, join cream to one long edge of the panel, 12 cm (14, 16) back from the neck end. Ch 13, sc in the 2nd ch from hook and in each ch across. Turn. (12 sc)
- Row 2: Ch 1, sc in BLO of each sc across. Turn. (12 sc)
- Rows 3 onward: Rep Row 2 until the band measures half the dog’s chest girth minus the panel width, plus 5 cm of overlap. For a 75 cm chest with a 33 cm panel, that is about 25 cm of band.
- Buttonhole row: Ch 1, sc in BLO of first 3 sc, ch 4, sk next 4 sc, sc in BLO of last 5 sc. Turn. (8 sc, 1 ch-4 sp)
- Next row: Ch 1, sc in BLO of first 5 sc, 4 sc in the ch-4 sp, sc in BLO of last 3 sc. Turn. (12 sc)
- Work 6 more rows in BLO rib, then work a second buttonhole row and its closing row. Two buttonholes 3 cm apart give you an adjustable fit for a summer and winter coat.
- Work 2 more rib rows, then fasten off and weave in.
- Sew the two buttons to the opposite long edge of the panel, positioned so the band pulls snug without compressing the dog’s chest. You should be able to slide two fingers flat between the band and the dog.
Finishing
Block the finished coat flat, gently. Mist it with water rather than soaking, pin the panel square, and let the ribbing stay unstretched — ribbing pinned out flat loses the elasticity that holds the coat on the dog. Pin the four corners and the outer edges only, and leave the rib sections to settle naturally.
Fit the coat on the dog before the first outing and watch how it moves. Walk the dog a few steps in it indoors. The neck should not ride up into the throat, the leg notches should not rub at the armpit, and the tail end should stop short of the tail base. Adjust the button position rather than reworking the coat — almost every fit problem is solved by moving a button 2 cm.
Check the buttons regularly. A button that works loose on a dog coat becomes a choking hazard, so sew them on with doubled yarn, reinforce the back with a small square of felt, and check them every few wears.
Hand wash in cool water with a wool-safe detergent, squeeze out in a towel, and dry flat. Wool blend will felt and shrink in a machine, and a felted dog coat cannot be stretched back to size.
Tips for Success
- Measure the dog, not the pattern. Breed and size charts are approximations — two dogs of the same breed can differ by 8 cm in chest girth, which is the difference between a coat that fits and one that slides sideways.
- Block all the squares together on one mat before joining. A panel made of squares that vary in size will never sit straight on a moving animal.
- Use wool or a wool blend rather than cotton. Cotton has no memory, so a cotton dog coat stretches out within a few wears and hangs off the dog instead of hugging the back.
- Work the ribbing with the smaller hook. A rib worked at the same gauge as the body has no grip, and the coat will rotate around the dog as it walks.
- Do a walking fit test before weaving in the final ends. Problems only show up once the dog moves, and leaving the ends loose means you can still adjust the seams.
Common Mistakes to Avoid
- Making the coat too long. If it covers the base of the tail it will get soiled every time the dog relieves itself, and most dogs resist wearing it after that happens once. Stop 3 cm short of the tail base.
- A chest band that is too tight. It should not compress the ribcage — two fingers should slide flat underneath. A tight band restricts breathing during exercise, which is exactly when the dog needs it least.
- Leg notches placed too far back. They must sit just behind the shoulder, not at the middle of the body. Too far back and the coat pulls against the front legs with every stride and the dog will refuse to walk in it.
- Using a shanked or domed button. Anything that protrudes can catch on a collar, a fence, or the dog’s own teeth. Flat buttons only, sewn tight against the fabric.
- Joining squares tightly. The coat flexes constantly with the dog’s movement, and rigid seams concentrate that stress at one line. They will split, usually across the back where it shows.
Ways to Customize This Pattern
- Add a reflective yarn strand held alongside the cream in the outer border round for visibility on winter walks.
- Work a small buttonhole slit at the center back, 10 cm from the neck end, to pass a harness clip through without removing the coat.
- Line the coat with a lightweight fleece panel cut to shape and slip stitched to the wrong side, for a much warmer version suited to short-coated breeds.
- Work all twelve squares in one jewel tone with cream centers for a coat that reads as a single designed piece rather than a scrap project.
- Replace the buttons with two lengths of sturdy hook-and-loop tape sewn to the band and panel, which is faster to fasten on a wriggling dog but wears out sooner and collects fur.
Frequently asked questions
Stand the dog squarely on all four legs. Back length runs from the bony bump at the base of the neck to the base of the tail, following the spine. Chest girth is measured around the widest part of the ribcage, just behind the front legs, with the tape snug but not tight. Neck is measured where a collar sits. Write all three down before choosing a size — measuring a dog lying down gives numbers several centimeters off.
Go by the back length and make the smaller size, then lengthen the chest band. A coat that is slightly short on the back still works; one that is too long will sit over the tail and get soiled. The band is the adjustable part of this design, which is exactly why it buttons rather than being sewn to a fixed length.
You can, but it will not perform as well. Cotton has no elasticity, so the ribbing loses its grip and the coat slides sideways on the dog within a few wears, and wet cotton holds cold water against the animal. If you want a washable option, a superwash wool or a wool-acrylic blend keeps the stretch and warmth while surviving more frequent washing.
Most dogs accept a coat if it fits properly and goes on calmly. The two things that cause refusal are binding at the armpits and a coat that shifts as they walk. If your dog freezes or tries to back out of it, check the leg notches first — that is the cause nine times out of ten, not the coat itself.
For a short walk in cool weather on a dog with a decent undercoat, yes. Crochet fabric is more open than knitted or woven fabric, so it is not windproof and it is not waterproof. For genuinely cold or wet conditions, or for a thin-coated breed, add the fleece lining mentioned in the customization section or treat this as a layer under a waterproof shell rather than as a coat on its own.
The finished Granny Square Dog Coat

