Harbor Stripe Crochet Bedspread Pattern
Beginner Friendly
Perfect for those just starting their crochet journey, with clear instructions and simple techniques
Single-Day Project
A satisfying project you can complete in a single afternoon or evening.
Handmade Gift
A beautiful keepsake — free forever. Read online or print at home.
About This Harbor Stripe Crochet Bedspread Pattern
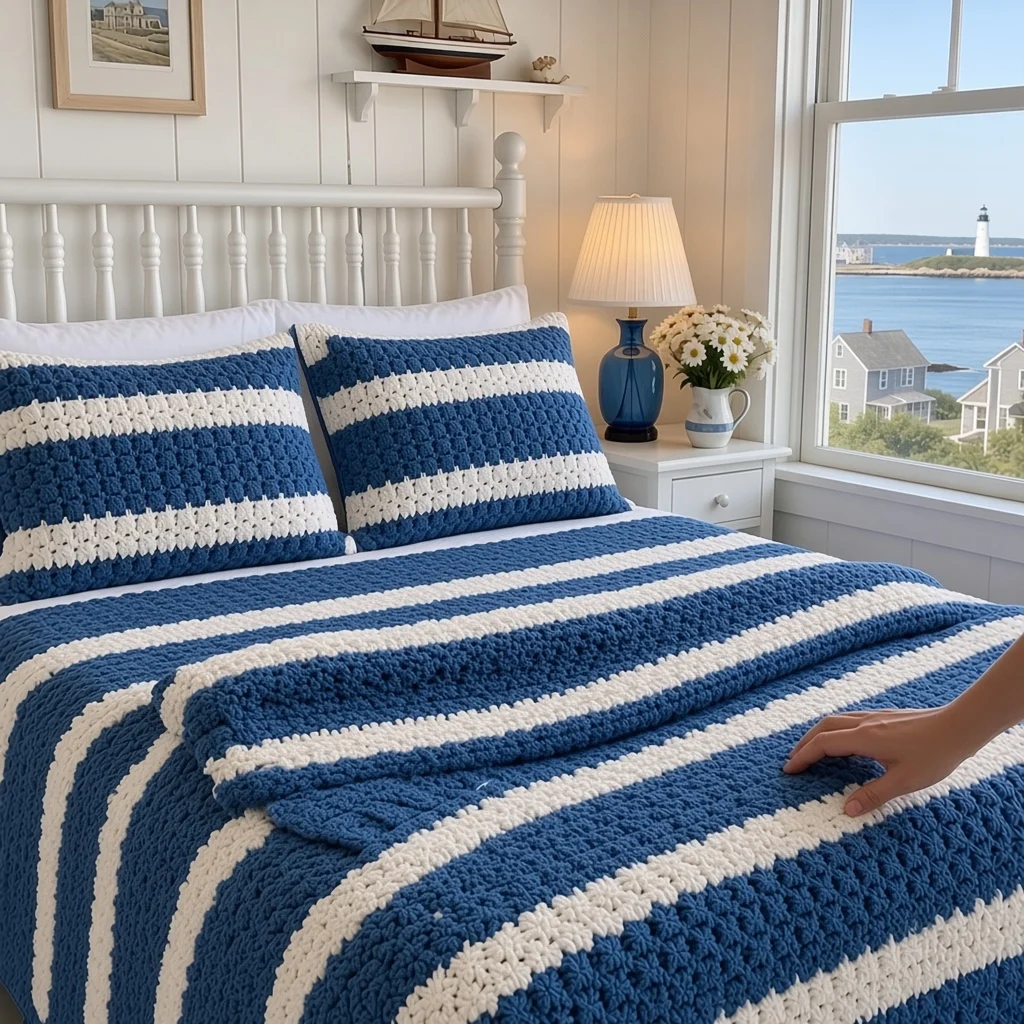
This striped crochet blanket pattern pairs wide bands of denim blue with narrow cream stripes, all worked in suzette stitch. Each stitch is a single crochet and double crochet worked together in one stitch, which gives the fabric a crunchy, nubbly texture that hides small tension changes and looks good from both sides. The colors are simple, but the texture gives the bedspread real depth, and the stripes give it a fresh, coastal look.
The bedspread is worked flat in rows from the foot of the bed to the head, carrying the unused color up the side so you have only a handful of ends to weave in. A three-round border in blue and cream covers the carried strands and finishes the edges neatly. The set is completed with two standard pillow covers that use the same stripes, and each has an overlapping envelope back so the pillows slide in and out easily for washing.
Expect 90 to 110 hours for the bedspread and both pillow covers. The stitch pattern is a single repeated row, so it is relaxing to work once it is established, but this full-size bedspread with color changes, carried yarn and pieced pillow covers is a project for an experienced crocheter. It is a good choice if you want a large, finished piece without complicated charts or motifs.
Materials
- Worsted weight (#4) yarn, color A, denim blue about 5,000 m / 5,470 yd (roughly 28 skeins of 100 g / 180 m)
- Worsted weight (#4) yarn, color B, cream about 1,450 m / 1,585 yd (roughly 9 skeins of 100 g / 180 m)
- 5 mm (H-8) crochet hook
- 5.5 mm (I-9) crochet hook for the foundation chains
- 2 pillow inserts 50 x 70 cm (20 x 28 in)
- Stitch markers at least 10, for counting the foundation chain
- Tapestry needle
- Blocking mats and a spray bottle
Abbreviations
A / Bcolor A (blue) / color B (cream)chchainsl stslip stitchscsingle crochetdcdouble crochet(sc, dc)suzette group: 1 sc and 1 dc worked into the same stitchrev screverse single crochet (crab stitch)skskipst(s)stitch(es)RS / WSright side / wrong sideBedspread Body
- With A and the 5.5 mm hook, ch 322. Change to the 5 mm hook.
- Row 1 (RS): (Sc, dc) in 2nd ch from hook, *sk next ch, (sc, dc) in next ch* until 2 ch remain, sk next ch, sc in last ch. Turn. (160 groups plus 1 sc: 321 sts)
- Row 2: Ch 1 (does not count), (sc, dc) in first sc, *sk next dc, (sc, dc) in next sc* until 2 sts remain, sk next dc, sc in last sc. Turn. (321 sts)
- Repeat Row 2 for every remaining row. Count your stitches at the end of each row for the first ten rows, then every few rows after that.
- Stripe sequence: Rows 1-16 in A. Then *6 rows in B, then 16 rows in A* 14 times. (324 rows in total, ending with a blue stripe)
- To change color, work the last yo of the final sc of the old color with the new color, then turn and continue. Every stripe has an even number of rows, so the change always happens at the same edge.
- Do not cut the color you are not using. Carry it loosely up the side edge, and catch it under the working yarn at the start of every second row so it lies flat. Fasten off both colors when you finish Row 324.
- Block to about 200 x 231 cm (79 x 91 in), pinning the side edges straight.
Border
- Rnd 1: With the RS facing and A, join yarn in the first st of the last row. Ch 1, 3 sc in same st, sc in each st across to the last st, 3 sc in last st. Along the side edge, work 9 sc for every 8 rows, working over the carried strands to hide them. Continue the same way along the foundation edge (1 sc in each ch) and the second side, with 3 sc in each corner. Sl st to first sc. Fasten off A.
- Rnd 2: Join B in the center sc of any corner. Ch 1, 3 sc in same st. Sc in each st around, with 3 sc in the center sc of each corner. Sl st to first sc. Fasten off B.
- Rnd 3: Join A in any st. Ch 1, rev sc in each st around, sl st to first st. Fasten off and weave in ends.
Pillow Front (make 2)
- With A and the 5.5 mm hook, ch 112. Change to the 5 mm hook.
- Row 1 (RS): (Sc, dc) in 2nd ch from hook, *sk next ch, (sc, dc) in next ch* until 2 ch remain, sk next ch, sc in last ch. Turn. (55 groups plus 1 sc: 111 sts)
- Row 2: Work as Bedspread Row 2, and repeat it for every remaining row.
- Stripe sequence: 10 rows A, 6 rows B, 16 rows A, 6 rows B, 16 rows A, 6 rows B, 10 rows A. (70 rows in total) Carry the yarn up the side edge as for the bedspread.
- Fasten off and block to 70 x 50 cm (28 x 20 in).
Pillow Back Pieces (make 4: 2 per pillow)
- With A and the 5.5 mm hook, ch 112. Change to the 5 mm hook.
- Work Pillow Front Rows 1-2, then repeat Row 2 until you have 42 rows. (111 sts) The piece should measure about 30 cm.
- Band rows: Ch 1, sc in each st across. Turn. (111 sc) Work 2 more band rows the same way, for 3 band rows in total. The band keeps the opening edge firm and stops it stretching.
- Fasten off and block to 70 x 32 cm. Make the second back piece the same way.
Pillow Assembly (make 2)
- Lay one front RS down. Place one back piece on top, RS up, lined up with the top edge of the front and with its band toward the center.
- Place the second back piece on top, RS up, lined up with the bottom edge of the front. Its band overlaps the first back piece by about 14 cm. Pin all three layers together around the edges.
- With A, join yarn at a corner through all layers. Ch 1, then sc around all four sides through every layer. Work 1 sc in each st along the top and bottom edges, 9 sc for every 8 rows along the sides, and 3 sc in each corner. Sl st to first sc.
- Fasten off, weave in ends, and slide the insert in through the envelope opening.
Finishing
When the border is done, lay the bedspread flat and check the side edges. The carried strands should be completely hidden inside the first border round, with no loops showing. Weave in the few remaining ends along a stripe of the same color, so they disappear into the texture. Mist the bedspread lightly and pat the stripes straight across the width.
Wash the bedspread and covers in cool water on a gentle cycle, and dry them flat or on low heat if your yarn label allows. Wash a scrap of blue and cream together before you start, to make sure the blue does not bleed into the cream stripes.
Tips for Success
- Suzette stitch makes it easy to lose or gain a stitch at the row ends. Always work the last sc into the final sc of the row below, never into the turning chain.
- Keep the carried yarn loose by spreading the last few stitches of the row before you catch it. If it is too tight, the side edge will pucker and the border will not lie flat.
- Change colors on the final yo of the previous row’s last stitch. This keeps the stripe lines clean, without a stray loop of the old color.
- Wind your cream into center-pull balls before you start, so you can carry it neatly without it rolling away during the long blue stripes.
- Measure the width every 30 rows. A blanket this wide shows even a small change in tension, and catching it early saves a lot of ripping back.
Common Mistakes to Avoid
- A blanket that narrows: you are skipping the last sc at the row ends. Count the stitches, place a marker in the last sc of each row, and make sure you finish into it.
- A foundation edge that pulls in: the chain was too tight. Make the chain with a larger hook, or replace it with a foundation sc row.
- Wavy side edges: the carried yarn is too tight, or not caught often enough. Catch it every second row and keep it relaxed.
- Stripes that slope: the dc in each group is drifting into different stitches. Make sure every (sc, dc) group goes into a single sc, skipping only the dc.
- Pillow covers that gape: the back pieces do not overlap enough. Keep the 3 sc band rows, and make sure the pieces overlap by at least 12 cm.
Ways to Customize This Pattern
- Change the colors to sage and cream, red and white, or charcoal and oatmeal.
- Change the stripe widths: thin 4-row cream stripes look crisper, and equal 10-row stripes look bolder.
- Make a throw: ch 162 for about 100 cm wide and work 8 stripe repeats for about 125 cm long.
- Add a third color as a 2-row accent stripe between the blue and cream, such as a pale sky blue.
- Add tassels or fringe to the foot edge for a softer, more decorative finish.
Frequently asked questions
Chain any even number of stitches. At this gauge, each 10 cm of width needs about 16 chains. For example, ch 242 for about 150 cm wide, or ch 352 for about 220 cm wide. The stitch pattern works on any even foundation chain.
Almost. Suzette stitch looks very similar on both sides, so the texture is good on either face. The only difference is the color changes, which are slightly cleaner on the right side.
No. The first border round is worked over the carried strands, so they are wrapped inside the single crochet. Catching the strands every second row also keeps them from forming loops.
About 12 to 15 minutes for a full 321-stitch bedspread row, once the rhythm is established. Working around two rows a day gives you a finished bedspread body in about five months.
The finished Harbor Stripe Crochet Bedspread Pattern

