Harvest Flower & Succulent Table Runner
Beginner Friendly
Perfect for those just starting their crochet journey, with clear instructions and simple techniques
Single-Day Project
A satisfying project you can complete in a single afternoon or evening.
Handmade Gift
A beautiful keepsake — free forever. Read online or print at home.
About This Harvest Flower & Succulent Table Runner
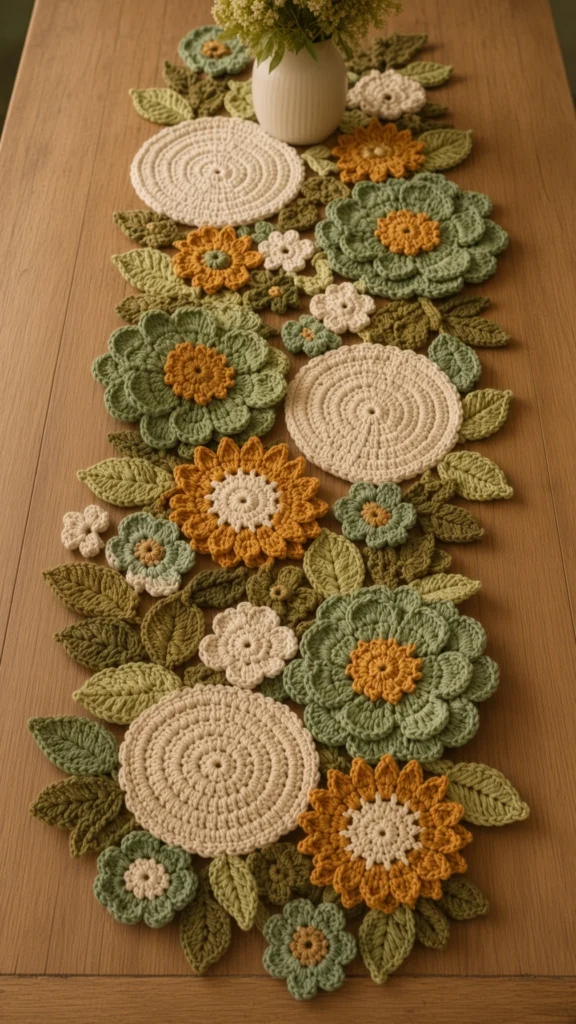
This crochet flower table runner pattern builds a full harvest centerpiece out of thirty-nine separate motifs instead of one long worked-in-rows panel. Three cream medallions anchor the length, four sunflowers and three big layered sage blooms sit between them, and succulent rosettes, leaves and small cream flowers fill every gap. Nothing is worked into a mesh base, so the finished runner has an irregular flower-bed edge rather than a rectangle outline.
The technical heart of this design is the front-loop tier method. The sage blooms and the succulents are worked as a flat disc where several rounds are made in back loop only, leaving a ring of free front loops behind. Petals are then worked into those free loops from the outside in, so each tier sits above the one below and the flower gains real depth without any stuffing. The sunflower uses the same idea on a single round: short petals out of the front loops, long petals out of the back loops of the same round.
Expect 16 to 20 hours spread over a week or two. Individual motifs are quick — a leaf takes about ten minutes, a succulent about twenty — but there are a lot of them, and blocking and assembly are a solid evening on their own. This suits an experienced crocheter who is comfortable with magic rings, tall stitches worked into a single stitch, and back-loop work, and who does not mind a long finishing session.
Materials
- Sage green DK cotton approx. 250 g — blooms, succulents, lighter leaves
- Forest green DK cotton approx. 150 g — darker leaves and succulent bases
- Cream / beige DK cotton approx. 150 g — medallions, sunflower centres, small flowers
- Mustard yellow DK cotton approx. 100 g — sunflower petals and bloom centres
- 4.0 mm crochet hook a size below the ball band, for firm flat motifs
- Tapestry needle blunt, large eye
- Stitch markers at least 4, for spiral rounds
- Rust-proof pins and a blocking mat or towel essential, not optional, for a flat runner
- Sewing thread matching each yarn colour for invisible motif joins
- Optional: 110 x 28 cm piece of sheer cotton voile or fine netting backing for a runner that will be used daily
- Scissors and a paper template or measuring tape to mark the 120 x 35 cm layout
Abbreviations
MRmagic ringchchainst(s)stitch(es)sl stslip stitchscsingle crochethdchalf double crochetdcdouble crochettrtreble crochetincincrease — 2 stitches in the same stitchFLOfront loop onlyBLOback loop onlyreprepeatskskipCream Medallion (make 3)
- With cream, work in continuous spiral rounds. Mark the first stitch of every round. R1: 8 hdc in MR. (8)
- R2: 2 hdc in each st around. (16)
- R3: (hdc in next st, 2 hdc in next st) rep 8 times. (24)
- R4: (hdc in next 2 sts, 2 hdc in next st) rep 8 times. (32)
- R5: (hdc in next 3 sts, 2 hdc in next st) rep 8 times. (40)
- R6: (hdc in next 4 sts, 2 hdc in next st) rep 8 times. (48)
- R7: (hdc in next 5 sts, 2 hdc in next st) rep 8 times. (56)
- R8: (hdc in next 6 sts, 2 hdc in next st) rep 8 times. (64)
- R9: (hdc in next 7 sts, 2 hdc in next st) rep 8 times. (72)
- R10: (hdc in next 8 sts, 2 hdc in next st) rep 8 times. (80)
- R11: (hdc in next 9 sts, 2 hdc in next st) rep 8 times. (88)
- R12: (hdc in next 10 sts, 2 hdc in next st) rep 8 times. (96)
- R13: sc in BLO of each st around, sl st to the first sc. (96) This back-loop round pulls a soft raised rim around the edge and stops the medallion cupping.
- Fasten off, leaving a 40 cm tail for sewing. Finished medallion: about 16 cm across after blocking.
Sunflower (make 4)
- With cream, work in continuous spiral rounds. R1: 12 sc in MR. (12)
- R2: 2 sc in each st around. (24)
- R3: (sc in next st, 2 sc in next st) rep 12 times, sl st to the first st of the round. (36) Fasten off cream.
- Front petal tier — join mustard in the FLO of any stitch of R3. Working in front loops only: (ch 2, 3 dc in next FLO, ch 2, sl st in next FLO, sl st in next FLO) rep 12 times, ending with a sl st in the joining stitch. This uses 3 front loops per repeat, all 36. You now have 12 short petals standing up from the centre. Fasten off.
- Back petal tier — turn the flower over and join mustard in any remaining BLO of R3. Working in back loops only: (sk 1 BLO, work hdc, dc, tr, tr, dc, hdc all in next BLO, sk 1 BLO, sl st in next BLO) rep 9 times. This uses 4 back loops per repeat, all 36. You now have 9 long pointed petals fanning out behind the short ones.
- Fasten off, leaving a 30 cm tail. Push the long petals outward and the short petals inward before blocking. Finished sunflower: about 11 cm across.
Layered Sage Bloom (make 3)
- With sage green, work in continuous spiral rounds. R1: 6 sc in MR. (6)
- R2: 2 sc in each st around. (12)
- R3: (sc in next st, 2 sc in next st) rep 6 times. (18)
- R4: (sc in next 2 sts, 2 sc in next st) rep 6 times. (24)
- R5: working in BLO for this and every following round of the base, (sc in next 3 sts, 2 sc in next st) rep 6 times. (30) The free front loops of R4 stay free for the inner tier.
- R6: in BLO, (sc in next 4 sts, 2 sc in next st) rep 6 times. (36)
- R7: in BLO, (sc in next 5 sts, 2 sc in next st) rep 6 times. (42) The free front loops of R6 stay free for the middle tier.
- R8: in BLO, (sc in next 6 sts, 2 sc in next st) rep 6 times, sl st to the first st. (48) Do not fasten off.
- Outer tier — working into both loops of the 48 sts of R8: (sk 1 st, work hdc, dc, tr, dc, hdc all in next st, sk 1 st, sl st in next st) rep 12 times. 4 sts per repeat, 48 total, 12 petals. Fasten off.
- Middle tier — join sage in any free front loop of R6 (36 free loops): (sk 1 loop, work hdc, 3 dc, hdc all in next loop, sk 1 loop, sl st in next loop) rep 9 times. 4 loops per repeat, 36 total, 9 petals. Fasten off.
- Inner tier — join sage in any free front loop of R4 (24 free loops): (sk 1 loop, 5 dc in next loop, sk 1 loop, sl st in next loop) rep 6 times. 4 loops per repeat, 24 total, 6 petals. Fasten off.
- Mustard centre: with mustard, R1: 8 sc in MR. (8) R2: 2 sc in each st around, sl st to the first st. (16)
- Centre petals: (ch 2, 2 dc in next st, ch 2, sl st in next st) rep 8 times. 2 sts per repeat, 16 total, 8 tiny petals. Fasten off, leaving a 25 cm tail.
- Sew the mustard centre flat over the middle of the sage base, stitching through the base of the inner tier so no raw centre shows. Finished bloom: about 15 cm across.
Succulent Rosette (make 5)
- Make 3 in sage green and 2 in forest green for tonal variation. R1: 6 sc in MR. (6)
- R2: 2 sc in each st around. (12)
- R3: in BLO, (sc in next st, 2 sc in next st) rep 6 times. (18) The front loops of R2 stay free.
- R4: in BLO, (sc in next 2 sts, 2 sc in next st) rep 6 times, sl st to the first st. (24) The front loops of R3 stay free. Do not fasten off.
- Outer tier — working into both loops of the 24 sts of R4: (sk 1 st, work hdc, dc, hdc all in next st, sk 1 st, sl st in next st) rep 6 times. 4 sts per repeat, 24 total, 6 broad leaves. Fasten off.
- Middle tier — join yarn in any free front loop of R3 (18 free loops): (ch 2, work dc, tr, dc all in next loop, ch 2, sk 1 loop, sl st in next loop) rep 6 times. 3 loops per repeat, 18 total, 6 pointed leaves. Fasten off.
- Inner tier — join yarn in any free front loop of R2 (12 free loops): (ch 1, 3 dc in next loop, ch 1, sl st in next loop) rep 6 times. 2 loops per repeat, 12 total, 6 small leaves. Fasten off, leaving a 20 cm tail.
- Pinch the inner tier upright with your fingers so the rosette reads as a succulent rather than a flat flower. Finished rosette: about 8 cm across.
Textured Leaf (make 18)
- Make 10 in sage green and 8 in forest green. Ch 13.
- R1, first side: sc in 2nd ch from hook, hdc in next ch, dc in next 3 ch, hdc in next 3 ch, sc in next 3 ch. (11 sts worked across 11 chains, 1 chain left)
- Tip: 3 sc in the last ch.
- R1, second side: working into the free loops on the opposite side of the foundation chain, sc in next 3, hdc in next 3, dc in next 3, hdc in next 1, sc in next 1, sl st to the first sc. (25 sts total)
- R2: ch 1, sc in each st up the first side to the tip, 3 sc in the centre stitch of the 3-sc tip, sc in each st down the second side, sl st to the first sc. (27 sts)
- Stem: ch 6, sl st in the 2nd ch from hook and in each remaining ch, sl st into the base of the leaf. Fasten off, leaving a 20 cm tail.
- To raise the central vein, run a line of surface slip stitches in the same colour along the original foundation chain from base to tip. Finished leaf: about 9 cm long.
Small Cream Flower (make 6)
- With mustard, R1: 10 sc in MR, sl st to the first st. (10) Fasten off mustard and join cream in any st.
- R2: (ch 2, 3 dc in next st, ch 2, sl st in next st) rep 5 times. 2 sts per repeat, 10 total, 5 rounded petals.
- Fasten off, leaving a 20 cm tail. Finished flower: about 4 cm across. Make 2 of these with a sage centre instead of mustard, for the shaded end of the runner.
Assembly and Layout
- Block every motif before you assemble anything. Wet or steam block, pin each piece flat, coax the petal tiers into position, and let them dry completely. Unblocked layered flowers curl, and a curled flower cannot be sewn flat.
- Mark a 120 x 35 cm rectangle on a towel or sheet with pins or tape. This is your working template, not the finished shape — the runner edge will be irregular.
- Place the 3 cream medallions along the length first, roughly 30 cm apart, staggered slightly off the centre line rather than in a straight row.
- Place the 3 sage blooms and 4 sunflowers in the gaps, alternating sides so no two large motifs of the same colour touch.
- Fill with the 5 succulents, then push the 18 leaves under the outside edges of the big motifs so the leaf tips stick out past them. The leaves are what makes the runner read as a garden bed rather than a row of coasters.
- Scatter the 6 small flowers last, in the small awkward gaps that are left.
- Photograph the layout before you move anything. You will need it once pieces start shifting under the needle.
- Sew in place with matching sewing thread, using small whip stitches at every point where two motifs touch. Sew leaves to flowers, flowers to medallions, and work from the centre of the runner outward. Every motif needs at least three contact points or the runner will sag when lifted.
Finishing
Weave in every end on the wrong side, working the tails under stitch bases rather than through the petal tiers, where they will show. There will be well over a hundred ends, so do this as you go rather than saving it for last.
Lift the runner by one end and check it holds together as one piece. Anywhere it hinges open, add a few more stitches at the nearest contact point. If the runner will be used on a daily table rather than as decoration, cut the sheer voile or netting to roughly 110 x 28 cm, lay it under the joined motifs, and tack it to the back of the large motifs only, leaving all leaf tips and outer petals free. The backing takes the strain off the joins without flattening the layered edge.
Give the finished runner a final light steam from the wrong side, hovering the iron rather than pressing, and let it dry flat overnight before putting it on the table.
Tips for Success
- Work the base discs at a firm tension. If you can see through the fabric of the medallion or the sage bloom base, go down to a 3.5 mm hook — a floppy base makes the whole runner drape badly.
- Count the free front loops before starting each petal tier on the sage bloom and succulent. If your count is off, the arithmetic will not close and you will discover it at the last petal.
- Make all 18 leaves in one batch while the stitch sequence is fresh, then all the small flowers. Batching keeps them consistent in size, which matters more than it sounds when they sit side by side.
- Use sewing thread, not yarn, for assembly. Yarn joins are bulky and visible between motifs; matching thread disappears entirely.
- Keep a few leaves and small flowers unsewn until the very end. There is always a gap you did not plan for.
Common Mistakes to Avoid
- Working the sage bloom base in both loops. If you forget the BLO on rounds 5 to 8, there are no free front loops left and the middle and inner tiers cannot be worked. Check after round 5 that a clear ridge of loose loops is visible.
- Skipping the blocking step to save time. Layered cotton flowers cup badly straight off the hook, and sewing an unblocked flower locks the cup in permanently. Block first, always.
- Sewing motifs at a single point. A one-point join lets motifs spin and the runner ripples. Three contact points minimum, spread around the motif.
- Making the sunflower’s long petal tier before the short one. The short front-loop tier is much harder to reach once the long petals are in the way. Front tier first, then turn the work over.
- Laying the runner out in a neat symmetrical grid. The design depends on staggered, overlapping placement — evenly spaced motifs read as a row of doilies rather than a flower bed.
Ways to Customize This Pattern
- Shorten to a 60 cm centrepiece by making 2 medallions, 2 sunflowers, 2 sage blooms, 3 succulents, 10 leaves and 4 small flowers — roughly half the time.
- Swap the palette to winter: swap mustard for deep rust, sage for grey-green, and cream for oatmeal, and it works from October straight through to February.
- Turn a single sage bloom plus 3 leaves into a matching napkin ring by sewing them onto a 12 cm chain loop.
- Add a fourth outer tier to the sage bloom: work (sk 1 st, hdc, dc, 3 tr, dc, hdc all in next st, sk 1 st, sl st in next st) into the 48 sts of round 8 for an even fuller, more dahlia-like bloom.
- Make the medallions functional by working them in doubled cotton on a 5.0 mm hook — they become heat-resistant trivets that still match the runner exactly.
Frequently asked questions
Yes, and it is faster. Chain a foundation about 118 cm long, work a double crochet mesh 26 cm wide, then sew the motifs on top. You lose the irregular flower-bed edge that gives this design its character, but you gain a runner that lies perfectly flat and survives the washing machine.
Almost always the tiers were worked into the wrong loops. Each tier must come out of a different round’s free front loops, which is what stacks them at different heights. If all three tiers emerged from the outer edge, the rosette will be flat. Check that rounds 3 and 4 were worked in back loop only.
Hand wash cool with a mild detergent, press the water out between towels, and pin it flat to dry in its final layout. Do not wring it and do not hang it — the weight of wet cotton will pull the joins apart. With a voile backing, a delicate machine cycle in a mesh laundry bag is usually safe.
You can, but the petals will not hold their shape as crisply and blocking will be temporary rather than permanent. If you use acrylic, steam block carefully with the iron held above the work, and expect a softer, floppier runner. Cotton is worth it for the sharp petal edges.
For standard 50 g DK cotton balls: about 5 sage, 3 forest green, 3 cream and 2 mustard. Buy an extra ball of sage — it is the colour you are most likely to run short on, and dye lots vary noticeably in greens.
The finished Harvest Flower & Succulent Table Runner

