Harvest Maple Table Runner Amigurumi Pattern
Beginner Friendly
Perfect for those just starting their crochet journey, with clear instructions and simple techniques
Single-Day Project
A satisfying project you can complete in a single afternoon or evening.
Handmade Gift
A beautiful keepsake — free forever. Read online or print at home.
About This Harvest Maple Table Runner Amigurumi Pattern
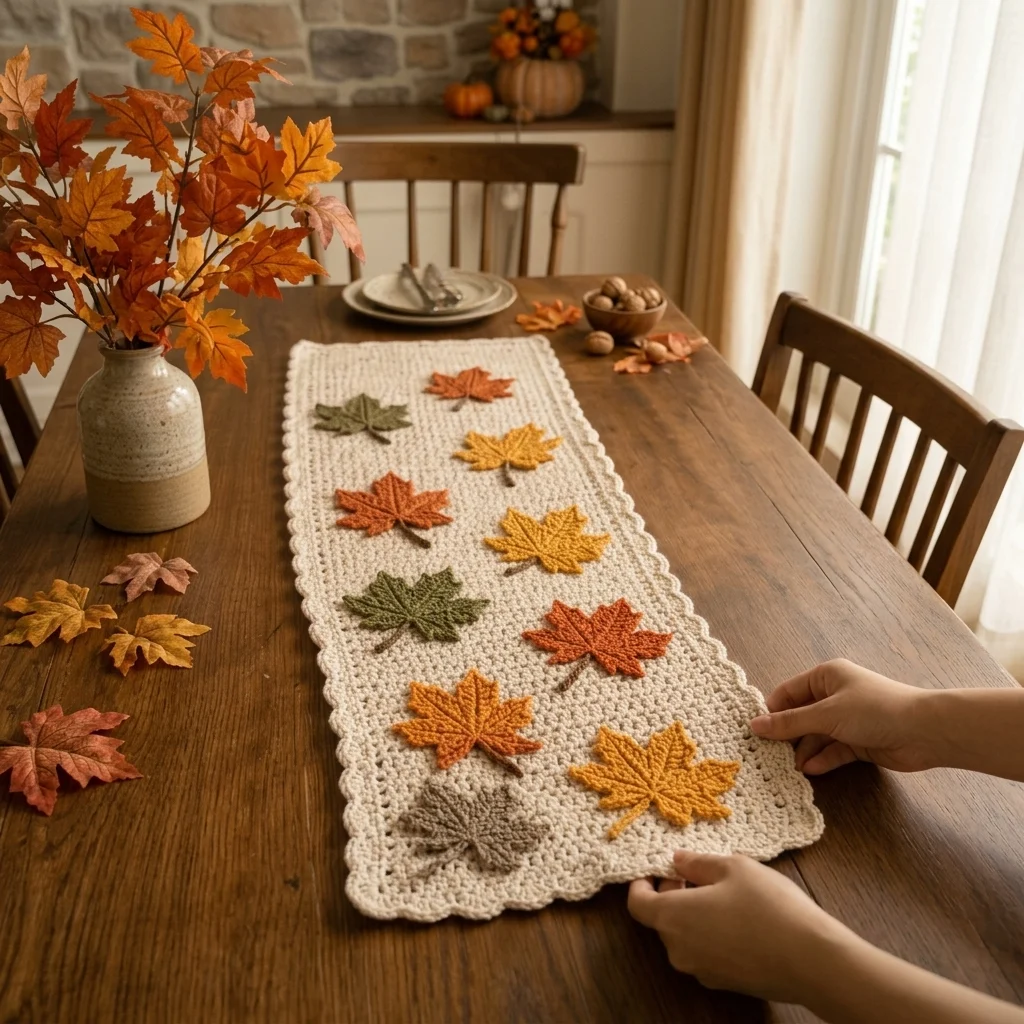
This maple leaf table runner crochet pattern pairs a simple oatmeal base with nine dimensional maple leaves worked in three autumn colorways and hand-sewn on in a scattered, asymmetrical layout. The base itself is a straightforward rectangle of half double crochet rows, but the scalloped edging and the leaves — each built with individually shaped lobes, a ridged spine, and embroidered veining — are where the real technique lives.
Plan on roughly 10 to 14 hours total: a few hours for the runner base worked flat in rows, then short bursts making one leaf at a time, since each leaf is quick once you’ve got the lobe shaping down. The scattered placement means you don’t have to match anyone else’s layout exactly, which makes this a forgiving project to pick up and put down over a week or two.
This is a good next project for someone who’s comfortable with basic increases and decreases and wants to move into appliqué work — shaping a leaf lobe, working a picot-scalloped edge, and hand-sewing finished motifs onto a base are all skills that transfer directly to other appliqué and home-decor patterns. It also makes a genuinely useful finished object, not just a display piece, for a fall or Thanksgiving table.
Materials
- Oatmeal/cream worsted weight yarn (Color A, base) ~250 g
- Burnt rust worsted weight yarn (Color B, leaves) ~25 g
- Mustard gold worsted weight yarn (Color C, leaves) ~30 g
- Olive green worsted weight yarn (Color D, leaves) ~20 g
- Small amount of brown yarn (Color E, stems) ~5 g
- 4.5 mm crochet hook
- Yarn/tapestry needle
- Straight pins for positioning leaves before sewing
- Fabric or spray starch optional, to help leaves hold a slightly cupped shape
Abbreviations
chchainscsingle crochethdchalf double crochetdcdouble crochetsl stslip stitchinc2 sts in same stitchdecdecrease (work 2 sts together)picotch 3, sl st in same st to form a small loopst(s)stitch(es)rnd/rowround/rowFOfasten offRunner Base
- With Color A, ch 43.
- Row 1: hdc in 3rd ch from hook and in each ch across. (41 sts) Ch 2, turn.
- Rows 2-58: hdc in each st across. (41 sts each row) Ch 2, turn. This builds the runner to roughly 90 cm long — check your own gauge and add or remove rows in pairs to reach your table length.
- Row 59 (final row): hdc in each st across, do not turn. FO leaving a long tail, or continue directly into the border below.
Scalloped Border
- With Color A, join with sl st in any corner st of the runner base if not continuing directly. Rnd 1: sc evenly around the entire outer edge, working 3 sc in each of the 4 corners to keep the rectangle flat. Sl st to first sc.
- Rnd 2 (scallops): *skip 2 sts, 5 dc in next st, skip 2 sts, sl st in next st* repeat around all 4 sides, adjusting the st count at each corner so a full scallop (5 dc) falls exactly on the corner stitch. Sl st to join, FO.
Rust Leaves (make 3, Color B)
- Ch 4. Rnd 1: sl st in 2nd ch from hook, sl st in next 2 ch (this forms the center stem base). Ch 6 (first lobe).
- Lobe 1 (center top): sc in 2nd ch from hook, hdc in next ch, dc in next 2 ch, hdc in next ch, 3 sc in last ch (tip). Working down the other side of the same chain: hdc in next st, dc in next 2 sts, hdc in next st, sl st in base of lobe. (12 sts along this lobe)
- Ch 5, sl st into the 2nd st up from the base of the center lobe to anchor the next lobe (upper right lobe).
- Lobe 2 (upper right): sc in 2nd ch from hook, hdc in next ch, dc in next ch, 3 sc in last ch (tip), dc in next st, hdc in next st, sl st to anchor point.
- Repeat the anchor-chain-and-lobe sequence from steps 3-4 twice more, mirrored, to create the upper-left lobe and then the two lower side lobes, working around the center point each time so all 5 lobes radiate outward evenly.
- After the 5th lobe, sl st back down to the center base. FO Color B leaving a short tail.
- Stem: join Color E at the base point, ch 6, sl st back down the chain to form a short stem tail. FO, weave in ends.
- Vein embroidery: using a strand of Color B threaded on a tapestry needle, work a straight stitch up the center of each lobe from base to tip, then 2-3 short diagonal stitches branching off each center vein.
Gold Leaves (make 3, Color C)
- Work exactly as the Rust Leaves above, substituting Color C for all 5 lobes.
- Use the same stem and vein embroidery steps, working the vein embroidery in Color C.
Olive Leaves (make 3, Color D)
- Work exactly as the Rust Leaves above, substituting Color D for all 5 lobes.
- Use the same stem and vein embroidery steps, working the vein embroidery in Color D.
Finishing
Lightly steam-block each leaf face-down on a towel, gently cupping each lobe tip upward as it cools so the finished leaves sit slightly off the surface of the runner rather than lying perfectly flat, matching the dimensional look in the reference photo.
Lay the blocked runner flat and arrange all nine leaves in a loose zigzag down its length, alternating colors so no two same-color leaves sit directly next to each other and no leaf touches the scalloped border. Pin each leaf in place once you’re happy with the layout, then use a strand of Color A or E to whip-stitch around the base of each leaf’s lobes, sewing through the stem point last to tack it flat against the runner.
Weave in all remaining ends on the underside of the runner. Steam the whole piece once more, lightly, from the back, to relax the border scallops flat.
Tips for Success
- Make and block every leaf before you place a single pin — trying to arrange curled or floppy leaves is where scattered layouts go wrong.
- Keep your hdc tension consistent across all 59 rows of the base; loose rows will show as visible bands once the leaves are sewn on and the light catches the surface differently.
- Work each lobe’s tip (the “3 sc in last ch”) snugly — a loose tip rounds off and loses the pointed maple-leaf silhouette.
- Lay leaves out and photograph the arrangement before sewing, so you can compare it to the reference layout and adjust spacing before it’s permanent.
- Whip-stitch leaves on with the same yarn weight as the base, not a thinner sewing thread — it keeps the attachment durable enough for a runner that will be folded and stored between seasons.
Common Mistakes to Avoid
- Skipping the corner increases on the border rnd 1, which pulls the corners of the runner into a curve instead of a sharp rectangle corner.
- Sewing leaves on before blocking them — the leaf will dry into whatever curled shape it was in when stitched, permanently.
- Placing all three colors in tight clusters instead of scattering them, which reads as three separate groups rather than one cohesive design.
- Working the scallop repeat without adjusting stitch count at the corners, leaving a gap or an uneven half-scallop at each corner of the runner.
- Using a hook size too small for worsted weight on the border round, which makes the scallops sit tight and stiff instead of draping softly off the edge.
Ways to Customize This Pattern
- Shorten the base to 30-35 rows for a set of matching placemats instead of one long runner.
- Add a 10th leaf in deep burgundy or wine for a richer, more jewel-toned autumn palette.
- Swap the maple lobe shaping for a simpler 3-lobe oak leaf silhouette for a quicker version.
- Work the entire base in a deep charcoal or forest green instead of oatmeal for a moodier winter-table look.
- Add a fringe trim instead of the scalloped border for a more rustic, farmhouse finish.
Frequently asked questions
The pattern as written uses nine leaves — three each in rust, gold, and olive — scattered down the runner’s length. You can use as few as six and simply space them a little further apart; just keep the color alternation so no two same-color leaves sit next to each other.
The slightly raised, cupped look comes from steam-blocking each leaf face-down and shaping the lobe tips upward while it cools, not from the stitch pattern alone. Skipping this step is the most common reason leaves end up flat against the runner instead of standing slightly off the surface.
Yes — the base is worked in easily countable rows, so add or remove pairs of rows to fit your table before starting the border. Just recalculate your leaf placement afterward so the scatter still looks even across the new length.
Whip-stitch around the base of each lobe using the same yarn weight as your runner base, not a fine sewing thread, and make sure to tack the stem point down as well. This gives a secure, flexible attachment that can handle folding and light laundering better than a few tacking stitches alone.
The finished Harvest Maple Table Runner Amigurumi Pattern

