Harvest Pumpkin Patch Crochet Table Runner
Beginner Friendly
Perfect for those just starting their crochet journey, with clear instructions and simple techniques
Single-Day Project
A satisfying project you can complete in a single afternoon or evening.
Handmade Gift
A beautiful keepsake — free forever. Read online or print at home.
About This Harvest Pumpkin Patch Crochet Table Runner
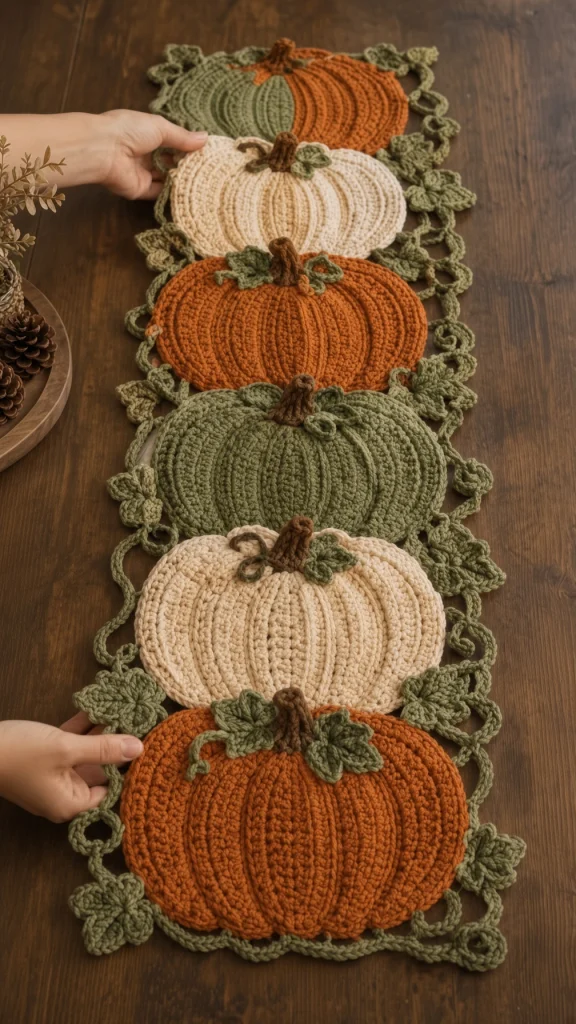
This crochet pumpkin table runner pattern is built from six flat oval pumpkins, overlapped down the length of the table so each one tucks slightly behind the next, with a looped vine border running all the way round. Every pumpkin is worked as an oval in the round from a short foundation chain, seven rounds of double crochet with twelve increases per round and none along the sides, then ribbed afterwards with six curved lines of surface slip stitch that run from the stem down to the lower edge.
The details are what make it read as a pumpkin patch rather than as six ovals in a row. Each pumpkin gets a small stuffed brown stem, two sage leaves and a coiled tendril, and the border carries twelve more leaves and eight tendrils scattered around its loops. None of that is padding. A ribbed oval with no stem looks like a mat, and the tendrils are the element people notice without being able to say why.
Expect 18 to 22 hours, of which the six pumpkins are about twelve. The ovals themselves are quick and rhythmic once the increase rule makes sense. The surface ribs, the assembly and the border take the rest, and the border in particular is slower than it looks because every loop becomes a small ring of fourteen stitches. Worsted cotton in three autumn shades holds the flat shape a runner needs and survives being washed after a meal. Written in US terms throughout.
Materials
- Worsted / Aran cotton in burnt orange approx. 150 g, 2 pumpkins
- Worsted / Aran cotton in cream approx. 150 g, 2 pumpkins
- Worsted / Aran cotton in sage green approx. 250 g, 2 pumpkins plus all leaves, tendrils and the border
- Worsted / Aran cotton in warm brown approx. 40 g, stems
- 4.0 mm crochet hook one size down from the ball band, for a dense flat fabric
- Tapestry needle blunt, large eye
- Stitch markers at least 8, four of them a different colour to mark the oval end zones
- Rust-proof pins and blocking mats you will be pinning an 80 cm runner, so a spare bed works too
- Spray bottle and a steam iron with a pressing cloth
- Scraps of brown yarn for stuffing the stems do not use polyfill, see the notes
- Tape measure and sharp scissors
Abbreviations
MRmagic ringchchainscsingle crochethdchalf double crochetdcdouble crochetsl stslip stitchsc2togsingle crochet 2 stitches togethersurface sl stslip stitch worked over the surface of finished fabricsp / spsspace / spacesst / stsstitch / stitchesreprepeatRSright sideFOfasten offGauge and Working Notes
- Gauge: 14 dc and 8 rounds to 10 cm, blocked. One finished pumpkin measures about 20 cm wide and 13 cm tall.
- Every round of the pumpkin is worked with the RS facing and joined with a sl st to the top of the beginning ch-3. Do not turn.
- The increase rule is the whole shape: 6 increases at each end of every round, 12 in total, and none along the two straight sides. The sides stay at 9 dc from Round 1 to Round 7.
- Mark the two end groups on Round 1 with a different colour of marker and move them up every round. If an increase ever lands on a side stitch, the pumpkin stops being an oval.
- Spread the six end increases evenly across the curve rather than stacking them, or you will get two visible spokes at each end.
- Work the surface ribs after the oval is finished and before the stem goes on. The stem covers the top ends of the ribs, so any wobble in the first centimetre gets hidden.
- Leave a 25 cm tail on every leaf, tendril and stem. You will use it to sew that piece down, which saves cutting new lengths later.
- Make all six pumpkins and block them before joining anything. The overlap is judged on blocked fabric.
Pumpkin Oval (make 6)
- With orange, cream or sage, ch 13.
- Round 1: dc in the 4th ch from hook (the 3 skipped ch count as the first dc), dc in each of the next 8 ch, 6 dc in the last ch; working now along the opposite side of the foundation chain, dc in each of the next 9 ch, 5 dc into the chain at the base of the beginning ch-3; sl st into the top of the ch-3 (30 dc: 6 at each end and 9 along each side).
- Place a marker at the centre of each 6-dc end group.
- Round 2: ch 3 (counts as first dc), dc in each of the 9 side sts, then 2 dc in each of the 6 sts of the end group; rep for the second side and second end; sl st to join (42 dc).
- Round 3: ch 3, dc in each side st, then at each end (dc in the next st, 2 dc in the next st) 6 times; sl st to join (54 dc).
- Round 4: ch 3, dc in each side st, then at each end (dc in the next 2 sts, 2 dc in the next st) 6 times; sl st to join (66 dc).
- Round 5: ch 3, dc in each side st, then at each end (dc in the next 3 sts, 2 dc in the next st) 6 times; sl st to join (78 dc).
- Round 6: ch 3, dc in each side st, then at each end (dc in the next 4 sts, 2 dc in the next st) 6 times; sl st to join (90 dc).
- Round 7: ch 3, dc in each side st, then at each end (dc in the next 5 sts, 2 dc in the next st) 6 times; sl st to join (102 dc).
- Round 8 (edge round): ch 1, sc in each st around with no increases, sl st into the first sc (102 sc). FO, leaving a long tail.
- Make 6: 2 orange, 2 cream, 2 sage green.
Surface Ribs (6 per pumpkin)
- Lay the finished oval flat with the long axis horizontal. The top centre is where the stem will sit, and the ribs radiate from just below it down to the lower edge.
- Mark 6 points along the lower edge of the oval, evenly spaced across the width and leaving about 3 cm clear at each far end.
- Working with the same colour as the pumpkin and holding the yarn behind the fabric, insert the hook from the front, pull a loop through, and work a line of surface sl sts from a point 2 cm below the top centre down to the first marked point, one sl st into each round as you cross it.
- Curve each rib outward as it descends, following the natural line of the rounds rather than cutting straight across them. A rib worked in a dead straight line looks drawn on.
- Keep every sl st the same size and slightly loose. A tight surface line gathers the fabric underneath it and the pumpkin will not block flat.
- Work all 6 ribs: 3 fanning left of centre and 3 fanning right. FO each one at the lower edge and weave the tail into the edge round.
- Step back and look before starting the next pumpkin. Ribs are the single most visible feature of this design, and six of them done consistently across six pumpkins is what makes the set look like a matched set.
Stem (make 6)
- Round 1: with brown, 6 sc in MR (6)
- Round 2: 2 sc in each st around (12)
- Round 3: sc in each st around (12)
- Round 4: (sc in the next 2 sts, sc2tog) rep 3 times (9)
- Round 5: sc in each st around (9)
- Round 6: (sc in the next st, sc2tog) rep 3 times (6)
- Rounds 7 to 9: sc in each st around (6)
- Stuff lightly with a scrap of brown yarn wound into a small ball, then FO leaving a 25 cm tail. Finished stem about 4 cm tall, flared at the base.
- Use yarn scraps rather than polyfill. White fibre shadows through brown cotton and shows as a pale patch at the top of every pumpkin.
- Press the base of the stem flat between finger and thumb before sewing, so it sits against the oval rather than standing up like a chimney.
Leaf (make 24)
- With sage green, ch 8.
- Round 1, first side: sc in the 2nd ch from hook, hdc in the next ch, dc in the next 3 ch, hdc in the next ch (6 sts, one chain free at the far end).
- Round 1, tip: 3 sc into that last free chain (9).
- Round 1, second side: working along the free loops on the underside of the foundation chain, hdc in the next ch, dc in the next 3 ch, hdc in the next ch, sc in the next ch (15).
- Round 1, base: 2 sc into the remaining chain at the base, sl st into the first sc (17).
- Side lobes: *ch 6, sc in the 2nd ch from hook, hdc in the next ch, dc in the next 2 ch, sl st into the 3rd st up from the base on that side of the leaf*; rep once on the opposite side, so the leaf has a central point and 2 side lobes.
- FO leaving a 20 cm tail. Finished leaf about 5 cm across.
- Make 24: 12 for the pumpkins, 2 each, and 12 for the border.
Tendril (make 14)
- With sage green, ch 20.
- Work 3 sc into the 2nd ch from hook and 3 sc into each remaining ch (57 sc). The strip will coil into a spiral on its own as you work.
- FO leaving a 20 cm tail. Do not block or straighten it. The coil is the point.
- Make 14: 6 for the pumpkins, one each, and 8 for the border.
- For a tighter curl work 4 sc into each chain instead of 3, and for a looser one work 2. Make one of each first and decide before committing to fourteen.
Joining the Pumpkins
- Block all six ovals flat before joining. Damp each one, pin it to 20 cm wide and 13 cm tall, and let it dry completely.
- Lay the pumpkins out in a vertical column in colour order: sage, cream, orange, sage, cream, orange. Overlap each one over the lower edge of the one above by about 2 cm.
- Stagger the column slightly left and right rather than stacking every pumpkin dead centre. A 1 cm offset alternating side to side is what gives the runner its loose, piled look instead of a column of ovals.
- Sew each overlap with a whip stitch along the full 2 cm contact zone, working through the edge round of the upper pumpkin and into the fabric of the one below. A join of two or three stitches will hinge and the runner will fold at every seam.
- Check the total length before you sew the last two. Six pumpkins at 13 cm with 2 cm overlaps gives about 68 cm, and the border adds a further 6 cm at each end. If you need more, widen the overlap gaps or add a seventh pumpkin.
- Sew the stems on next, each one centred at the top of its pumpkin with the flattened base stitched down all the way round so it cannot rock.
- Add 2 leaves and 1 tendril to each pumpkin, tucked under the base of the stem and fanning out to one side. Stitch the leaves at the base only so the tips lift, and tack the tendril at two points along its coil.
Looped Vine Border
- Round 1: join sage green at one side of the column with the RS facing. Work sc evenly all the way around the outline of the joined pumpkins, following the curves in and out where one oval meets the next, roughly 1 sc per stitch along the free edges.
- This gives approximately 300 sc. Adjust the last few stitches so the total is an exact multiple of 6, then sl st into the first sc. The exact number does not matter, but the multiple does.
- Round 2: ch 1, *ch 10, skip the next 5 sts, sl st in the next st*; rep from * all the way around (about 50 ch-10 loops).
- Round 3: *work 14 sc into the next ch-10 loop, sl st into the sl st between the loops*; rep from * around. Each loop closes into a small ring and the rings form a chain all the way round the runner. Sl st to join and FO.
- Keep the sl sts between rings loose. A tight one pulls two rings together and the border starts to scallop inward instead of lying flat.
- Sew the remaining 12 leaves around the border, spacing them roughly 4 per long side and 2 at each end, stitched to the rings rather than to the pumpkins.
- Sew the remaining 8 tendrils among the rings, 3 per long side and 1 at each end, tacked at two points each so they cannot flip over.
Finishing
Weave in every end on the back of a solid section, following the line of the stitches for at least 3 cm and splitting the yarn once along the way. Do not weave tails along the border rings, where a doubled strand shows immediately through an open loop. There are around 80 ends on this runner if you count every rib, leaf and tendril, so do them as you finish each pumpkin rather than saving them all for the end.
Block the assembled runner in one piece even though the pumpkins were blocked individually, because every seam redistributes tension across both pieces. Soak it in cool water, roll it in a towel to take out the excess, then lay it on mats. Pin the two ends first to set the length, then the sides to set the width, then pin every single border ring out to a proper circle. The rings are the part that will not settle on its own, and an unpinned border dries as a row of squashed ovals.
Let it dry a full day, then unpin and lay it on the table. Fluff each tendril back into its coil with your fingers and check that every leaf tip lifts rather than lying flat. If a stem has flattened under the pins, steam it from 15 cm away with the iron never touching the work and pinch it back into shape while it is warm.
Tips for Success
- Count the side stitches at the end of every round. They must read 9 on both sides from Round 1 through Round 7. The moment a side reads 10, an increase has drifted out of an end zone and the oval is turning into a lozenge.
- Work all six pumpkins of one colour pairing back to back rather than one per evening. Tension drifts between sessions, and two ovals that differ by a centimetre are very visible once they overlap.
- Do your six ribs on one pumpkin, then immediately do them on the next while the curve is still fresh in your hand. Ribbing all six in a single sitting is the only reliable way to get them matching.
- Cut a paper oval at 20 by 13 cm and check each pumpkin against it around Round 6. Adding or dropping a round then costs ten minutes, and doing it after the ribs are on costs the whole pumpkin.
- Lay the whole column out on the actual table before sewing a single overlap, and photograph it. The stagger and the colour order both look different on dark wood than they do on a blocking mat.
Common Mistakes to Avoid
- Increasing along the straight sides. The sides carry the pumpkin’s width and must stay at 9 dc throughout. Two stray increases per round and the oval swells into a circle with pointed ends.
- Surface ribs worked too tight. A tight line of sl sts gathers the fabric behind it and puckers the whole pumpkin, which blocking cannot release. Keep the ribs looser than you think they need to be.
- Ribs worked in dead straight lines. Real pumpkin segments curve, and a straight rib reads as a drawn-on line. Follow the arc of the rounds as you descend.
- Stems stuffed with polyfill. White fibre shadows through brown cotton and every pumpkin ends up with a pale crown. Wind a scrap of the brown yarn into a ball instead.
- Overlaps joined with a few stitches in the middle. The runner then folds at every seam when you pick it up. Whip stitch the full 2 cm contact zone.
- A border Round 1 that is not a multiple of 6. Round 2 works in repeats of 6 stitches, so an odd count leaves a gap or a doubled loop somewhere along the edge that is obvious once the rings are worked.
Ways to Customize This Pattern
- Change the length by whole pumpkins. Each one adds about 11 cm once overlapped, so five gives roughly 69 cm and eight gives roughly 102 cm for a long dining table.
- Make matching placemats by working a single pumpkin with 2 extra rounds, continuing the increase pattern as (dc in the next 6 sts, 2 dc in the next) and then (dc in the next 7, 2 dc in the next), which gives a 26 cm oval.
- Swap the palette for a different season: white, grey and pale blue with the stems in charcoal turns the same six ovals into a winter piece with no pattern changes at all.
- Work one pumpkin in each of six different shades rather than three pairs, using up oddments, since no pumpkin needs more than about 75 g.
- Skip the looped border and work 3 rounds of sc followed by a picot edge instead. It takes two hours rather than five and gives a tidier, less rustic runner.
- Turn a single pumpkin into a trivet by working it in two layers held together, or into a wall hanging by adding a chain loop at the top of the stem.
Frequently asked questions
Not easily on this construction. Because the increases all fall at the two ends, the stitch positions drift outward as the oval grows, so a front post stitch worked in the same numbered stitch each round wanders off the line you want. Surface slip stitch is worked over the finished fabric, which means you control exactly where each rib goes and can curve it. If you do want post stitch ribs, you would need to work the pumpkin as a circle rather than an oval.
The six end increases are bunched into too few stitches. Spread across the full curve they give a smooth arc, but worked over five or six stitches they make a corner. Undo back two rounds and redo them with the increases spaced out as written. A mild point will soften in blocking, but a real one will not.
Two centimetres is the balance point between a runner that looks piled and one that looks like a chain. Less than 1 cm and the pumpkins read as separate mats that happen to touch. More than 4 cm and you lose the lower rounds of each oval, including the ends of the ribs, which is the part that makes them look like pumpkins. Lay three out on the table and try it before committing.
It lies flat if the border rings are pinned out individually when you block it. The rings are the only part of the runner with no fabric holding them in shape, so they dry however you leave them. Unpinned they dry squashed and the edge waves. This is also the first thing to redo if the runner has been washed and no longer sits right.
Hand wash in cool water with a mild detergent, supporting the whole runner rather than lifting it by one end, since wet pumpkins are heavy and the seams take the strain. Press the water out against the side of the basin and never wring. Lay it flat, re-pin the ends, the sides and every border ring, and reshape the stems and tendrils with your fingers while damp. Skip the machine, as the surface ribs and appliqué stitching take a beating in a drum.
The finished Harvest Pumpkin Patch Crochet Table Runner

