Hawaiian Quilt Crochet Blanket Pattern
Beginner Friendly
Perfect for those just starting their crochet journey, with clear instructions and simple techniques
Single-Day Project
A satisfying project you can complete in a single afternoon or evening.
Handmade Gift
A beautiful keepsake — free forever. Read online or print at home.
About This Hawaiian Quilt Crochet Blanket Pattern
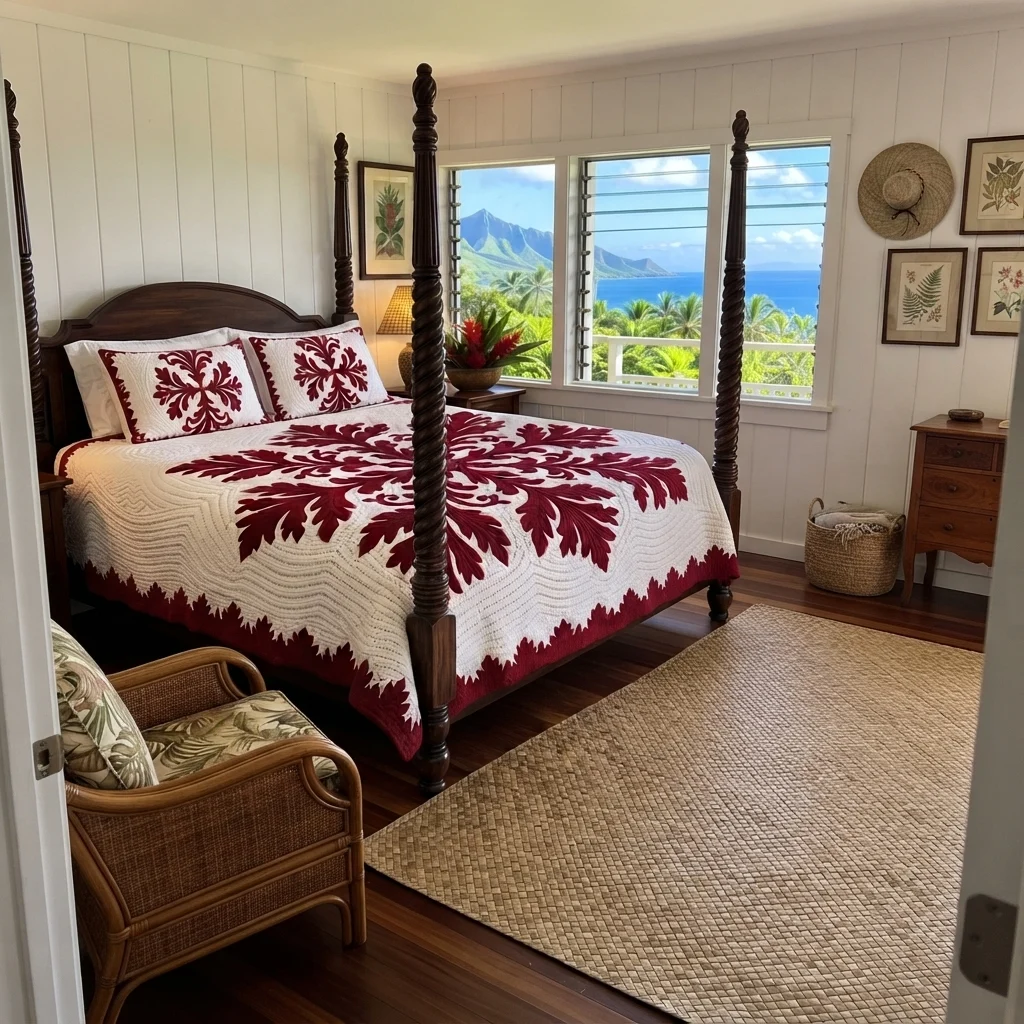
This Hawaiian quilt crochet blanket pattern turns a classic red and white island quilt into a heavy, textured throw. A deep burgundy medallion of eight leafy fronds spreads across a plain white field, and a border of burgundy leaf points runs all the way around, just like the bedspread in the photo.
It is an advanced pattern because of the finishing. The white body is a simple ridged single crochet slab, but you will make eight stems, 88 leaves, eight curled tendrils and a center rosette, then pin and sew every piece into a symmetrical medallion. The border adds five rounds of almost 700 stitches and about 175 hand-shaped leaves. Plan on 50 to 60 hours in total, with about 15 of them spent on the medallion.
It suits crocheters who are comfortable with small shaped pieces and careful placement, and who want a bold, graphic bedspread in two colors. The finished blanket is about 147 x 180 cm, and you can change the size by adding or removing stitches in the body.
Materials
- Chunky cotton-blend yarn, white (W) about 3.0 kg, estimated, body and border
- Chunky cotton-blend yarn, burgundy (B) about 750 g, estimated, medallion and leaf edge
- Crochet hook 6.5 mm
- Yarn needle
- Stitch markers and pins for placing the medallion
- Tape measure and flat surface for layout and blocking
Abbreviations
MRmagic ringchchainscsingle crochetinc2 sc in the same stitchhdchalf double crochetdcdouble crochetsl stslip stitchst(s)stitch(es)BLOback loop onlyRSright sideFOfasten offWwhite yarnBburgundy yarn( )xrepeat the stitches in brackets the number of times givenWhite Body (flat, W)
- Foundation: with W, ch 141.
- Row 1 (RS): sc in the 2nd ch from the hook and in each ch across (140). Ch 1 and turn.
- Rows 2-192: sc in the back loop only of each st across (140). Ch 1 and turn at the end of every row except the last. The ch 1 does not count as a stitch.
- Place a stitch marker in the turning chain of every 24th row so you can check your length. After row 192 do not FO.
- Check your body: every row must have exactly 140 stitches, and the body should measure about 127 cm wide and 160 cm tall after blocking. The ridges should run across the width.
White Border Rounds (W)
- Round 1: with the RS facing you and row 192 at the top, ch 1 and work 3 sc in the top right corner stitch. Sc in each of the next 138 sts across the top. Work 3 sc in the top left corner stitch.
- Work 190 sc evenly down the left side, one in each row end between the corners. Work 3 sc in the first stitch of the foundation edge (the bottom left corner), 138 sc across the foundation edge and 3 sc in the last stitch (the bottom right corner). Work 190 sc evenly up the right side. Join with a sl st to the first sc (668).
- Rounds 2-4: ch 1, sc in each st around, working 3 sc in the middle st of each 3-sc corner group. Join with a sl st at the end of each round. Each round adds 8 stitches: round 2 has 676, round 3 has 684 and round 4 has 692. FO W.
- Check your border: after round 4 there are 144 stitches between the corner groups along the top and foot and 196 down each side.
Burgundy Leaf Edge (B)
- Round 5: join B in the middle st of any corner group. Ch 1, sc in each st around, working 3 sc in the middle st of each corner group. Join with a sl st (700). After this round there are 146 stitches between the corner groups along the top and foot and 198 down each side.
- Round 6 (leaves): sl st in the next st. *Ch 7. Starting in the 2nd ch from the hook: sl st, sc, hdc, dc, hdc, sc (6 sts). Skip 3 sts of round 5 and sl st in the next st.* Repeat from * to * around.
- Each leaf uses 4 stitches of the round, so there are about 175 leaves. Near each corner, skip 1 st instead of 3 if needed so a leaf lands on the corner point. Count a few leaves on each side. They should hang evenly, with no overlapping.
- Join with a sl st to the first sl st, FO and weave in the end.
How the Leaves Work
- Every leaf is a short chain worked back along itself. Its length is n stitches. Ch n+1, then, starting in the 2nd ch from the hook, work: sl st, sc, hdc, dc in each of the next (n-6) chains, hdc, sc, sl st. This gives exactly n stitches.
- The sizes for the fronds are: n = 14 (8 dc), n = 12 (6 dc), n = 10 (4 dc), n = 8 (2 dc) and n = 6 (no dc: sl st, sc, hdc, hdc, sc, sl st). The tip leaf is n = 16 (10 dc).
- FO each leaf leaving a tail of about 15 cm for sewing.
Leaves (make 88, B)
- Make 16 leaves of n = 14: ch 15, then sl st, sc, hdc, 8 dc, hdc, sc, sl st (14).
- Make 16 leaves of n = 12: ch 13, then sl st, sc, hdc, 6 dc, hdc, sc, sl st (12).
- Make 16 leaves of n = 10: ch 11, then sl st, sc, hdc, 4 dc, hdc, sc, sl st (10).
- Make 16 leaves of n = 8: ch 9, then sl st, sc, hdc, 2 dc, hdc, sc, sl st (8).
- Make 16 leaves of n = 6: ch 7, then sl st, sc, hdc, hdc, sc, sl st (6).
- Make 8 tip leaves of n = 16: ch 17, then sl st, sc, hdc, 10 dc, hdc, sc, sl st (16).
- Sort the leaves into eight bags, each with 2 leaves of every size and 1 tip leaf (11 leaves).
Stems (make 8, B)
- Ch 41. Starting in the 2nd ch from the hook, sl st in each ch across (40). FO leaving a tail of about 20 cm.
- The stem should measure about 36 cm. Number the stitches 1 to 40 from the base. You will sew the leaves at stitches 6, 12, 18, 24 and 30, and the tip leaf at stitch 40.
Tendrils (make 8, B)
- Ch 17. Starting in the 2nd ch from the hook, work 2 sc in each of the next 16 chs (32). FO leaving a tail of about 15 cm.
- The extra stitches make each tendril curl on its own. If it uncurls, tack it with a couple of stitches on the back.
Center Rosette (B)
- Round 1: 8 sc in MR (8)
- Round 2: inc x8 (16)
- Round 3: (1 sc, inc)x8 (24)
- Round 4: (2 sc, inc)x8 (32). Join with a sl st, FO leaving a long tail. The rosette should be about 9 cm across.
Medallion Placement
- Find the center of the blocked body: between stitches 70 and 71, and between rows 96 and 97. Pin a marker there and pin the rosette centered on it.
- Pin 8 stems around the rosette like the spokes of a wheel, at 0, 45, 90, 135, 180, 225, 270 and 315 degrees. The 0, 90, 180 and 270 degree stems run straight along the rows and the columns. The base of each stem starts 5 cm from the rosette’s center, so it tucks under the edge of the rosette.
- Measure from the center to the tip of every stem and check that all eight are the same. The tips should reach about 50 cm from the center. The diagonal stems end about 35 cm over and 35 cm up from the center, well inside the body.
- Pin the leaves to every stem, one on each side at stitches 6 (n = 14), 12 (n = 12), 18 (n = 10), 24 (n = 8) and 30 (n = 6), with the leaf bases at the stem and the tips angled out at about 45 degrees. Pin the tip leaf straight at the end of the stem (stitch 40).
- Pin a tendril between the leaves at stitch 12 of each stem, with the curl pointing outward.
- Step back and check that the medallion looks symmetrical before you sew anything.
Sewing the Medallion
- Sew the stems first, working small stitches along both edges of each stem and through the back loops of the body, tacking every 2 cm.
- Sew the leaves next, with the base end tucked under the stem and the sides tacked for the first 3 cm. Leave the outer tips free so they lift slightly.
- Sew the tendrils, then the tip leaves.
- Sew the rosette last, working small stitches around its whole edge, which hides the bases of the stems.
- Weave all tails along the back of the blanket for at least 6 cm.
Finishing
Weave in all ends along the back, following the stitches for at least 8 cm. Block the blanket before you sew on the medallion if you can: lay it flat on towels, pin the corners and edges to about 147 x 180 cm, and mist it with water. Let it dry fully before moving it.
After sewing, steam the medallion from a few centimeters above without pressing, so the leaves keep their shape. Drape the blanket with the medallion centered on the bed and the leaf edge hanging over the sides and foot, and it will look like the photo.
Tips for Success
- Count your stitches at the end of every 20 rows. There should always be 140, or the medallion will drift off center.
- Make the leaves in batches of ten, one size at a time, so every frond is the same.
- Work the stems loosely. A tight stem pulls the fronds into curves and shortens them.
- Use a thinner burgundy thread to sew on the pieces, so the stitches sink in and stay hidden.
- Lay the pieces out on the floor and look at them from a few steps back before you pin them to the blanket.
Common Mistakes to Avoid
- Counting the ch 1 turning chain as a stitch makes the body 141 stitches wide and moves the center. The ch 1 never counts.
- Working the body in both loops loses the ridges and makes it stiffer. Work every row in the back loop only.
- Sewing the leaves flat against the fabric hides their shape. Leave the tips free.
- Pinning the fronds without measuring makes the medallion lopsided. Check every tip against the center.
- Working different corner counts in the border makes it ripple. Use exactly 3 sc in each corner stitch on every round.
Ways to Customize This Pattern
- Swap burgundy for navy, forest green or royal blue and keep the white field for a different island palette.
- Make a smaller medallion with 4 fronds (the straight ones only) for a quicker blanket, and add a ring of small leaves around the center.
- Stitch echo lines around the medallion in white surface slip stitch, 3 cm apart, to copy the quilting in the photo.
- Make a baby blanket: ch 81 (80 stitches), work 100 rows and 3 border rounds, with one medallion of 4 fronds, about 80 x 95 cm.
- Make matching pillow covers by working 50 stitches for 50 rows, sewing on 4 small fronds around a rosette, and joining to a plain back with a button closure.
Frequently asked questions
The amounts above are estimates of about 3.75 kg in all. Weigh your swatch and scale it up by area for the white body and border, then weigh one finished frond, multiply by 8, and add about 10 percent for the leaf edge and sewing.
Add or remove stitches in any number for the width, and rows in any number for the length, then move the center marker to the new middle. Recalculate the border from the new counts: top and foot are the stitch count minus 2, and the sides are the row count minus 2. If you go much wider, make the stems longer in steps of 10 chains.
A one-sided leaf is quick to make, and it lies flat when you sew it on. Working both sides of the chain gives fatter leaves, closer to the photo, but you need about twice the yarn and time for every leaf.
With a washable cotton blend, wash it on a gentle cycle in cool water, press out the water without wringing, and lay it flat to dry. Burgundy can bleed onto the white, so wash it with a color catcher the first time, and check that the medallion is sewn on securely before every wash.
The finished Hawaiian Quilt Crochet Blanket Pattern

