Heart Lace Table Runner in Sage and Cream
Beginner Friendly
Perfect for those just starting their crochet journey, with clear instructions and simple techniques
Single-Day Project
A satisfying project you can complete in a single afternoon or evening.
Handmade Gift
A beautiful keepsake — free forever. Read online or print at home.
About This Heart Lace Table Runner in Sage and Cream
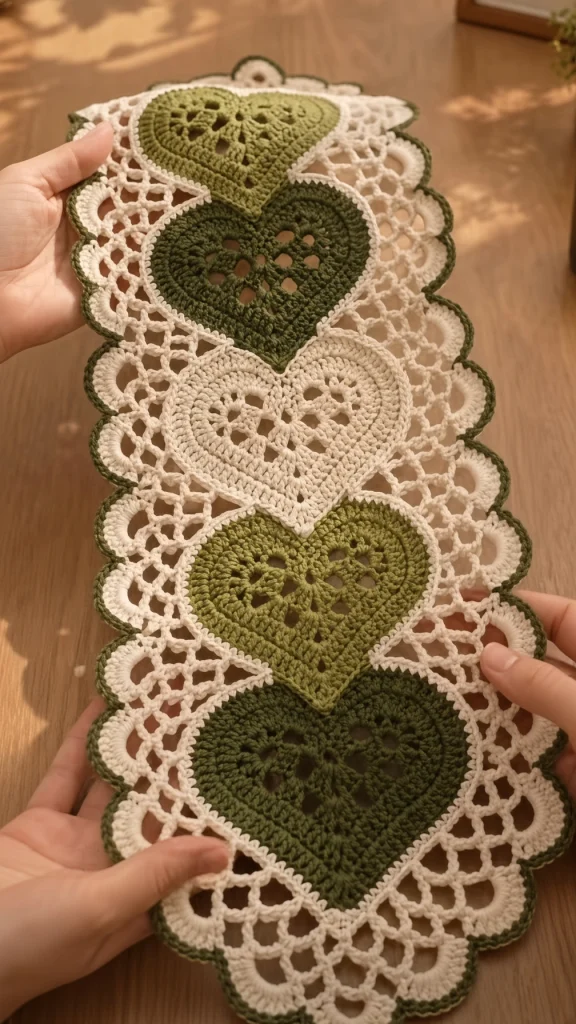
This crochet heart table runner pattern sets five filet-centered hearts into a cream mesh ground, overlapping down the length of the piece so each heart’s point tucks behind the round lobes of the one below it. The hearts alternate olive, deep forest and cream, and each one has an open filet panel worked into its middle — a diamond lattice of chain spaces that lets the ground show through while the outline stays solid.
The mesh ground is what holds everything together. It is a simple ch-3 net worked as a single panel, but the shaping around each heart has to follow the heart’s outline rather than run straight, which is the part that takes real attention. Once a heart is set into its opening, a slip stitch outline round in the heart’s own color locks it in and hides the join, so from the front there is no visible seam between motif and ground.
The border is deep — five rounds building to a wide scallop, each scallop finished with a picot edge in forest green so the outline reads as a firm dark line around all that cream. Plan on around two hours per heart, six or seven for the mesh ground, five for the border, and the rest for setting the hearts in and blocking: roughly 24 to 30 hours. It is advanced work because of the shaped openings and the filet centers, and it is not a project to start if you dislike counting.
Materials
- Size 3 crochet cotton in cream approx. 600 m (about 200 g) — mesh ground, border, 1 heart
- Size 3 crochet cotton in deep forest green approx. 180 m (about 60 g) — 2 hearts and border edging
- Size 3 crochet cotton in olive green approx. 140 m (about 45 g) — 2 hearts
- 2.5 mm crochet hook US B-1/C-2
- Tapestry needle blunt tip
- Rustproof pins 70+; the scallops alone need one each
- Blocking mats or a towel-covered board at least 95 x 40 cm
- Stitch markers 10-12
- Spray starch recommended, for holding the scallops crisp
- Measuring tape and small sharp scissors
Abbreviations
begbeginningchchaindcdouble crochetdc2togdouble crochet 2 stitches togetherhdchalf double crochetpicotch 3, sl st in 3rd ch from hookreprepeatrnd(s)round(s)RSright sidescsingle crochetskskipsl stslip stitchsp(s)space(s)st(s)stitch(es)trtreble crochetGauge and sizing
- Gauge in mesh: 7 ch-3 spaces and 7 rows = 10 cm x 10 cm, blocked.
- One finished heart measures approximately 17 cm wide by 16 cm from the top of the lobes to the point.
- Mesh ground before border: approximately 72 cm long by 22 cm wide.
- Finished runner: approximately 84 cm long by 30 cm wide, measured to the outer edge of the scallops.
- All instructions use US crochet terminology.
- To lengthen, add one heart per 14 cm, plus 10 rows to the mesh ground and 8 more scallops to the border.
Heart motif (make 5: 2 olive, 2 forest green, 1 cream)
- The heart is worked from the point upward in rows, then finished with an outline round.
- Row 1 (RS): Ch 5. Dc in 5th ch from hook. Turn. (1 dc, 1 ch-4 sp)
- Row 2: Ch 4 (counts as dc + ch 1), (dc, ch 1, dc) in the ch-4 sp, ch 1, dc in the top of the turning ch. Turn. (4 dc, 3 ch-1 sps)
- Row 3: Ch 4, dc in first ch-1 sp, ch 1, (dc, ch 1, dc) in next ch-1 sp, ch 1, dc in next ch-1 sp, ch 1, dc in the top of the turning ch. Turn. (6 dc, 5 ch-1 sps)
- Row 4: Ch 4, *dc in next ch-1 sp, ch 1; rep from * across, working (dc, ch 1, dc) in the center sp, and dc in the top of the turning ch. Turn. (8 dc, 7 ch-1 sps)
- Rows 5-13: Rep Row 4, adding 2 dc and 2 ch-1 sps each row. (Row 5: 10 dc. Row 6: 12 dc. Row 7: 14 dc. Row 8: 16 dc. Row 9: 18 dc. Row 10: 20 dc. Row 11: 22 dc. Row 12: 24 dc. Row 13: 26 dc, 25 ch-1 sps)
- Rows 14-17 (filet panel, worked straight): Ch 4, *dc in next ch-1 sp, ch 1; rep from * across, dc in the top of the turning ch. Turn. (26 dc, 25 ch-1 sps each row) These four straight rows form the open lattice at the heart’s center. Do not increase.
- Row 18 (divide for the lobes): Ch 4, work in pattern across the first 12 ch-1 sps, dc in the next sp, turn — leave the remaining sps unworked. Work the left lobe first. (13 dc)
- Left lobe, Rows 19-21: Ch 4, work in pattern across, dc2tog over the last 2 sps at the inner edge. Turn. (Row 19: 12 dc. Row 20: 11 dc. Row 21: 10 dc)
- Left lobe, Row 22: Ch 4, work in pattern across the first 7 sps, dc2tog over the next 2, dc in last sp. Turn. (9 dc)
- Left lobe, Row 23: Ch 1, sc in each dc and ch-1 sp across to shape the curved top. Fasten off.
- Right lobe: rejoin the yarn in the first unworked ch-1 sp of Row 17 and work Rows 18 to 23 as a mirror image, placing the dc2tog decreases at the inner edge each time.
- Outline round: join the same color at the heart’s bottom point. Ch 1, work sc evenly around the entire heart: 2 sc into each row end along the two straight sides, 1 sc into each st across the two lobe tops, 3 sc at the bottom point, and dc2tog at the inner notch between the lobes so the V stays sharp. Sl st to first sc. (approximately 148 sc; small variations in row-end tension will not show)
- Fasten off, leaving a 60 cm tail for setting into the mesh. Block the heart to 17 cm wide before going further. Make 5.
Mesh ground
- With cream, ch 68.
- Row 1 (RS): Sc in 8th ch from hook, *ch 3, sk next 3 ch, sc in next ch; rep from * across. Turn. (16 ch-3 sps)
- Row 2: Ch 6 (counts as sc + ch 3), turn, sc in first ch-3 sp, *ch 3, sc in next ch-3 sp; rep from * across, ending sc in the turning ch sp. Turn. (16 ch-3 sps)
- Rows 3-8: Rep Row 2. (16 ch-3 sps each row)
- Row 9 (first heart opening): Work 4 ch-3 sps in pattern, ch 14 (this chain will span the width of the heart opening), sk the next 8 ch-3 sps, sc in the following sp, then work the remaining 3 sps in pattern. Turn.
- Rows 10-19: Continue in mesh pattern on both sides of the opening, working the ch-14 span as a single long bridge and skipping across it each row with another ch 14 until the opening measures about 16 cm tall. On Row 20, resume the full 16 ch-3 sps across.
- Rows 20-24: Work in mesh pattern across all 16 sps. (16 ch-3 sps each row)
- Rows 25-35: Work the second heart opening as for Rows 9 to 19, but offset it 2 spaces to the right so the hearts stagger down the runner.
- Rows 36-40: Work in mesh pattern across all 16 sps.
- Rows 41-51: Third heart opening, offset 2 spaces to the left.
- Rows 52-56: Work in mesh pattern across all 16 sps.
- Rows 57-67: Fourth heart opening, offset 2 spaces to the right.
- Rows 68-72: Work in mesh pattern across all 16 sps.
- Rows 73-83: Fifth heart opening, offset 2 spaces to the left.
- Rows 84-91: Work in mesh pattern across all 16 sps. Fasten off. The ground should measure about 72 cm by 22 cm.
Setting the hearts
- Block the mesh ground flat to 72 cm by 22 cm before setting any hearts. Unblocked mesh distorts around an opening and the heart will never sit square.
- Lay the ground on the blocking mat and pin one heart into each opening, right side up, with the point downward. The heart should fill the opening with its outline round just overlapping the mesh on all sides.
- Order the colors from top to bottom: olive, forest, cream, olive, forest. That keeps the single cream heart in the middle where it reads as the focal point.
- Check the alignment of all five before sewing anything. The points should sit on a line that runs down the center of the runner, even though the openings are staggered — it is the point, not the whole heart, that the eye follows.
- Sew each heart in using its own 60 cm tail. Work small whip stitches through the outline round’s sc and into the nearest mesh sc or ch-3 space, spacing them about 8 mm apart all the way around.
- Never pull the sewing tight. A tight seam draws the mesh in around the heart and puckers the whole panel, which no amount of blocking will correct.
- Outline round: once each heart is sewn in, join the heart’s own color at the bottom point and work a round of slip stitch all the way around the seam line, catching both the heart’s outline round and the mesh. This hides the join completely and gives the crisp colored edge visible around each heart.
- Weave all tails into the back of the heart itself, never through the open mesh, where a colored tail will show from the front.
Border
- Rnd 1 (cream): Join cream with a sl st at any corner. Ch 1, work sc evenly around the entire runner: 3 sc into each ch-3 sp along the two long edges, 3 sc into each ch-3 sp along the two short edges, and 3 sc in each corner. Sl st to first sc. Your total should be a multiple of 8 — aim for about 432 sc, adjusting by a stitch or two at a corner where it will not show.
- Rnd 2 (cream mesh): Ch 1, sc in first sc, *ch 3, sk next 3 sc, sc in next sc; rep from * around, working 2 ch-3 sps into each corner, sl st to first sc. (108 ch-3 sps)
- Rnd 3 (cream mesh): Sl st into first ch-3 sp, ch 1, sc in same sp, *ch 4, sc in next ch-3 sp; rep from * around, sl st to first sc. (108 ch-4 sps)
- Rnd 4 (cream, gathering into scallops): Sl st into first ch-4 sp, ch 1, sc in same sp, *ch 5, sk next 2 sps, sc in next sp; rep from * around, sl st to first sc. (36 ch-5 sps)
- Rnd 5 (cream scallops): Sl st into first ch-5 sp, ch 3, 8 dc in same sp, *sc in next ch-5 sp, 9 dc in next ch-5 sp; rep from * around, sc in last sp, sl st to top of beg ch-3. (18 scallops of 9 dc)
- Rnd 6 (forest green picot edge): Join forest green with a sl st in any sc between scallops. Ch 1, *sc in next 2 dc, picot, sc in next 2 dc, picot, sc in next dc, picot, sc in next 2 dc, picot, sc in next 2 dc, sl st in next sc; rep from * around, sl st to first sc. (4 picots per scallop, 72 picots total)
- Fasten off and weave the tail into the back of a scallop, not into the cream mesh where green would show through.
Finishing
Block the finished runner thoroughly. Soak it in cool water for ten minutes, press the water out between towels without wringing, then lay it on the blocking surface. Pin the five heart points along a single straight line first, then square up the two long edges parallel to that line. Only once the body is true should you pin the scallops.
Pin each scallop individually, putting a pin through the center picot and pulling it gently outward. Work alternately from opposite ends of the runner rather than straight down one side, so the tension stays balanced. Expect to use around seventy pins in total.
Let it dry completely, at least twelve hours, before unpinning. If you want the scallops to hold their shape unsupported, mist with spray starch while still pinned and let it dry a second time. Re-block after each wash.
Hand wash in cool water with mild detergent and never wring. Store rolled around a cardboard tube rather than folded — a crease across a filet panel is very difficult to block out, and folded scallops tend to stay bent.
Tips for Success
- Make and block one heart before starting the mesh ground. Every opening in the ground is sized to fit the heart, so the heart has to come first and its blocked size is the number everything else depends on.
- Count the ch-1 spaces at the end of every increase row on the heart. The count should be one less than the dc count on every row from Row 2 to Row 13, and if it drifts the heart comes out lopsided in a way blocking cannot correct.
- Mark the center of each heart opening in the mesh with a stitch marker before you start the bridging rows. It is easy to drift a space to one side over ten rows, and the heart will then sit off-center in its own opening.
- Keep the mesh ch-3 spaces loose and even. Filet mesh shows tension variation more than almost any other fabric, and one tight row will read as a visible line across the finished runner.
- Work the slip stitch outline round after each heart is sewn in, not before. It is what makes the seam disappear, and doing it before sewing leaves you with two edges to join instead of one.
Common Mistakes to Avoid
- Hearts that come out asymmetrical. The increases in Rows 4 to 13 must fall in the exact center space of each row. If they drift one space to the side, the heart leans, and the lean gets worse as the rows build. Count to the center every row.
- Openings sized to the unblocked heart. A blocked heart is noticeably larger than an unblocked one, and if you sized the openings to the smaller version every heart will bunch when you try to set it in. Block first, measure, then cut the opening.
- Sewing the hearts in tightly. This is the single most common reason one of these runners will not lie flat. The seam needs the same give as the mesh around it — if the mesh puckers within 2 cm of the heart, the stitching is too tight.
- Losing count in the filet panel. Rows 14 to 17 are worked straight with no increases, and it is easy to slip back into the increase pattern. If your heart is wider at the lobes than it should be, this is why.
- Unpinning the scallops before the runner is fully dry. Damp cotton relaxes back within an hour, and the scallops are the first thing to soften. Twelve hours is the minimum.
Ways to Customize This Pattern
- Work all five hearts in cream to match the ground, so the design reads entirely as texture and the filet panels do all the work. It suits a formal table far better than the two-tone version.
- Make a single heart with a small mesh surround and the same border for a matching set of four coasters or a 25 cm table topper.
- Swap the greens for dusty rose and deep plum on a cream ground for a version that suits a spring table or a wedding without changing a single stitch count.
- Replace the filet centers with solid dc so the hearts read as solid shapes against the open mesh. It is faster to work and gives a much stronger contrast between motif and ground.
- Add two more hearts and 26 more mesh rows for a 112 cm runner, and add 6 more scallops to each long edge of the border.
Frequently asked questions
No. A lean comes from the increases drifting off the center space, and it is built into the fabric rather than the shape. Blocking will pull it straight while damp and it will lean again within a day. Count to the exact center space on every increase row, and if you spot the lean before Row 8, rip back — after that it is faster to start the heart over.
Yes, and it is considerably easier. Work the mesh ground as 91 straight rows with no openings, then sew each heart on top. You lose the inset look — the hearts sit proud rather than flush — and the runner becomes slightly heavier, but the shaping problems disappear entirely. For a first attempt this is the version to make.
The sewing is too tight. Each whip stitch should sit loosely enough that you can slide a needle under it. Undo the seam around the worst heart, re-pin it, and sew again with visibly more slack — you should feel like you are barely holding it in place. The slip stitch outline round afterward is what actually locks it down.
Yes, with a 3.5 mm hook. Each heart grows to roughly 23 cm and the finished runner to about 112 cm by 40 cm, which suits a large dining table. You will need roughly twice the yardage, and the border scallops will be proportionally deeper, so consider dropping Rnd 3 to keep them from overwhelming the piece.
It will, provided both the heart and the ground were blocked separately before assembly and the seams are loose. The failure mode is always tension, never the construction. If the finished piece ripples, find the heart whose seam pulls hardest, undo it, and redo it — that one seam is usually responsible for the whole problem.
The finished Heart Lace Table Runner in Sage and Cream

