Heart Medallion Lace Table Runner Crochet Pattern
Beginner Friendly
Perfect for those just starting their crochet journey, with clear instructions and simple techniques
Single-Day Project
A satisfying project you can complete in a single afternoon or evening.
Handmade Gift
A beautiful keepsake — free forever. Read online or print at home.
About This Heart Medallion Lace Table Runner Crochet Pattern
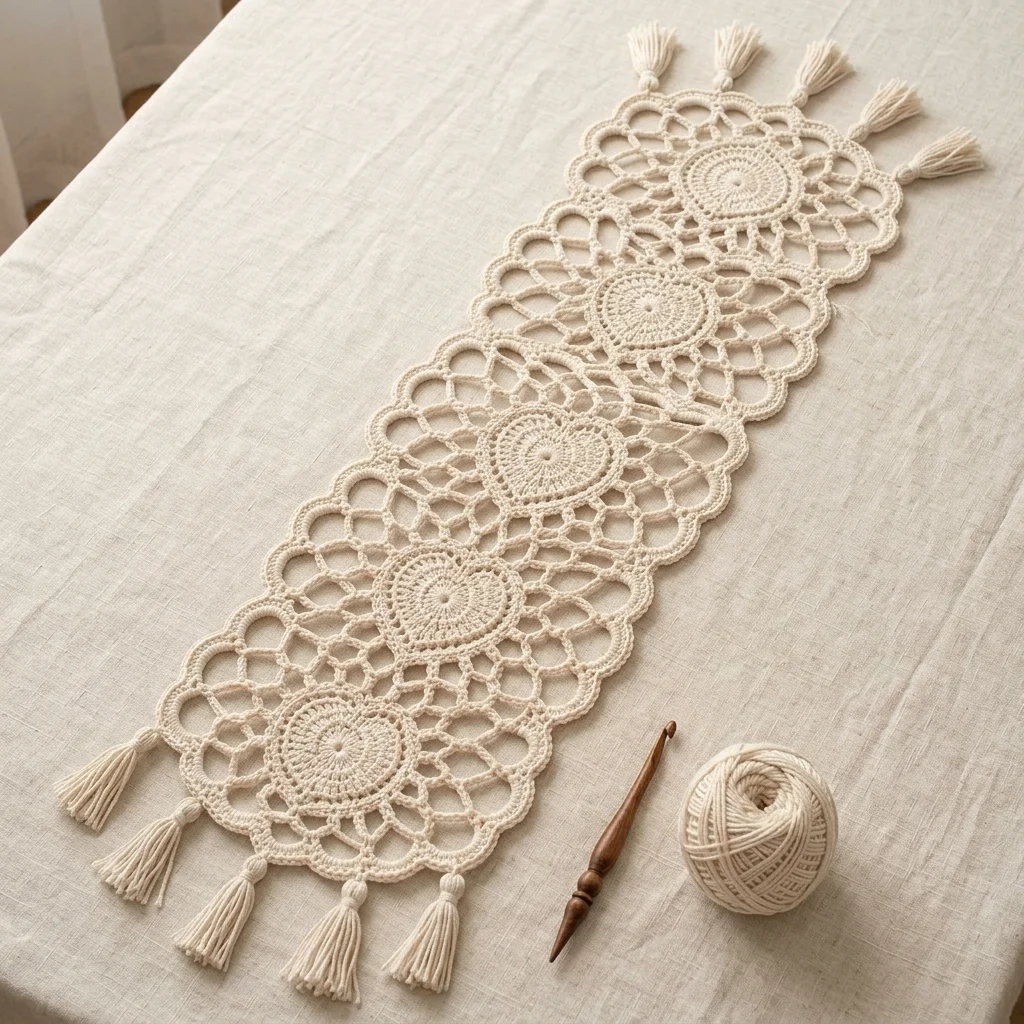
This crochet heart lace table runner pattern chains 5 round lace medallions, each centered on a small crocheted heart, down a single line, connected between medallions by a wide band of open, oval loop mesh rather than a solid join. One short end finishes plain and scalloped, while the other flows into a full tassel fringe, giving the runner a soft, romantic, heirloom-style look throughout.
What makes this design distinctive is the loop mesh connecting each medallion: instead of joining rounds directly edge to edge, wide ch-based loops link one medallion to the next, so the negative space between them reads as intentional, airy lace rather than a gap to be filled. Each medallion itself centers on a solid heart worked in tight spiral rounds, contrasting with the open scalloped petals surrounding it. Expect to spend 22-26 hours total across 5 medallions, the connecting loop mesh, and the tassel fringe.
This is an advanced pattern, best suited to someone comfortable with fine lace weight yarn, precise medallion shaping, and consistent loop-mesh joining between motifs, rather than someone wanting a quick or heavy-weight project.
Materials
- Fingering/lace weight cotton yarn, natural cream ~180g
- Crochet hook 2.5 mm (US B/1)
- Tapestry/yarn needle
- Steam iron and pressing cloth, or blocking mat and pins
- Piece of cardboard or a book for wrapping tassels
- Sharp scissors
Abbreviations
chchainsl stslip stitchscsingle crochethdchalf double crochetdcdouble crochettrtreble/triple crochetMRmagic ringch-spchain spaceincincrease (2 sc in one st)st(s)stitch(es)reprepeatFOfasten offHeart Center (make 5)
- Ch 2. Round 1: 6 sc in 2nd ch from hook, do not join, work in a continuous spiral. (6 sts)
- Round 2: inc in each st around. (12 sts)
- Round 3: *sc 1, inc; rep from * around. (18 sts)
- Round 4: sc around even, forming a solid textured disc. (18 sts)
- Round 5, heart shaping: work evenly around, but at 2 points opposite each other near what will be the top of the disc, work 2 sc into the same st instead of 1, to begin building the top two lobes; at the single point opposite these two, skip a stitch every other repeat through 2-3 sts to taper toward a bottom point.
- Sl st to close, FO leaving a short tail. Repeat for 5 hearts total.
Medallion Petal Rounds (make 5, surrounding each heart)
- Join cream behind the heart shape, in a base st along its outer edge. Round 1: *ch 3, skip 1 st, sl st in next st; rep from * around to form small ch-3 loops evenly circling the heart.
- Round 2: in each ch-3 loop, work (sc, hdc, 2 dc, hdc, sc) to form a rounded petal encircling the heart. Sl st to join.
- Round 3 (outer scallop): working behind Round 2, join in a base st between two petals. *ch 4, sl st in same base st; rep from * around, then in each ch-4 loop work (sc, hdc, 3 dc, hdc, sc) for a second, larger scalloped round framing the medallion.
- Sl st to close, FO leaving a long tail for the connecting mesh. Repeat for all 5 medallions.
Connecting Loop Mesh (between each pair of medallions, 4 sections total)
- Join cream at the base point of one medallion where it will connect to the next. Row 1: ch 8, sl st into a corresponding point on the neighboring medallion to form one large oval loop. Repeat this loop 3-4 times across the gap between the two medallions, evenly spaced, to build a wide band of open loops connecting them.
- Row 2: work a second, offset row of ch-8 loops between the first row’s loops, joining into the medallions’ edges on each side, so the connecting section reads as an open lattice rather than a single row of loops.
- FO leaving short tails. Repeat this connecting mesh section 4 times, once between each pair of adjacent medallions.
Scalloped End (plain end, opposite the tassel end)
- With cream, join at the outer edge of the first medallion on the plain end. Work a simple scallop trim, *sk 1 st, 3 dc in next st, sk 1 st, sl st in next st; rep from * around the outer curve of this end medallion only.
- Join with sl st and FO. Weave in ends.
Tassel Fringe (at the opposite end)
- Wrap cream yarn around a piece of cardboard or a book approximately 15 cm wide, 25-30 times per tassel, for 6-8 individual tassels total.
- Tie each wrapped bundle tightly at the top with a separate strand, leaving long ends for attaching, then cut through the loops at the bottom to release the strands.
- Wrap and tie a separate strand around each tassel a short distance below the top tie to form its neck, then trim ends evenly.
- Attach the tassels evenly spaced along the outer scalloped edge of the last medallion, using each tassel’s top tie to secure it.
Finishing
Steam-block the entire runner face-down on a towel, pinning each medallion’s scalloped petals into an even, symmetrical circle, and gently opening the connecting loop mesh sections so they sit relaxed rather than pulled tight. Pin the heart shape within each medallion so its top two lobes and bottom point are clearly defined. Let the whole piece dry completely flat, then comb through the tassels lightly and trim evenly for a clean finish.
Tips for Success
- Block one full medallion before making the rest, so all 5 finish at a consistent size for even connecting mesh spacing.
- Keep ch-8 loop lengths in the connecting mesh sections consistent within each section; uneven loops are very visible in this wide open lattice style.
- Mark the heart’s top-lobe increase points clearly before starting Round 5 of each center, so all 5 hearts build symmetrically.
- Work at an even, relaxed tension throughout; lace weight cotton shows tension inconsistencies more than heavier yarns.
- Wrap tassels generously and evenly; a full, even fringe reads as much more finished than a sparse one.
Common Mistakes to Avoid
- Making all 5 medallions at inconsistent sizes causes the connecting mesh sections to look mismatched down the runner. Fix: block your first medallion and use it as a size reference for the rest.
- Placing the heart’s top-lobe increases at mismatched points makes it lopsided. Fix: mark both increase points before starting and confirm they sit at truly opposite positions.
- Working connecting loop mesh at inconsistent lengths between different medallion pairs distorts the overall runner length. Fix: measure and match ch-8 loop counts across all 4 connecting sections.
- Skipping blocking leaves the medallions looking soft and undefined rather than crisp. Fix: block firmly with pins holding each scalloped round open.
- Cutting tassel strands to inconsistent lengths gives a ragged fringe edge. Fix: use a fixed-width cardboard wrap to cut every tassel the same length.
Ways to Customize This Pattern
- Reduce to 3 medallions for a shorter runner suited to a smaller table.
- Work the piece in a soft blush or pale blue instead of cream for a different color story.
- Finish both ends with the scalloped trim instead of adding tassels, for a symmetrical, fringe-free version.
- Add a fifth connecting mesh section and an extra medallion for a longer runner.
- Scale each medallion down for a set of matching heart-centered coasters using the same construction.
Frequently asked questions
Block your first finished medallion and use its measurements as a checkpoint for each subsequent one; lace weight motifs can vary in size more than heavier yarn pieces if tension shifts even slightly.
Yes. Work the same scalloped trim from the plain end on both ends of the runner for a symmetrical finish with no fringe at all.
This usually means the ch-8 loops varied in length within a single section. Count chains carefully for every loop in a connecting section and keep them identical before moving to the next section.
Lace weight gives the delicate, fine look shown in the photo. A thicker yarn will work structurally but will produce a noticeably chunkier, less lace-like finished runner.
The finished Heart Medallion Lace Table Runner Crochet Pattern

