Heart-Shaped Layered Flower Doily Crochet Pattern
Beginner Friendly
Perfect for those just starting their crochet journey, with clear instructions and simple techniques
Single-Day Project
A satisfying project you can complete in a single afternoon or evening.
Handmade Gift
A beautiful keepsake — free forever. Read online or print at home.
About This Heart-Shaped Layered Flower Doily Crochet Pattern
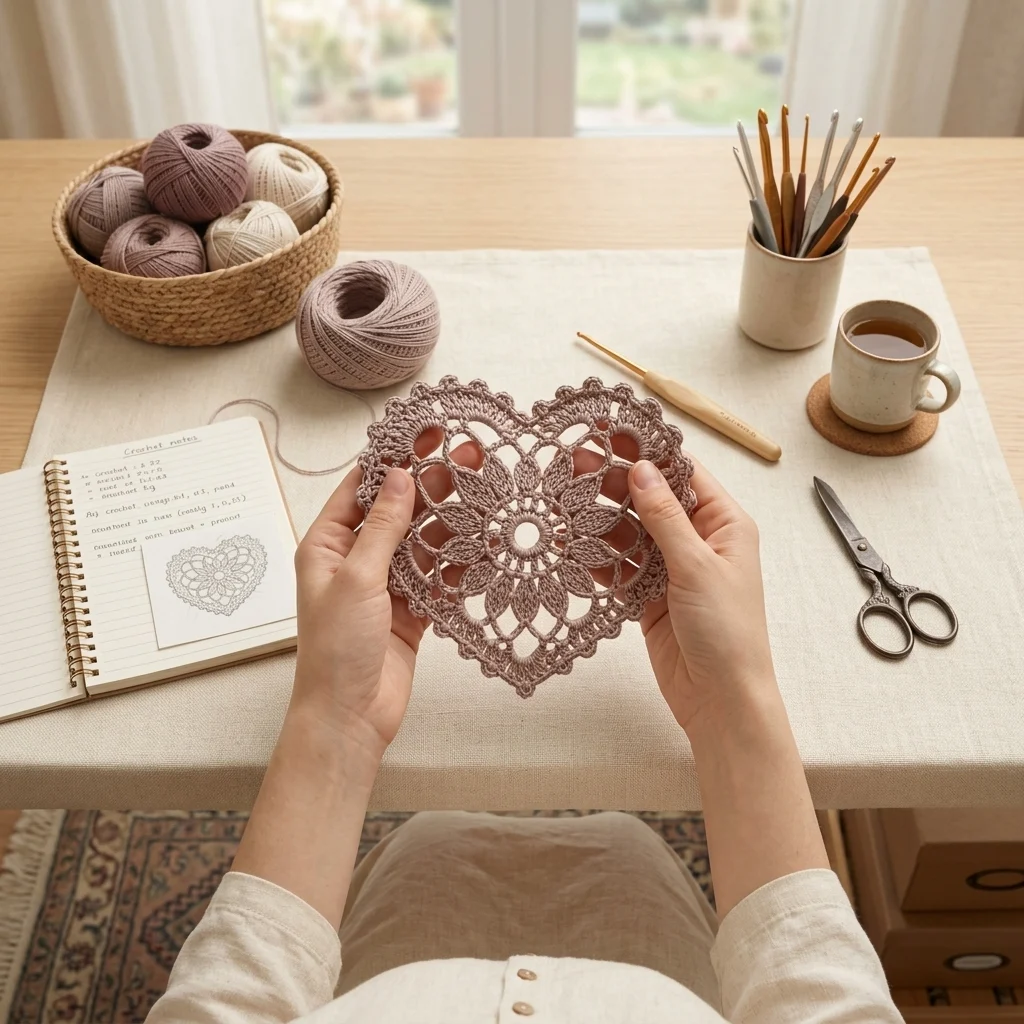
This crochet heart doily pattern takes a classic layered flower motif, a small ring of petals blooming outward through three graduated rounds, and shapes its outer rounds into a heart silhouette instead of a plain circle. Worked entirely in one soft mauve fingering weight cotton, it reads as a single cohesive piece of lace rather than a flower with a separate border tacked on.
What makes this design distinctive is how the heart shape is built directly into the stitch pattern rather than added afterward: the outer rounds increase more heavily at the top two lobes and taper steadily toward the bottom point, so the heart silhouette emerges naturally from the lace structure itself. Because it’s a single continuous piece with no separate motifs to join, this doily is a good showcase for precise stitch counting and picot consistency rather than motif assembly. Expect to spend 5-7 hours total, worked in one sitting or across a few short sessions.
This is an advanced pattern, best suited to someone comfortable following a doily-style chart with shaping and confident adjusting increases asymmetrically to build a heart rather than a circle.
Materials
- Fingering/lace weight cotton yarn, mauve or dusty rose ~30g
- Crochet hook 2.25 mm (US B/1)
- Tapestry/yarn needle
- Steam iron and pressing cloth, or blocking mat and pins
- Sharp scissors
Abbreviations
chchainsl stslip stitchscsingle crochethdchalf double crochetdcdouble crochetMRmagic ringch-spchain spacepicotch 3, sl st in first ch of the 3st(s)stitch(es)reprepeatFOfasten offCenter Ring
- Ch 6, sl st in first ch to form a ring.
- Round 1: ch 3 (counts as first dc), 15 dc into the ring. Sl st to join at top of ch-3. (16 sts)
- Round 2: ch 1, sc in each st around. Sl st to join. (16 sts)
First Petal Layer
- Round 3: *ch 4, skip 1 st, sl st in next st; rep from * around all 16 sts to form 8 small ch-4 loops.
- Round 4 (petals): in each ch-4 loop, work (sc, hdc, 3 dc, hdc, sc) to form a rounded petal. 8 petals total. Sl st to join at the base of the first petal.
Second Petal Layer
- Round 5: working behind the first petal layer, join in the base st between two petals. *ch 5, sl st in same base st; rep from * around all 8 base points to form 8 larger ch-5 loops.
- Round 6 (larger petals): in each ch-5 loop, work (sc, hdc, dc, 3 tr, dc, hdc, sc) to form a longer petal layered behind the first round. 8 petals total. Sl st to join.
Heart Shaping, Outer Lace Round
- Round 7: join at the base point that will sit at the top center dip of the heart, between two petals. Work evenly around the flower in a chain-loop lace pattern, *ch 5, sc in next petal base; rep from * around, but at the two base points directly above where the heart’s top two lobes will form, work an extra (ch 5, sc) repeat to add 2 extra loops on each side, building the beginning of the heart’s rounded top.
- Round 8: work (sc, hdc, 3 dc, hdc, sc) into each ch-5 loop from Round 7 as before, but at the top-lobe extra loops added in Round 7, work a slightly larger (sc, hdc, 5 dc, hdc, sc) shell to round out each top lobe further.
- Continue around the sides evenly, then at the single base point that will become the bottom point of the heart, skip adding any extra loops and instead work the shells slightly smaller through this section to taper the shape to a point.
Scalloped Picot Border
- Round 9: join at the top center dip. *sc in top of next shell, ch 3, picot, ch 1, sl st in same st; rep from * around the entire heart shape, following the shaping established in Round 8, working slightly more picot-scallop repeats around the 2 top lobes and fewer through the tapering bottom point, so the picot trim follows the heart’s outline exactly.
- Join with sl st to first st and FO, leaving a short tail. Weave in all ends.
Finishing
Steam-block the doily face-down on a towel, pinning the two top lobes into full, rounded curves and pinning the bottom point out to a crisp, centered tip. Pin every picot scallop open along the outer edge for a crisp finished line. Let the piece dry completely flat before moving it or handling it further; fingering weight lace holds its blocked shape best once fully dry.
Tips for Success
- Check the doily lies flat after every round through the center flower; catching a ripple early is much easier than un-picking heart-shaping rounds later.
- Keep picot size perfectly consistent around the whole border; uneven picots are very noticeable on a small, detailed piece like this.
- Mark the two top-lobe points and the single bottom point clearly before starting Round 7, so you don’t lose track of where the extra shaping repeats belong.
- Block firmly with steam and pins rather than relying on the stitches alone to hold the heart shape; lace weight cotton needs blocking to show its shape at its best.
- Work at a slow, even tension throughout; this piece is small enough that tension changes are immediately visible in the finished shape.
Common Mistakes to Avoid
- Adding the extra top-lobe loops at the wrong points in Round 7 throws off the whole heart silhouette. Fix: mark the two top-lobe positions clearly before starting the shaping round.
- Working the bottom point shells at the same size as the rest of the round leaves a blunt point instead of a sharp one. Fix: taper shell size down through the last few repeats before the point as instructed.
- Skipping blocking leaves the heart shape looking rounded and undefined rather than crisp. Fix: block firmly with pins holding both lobes and the point in place.
- Working picots inconsistently around the border disrupts the clean scalloped line. Fix: keep the ch-3 picot length exactly the same throughout.
- Losing count during the two petal layer rounds is easy since both use a similar structure. Fix: count sts after each round before moving to the next layer.
Ways to Customize This Pattern
- Scale up the yarn weight and hook size for a larger heart doily suited to a small table centerpiece.
- Work the center flower in a contrasting color from the outer heart shaping for a two-tone version.
- Stiffen the finished piece lightly with fabric stiffener for use as a hanging ornament instead of a flat doily.
- Add a small ribbon loop at the top center dip for hanging.
- Make a matching pair in two colors for a Valentine’s or anniversary table setting.
Frequently asked questions
Lay your Round 6 flower flat and decide which two base points, opposite each other near the top, will become the heart’s two lobes. Mark those with removable stitch markers before starting Round 7 so the extra shaping lands in the right place.
Yes. Switch to a heavier yarn, such as DK weight, and a larger hook, keeping all stitch counts the same. The heart shape scales proportionally; only the finished size changes.
This usually means the extra shaping repeats weren’t placed at truly opposite points around the flower, or one side received more repeats than the other. Recount base points on each side of the top center dip to confirm they match before continuing.
Fingering weight gives the delicate, lacy look shown in the photo. A thicker yarn will still work structurally but will produce a chunkier, less lace-like finished doily.
The finished Heart-Shaped Layered Flower Doily Crochet Pattern

