Heirloom Cream Lace Bedspread Crochet Pattern
Advanced
For experienced crocheters who enjoy complex shaping, fine detail, and ambitious construction
Single-Day Project
A satisfying project you can complete in a single afternoon or evening.
Handmade Gift
A beautiful keepsake — free forever. Read online or print at home.
About This Heirloom Cream Lace Bedspread Crochet Pattern
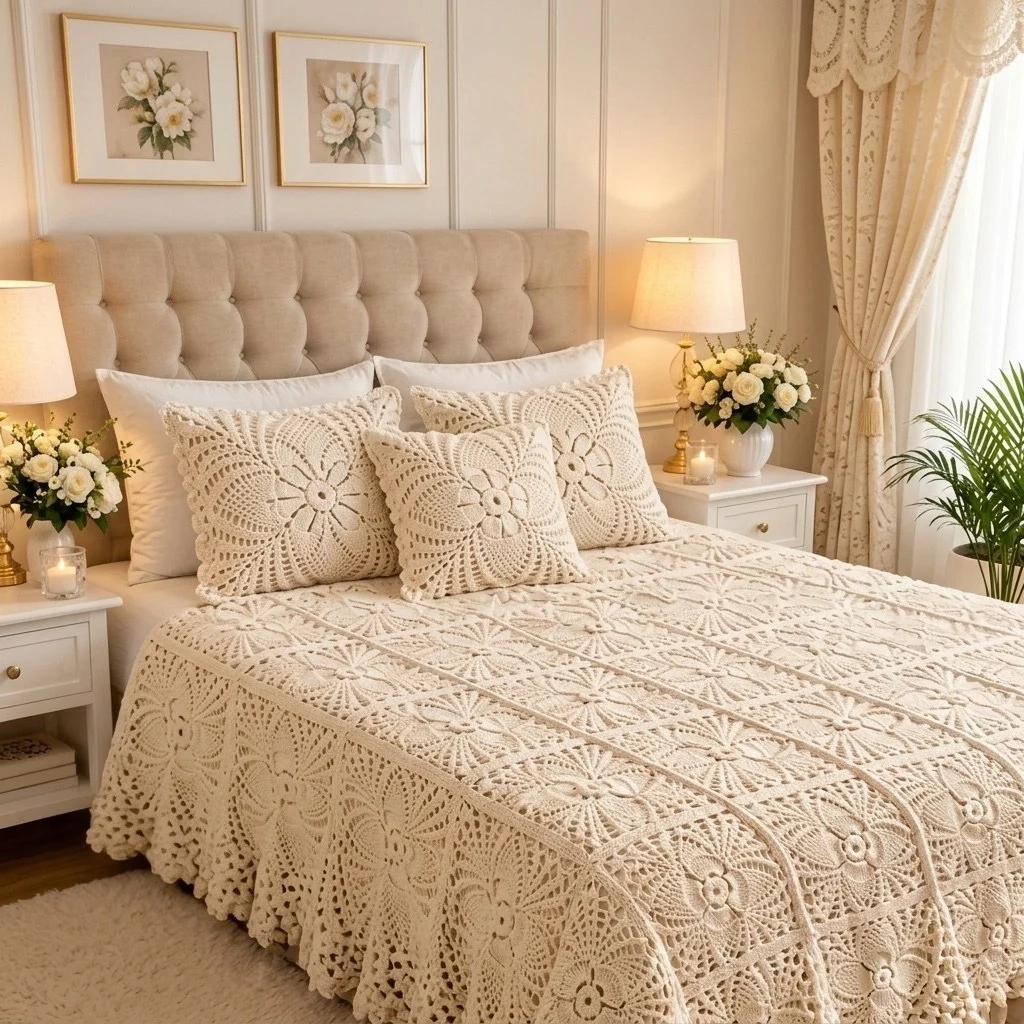
This crochet lace bedspread pattern is the kind of project you start in one season and finish in another, and it looks like it. The whole cover is worked in a single cream mercerised cotton and built from three separate components: seventy open wheel motifs with popcorn rings, twenty narrow popcorn divider rectangles that form the two raised vertical seams running down the bed, and a deep pineapple border worked around the joined centre. Nothing is improvised at the end — every piece is made flat, blocked to size, then joined, so the finished spread lies square instead of rippling at the edges.
The wheel motif is where the character comes from. It starts as a sixteen-spoke ring, opens into a popcorn round, then squares off over four rounds so the circles sit inside clean squares with a lacy grid between them. Each motif also gets a raised hub: a round of surface slip stitch worked over the centre mesh after the motif is finished, which is what gives the flowers that pressed, embossed look in the photo. The pineapple border is the longest single stretch of work — one hundred and twenty-two pineapples, each narrowing from seven loops to one — but it is rhythmic and easy to pick up and put down.
Plan on 90 to 110 hours. A single motif takes around 35 minutes once you have the rounds memorised, the divider rectangles about 25 minutes each, and the border two or three long evenings. This is a pattern for someone who is already comfortable with chain-space lace, popcorns and reading a round by its stitch count — not a first blanket. If you have made a pineapple doily before, nothing here will surprise you; there is just a great deal more of it.
Materials
- 4-ply / fingering mercerised cotton in cream about 2,400 g (24 × 100 g balls, approx. 280 m per 100 g)
- 2.5 mm crochet hook main hook
- 3.0 mm crochet hook optional, for foundation chains only
- Blunt tapestry needle for joining and ends
- Rust-proof pins at least 200
- Foam blocking mats enough for a 40 cm working area
- Card or paper template, 20 cm square for blocking motifs
- Spray bottle of water or a steam iron cotton setting
- Locking stitch markers 8-10
- Tape measure and sharp scissors
Abbreviations
begbeginningchchainch-spchain spacedcdouble crochet (US)MRmagic ringPCpopcorn: 5 dc in same st or sp, drop loop, insert hook in top of first dc, pick up dropped loop and draw through, ch 1 to closepicotch 3, sl st in 3rd ch from hookreprepeatRSright sidescsingle crochet (US)sl stslip stitchsp(s)space(es)st(s)stitch(es)WSwrong sideGauge and Layout
- Gauge: one finished wheel motif (Rnds 1-10) measures 20 cm square after blocking, using 2.5 mm hook and 4-ply cotton. Rnds 1-3 of the motif measure 7 cm across.
- Layout, left to right: 2 motif columns, 1 divider strip, 3 motif columns, 1 divider strip, 2 motif columns. That is 7 motif columns and 2 divider strips.
- Layout, top to bottom: 10 motifs per column, and 10 divider rectangles per divider strip.
- Total pieces: 70 wheel motifs and 20 divider rectangles.
- Joined centre measures approximately 156 cm wide × 200 cm long. The pineapple border adds about 13 cm all round, for a finished spread of approximately 180 × 225 cm.
- Work every round of every piece with the RS facing unless told otherwise; all motif rounds are joined with a sl st and not turned.
Wheel Square Motif (make 70)
- Rnd 1: MR, ch 3 (counts as first dc), 15 dc in ring, pull ring closed, sl st to top of beg ch-3. (16 dc)
- Rnd 2: ch 4 (counts as dc + ch 1), *dc in next dc, ch 1; rep from * 14 more times, sl st to 3rd ch of beg ch-4. (16 dc, 16 ch-1 sps)
- Rnd 3: sl st into first ch-1 sp, ch 3 (counts as dc), 2 dc in same sp, 3 dc in each ch-1 sp around, sl st to top of beg ch-3. (48 dc)
- Rnd 4: ch 5 (counts as dc + ch 2), skip 2 dc, *dc in next dc, ch 2, skip 2 dc; rep from * around, sl st to 3rd ch of beg ch-5. (16 dc, 16 ch-2 sps)
- Rnd 5: sl st into first ch-2 sp, ch 3, 4 dc in same sp, close as PC, ch 3, *PC in next ch-2 sp, ch 3; rep from * around, sl st to top of first PC. (16 PC, 16 ch-3 sps)
- Rnd 6: sl st into first ch-3 sp, ch 1, sc in same sp, ch 5, *sc in next ch-3 sp, ch 5; rep from * around, sl st to first sc. (16 sc, 16 ch-5 sps)
- Rnd 7 (squaring round): sl st into first ch-5 sp, ch 3 (counts as dc), 2 dc in same sp, ch 3, 3 dc in same sp (corner made), *[ch 2, 3 dc in next ch-5 sp] 3 times, ch 2, (3 dc, ch 3, 3 dc) in next ch-5 sp; rep from * twice more, [ch 2, 3 dc in next ch-5 sp] 3 times, ch 2, sl st to top of beg ch-3. (72 dc; 4 corner ch-3 sps; 16 ch-2 sps; all 16 loops used)
- Rnd 8: ch 3 (counts as dc), dc in each dc around, working 2 dc in each ch-2 sp and (2 dc, ch 2, 2 dc) in each corner ch-3 sp, sl st to top of beg ch-3. (120 dc, 4 corner ch-2 sps — 30 dc along each side between corners)
- Rnd 9: sl st into any corner ch-2 sp, ch 3 (counts as dc), dc in same sp, *[ch 2, skip 2 dc, dc in next dc] 10 times, ch 2, (dc, ch 3, dc) in next corner ch-2 sp; rep from * twice more, [ch 2, skip 2 dc, dc in next dc] 10 times, ch 2, dc in beg corner sp, ch 3, sl st to top of beg ch-3. (48 dc, 44 ch-2 sps, 4 corner ch-3 sps)
- Rnd 10 (edge round): ch 1, sc in each dc around, working 2 sc in each ch-2 sp and (2 sc, ch 2, 2 sc) in each corner ch-3 sp, sl st to first sc. (152 sc, 4 corner ch-2 sps — exactly 38 sc along each side between corners)
- Fasten off, leaving a 15 cm tail. Count 38 sc on all four sides before you move on; this number is what the joins and the border are built on.
Raised Hub (surface detail, on all 70 motifs)
- Turn the finished motif RS up and find the ring of 16 ch-1 sps from Rnd 2.
- Make a slip knot in a fresh strand of cream and hold it behind the work.
- Insert the hook from front to back through the first ch-1 sp, catch the strand and draw a loop to the front.
- Insert the hook from front to back through the next ch-1 sp, catch the strand and draw a loop through both the sp and the loop on the hook — one surface sl st made.
- Rep around all 16 ch-1 sps, keeping the tension loose enough that the ring does not pucker. (16 surface sl sts)
- Sl st into the first surface st to close the ring, draw the end through to the back and fasten off. The raised cord sits on top of the hub and lifts the wheel centre.
Popcorn Divider Rectangle (make 20)
- Row 1: ch 21. Dc in 4th ch from hook and in each ch across, turn. (19 dc, counting beg ch-3 as a dc)
- Row 2: ch 3 (counts as dc), [ch 2, skip 2 dc, dc in next dc] 6 times, turn. (7 dc, 6 ch-2 sps — 19 sts’ worth)
- Row 3: ch 3 (counts as dc), [2 dc in next ch-2 sp, dc in next dc] 6 times, turn. (19 dc)
- Row 4: ch 3 (counts as dc), dc in next 8 dc, PC in next dc, dc in next 9 dc, turn. (18 dc and 1 centred PC = 19 sts)
- Rows 5-28: rep Rows 2-4 eight more times, ending with a popcorn row. (28 rows worked)
- Row 29: ch 3 (counts as dc), dc in each st across, turn. (19 dc) Do not fasten off.
- Edge round: ch 1, work (sc, ch 2, sc) in the corner, then 38 sc evenly spaced along the long row-end edge, (sc, ch 2, sc) in the corner, sc in each of the 19 sts along the short edge, (sc, ch 2, sc) in the corner, 38 sc evenly along the second long edge, (sc, ch 2, sc) in the last corner, sc in each of the 19 foundation sts along the remaining short edge, sl st to first sc. (38 sc on each long side, 19 sc on each short side, 4 corner ch-2 sps)
- Fasten off. The rectangle should block to 8 cm × 20 cm, with its long edges matching a motif side exactly.
Blocking the Pieces
- Pin your 20 cm square template to a foam mat and trace its outline with pins so you can re-pin identically every time.
- Spray a motif until it is evenly damp, lay it over the template and pin the four corner ch-2 sps first, then the midpoint of each side.
- Pin out each of the four ch-3 corner loops and every second ch-2 sp along the sides so the lace grid opens fully and the edges run straight, not scalloped.
- Leave to dry fully, at least 6 hours. Block in batches of 6-10 while you keep crocheting the next ones.
- Block the divider rectangles the same way to 8 × 20 cm, checking that the long edges stay dead straight.
- Do not skip this step or press the popcorns flat — pin around them, not over them.
Joining the Motifs and Strips
- Lay out all 70 motifs and 20 rectangles on the floor in the layout given above before you join anything, and check that the raised hubs all face the same way.
- Join motifs into vertical columns first. Hold two blocked pieces WS together, edges aligned, and join cream in the matching corner ch-2 sps.
- Working through the back loop only of both pieces at once, sl st in each pair of sts across the seam: 38 sl sts for a motif-to-motif seam, 38 sl sts for a motif-to-rectangle long seam, 19 sl sts for a rectangle-to-rectangle short seam. Fasten off and weave in.
- Make 7 motif columns of 10 motifs each, and 2 divider strips of 10 rectangles each (joined short edge to short edge, 19 sl sts per seam).
- Now join the columns side by side in this order: motif column, motif column, divider strip, motif column, motif column, motif column, divider strip, motif column, motif column.
- For these long vertical seams, work the same back-loop sl st join down the full 200 cm edge, keeping the seam relaxed — if the sl sts pull tight the spread will cup. Change to a 3.0 mm hook for the join if your sl sts tend to be firm.
- Press the joined centre lightly with steam, measure the four sides, and square up any seam that has drawn in before you start the border.
Pineapple Scalloped Border
- Rnd 1 (set-up): join cream in any outer corner ch-2 sp. Ch 1, (sc, ch 2, sc) in the corner sp, then sc in each st along the edge, 1 sc in each seam line, and (sc, ch 2, sc) in each remaining outer corner sp; sl st to first sc. Adjust as you go so that each short end has 312 sc between corners and each long side has 396 sc between corners (add or skip a stitch at a seam where needed).
- Rnd 2: ch 1, sc in first st, *ch 5, skip 5 sts, sc in next st; rep from * along each side, and work (sc, ch 5, sc) in each corner ch-2 sp; sl st to first sc. (52 ch-5 loops on each short end, 66 on each long side, plus 1 corner loop at each corner)
- Rnd 3: sl st to centre of first loop, ch 1, sc in same loop, *ch 5, sc in next loop; rep from * around, working (sc, ch 5, sc) in each corner loop; sl st to first sc. (same loop counts as Rnd 2)
- Rnd 4 (fan round): sl st to centre of a corner loop, ch 3, 8 dc in same corner loop (corner fan made), *ch 3, sc in next loop, ch 3, 9 dc in next loop; rep from * along the side, ending with ch 3, sc in the last loop before the corner, ch 3, 9 dc in the corner loop; rep around; sl st to top of beg ch-3. (122 fans of 9 dc in total, one at each corner)
- Rnd 5: ch 3 (counts as dc), [ch 1, dc in next dc] 8 times, *ch 3, sc in next sc, ch 3, dc in first dc of next fan, [ch 1, dc in next dc] 8 times; rep from * around, ending ch 3, sc in last sc, ch 3, sl st to top of beg ch-3. (9 dc and 8 ch-1 sps in each fan)
- Rnd 6: sl st into first ch-1 sp of a fan, ch 1, sc in same sp, [ch 3, sc in next ch-1 sp] 7 times, *ch 3, (3 dc, ch 3, 3 dc) in next sc (shell made), ch 3, sc in first ch-1 sp of next fan, [ch 3, sc in next ch-1 sp] 7 times; rep from * around, ending ch 3, shell in last sc, ch 3, sl st to first sc. (7 ch-3 loops per pineapple, 1 shell between pineapples)
- Rnd 7: sl st to centre of first loop, ch 1, sc in same loop, [ch 3, sc in next loop] 5 times, *ch 3, shell in ch-3 sp of next shell, ch 3, sc in first loop of next pineapple, [ch 3, sc in next loop] 5 times; rep from * around, ending ch 3, shell in last shell, ch 3, sl st to first sc. (6 loops per pineapple)
- Rnd 8: as Rnd 7, but work [ch 3, sc in next loop] 4 times across each pineapple. (5 loops per pineapple)
- Rnd 9: as Rnd 7, but work [ch 3, sc in next loop] 3 times across each pineapple. (4 loops per pineapple)
- Rnd 10: as Rnd 7, but work [ch 3, sc in next loop] twice across each pineapple. (3 loops per pineapple)
- Rnd 11: as Rnd 7, but work [ch 3, sc in next loop] once across each pineapple. (2 loops per pineapple)
- Rnd 12: sl st to centre of first loop, ch 1, sc in same loop, *ch 3, sc in next loop, ch 3, shell in next shell, ch 3, sc in first loop of next pineapple; rep from * around, sl st to first sc. (1 loop per pineapple)
- Rnd 13 (tips): sl st to centre of the single loop, ch 1, sc in same loop, *ch 5, shell in next shell, ch 5, sc in the single loop of the next pineapple; rep from * around, sl st to first sc. Each pineapple now ends in one closed point.
- Rnd 14 (picot round): ch 1, sc in first sc, picot, *5 sc in next ch-5 sp, (3 sc, picot, 3 sc) in next shell ch-3 sp, 5 sc in next ch-5 sp, sc in next tip sc, picot; rep from * around, sl st to first sc.
- Fasten off and weave in all ends on the WS, running each tail along a shell or chain for at least 5 cm.
Finishing
Lay the whole spread out damp on a clean sheet in a room where it can stay for a day. Start by pinning the four corners square, then pin the two long sides and the two short ends straight, measuring as you go so opposite sides match within a centimetre. Once the body is true, pin out the border: put one pin in every pineapple tip and one in the centre of every shell picot, pulling each tip out until the pineapple is a clear triangle rather than a soft ripple. This is slow — 122 pineapples, two pins each — but it is what turns the edge from wavy to crisp.
Let it dry completely before unpinning, then check the seams from the wrong side and reinforce any join that looks slack by running a line of back-loop sl sts over it again. For use on a bed, lay the spread with the two popcorn divider strips running lengthwise down the mattress, which puts a motif column centred over each side of the bed and lets the border drop evenly. Wash by hand or on a wool cycle at 30 degrees, dry flat, and re-pin the pineapple tips each time — cotton lace keeps its shape for years as long as it is dried flat rather than hung.
Tips for Success
- Make all 70 motifs before you join anything. Your tension shifts over a project this long, and blocking a full batch to one template hides the drift that would otherwise show up as uneven seams.
- Close every popcorn with a ch 1 and push it to the right side with your thumb as you make it. Popcorns that pop to the back on a few motifs are very visible once the spread is laid flat.
- Count Rnd 10 of every single motif. If a motif has 37 or 39 sc on a side, the border set-up round will not land on a multiple of six and you will discover it 300 stitches later.
- Use a locking marker in the first sc of each border round and move it up as you go — the pineapple rounds all look alike, and losing your place in Rnd 9 costs an hour.
- Wind off a 15 g mini-ball for each motif join so you are not dragging a full 100 g ball across 200 cm of seam.
Common Mistakes to Avoid
- Joining the seams too tightly. Back-loop sl sts have almost no give; if your joined centre measures less than 156 cm wide, undo a seam and redo it with a 3.0 mm hook.
- Working Rnd 7 of the motif with corners in the wrong loops. The corners must fall in every fourth ch-5 loop — 4 loops per quarter — or the square comes out as a rhombus that will not block true.
- Skipping the raised hub because the motif already looks finished. The surface slip stitch ring is what gives the pressed, embossed centre in the photo; a motif without it reads flat next to one with it.
- Letting the border set-up round drift. Each short end needs 312 sc and each long side 396 sc between corners; absorb any difference at the seam stitches, not in the middle of a motif edge, where an extra stitch shows.
- Blocking the border before the body is square. Pin and dry the joined centre first, then work the border, then block the whole piece — otherwise the pineapples stretch to cover a crooked edge and stay crooked.
Ways to Customize This Pattern
- Resize for a different bed: each motif column adds 20 cm of width and each motif row adds 20 cm of length. A single bed is 5 columns × 9 rows with one divider strip; a king is 9 columns × 10 rows with two.
- Work it in DK cotton with a 4.0 mm hook. The motif then blocks to about 30 cm, so use 5 columns × 7 rows plus two divider strips for roughly the same finished size, and buy about 3,100 g.
- Make matching cushion covers from four motifs joined in a 2 × 2 block, with a divider rectangle edging strip and Rnds 1-3 of the border worked around the outside instead of the full pineapples.
- Shorten the drop by stopping the border at Rnd 10 and working the picot round over the 3-loop pineapples — that gives a 7 cm edge instead of 13 cm, for a spread that sits on top of a bed base.
- Swap the popcorn divider rectangles for plain filet-mesh rectangles (repeat Rows 2-3 only, no popcorn rows) if you want the panel seams quieter and the wheels to carry all the texture.
Frequently asked questions
You can, by replacing the corner ch-2 and every third ch-2 sp of Rnd 10 with a sl st into the matching space on the neighbouring motif. The drawback is that join-as-you-go locks in your tension from day one, and over 70 motifs made across several months that tension will change. If you do join as you go, block each motif before attaching it and work in 10-motif columns so you can still square things up.
Weigh your first blocked motif on a kitchen scale. At the stated gauge it comes out at roughly 26 g, so 70 motifs is about 1,820 g. Add about 11 g per divider rectangle (220 g for 20) and allow 350 g for the border and joining. Buy all of it in one dye lot if you can, because cream shades vary more between lots than you would expect and a single mismatched motif column is obvious.
Almost always the set-up round. If Rnd 1 has too many sc for the edge length, every later round multiplies the excess. Count a 50 cm stretch of Rnd 1 against the pattern’s rate of 312 sc per short end and 396 per long side. If you are over by more than about ten stitches, pull back Rnd 1 and rework it, skipping a stitch at each seam line. Blocking will fix a gentle wave but not a genuine surplus of stitches.
No. If you prefer the raised seams running across the bed, turn the layout 90 degrees: 10 motif columns of 7 motifs each, with the two divider strips running horizontally and made from 14 rectangles instead of 20. The rectangle short edge is 19 sc and the motif side is 38 sc, so in that orientation you join two rectangles side by side across each motif width — plan the rows on the floor before you sew.
The finished Heirloom Cream Lace Bedspread Crochet Pattern