Advanced
For experienced crocheters who enjoy complex shaping, fine detail, and ambitious construction
Single-Day Project
A satisfying project you can complete in a single afternoon or evening.
Handmade Gift
A beautiful keepsake — free forever. Read online or print at home.
About This Spiral Mandala Crochet Blanket
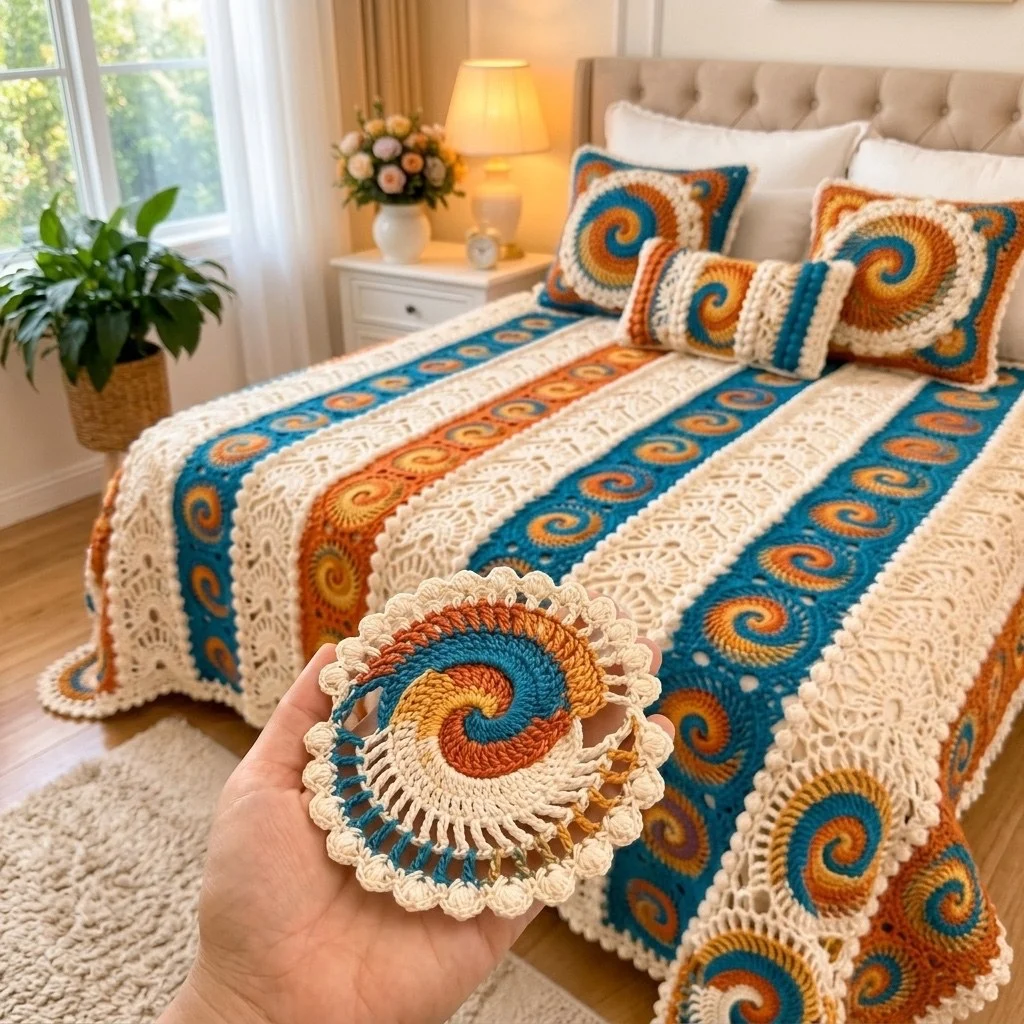
This spiral mandala crochet blanket pattern turns one four-colour swirl motif into a full boho bedspread, worked in cream, deep teal, burnt orange and golden yellow DK cotton. The spiral itself is made with four strands running at once, each one travelling around its own quarter of the circle, so the arms curl outward in a continuous pinwheel with no visible colour jogs. Around that centre sit a teal ring, a round of open treble spokes, an orange bridge round and a cream bobble scallop, which is what gives each motif that lace-doily look in the photo.
The finished blanket is built from four strips of ten motifs, three panels of cream shell lace and two narrow teal ribbed stripes, all joined into vertical bands and then framed with a bobble-and-picot border that repeats the motif edge. One motif takes about 45 minutes once you have the spiral technique in your hands, so the whole bedspread runs roughly 50 to 70 hours. It is a long project but a very portable one: the motifs travel anywhere, and the panels are plain enough to work while your attention is elsewhere.
This is an advanced pattern. You need to be comfortable carrying four live strands in a continuous spiral, reading your own stitch counts, working trebles and bobbles, and joining flat pieces so the seams stay straight. If you have made mandalas or join-as-you-go squares before, you will be fine. If you want to test the waters first, make a single motif as a coaster or a potholder front and see how you like the rhythm before committing to forty of them.
Materials
- DK cotton yarn in cream approx. 1200 g (main colour, A)
- DK cotton yarn in deep teal approx. 450 g (B)
- DK cotton yarn in burnt orange approx. 250 g (C)
- DK cotton yarn in golden yellow approx. 200 g (D)
- Crochet hook 3.0 mm
- Spare hook 3.5 mm, for the joining seams only
- Blunt tapestry needle for ends, seams and surface accents
- Stitch markers at least 5 – four for the spiral wedges, one for round starts
- Rustproof blocking pins and a blocking mat or a towel-covered bed
- Spray bottle or steam iron for blocking cotton
- Scissors and a flexible tape measure
- Gauge: one finished motif measures ~16 cm across; 16 sc and 18 rows = 10 cm
Abbreviations
MRmagic ringchchainsl stslip stitchscsingle crochethdchalf double crochetdcdouble crochettrtreble crochetinc2 sc in the same stitchBLOback loops onlyspspacest(s)stitch(es)reprepeatbobble5 unfinished dc in one st, yarn over, pull through all 6 loopspicotch 3, sl st in 3rd ch from hookRSright sideA / B / C / Dcream / teal / burnt orange / golden yellowSpiral Centre (Rounds 1-9) – make 40
- Each colour works its own quarter, called a wedge. Mark the first stitch of each wedge with a stitch marker and move the marker up every round. Work in a continuous spiral with no joins and no turning chains, RS always facing.
- Round 1: With A, make a MR and work 2 sc into the ring. Drop A to the front. With B, 2 sc in the ring. Drop B. With C, 2 sc in the ring. Drop C. With D, 2 sc in the ring. Pull the ring closed gently around all four strands. (8 sts – 2 per wedge)
- Round 2: With A, inc in each of the next 2 sts (these are A’s own 2 sts). Drop A. Rep with B over B’s 2 sts, then C, then D. (16 sts – 4 per wedge)
- Round 3: With A, (inc, sc in next st) twice over A’s 4 sts. Drop A. Rep with B, C and D over their own 4 sts. (24 sts – 6 per wedge)
- Round 4: With A, (inc, sc in next 2 sts) twice. Drop A. Rep with B, C and D. (32 sts – 8 per wedge)
- Round 5: With A, (inc, sc in next 3 sts) twice. Drop A. Rep with B, C and D. (40 sts – 10 per wedge)
- Round 6: With A, (inc, sc in next 4 sts) twice. Drop A. Rep with B, C and D. (48 sts – 12 per wedge)
- Round 7: With A, (inc, sc in next 5 sts) twice. Drop A. Rep with B, C and D. (56 sts – 14 per wedge)
- Fasten off B, C and D, leaving 10 cm tails. A is now sitting exactly where it began round 7, at the start of B’s wedge. Do not fasten off A.
- Round 8: With A, sc in each st around, laying the three loose tails along the top of the previous round and working over them to bury them. (56 sts)
- Round 9: With A, (sc in next 6 sts, inc) 8 times. Sl st to the first sc of this round to close the spiral section. (64 sts) Do not fasten off.
Teal Ring and Open Spoke Rounds (Rounds 10-12)
- Round 10: Fasten off A. Join B with a sl st in any st, ch 1, sc in each st around, sl st to first sc. (64 sc) Fasten off B. This is the solid teal ring that frames the swirl.
- Round 11: Join A with a sl st in any st. Ch 5 (counts as tr plus ch 1), skip next st, *tr in next st, ch 1, skip next st*, rep from * around, sl st to the 4th ch of the beginning ch-5. (32 tr and 32 ch-1 sps) Keep the trebles tall and loose – these are the open spokes. Fasten off A.
- Round 12: Join C with a sl st in any ch-1 sp. Ch 1, 2 sc in the same sp, then 2 sc in each ch-1 sp around, sl st to first sc. (64 sc) Fasten off C. The orange round closes the tops of the spokes and keeps the openwork from stretching.
Bobble Scallop Edge (Rounds 13-14)
- Round 13: Join A with a sl st in any st. Ch 1, *sc in next 3 sts, bobble in next st*, rep from * around (16 times), sl st to first sc. (64 sts – 48 sc and 16 bobbles) Push each bobble to the right side with your thumb as you close it.
- Round 14: Ch 1, *sc in next 3 sts, sc in the top of the next bobble, picot*, rep from * around (16 times), sl st to first sc. (64 sc with 16 picots sitting on the bobbles)
- Fasten off A, leaving a 15 cm tail if this motif will be joined later; weave in all other ends now, before blocking.
- Block each finished motif flat to a 16 cm circle. Cotton holds its shape well once pinned, sprayed and left to dry, and blocked motifs join far more evenly than unblocked ones.
Surface Accents – on every motif
- With D and the tapestry needle, work a small three-wrap French knot in the top of every other bobble around the edge. (8 knots per motif) Anchor each knot on the wrong side with a tiny backstitch so it cannot pull through the bobble.
- With D and the 3.0 mm hook, work a surface slip stitch chain along the outer curve of the teal wedge, from the magic ring out to the teal ring in round 10. Insert the hook from the right side between two stitch columns, pull a loop through, and sl st outward one round at a time, following the natural curve of the spiral.
- Repeat the same surface chain in C along the outer curve of the cream wedge. Two accent lines per motif are enough – more than that and the swirl gets visually noisy.
- Pull every accent tail through to the wrong side and weave it in along the back of the sc rounds, not across the open spokes.
Cream Shell-Lace Panel – make 3
- With A and the 3.0 mm hook, ch 37 loosely.
- Row 1: Sc in the 2nd ch from hook, *skip 2 ch, 5 dc in next ch, skip 2 ch, sc in next ch*, rep from * across. (6 shells and 7 sc) Turn.
- Row 2: Ch 3 (counts as dc), 2 dc in the first sc, *sc in the centre dc of the next shell, 5 dc in the next sc*, rep from * across, ending with sc in the centre dc of the last shell and 3 dc in the last sc. (5 full shells, 2 half shells and 6 sc) Turn.
- Row 3: Ch 1, sc in the first dc, *5 dc in the next sc, sc in the centre dc of the next shell*, rep from * across, ending with 5 dc in the next sc and sc in the top of the beginning ch-3. (6 shells and 7 sc) Turn.
- Rep rows 2 and 3 until the panel measures 160 cm, ending with a row 3. Each panel should finish about 16 cm wide.
- Edging row: Ch 1, work sc evenly down the long edge at a rate of 2 sc per row end, turn at the corner with 3 sc, work sc across the short end, 3 sc in the corner, 2 sc per row end up the second long edge, 3 sc in the corner, sc across the foundation edge, 3 sc in the final corner, sl st to first sc. Fasten off. This straight sc frame is what the motif strips get sewn to.
Teal Ribbed Stripe – make 2
- With B and the 3.0 mm hook, ch 302 loosely. A loose foundation chain matters here – if yours pulls in, go up one hook size for the chain only.
- Row 1: Hdc in the 3rd ch from hook and in each ch across. (300 hdc) Turn.
- Row 2: Ch 2, hdc BLO in each st across. (300 hdc) Turn.
- Rows 3-15: Rep row 2. (300 hdc each row) The back-loop ridges should run the full length of the stripe.
- Finishing row: Ch 1, sc evenly all the way around the rectangle, working 3 sc in each corner and 2 sc per row end along the short sides, sl st to first sc. Fasten off. Each stripe should measure about 160 cm by 8 cm.
Joining the Motifs into Strips
- Lay 10 blocked motifs in a vertical line, right sides up, with the teal wedge of every motif pointing the same way so the swirls all spin in the same direction.
- Hold the first two motifs with wrong sides together. With A and the 3.5 mm hook, sl st through the matching picots and the two sc on either side of them – 5 picot-and-stitch pairs in total per join – so the motifs meet along a short straight seam instead of a single point.
- Continue down the line until all 10 motifs form one strip, then make 4 strips in total. Each strip should measure about 160 cm long and 16 cm at its widest point.
- Fill-in edges: with A, work sc into the free picots along both long sides of each strip, chaining 3 across each gap between motifs, to create a straightish edge. Aim for about 300 sc plus chains per side and keep the count the same on both sides of every strip.
- Press each joined strip lightly under a damp cloth before assembly. Strips that are blocked to the same length make the whole blanket hang square.
Finishing
Lay the pieces out on the floor in this order, left to right: teal ribbed stripe, motif strip, cream lace panel, motif strip, cream lace panel, motif strip, cream lace panel, motif strip, teal ribbed stripe. Check that every swirl spins the same way and that all nine bands start and end at the same horizontal line, easing any short panel by pinning it out an extra centimetre or two.
Join the bands one seam at a time. With A, the 3.5 mm hook and both pieces held right sides up, work a flat sl st seam through the outer loop of each facing stitch, matching stitch for stitch along the whole 160 cm. Flat seams keep the blanket reversible and stop a hard ridge forming down the bed. Work each seam from the same end so the fabric cannot creep, and check the alignment every 30 cm.
For the border, join A in any corner and work round 1 as sc evenly all the way around the blanket with 3 sc in each corner, adjusting the final count on each side to a multiple of 4. Round 2: *sc in next 3 sts, bobble in next st* around, with 3 sc in each corner stitch. Round 3: *sc in next 3 sts, sc in the top of the next bobble, picot* around, with (sc, picot, sc) in each corner. Fasten off and weave in every end along the back of the border, never across an open spoke. Wet block the finished blanket flat, pinning the picot edge out into gentle even scallops, and let it dry fully before it goes on the bed – cotton takes a day or more, but that final block is what makes the lace panels and the mandalas read as one piece.
Tips for Success
- Keep all four spiral strands at the same tension. If one colour is tighter than the others, that wedge will shrink and the motif will tilt rather than lie flat. Check after round 4 by laying the disc on a table – it should sit down with no cupping.
- Work the first motif, block it, and measure. If yours comes out larger than 16 cm, drop to a 2.5 mm hook; if smaller, go up to a 3.5 mm. Every panel length in this pattern is built around that 16 cm motif.
- Make all 40 motifs before you join anything. Your tension will settle after the first five or six, and working them in one run keeps them consistent – then block the whole batch together to the same circle template.
- Cut a 16 cm circle from cardboard and pin each motif around it while blocking. It is faster than measuring each one and guarantees the strips line up.
- Count the trebles in round 11 before moving on. That round sets the open spoke spacing, and an extra or missing treble will show as a wide gap in the lace once the orange round is on top of it.
Common Mistakes to Avoid
- Cutting the yarn between spiral rounds. The four strands must stay live from round 1 to round 7 – cutting and rejoining creates a stepped edge on every wedge and dozens of extra ends. If you have already cut, rejoin at the exact marked stitch and bury the tails under round 8.
- Losing track of which wedge belongs to which colour. Without markers the increase stitch drifts and the swirl arms turn wobbly. Mark the first stitch of each wedge and move all four markers at the same time, once per round.
- Working round 9’s increases in the wrong places. They must be spread evenly – eight increases, one every 7 stitches – or the circle will ripple right where the teal ring sits. Recount to 64 before joining round 10.
- Joining motifs at a single picot. A one-point join leaves big holes and lets the strip twist. Always join across 5 pairs of stitches so each seam is a short straight line.
- Skipping the block before assembly. Unblocked motifs vary by a centimetre or more, and that difference multiplies over ten motifs until a strip no longer matches the lace panel beside it.
Ways to Customize This Pattern
- Make a throw instead of a bedspread: use 3 motif strips of 7 motifs, 2 cream lace panels and 1 teal stripe for a piece around 85 x 115 cm.
- Swap the palette while keeping the structure: sage, mustard and rust on oatmeal, or three shades of blue from pale to navy on white, both read beautifully as a spiral.
- Turn a single motif into a 20 cm round cushion front: make two motifs, back them with a circle of plain sc, and join around the edge with a sc seam, stuffing lightly before you close.
- Replace the teal ribbed stripes with two more cream lace panels for a softer, more uniform look, or widen them to 25 hdc for a bolder block of colour at each edge.
- Leave off the golden yellow French knots and work the whole edge round in C for a cleaner, more modern finish that still frames the swirls.
Frequently asked questions
Yes, but the maths changes. The pattern increases by 8 stitches per round because there are four wedges increasing by 2 each. With three colours you would work three wedges and increase by 6 per round; with two, four wedges in two alternating colours keeps the counts exactly as written and is the easiest substitution.
Round 12 puts 2 sc in each of the 32 chain spaces, which gives 64 stitches – the same count as round 10. If it ruffles, your trebles in round 11 are too short, so the circumference outgrew the radius. Pull each treble up to a full 2 cm before finishing it, or work round 12 with a hook half a size smaller.
Forty motifs for the full bedspread, ten per strip. You can join as you go by replacing the picots of round 14 with a sl st into the matching picot of the neighbouring motif, but only do it after your tension has settled, because join-as-you-go leaves no room to swap out a motif that came out the wrong size.
Cotton is what gives the mandalas their crisp bobbles and holds the open spokes open, and it blocks to exact measurements. It is heavy, though – expect around 2 kg finished. A cotton-acrylic blend in the same DK weight will cut the weight by roughly a third and still block well, but it will soften the bobble definition slightly.
The finished Spiral Mandala Crochet Blanket